Check Fuel Pressure: Complete Mechanic’s Guide
Fuel pressure is one of the most critical parameters in your vehicle’s engine management system. When fuel pressure drops below specifications, your engine may hesitate, stall, or fail to start entirely. Understanding how to check fuel pressure accurately can save you hundreds of dollars in diagnostic fees and help you identify fuel system problems before they leave you stranded.
Whether you’re troubleshooting a rough idle, poor acceleration, or a no-start condition, learning to measure fuel pressure with a proper gauge is an essential skill for any DIY mechanic. This comprehensive guide walks you through the entire process, from gathering the right tools to interpreting your readings like a professional technician.
Why Fuel Pressure Matters
Your vehicle’s fuel system operates under precise pressure specifications set by the manufacturer. Modern fuel injection systems require consistent pressure delivery—typically between 35 and 65 PSI depending on your vehicle’s year, make, and model. When pressure falls outside these parameters, the engine control unit cannot inject the correct fuel quantity, leading to performance problems.
Low fuel pressure starves the engine of adequate fuel, causing hard starts, hesitation during acceleration, and stalling. High fuel pressure forces excess fuel into the combustion chamber, resulting in black smoke, poor fuel economy, and fouled spark plugs. Both conditions indicate your fuel pump, regulator, or filter needs attention. Learning to check readings with precision instruments helps you distinguish between electrical and mechanical issues in your fuel system.
The fuel pressure test is often the first diagnostic step mechanics perform when addressing starting issues or performance complaints. By checking fuel pressure early, you eliminate the fuel system as a variable before pursuing expensive repairs elsewhere in your engine bay.
Tools and Equipment You’ll Need
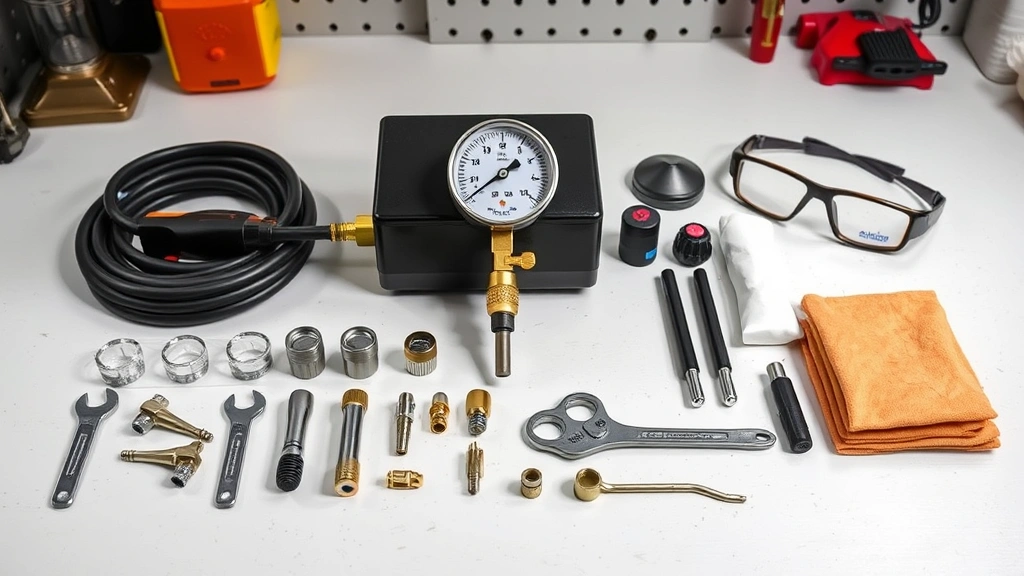
Proper equipment makes fuel pressure testing straightforward and safe. You don’t need expensive shop tools—a quality fuel pressure gauge is your primary investment. Here’s what you should gather before beginning:
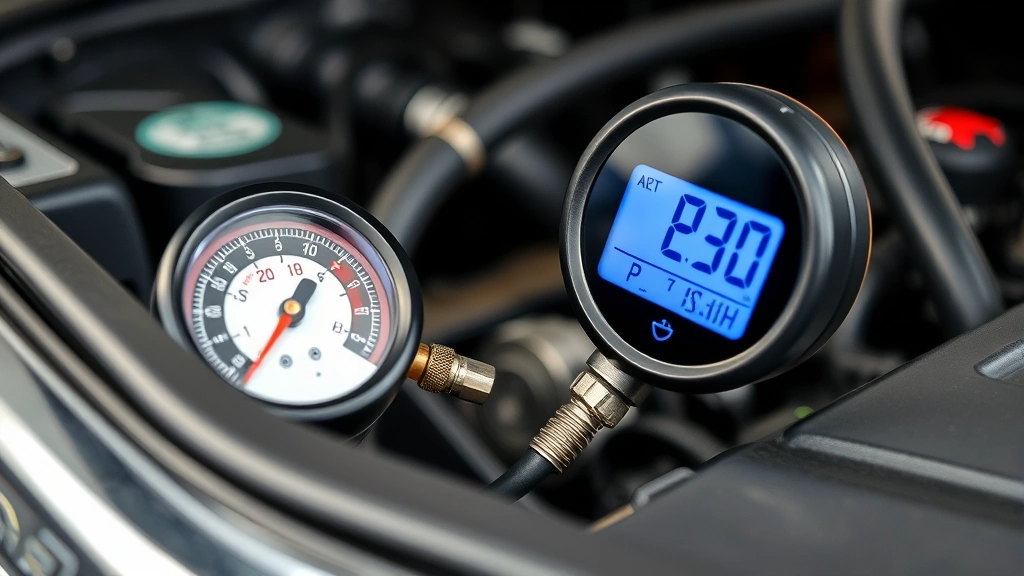
- Fuel Pressure Gauge Set: Choose a gauge with a range of 0-100 PSI minimum. Digital gauges offer easier reading accuracy than analog models, though both work effectively.
- Fuel Pressure Test Port Adapter Kit: These adapters connect your gauge to your vehicle’s Schrader valve, similar to tire valve stems. Different vehicles use different connector types, so verify compatibility with your specific year and model.
- Fuel Pressure Regulator Vacuum Hose: You’ll need access to the vacuum line if testing requires it, typically found on older vehicles.
- Socket Set and Wrenches: Various sizes help you access the fuel rail and test ports.
- Shop Towels and Absorbent Materials: Fuel spills require immediate cleanup. Keep absorbent materials and paper towels readily available.
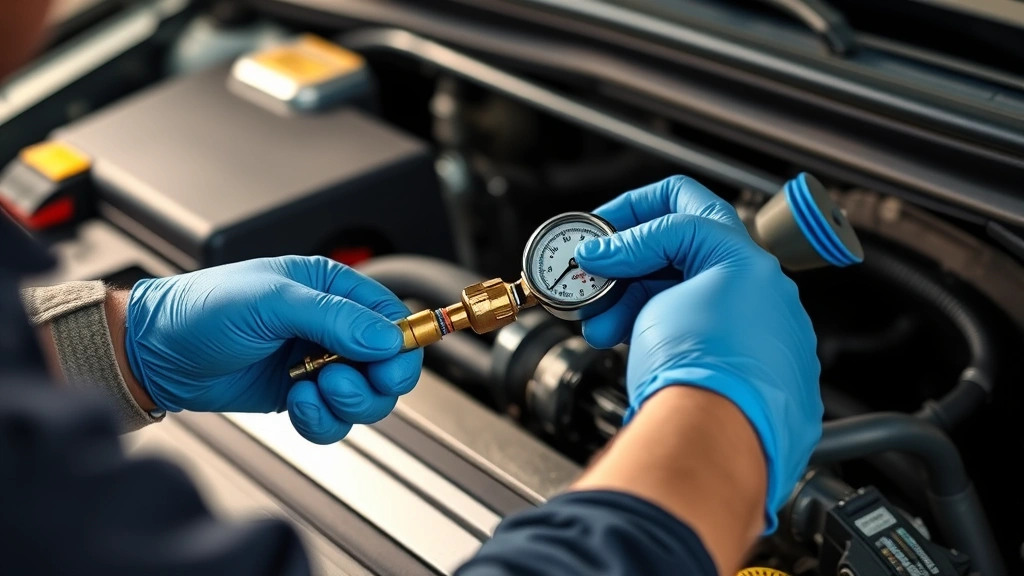
- Safety Glasses and Nitrile Gloves: Fuel contact with skin or eyes requires immediate attention, so protective gear is non-negotiable.
- Fuel Container or Catch Pan: Residual fuel may spray when disconnecting the gauge, so position containment equipment strategically.
When purchasing your fuel pressure gauge, invest in a reputable brand from an automotive supply store. Budget-friendly options often lack accuracy, making your diagnostic results unreliable. Quality gauges from manufacturers endorsed by professional mechanics provide consistent, trustworthy readings.
Safety Precautions Before Testing
Fuel is highly flammable and requires respectful handling. Before touching any fuel system component, establish a safe working environment. These precautions protect you and prevent catastrophic fuel fires:
- Work in a Well-Ventilated Area: Fuel vapors accumulate in enclosed spaces. Open your garage doors, work outdoors, or use ventilation fans to disperse fumes.
- Disconnect the Battery Negative Terminal: This eliminates the risk of electrical spark ignition. Leave the battery disconnected throughout your testing process.
- Allow the Engine to Cool Completely: Hot fuel systems spray violently when opened. Wait at least two hours after the engine runs before beginning work.
- Relieve Fuel System Pressure: Most vehicles have a fuel pump fuse or relay you can remove to depressurize the system. Consult your owner’s manual for the exact location. Some vehicles require activating the ignition without starting the engine several times to bleed pressure safely.
- Keep a Fire Extinguisher Nearby: Position a Class B fire extinguisher within arm’s reach. Know how to use it before beginning work.
- Wear Protective Equipment: Safety glasses shield your eyes from fuel spray. Nitrile gloves prevent skin contact and make cleanup easier.
- Never Smoke or Create Sparks: Eliminate all ignition sources within 50 feet of your work area.
These safety measures might seem excessive, but fuel-related fires spread rapidly and cause severe burns. Taking time to establish proper conditions is far easier than managing a fuel emergency.
Locating Your Fuel Pressure Test Port
The fuel pressure test port, also called the Schrader valve, connects to your vehicle’s fuel rail. Finding it requires consulting your vehicle’s service manual or online repair database specific to your year, make, and model. Different manufacturers position this port in various locations:
- Engine Bay Fuel Rail: Most modern vehicles have the test port mounted directly on the fuel rail, typically on the driver’s side or center of the engine bay.
- Fuel Line Connection: Some vehicles require disconnecting a fuel line and installing an adapter between the line and fuel rail.
- Fuel Pump Assembly: Older vehicles may have the test port on the fuel pump itself, located in the engine bay near the firewall.
Once you locate the test port, examine it for any protective caps or covers. Remove these carefully and set them aside in a safe location. The port resembles a tire valve stem and may have a small amount of fuel residue around it—this is normal.
If you cannot find the test port after checking your manual, consult online forums dedicated to your specific vehicle. Many enthusiasts document port locations with photos. As a last resort, contact your vehicle manufacturer’s customer service line with your VIN for exact specifications.
Step-by-Step Testing Procedure
Now that you’ve gathered equipment and located the test port, you’re ready to measure fuel pressure. Follow these steps methodically to ensure accurate results:
Step 1: Prepare Your Workspace Park your vehicle on level ground with the engine off. Engage the parking brake and place wheel chocks behind the rear wheels. Open your garage doors and position your work light for clear visibility. Lay absorbent materials around the fuel rail area to catch any spills.
Step 2: Relieve System Pressure Locate your fuel pump fuse or relay according to your service manual—typically found in the fuse box under the dashboard or engine bay. Remove this component and set it aside. Turn the ignition key to the “On” position without starting the engine, then turn it back off. Repeat this cycle three times. This bleeds pressure from the system safely. You should hear the fuel pump prime briefly each time you turn the key on.
Step 3: Disconnect the Negative Battery Terminal Using an appropriately sized wrench, loosen the negative battery terminal nut and slide the terminal off the post. This prevents any electrical spark during your work. You may tape the terminal away from the battery post for safety.
Step 4: Install the Fuel Pressure Gauge Select the correct adapter for your vehicle’s test port from your gauge kit. Thread the adapter onto the test port by hand first, then tighten with a wrench. Don’t over-tighten—snug is sufficient. Connect your fuel pressure gauge to the adapter. Ensure all connections are tight but not forced.
Step 5: Reconnect the Battery and Fuel Pump Reinstall the negative battery terminal and tighten the nut securely. Reinstall your fuel pump fuse or relay in its original location. Verify all connections are secure.
Step 6: Read the Gauge at Key-On Turn the ignition key to the “On” position without starting the engine. The fuel pump should prime and pressurize the system. Watch your gauge carefully as pressure rises. It should stabilize within 5-10 seconds. Record this reading—this is your key-on pressure, which should match your vehicle’s specification within ±5 PSI.
Step 7: Read the Gauge at Idle Start the engine and let it reach normal operating temperature. Once warmed up, note the gauge reading at idle. This idle reading should be slightly lower than your key-on reading, typically 5-10 PSI less. Record this value.
Step 8: Perform Load Tests Gently accelerate the engine to 2,000-3,000 RPM and observe the gauge. Pressure should increase proportionally with engine speed. Return to idle and note any pressure fluctuations. Smooth, consistent readings indicate a healthy fuel system.
Step 9: Test Vacuum-Regulated Pressure If your vehicle has a vacuum-regulated fuel pressure regulator, locate the vacuum hose connected to the regulator. Carefully disconnect this hose while the engine idles. Fuel pressure should increase by 5-10 PSI when vacuum is removed. Reconnect the hose and verify pressure returns to normal. This confirms your regulator functions properly.
Step 10: Document and Remove the Gauge Write down all your readings with timestamps. Turn off the engine and allow it to cool for 5 minutes. Carefully disconnect the fuel pressure gauge from the test port adapter. Have absorbent materials ready, as a small fuel spray may occur. Hand-tighten the protective cap back onto the test port. Wipe up any spills immediately.
Understanding Your Readings
Your fuel pressure readings tell a story about your fuel system’s health. Interpreting these results correctly guides your next diagnostic steps. Here’s what different readings indicate:
Normal Readings: If your key-on pressure matches your vehicle’s specification (typically 35-65 PSI) and idle pressure is 5-10 PSI lower, your fuel pump and regulator function correctly. Smooth pressure increases during acceleration and proper vacuum-regulated pressure changes confirm a healthy system. In this case, fuel system issues can be ruled out, and you should investigate other potential causes of your symptoms.
Low Pressure at Key-On: Pressure below specification at key-on indicates a weak fuel pump, failing fuel pump relay, or clogged fuel filter. A fuel filter replacement often resolves this issue if the pump and electrical connections test good. If low pressure persists after filter replacement, your fuel pump likely requires replacement—a more involved repair.
Low Pressure at Idle: If key-on pressure is normal but idle pressure drops significantly, your fuel pressure regulator may be leaking internally. This allows fuel to return to the tank excessively, starving the injectors. Regulator replacement is typically required.
Pressure Spikes During Acceleration: Pressure that climbs excessively during acceleration suggests a faulty fuel pressure regulator that isn’t properly controlling flow. The regulator should maintain relatively stable pressure regardless of engine load.
Fluctuating Readings: Pressure that bounces or wavers indicates fuel pump cavitation, a weak pump struggling to maintain consistent flow. This typically precedes complete pump failure.
When your readings don’t match specifications, consult your vehicle’s service manual for the exact pressures your engine requires. Different engines have different specifications, and a reading that’s low for one vehicle might be normal for another.
Common Fuel Pressure Problems
Understanding common fuel system failures helps you recognize patterns in your readings. These issues frequently appear in diagnostic work:
Failed Fuel Pump: The most common fuel pressure problem is a fuel pump that no longer generates adequate pressure. Symptoms include no fuel pressure at key-on, difficulty starting, and stalling under load. Fuel pumps fail from age, contaminated fuel, or running the tank nearly empty repeatedly. Replacement requires fuel tank access and typically costs $400-800 in labor plus parts.
Clogged Fuel Filter: A severely restricted fuel filter reduces pressure and fuel flow. Unlike a fuel pump failure, a clogged filter usually allows some pressure to build, but it remains below specification. Fuel filter replacement is inexpensive ($30-100) and should be your first troubleshooting step when pressure is low.
Leaking Fuel Pressure Regulator: A regulator that leaks internally allows excess fuel to return to the tank, reducing pressure. This problem typically shows normal key-on pressure that drops excessively at idle. Regulator replacement costs $150-300 depending on vehicle complexity.
Faulty Fuel Pump Relay: The relay that controls fuel pump electrical power can fail, preventing the pump from priming. This shows zero pressure at key-on with no pump priming sound. Relay replacement costs $30-75 and is worth testing before assuming pump failure.
Contaminated Fuel Injectors: While not directly a pressure problem, injector fouling often accompanies low pressure symptoms. Poor fuel quality or water in the tank can damage injectors, requiring cleaning or replacement.
Many of these issues can be prevented through regular maintenance. Replacing your fuel filter every 30,000-50,000 miles and using quality fuel from reputable stations significantly extends fuel system component lifespan.
When to Call a Professional
While fuel pressure testing is accessible to DIY mechanics, some situations require professional expertise. Knowing when to step back protects both you and your vehicle:
Fuel Tank Access Required: If your diagnostics indicate fuel pump failure, professional service is advisable. Removing and replacing a fuel pump requires dropping the fuel tank—a job involving multiple steps, special tools, and significant safety considerations. Professional shops have the equipment and experience to complete this work safely and efficiently.
Complex Electrical Issues: If your fuel pump isn’t priming and you’ve verified the relay functions, the problem may involve the engine control module or wiring harness. Professional diagnostic equipment can identify electrical faults that basic testing cannot.
Fuel System Leaks: If you discover fuel leaking from any component during your testing, stop immediately and contact a professional. Fuel leaks are serious fire hazards that require expert repair.
Unfamiliar Vehicle Systems: Some vehicles have unique fuel systems that differ significantly from standard configurations. If you’re uncomfortable with your specific vehicle’s setup, professional guidance is worth the investment.
Remember, as part of your broader DIY car repairs education, knowing your limitations is just as important as developing your skills. Professional mechanics invest years in training and have access to specialized diagnostic equipment. Sometimes their expertise saves you money by preventing costly mistakes.
Frequently Asked Questions
What’s the difference between fuel pressure and fuel flow?
Fuel pressure measures the force at which fuel exits the pump, typically expressed in PSI. Fuel flow measures the volume of fuel delivered per minute. Your gauge only measures pressure. If pressure is normal but the engine still runs poorly, a flow test performed by a professional may reveal injector or pump volume issues. For most DIY diagnostics, pressure testing is sufficient to identify major system failures.
Can I test fuel pressure with the engine running continuously?
Yes, but limit your testing to 10-15 minutes with the engine running. Prolonged operation with a gauge installed creates unnecessary heat and pressure in the fuel system. Take your readings quickly and allow the engine to cool between tests.
What if my readings are within spec but symptoms persist?
Normal fuel pressure eliminates the fuel pump and regulator as problem sources. Persistent symptoms may indicate fuel injector fouling, vacuum leaks, ignition system problems, or sensor failures. Consult your vehicle’s service manual for additional diagnostic procedures, or consider professional diagnosis using a code reader to identify fault codes your engine has stored. You might also review our guide on checking for parasitic draw if electrical issues are suspected.
How often should I check my fuel pressure?
Fuel pressure testing is a diagnostic tool, not a routine maintenance task. Check pressure only when you experience symptoms suggesting fuel system problems. If your vehicle runs smoothly, fuel pressure testing is unnecessary. Regular fuel filter changes and quality fuel usage prevent most fuel system issues.
Is it safe to drive with a fuel pressure gauge installed?
You should not drive with a gauge installed. The gauge adds a connection point where fuel can leak, and vibration during driving can damage the gauge or connections. Install the gauge, take your readings, and remove it before operating the vehicle.
What if I can’t find my vehicle’s fuel pressure specification?
Your vehicle’s service manual, available through manufacturer websites or automotive databases, contains exact specifications. Online forums dedicated to your vehicle’s year and model often have this information posted. As a general guideline, most vehicles operate between 35-65 PSI, but always verify your specific vehicle’s requirements before interpreting readings.
Can a fuel pressure gauge damage my fuel system?
When installed correctly, a fuel pressure gauge poses no risk to your fuel system. The gauge simply measures pressure at the test port—it doesn’t alter fuel flow or introduce contaminants if you work carefully. Use clean hands and equipment, and avoid touching the inside of connections.


