
Table of Contents
Introduction
There’s something magical about turning a pile of raw lumber into something beautiful and useful. Maybe it’s that coffee table you’ve been wanting for your living room, or perhaps a custom bookshelf that actually fits your space perfectly. Whatever sparked your interest in woodworking, you’re in for a treat—and honestly, you picked the perfect time to start.
Here’s the thing about woodworking: it used to feel like this exclusive club where you needed years of apprenticeship just to make a decent box. Not anymore. Thanks to detailed DIY woodworking plans, anyone can jump in and start creating. These aren’t just rough sketches either—we’re talking about step-by-step blueprints with exact measurements, cut lists, and assembly instructions that actually make sense. It’s like having a master craftsman looking over your shoulder, minus the intimidation factor. And if you’re curious about how detailed plans can transform your DIY success rate, check out DIY car repairs—same principle, different garage.
But let’s talk about why good woodworking plans are such game-changers. Sure, you’ll save money (and avoid those “oops, I cut this board too short” moments that make you want to quit). But the real magic happens when you start customizing projects to fit your style. Want that dining table a little taller? No problem. Prefer oak over pine? Easy adjustment. You’re not just following instructions—you’re learning skills that compound with every project. Speaking of building foundational skills, exploring DIY paper crafts might sound unrelated, but it actually teaches the same design principles and precision that make woodworking projects shine. Plus, there’s something deeply satisfying about creating quality pieces instead of buying mass-produced furniture that falls apart in two years.
Now, let’s get practical for a moment. You’ll need the right tools and materials—that’s non-negotiable. But don’t panic thinking you need a warehouse full of equipment. Start with the basics: a good saw, some clamps, measuring tools, and quality wood. The fancy stuff can come later. If you’re interested in expanding your hands-on skills, DIY flooring installation teaches similar tool mastery and precision that complements woodworking beautifully. And here’s a pro tip: understanding refinishing hardwood floors will teach you finishing techniques that’ll make your woodworking projects look absolutely professional.
What You’ll Learn in This Guide
We’re going to walk through everything you need to know about DIY woodworking plans—from choosing your first project to putting on those final finishing touches. Here’s what’s coming up:
- Benefits of Using DIY Woodworking Plans: Why detailed plans are your secret weapon for avoiding costly mistakes, saving money, and creating pieces that actually reflect your personal style and fit your space perfectly.
- How to Choose the Right Woodworking Plans: The key factors that separate great plans from frustrating ones, including how to match projects to your skill level, tools, and goals without biting off more than you can chew.
- Tools and Materials Needed: A realistic breakdown of essential tools (and which ones you can skip for now), plus how to choose the right wood and finishing supplies without breaking the bank or overwhelming your workspace.
- Step-by-Step Instructions for Woodworking Projects: A practical walkthrough from setting up your workspace to applying that final coat of finish, with real-world tips for staying safe, maintaining accuracy, and troubleshooting when things don’t go as planned.
By the time you finish this guide, you’ll feel confident reading woodworking plans and tackling projects that actually excite you. Many woodworkers also explore related skills like DIY blinds installation—it might seem unrelated, but the measuring precision and installation techniques transfer beautifully to woodworking projects. Think of this guide as your trusted workshop buddy, ready to help whenever you hit a snag.
Coming up, we’ll dig into how to pick the perfect woodworking plans for your experience level and goals. No more wondering if that gorgeous dining table project is way over your head or if you should start with something simpler. We’ll also build your toolkit strategically, focusing on the essentials first and adding specialized equipment as your skills and ambitions grow. Throughout everything, safety stays front and center—because the best project is one where you keep all your fingers.
Whether you’re completely new to this (welcome!) or you’ve been tinkering in your garage for years, there’s something here for you. Our goal is simple: help you turn those woodworking dreams into reality with confidence, creativity, and maybe even a little fun along the way. Ready to transform some wood into something amazing? Let’s get started.
Now that you’ve got the woodworking basics down, let’s talk about what really makes or breaks your projects. Whether you’re building your first birdhouse or dreaming of crafting custom furniture, two things will determine your success: picking the right plans and knowing how to execute them properly. Trust me—I’ve seen too many enthusiastic beginners bite off more than they can chew, and I’ve also watched seasoned woodworkers rush through steps they should have taken slowly. The good news? With the right approach to plan selection and a solid step-by-step process, you’ll not only create beautiful pieces but actually enjoy every minute of it.
How to Choose the Right Woodworking Plans
Here’s the thing about woodworking plans—they’re not all created equal, and choosing the wrong one can turn your exciting project into a frustrating nightmare. Plans range from “my first cutting board” simple to “master craftsman joinery” complex. The key is being brutally honest about where you stand skill-wise. I know it’s tempting to jump straight into that gorgeous dining table you saw online, but starting with projects that match your current abilities will build your confidence (and your skills) much faster.
Think about it this way: beginner plans are like training wheels—they guide you through basic cuts and assembly without overwhelming you with advanced techniques. More complex plans? They assume you already know your way around a dovetail joint and can handle intricate finishing work. The size of your project matters too. Large furniture pieces need serious workspace planning and can tie up your garage for months. Smaller projects, on the other hand, make perfect weekend builds and give you that satisfying “finished something” feeling quickly. If you’re looking for inspiration on varied project types, check out our guide on creative DIY pallet projects—it’s packed with ideas for different skill levels.
But here’s what many people overlook: your tool situation. Before you fall in love with a plan, scan through the required tools list. Some projects live and die by power tools like jigsaws and routers, while others rely mainly on good old-fashioned hand tools. Don’t forget about materials either—that beautiful mahogany project might look amazing, but if you’re on a pine budget, you’ll need to adjust accordingly. And please, for the love of all things wooden, choose plans with clear instructions and good diagrams. Vague directions and fuzzy photos will have you second-guessing every cut. It’s like trying to follow a financial plan without knowing your actual budget—you need clear, detailed guidance to succeed. When you take time to evaluate these factors properly, you’ll end up with plans that not only match your abilities but actually inspire you to keep building.
Key Considerations When Selecting Woodworking Plans
Let me break down the most important things to consider when you’re browsing through plans. These points will help you balance your woodworking dreams with reality:
- Skill Level Compatibility: Be honest about your experience level. Beginner plans focus on simple shapes and straightforward assembly, while advanced projects demand mastery of complex joinery techniques. Matching your skill to the project complexity saves you from frustration and helps you build expertise gradually.
- Project Size and Purpose: Consider both the scale and the intended use of what you’re building. Large furniture requires significant workspace and materials, while smaller decorative pieces offer quick wins. Make sure the project scope aligns with your goals and physical limitations.
- Tools and Materials Availability: Double-check that you have (or can reasonably acquire) all required tools without breaking the bank. Same goes for materials—choose projects using wood and hardware you can easily source locally or online. This prevents costly delays and budget surprises.
- Plan Clarity and Detail: Look for plans with comprehensive instructions and detailed diagrams or photos. Clear step-by-step guidance makes the difference between accurate cuts and costly mistakes—essential for achieving professional-looking results even in your home workshop.
When you think through these considerations carefully, you’re setting yourself up for woodworking success. Once you’ve found a plan that clicks with your skills and resources, it’s time to roll up your sleeves and start building.
Step-by-Step Instructions for Woodworking Projects
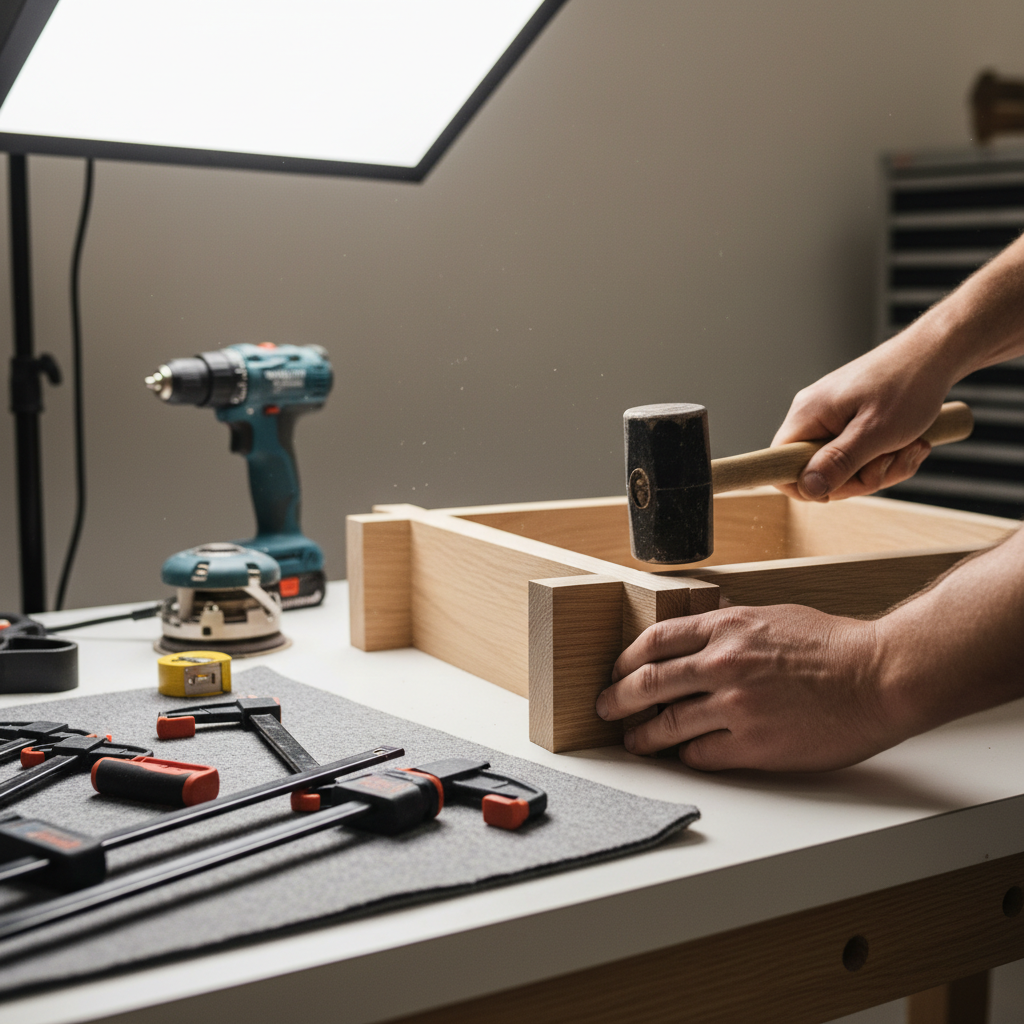
Okay, you’ve got your perfect plan—now what? Executing a woodworking project successfully goes way beyond just having good instructions. It’s about preparation, precision, and patience (yes, even when you’re excited to see results). First things first: prep your workspace like your project depends on it. Because it does. A clean, well-lit area with everything organized isn’t just nice to have—it’s essential for safety and efficiency. You want to focus on your cuts, not hunt for your measuring tape.
Before you make a single cut, read through the entire plan. I mean really read it—don’t just skim. Understanding the full sequence helps you spot potential challenges early and plan your approach logically. Think of it as your project roadmap. Now, when you get to the actual cutting and assembly (the fun part!), remember that precision is everything. Measure twice, cut once isn’t just a saying—it’s woodworking gospel. Your measurements determine how well everything fits together, so take your time and use the right tools for each task.
Assembly is where your project really comes to life, but it’s also where rushing can ruin everything. Keep your joints aligned, secure them properly with the right fasteners or glue, and double-check your work as you go. The finishing touches—sanding, staining, painting—that’s where good becomes great. These final steps add both beauty and protection to your piece. Always do a final quality check, looking for any details that need refining or small flaws that need fixing. For insights into managing complex multi-step projects with precision, our guide on DIY flooring installation offers excellent techniques that apply perfectly to woodworking projects.
Essential Phases of Woodworking Projects
Breaking your project into clear phases makes everything more manageable and improves your results. Here are the core stages every successful build goes through:
- Workspace and Tool Preparation: Create a clean, organized work area with proper lighting and ventilation. Gather all your tools, safety equipment, and materials before starting to avoid interruptions and maintain your focus throughout the build.
- Comprehensive Plan Review: Read through every step of your woodworking plan carefully. Understand the sequence, identify any challenging steps, and prepare for special tools or techniques you’ll need. This prevents unpleasant surprises mid-project.
- Accurate Cutting and Assembly: Measure twice, cut once using the appropriate tools for precision. Align all parts correctly, secure joints firmly, and constantly verify fit to ensure you’re building something structurally sound and square.
- Finishing and Quality Assurance: Apply your chosen finish—stain, paint, or sealant—following proper techniques. Sand all surfaces smooth and inspect your completed project thoroughly, addressing any imperfections for that polished, professional appearance.

Here’s the thing about DIY woodworking—it’s one of those hobbies that just keeps giving back. Whether you’re a complete beginner picking up your first saw or someone who’s been tinkering in the garage for years, good plans can transform your ideas into real, tangible pieces you’ll actually use and love. And let’s be honest, there’s something deeply satisfying about pointing to a bookshelf or coffee table and saying, “I built that.”
The best part? You’re not just saving money (though you definitely are—store-bought furniture prices these days are crazy). You’re building something that fits your space perfectly. That awkward corner in your living room? Custom solution. Need a desk that’s exactly 37 inches wide? No problem. Plus, every project teaches you something new, and before you know it, you’re handling tools with confidence you never thought you’d have.
Now, here’s where a lot of people go wrong—they either pick plans way above their skill level or assume they need a workshop that looks like something from a home improvement show. Reality check: you don’t. Smart plan selection means being honest about what you can handle right now, not what you wish you could do. And those essential tools we talked about? Start with the basics. Your wallet (and your spouse) will thank you.
The secret sauce is really in the approach. Take it step by step. Set up your workspace so everything flows smoothly—trust me, you’ll appreciate good lighting and organization when you’re trying to make precise cuts. Safety isn’t optional, and neither is patience. Rush through the finishing, and you’ll see those shortcuts every time you look at your piece.
When problems pop up (and they will—wonky measurements, wood that doesn’t cooperate, finishes that don’t look quite right), don’t panic. Every woodworker has been there. These hiccups are just part of the learning curve, and honestly, they make you better at troubleshooting future projects.
Ready to dive deeper? The skills you’re building here open doors to all sorts of related projects. Check out creative DIY pallet projects for some brilliant inspiration that’ll stretch your creativity without breaking the bank. If you want to level up your precision and finishing game, DIY flooring installation teaches the same methodical approach that makes woodworking successful. And here’s something you might not expect—DIY paper crafts can actually sharpen your design eye in ways that translate beautifully to wood projects.
So where does this leave you? With everything you need to start creating pieces that matter. Each project you complete isn’t just furniture or décor—it’s proof of what you can accomplish with your own two hands. That confidence? It carries over into everything else you do. Keep experimenting, keep learning, and keep building. The journey really is just as rewarding as those beautiful pieces you’ll create along the way.
Frequently Asked Questions
-
What skill level is required for DIY woodworking plans?
- DIY woodworking plans are available for all skill levels, ranging from beginner-friendly projects with simple cuts and assembly to advanced plans featuring intricate joinery and finishing.
-
Can I use any type of wood for my project?
- Wood choice depends on the project purpose and desired finish. Some woods are easier to work with than others, so beginners should start with more manageable varieties like pine or poplar.
-
What basic tools do I need to start?
- A basic toolkit including saws, measuring tools, clamps, a drill, and safety gear is sufficient for most beginner woodworking projects.
-
How do I avoid common woodworking mistakes?
- Careful measurement, following the plans step-by-step, using the right tools, and taking your time during assembly help prevent common mistakes.
-
Where can I find reliable woodworking plans?
- Reliable plans can be sourced from books, online DIY communities, specialized websites, or guides that emphasize clear diagrams, instructions, and realistic project scope.