How to Clean a Gun Safely: Expert-Approved Steps for Firearm Maintenance
Proper firearm maintenance is essential for safety, reliability, and longevity of your weapon. Whether you own a rifle, shotgun, or handgun, regular cleaning prevents corrosion, removes fouling, and ensures your firearm functions as intended. This comprehensive guide walks you through the expert-approved process of cleaning a gun safely, covering everything from preparation to storage. Like maintaining other equipment in your home—whether you’re learning how to clean a gas grill or performing routine upkeep—firearm maintenance requires dedication, proper technique, and respect for the equipment.
Gun cleaning isn’t complicated, but it demands attention to detail and unwavering commitment to safety protocols. This guide emphasizes the fundamental rule: always treat every firearm as if it’s loaded, even during maintenance. By following these expert-approved steps, you’ll develop a reliable cleaning routine that keeps your firearms in optimal condition while minimizing safety risks.
Essential Safety Rules Before You Start
Before touching any firearm, establish an ironclad safety foundation. The primary rule of firearm safety is treating every gun as though it’s loaded at all times. This mindset prevents negligent discharges and creates a culture of responsibility in your cleaning space. Never point a firearm at anything you don’t intend to destroy, regardless of whether you believe it’s unloaded. This applies even during disassembly and cleaning.
Your cleaning environment matters significantly. Choose a well-ventilated area away from children, pets, and other people. Cleaning solvents and bore cleaners produce fumes that require proper air circulation. Never clean firearms in living spaces or near food preparation areas. Set up a dedicated cleaning station with adequate lighting so you can see all components clearly. Poor visibility leads to mistakes and safety oversights.
Remove all ammunition from your cleaning area before beginning. Store ammunition in a separate, locked location away from your workspace. Even a single round introduces unnecessary risk during maintenance. Establish a clear separation: ammunition stays locked away while firearms are being serviced. This simple rule eliminates a major category of preventable accidents.
Wear appropriate personal protective equipment throughout the cleaning process. Safety glasses protect your eyes from solvent splashes and small spring components that might fly during disassembly. Nitrile gloves protect your skin from solvents and fouling residue. Some shooters prefer cotton gloves for better grip and dexterity. Ensure your workspace is organized and clutter-free to prevent dropping components or losing small parts.
Gathering Your Cleaning Supplies
Proper cleaning requires specific tools and materials designed for firearm maintenance. Unlike general home cleaning projects—such as when you’re tackling grout cleaning—firearm cleaning demands specialized products that won’t damage precision components.
Essential cleaning supplies include:
- Gun cleaning solvent (bore cleaner and degreaser)
- Gun oil or lubricant designed for firearms
- Cleaning rod with proper caliber-specific attachments
- Bore brushes in appropriate calibers
- Cleaning patches and patch holders
- Brass or nylon brushes for external components
- Cotton swabs and pipe cleaners for tight spaces
- Soft cloths for wiping and final assembly
- Flashlight for inspecting bore and action
- Hammer and punch set (plastic, not metal-on-metal)
- Takedown tool if manufacturer-specific
Invest in quality cleaning solvents specifically formulated for firearms. Standard penetrating oils lack the solvency needed to remove powder residue and copper fouling. Bore cleaners contain chemicals that break down fouling without damaging barrel steel. Avoid using household products like WD-40 or general-purpose oils, which attract dirt and provide inadequate lubrication for firearm mechanisms.
Your cleaning rod must match your firearm’s caliber. Using an oversized rod damages bore walls and creates dangerous pressure points. Quality rods feature ball bearings at the muzzle end to prevent contact with the crown—the critical muzzle surface that affects accuracy. Many experienced shooters prefer one-piece rods over segmented versions, as they eliminate wobbling during use.

Preparation and Inspection
Begin every cleaning session with a visual inspection of your firearm. Check for any visible damage, cracks, or unusual wear patterns. Inspect the exterior for rust, corrosion, or dried fouling. Look inside the action for debris accumulation. This inspection serves two purposes: it identifies maintenance needs and establishes a baseline for your firearm’s condition.
Ensure your firearm is completely unloaded through visual and physical inspection. Open the action, look into the chamber, and physically feel inside to confirm it’s empty. Check the magazine well and remove any magazines. Some shooters perform this check multiple times throughout the cleaning process as an additional safety measure.
Place your firearm on a cleaning mat or protective cloth to prevent damage to the finish and catch small parts during disassembly. The mat also prevents components from rolling away. Choose a mat designed for firearms—they typically feature compartments for organizing small parts and absorbing cleaning solvents.
Read your firearm’s manual before disassembly. Different firearms have different takedown procedures, and some require specific techniques to prevent damage. Manufacturer manuals provide crucial information about safe disassembly limits and reassembly procedures. Attempting to disassemble beyond field-stripping level without proper knowledge can damage critical components.
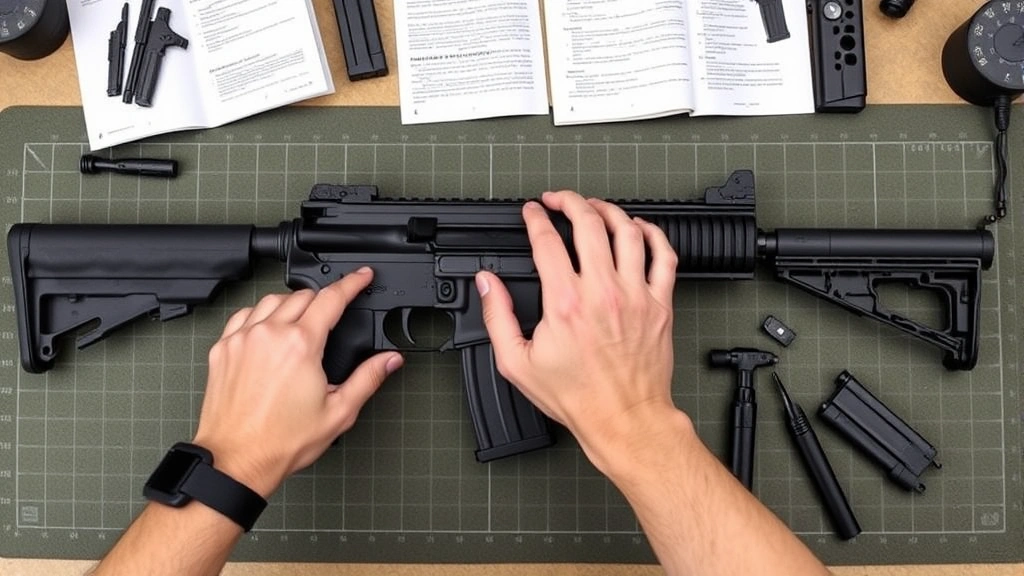
Field Stripping Your Firearm
Field stripping removes the major components necessary for thorough cleaning without requiring a gunsmith’s expertise. The process varies by firearm type, so consult your specific manual. Most modern handguns and rifles field strip into four to six major components: slide or bolt carrier, barrel, springs, and frame or receiver.
General field-stripping principles:
- Ensure the firearm is unloaded and the safety is engaged
- Remove the magazine and visually confirm the chamber is empty
- Cycle the action several times to verify it’s empty
- Follow manufacturer-specific disassembly steps in order
- Place components on your cleaning mat in the order removed
- Photograph or video the disassembly process for reference during reassembly
- Keep small springs and pins organized and protected
Take your time during disassembly. Rushing leads to lost components and potential damage. If you encounter resistance, stop and consult your manual rather than forcing components apart. Many firearms have safety features that prevent disassembly beyond field-strip level—respect these design limitations.
Some components may be held by roll pins or small springs under tension. These require careful handling to prevent launching parts across the room. A small parts tray or magnetic bowl helps contain tiny components during disassembly. Many experienced cleaners use small plastic bags labeled with component names to organize and protect parts during cleaning.
The Cleaning Process Step-by-Step
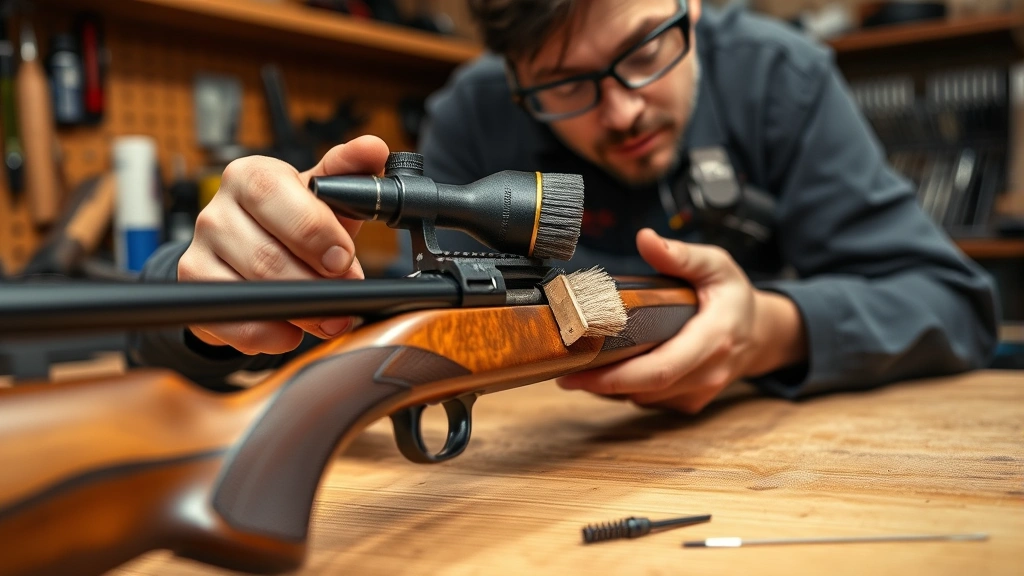
Begin by wiping down exterior surfaces with a cloth dampened in gun solvent. Remove fouling, dirt, and old lubricant residue. Pay special attention to crevices, rails, and areas where fouling accumulates. Use brass or nylon brushes to scrub stubborn deposits without scratching the finish. Avoid steel brushes on finished surfaces, as they cause scratching and can initiate corrosion.
Clean the action and internal surfaces thoroughly. Cotton swabs and pipe cleaners reach tight spaces where solvents can dissolve fouling. Work systematically through all crevices, paying special attention to firing pin channels, safety mechanisms, and trigger assemblies. Fouling accumulation in these areas affects reliability and can cause safety issues.
For the slide or bolt carrier, soak components in solvent for several minutes to soften stubborn fouling. Use brushes and swabs to remove deposits. Many shooters use an ultrasonic cleaner for small parts—this method is highly effective but requires proper safety procedures for handling solvents. Whether using ultrasonic cleaning or manual methods, always wear gloves and ensure adequate ventilation.
Wipe down all components with clean cloths as you progress through the cleaning process. Each component should be visibly clean with no solvent residue before moving to lubrication. Some shooters use a final rinse with a light solvent to remove any remaining fouling before the lubricating stage.
Barrel Cleaning Techniques
The barrel requires meticulous attention, as fouling directly affects accuracy and reliability. Start by attaching the appropriate bore brush to your cleaning rod. The brush should fit snugly in the bore without forcing. Apply gun solvent to the brush and push it through the barrel from the chamber toward the muzzle. Never pull the brush backward through the bore, as this direction can damage the muzzle crown or catch the brush on obstructions.
Push the brush completely through the barrel and out the muzzle end. Pull the rod back through from the muzzle, then repeat the process. Continue pushing the brush through until resistance decreases and fouling visibly reduces. This typically requires 10-20 passes depending on shooting history and powder type.
Switch to a smaller bore brush or jag with cleaning patches after initial brush passes. Attach a patch holder to your cleaning rod and insert a cleaning patch soaked in solvent. Push this through the barrel several times. The patches will appear dark with fouling. Continue with fresh patches until they emerge nearly clean—typically requiring 8-12 patch passes.
For stubborn copper fouling (common with jacketed bullets), use specialized copper solvents. These aggressive chemicals require extended soaking and produce strong fumes—ensure excellent ventilation. Follow product instructions carefully, as some copper solvents require neutralization with a second product before oil application. Copper fouling appears as blue or green discoloration inside the bore.
Inspect the bore using a flashlight to confirm cleanliness. Look for any remaining fouling, rust, or corrosion. A properly cleaned bore appears bright and reflective under light. If you see persistent discoloration or fouling, repeat the cleaning process with fresh solvent. Never reassemble your firearm with a dirty bore, as this promotes corrosion and affects accuracy.
After achieving a clean bore, run a patch with light gun oil through the barrel to protect against corrosion and provide initial lubrication. Some shooters prefer to apply a very thin oil coat while others leave bores dry. Consult your firearm manufacturer’s recommendations—different designs benefit from different approaches.
Reassembly and Function Check
Before reassembly, wipe all components with clean, dry cloths to remove excess solvent. Solvent residue can interfere with proper fit and function. Apply appropriate lubricant to friction points—firing pin channels, hammer mechanisms, trigger assemblies, and slide rails for handguns. Use minimal lubricant; excess oil attracts dirt and can affect reliability.
Reassemble your firearm in reverse order of disassembly, following manufacturer instructions precisely. Work slowly and deliberately, ensuring each component seats properly. Springs and pins should fit without forcing. If resistance occurs, stop and verify proper alignment rather than proceeding with force.
Once reassembled, perform a detailed function check with an unloaded firearm. Cycle the action multiple times, checking for smooth operation. Test the safety mechanism, trigger pull, and hammer or striker function. Everything should operate smoothly without grinding or unusual sounds. If you notice problems, disassemble and identify the issue rather than firing an improperly functioning firearm.
For firearms with magazines, test magazine insertion and removal. Verify the magazine seats fully and releases cleanly. Ensure the slide or bolt locks back on an empty magazine. These checks confirm proper reassembly and identify any issues before firing.
Proper Storage After Cleaning
Proper storage prevents corrosion and maintains your firearm’s condition between shooting sessions. Store firearms in a cool, dry location away from humidity. Moisture promotes rust formation, particularly in areas where you’ve removed protective oils during cleaning. Many shooters store firearms in safes or lockable cases designed to exclude moisture.
Apply a light protective oil coat to external surfaces if storing for extended periods. This thin film prevents corrosion without attracting excessive dirt. Use a soft cloth to apply oil evenly, then buff away excess with a clean cloth. The goal is a barely visible protective layer, not a slick coating.
Store ammunition separately in locked containers, away from firearms. This prevents unauthorized access and eliminates the risk of ammunition being present if your firearm is accessed unexpectedly. Proper storage demonstrates responsible ownership and protects your household.
Check your firearms periodically during storage. Monthly inspections identify any corrosion or mechanical issues before they become serious problems. Wipe down external surfaces and verify the storage environment remains dry. If you notice any corrosion developing, clean and re-oil affected areas immediately.
For long-term storage exceeding several months, consider storing firearms with desiccant packs in sealed cases. These absorb moisture and significantly reduce corrosion risk. Some shooters apply cosmoline or other long-term protective coatings to firearms stored for years, though this requires complete removal and cleaning before use.
FAQ
How often should I clean my gun?
Clean your firearm after every shooting session, regardless of how few rounds you fired. Powder residue begins corroding barrel steel immediately. For firearms stored without regular use, clean every 3-6 months as a preventive measure. Firearms exposed to harsh environments (salt water, extreme humidity) require more frequent cleaning.
What’s the difference between gun oil and gun solvent?
Solvents dissolve and remove fouling, powder residue, and old lubricant. Oils provide lubrication and corrosion protection. Both are essential—solvents clean, oils protect. Using only oil without solvent leaves fouling behind; using only solvent without oil leaves your firearm unprotected against corrosion.
Can I clean my gun without disassembling it?
Field stripping is the minimum disassembly needed for thorough cleaning. You can clean the bore without field stripping by using a bore rod from the breech or muzzle, but you’ll miss fouling in the action and internal surfaces. Complete cleaning requires field stripping as described in this guide.
Is it safe to clean a gun indoors?
Yes, with proper ventilation. Ensure your space has windows open or a ventilation system running. Solvent fumes are hazardous in enclosed spaces, but with adequate air circulation, indoor cleaning is safe. Never clean firearms in bedrooms, living rooms, or kitchens where ventilation may be inadequate.
What should I do if I lose a small spring during disassembly?
Stop immediately and locate the spring before proceeding. Springs under tension can be difficult to reinstall if you forget their location. If you cannot find the spring, consult your firearm’s manual or contact the manufacturer. Never reassemble a firearm missing springs or critical components.
How do I know if my barrel is clean?
Use a flashlight to look through the bore from the breech end. A clean bore appears bright and reflective with no visible fouling, corrosion, or discoloration. If you see any dark spots or discoloration, continue cleaning until the bore is completely clear.


