Table of Contents
Introduction
Here’s something that might surprise you: billions of people around the world don’t have access to clean drinking water. But here’s what’s even more surprising—you can actually create your own water filtration system at home using materials you probably already have lying around. No expensive equipment needed. No monthly subscriptions to worry about.
Let’s talk about what’s actually floating around in your water. It’s not just the obvious stuff like dirt and sand (though those are definitely there). You’ve got chemical hitchhikers like chlorine and pesticides, plus some seriously unwelcome guests—bacteria and viruses that can make you genuinely sick. We’re talking everything from an upset stomach to something much worse. The good news? Once you understand what you’re dealing with, you can actually do something about it. Speaking of protecting your home environment, you might find it helpful to check out these DIY home security measures for a more complete approach to household safety.
Now, most of us are lucky enough to live somewhere with water treatment facilities doing the heavy lifting. But what if you’re not? Or what if you want that extra peace of mind? That’s where DIY filtration comes in. Think charcoal filters, sand and gravel layers, good old-fashioned boiling, even UV treatment if you want to get fancy. Each method tackles different problems, so you can mix and match based on what’s actually in your water. And while we’re talking about water safety, it’s worth considering the bigger picture—like these strategies to reduce water pollution that can help improve water quality at the source.
Maybe you’re wondering where to even start with this whole DIY filtration thing. Don’t worry—we’re going to walk through everything step by step. From gathering your materials (most of which you can find at any hardware store) to putting it all together and keeping it running smoothly. We’ll also talk about when it’s time to call in the professionals for water testing, because sometimes DIY has its limits. If you’re the type who likes tackling home projects yourself, you might also enjoy learning about DIY flooring installation—it’s another great way to take control of your living space.
What You’ll Learn in This Guide
Ready to become your own water filtration expert? Here’s exactly what we’re going to cover:
- Understanding Water Contaminants: Learn about the various types of pollutants that commonly affect water sources and why filtration is essential to health.
- Popular DIY Filtration Methods: Explore effective techniques such as charcoal, sand and gravel filters, boiling, and UV treatment, including how they work and their pros and cons.
- Step-by-Step Assembly Instructions: Detailed, easy-to-follow guidance on how to build your own filter using household and natural materials, complete with maintenance tips to ensure long-term use.
- When to Seek Professional Help: Understand situations in which DIY filtration might not be enough and the importance of professional water testing to guarantee safety.
First up, we’re going to get into the nitty-gritty of what’s actually contaminating your water. Knowledge is power here—the more you know about what you’re fighting, the better you can fight it. Then we’ll dive into the practical stuff: which filtration methods work best for different situations, and how you can build them yourself. If you’re getting excited about DIY projects in general, you might want to check out this guide on DIY car repairs too—once you start fixing things yourself, it’s kind of addictive.
By the time we’re done here, you’ll have everything you need to provide cleaner, safer water for your family. Whether you’re preparing for emergencies, living off-grid, or just want better-tasting water from your tap, these skills will serve you well. Plus, there’s something pretty satisfying about being self-sufficient when it comes to something as basic as clean water.
So let’s get started. Clean water shouldn’t be a luxury—and with a little know-how and some basic materials, it doesn’t have to be. Every filter you build is a step toward better health, more independence, and a little less reliance on systems outside your control.
So you’re interested in DIY water filtration? Smart move. But here’s the thing—before you start building your own filter, you need to know what you’re actually fighting against. Water contamination isn’t just some abstract problem that happens “somewhere else.” It’s real, it’s everywhere, and honestly? It’s scarier than most people realize. The good news is that DIY filtration can tackle most of these problems without breaking the bank. You just need to understand what’s lurking in your water and how to beat it. Ready to dig into the nitty-gritty? Let’s talk about what’s really in that glass you’re drinking from.
Understanding Water Contaminants and Their Impact
Water contaminants come in all shapes and sizes—literally. Think of them as three main troublemakers: physical stuff you can see, chemical nasties you can’t, and tiny living things that definitely don’t belong in your body. Physical contaminants? That’s your dirt, rust, and sediment making your water look like chocolate milk. Not exactly appetizing, right? But here’s what’s worse—that murky water isn’t just ugly. It’s like a cozy hotel for bacteria and other microorganisms you really don’t want to meet.
Then you’ve got chemical pollutants. These are the sneaky ones. Chlorine from water treatment (ironic, isn’t it?), pesticides from farms, heavy metals like lead that can mess with your brain—the list goes on. Some of these will make you sick right away. Others? They’re playing the long game, slowly damaging your organs or increasing cancer risk. Not exactly what you want in your morning coffee. And don’t get me started on biological contaminants—bacteria, viruses, and protozoa that cause everything from stomach bugs to serious diseases. These microscopic invaders are responsible for waterborne illness outbreaks worldwide.
Here’s why this matters for your DIY project: every contaminated sip is a roll of the dice with your health. Kids are especially vulnerable—their developing bodies can’t handle these toxins like adults can. That’s where smart filtration comes in. When you combine physical removal, chemical absorption, and pathogen elimination, you’re building a fortress against contamination. Want to explore broader water pollution solutions beyond just filtration? Check out these practical steps to reduce water pollution for the bigger picture.
Key Categories of Contaminants in Water
Alright, let’s break down your enemies into categories. Know your opponent, win the battle:
- Physical Contaminants: The stuff you can actually see—sediment, dirt, rust particles, and other floating debris. Sure, they make your water look gross, but they’re also clogging up your system and creating perfect hiding spots for bacteria. The solution? Layered filtration using sand and gravel that traps these particles like a net. Think of it as your filter’s bouncer—keeping the riffraff out.
- Chemical Pollutants: This category includes chlorine (yes, the same stuff that’s supposed to “clean” your water), agricultural pesticides, industrial chemicals, and heavy metals like lead and arsenic. Scary stuff. The hero here is activated charcoal—it’s like a super-absorbent sponge that grabs onto these chemicals and doesn’t let go. Bonus: it also fixes that weird taste and smell.
- Biological Contaminants: Meet the living nightmares—bacteria, viruses, and protozoa that cause serious illness. These microscopic troublemakers require the nuclear option: boiling, UV light, or chemical disinfection. Physical filtration alone won’t cut it here. You need to actually kill these things.
- Microplastics and Emerging Pollutants: The new kids on the contamination block. Tiny plastic particles and synthetic chemicals that scientists are still figuring out. Most DIY systems can catch some of these, but here’s a reality check—you might need professional water testing to know what you’re dealing with. It’s a reminder that water contamination keeps evolving.
Now that you know what you’re up against, let’s talk about how to fight back with some seriously effective DIY methods.
Popular DIY Water Filtration Methods and Construction Tips
Ready to get your hands dirty? (Ironically, to get your water clean.) DIY filtration is like cooking—you can use simple ingredients to create something amazing. The secret sauce? Combining different methods to tackle different problems. We’re talking charcoal filters, sand and gravel layers, boiling, UV treatment—the whole arsenal. And the best part? You can build most of these with stuff from your garage or local hardware store.
The beauty of DIY is control. You know exactly what’s in your system, you can maintain it yourself, and when something needs replacing, you’re not calling a technician. Plus, there’s something deeply satisfying about drinking water you filtered yourself. Need detailed project plans? The folks at DIY water filtration tips have you covered with step-by-step guides that actually make sense.
Essential DIY Water Filtration Techniques
Let’s get practical. Here are the heavy hitters in the DIY filtration world:
- Charcoal Filtration: Activated charcoal is basically a chemical magnet. Its porous structure traps toxins, kills bad tastes and odors, and makes your water actually pleasant to drink. Building one is straightforward—crush up some activated charcoal, layer it in a container (with other materials for pre-filtering), and let it work its magic. Pro tip: don’t use charcoal from your BBQ. That’s not the same thing.
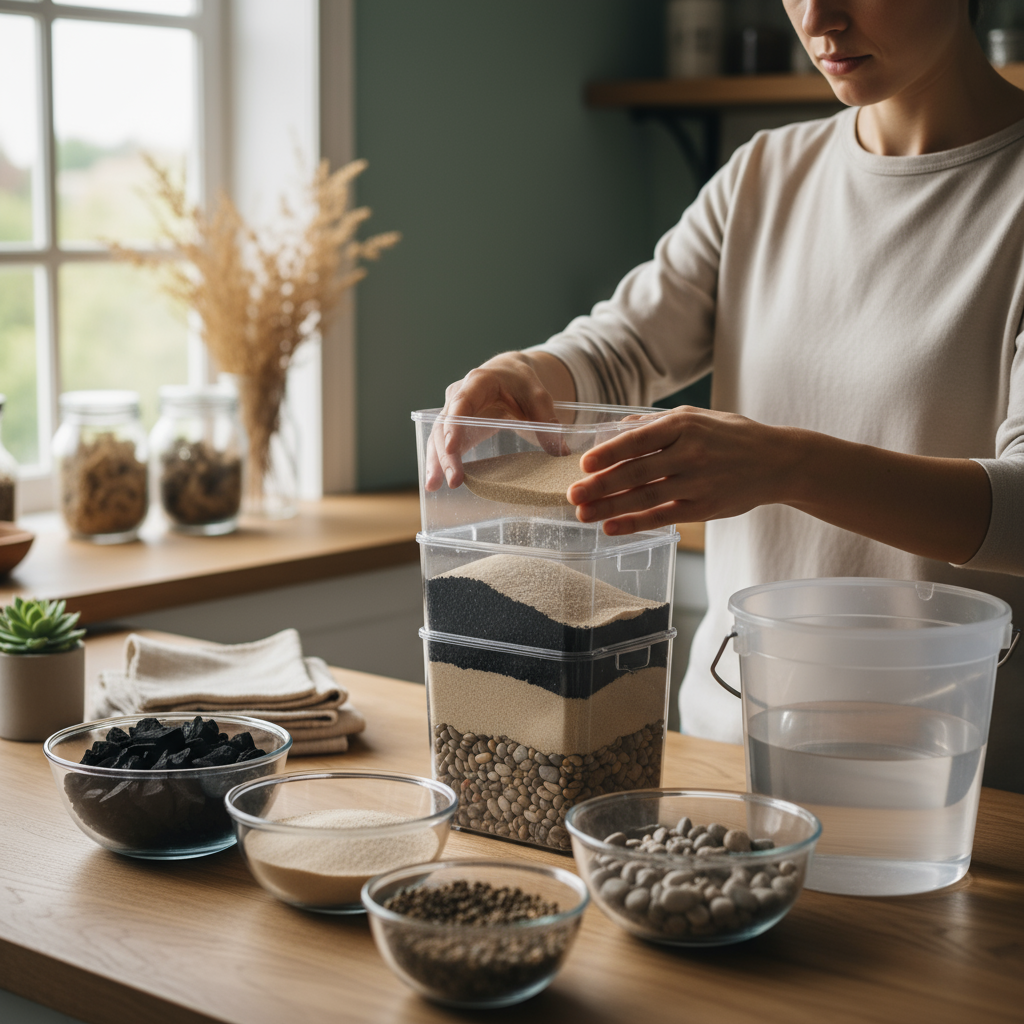
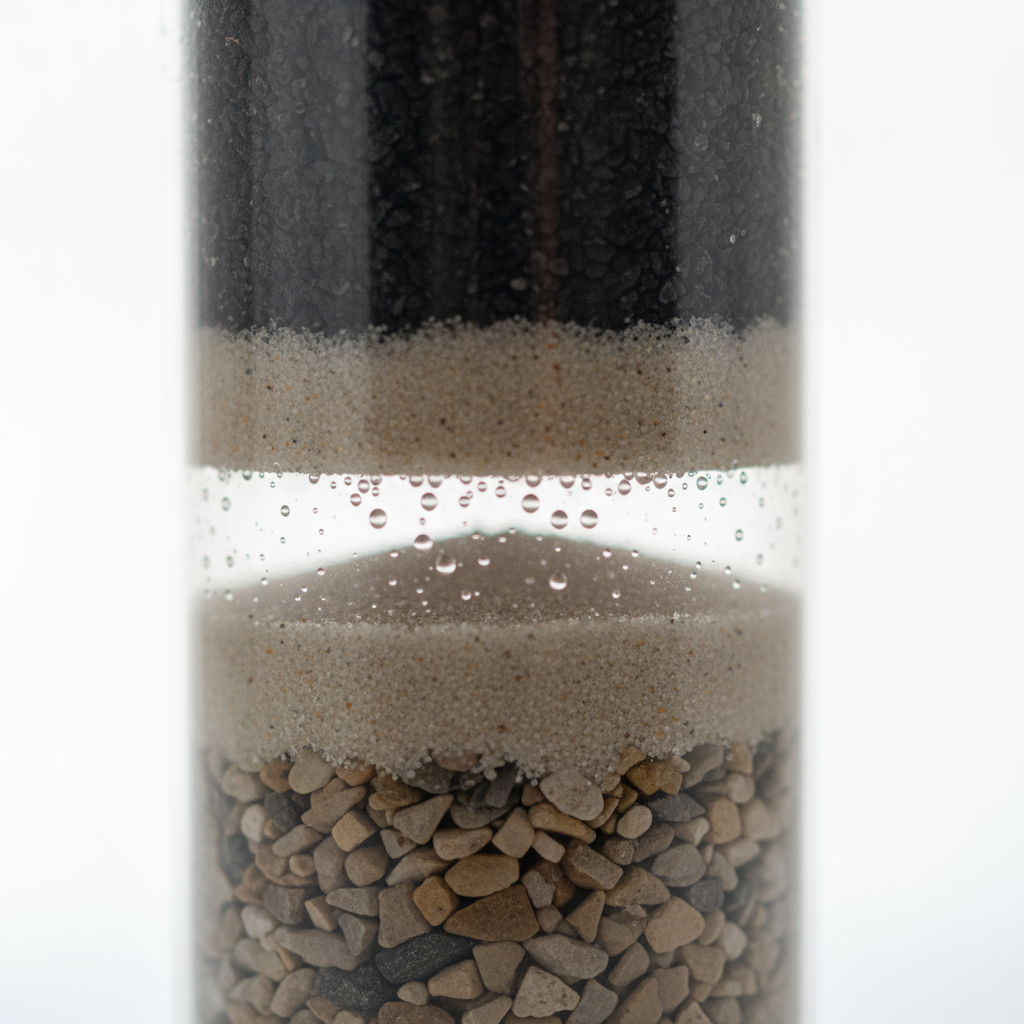
- Sand and Gravel Filters: This is nature’s own filtration system, and it’s been working for thousands of years. Layer coarse gravel at the bottom, fine sand at the top, and watch as physical contaminants get trapped on their way through. The trick is getting the layering right—too loose and everything flows through, too tight and nothing flows at all. Clean materials are crucial here. You don’t want to add contamination while trying to remove it.
- Boiling and UV Treatment: When you absolutely, positively need to kill every living thing in your water overnight—boiling is your friend. It’s foolproof for biological contaminants, though it won’t touch chemicals or physical debris. UV treatment is the high-tech option that zaps microorganisms with ultraviolet light. No heat, no chemicals, just pure science. Just make sure you’re using certified UV equipment, not some random light bulb.
- Combining Methods for Best Results: Here’s where the magic happens. Start with physical filtration to catch the big stuff, run it through charcoal for chemical cleanup, then finish with boiling or UV for biological threats. It’s like a three-layer security system for your water. Each layer catches what the others miss.
Building your filter is just the beginning. Want it to actually work long-term? Pay attention to assembly and maintenance. Use containers with proper mesh or cloth to keep your filter layers in place. Don’t let different layers mix together—contamination is sneaky. Keep water flowing at a steady rate (too fast and it won’t filter properly, too slow and you’ll be waiting forever). Replace that charcoal regularly, clean your sand and gravel components, and always test your system before relying on it. A well-maintained DIY filter can be just as effective as expensive commercial systems—and a lot more satisfying to use.

Here’s the thing about water—we all need it, but not all of it is safe to drink. What you’ve learned here isn’t just theory; it’s practical knowledge that can genuinely protect your family’s health. Those three main culprits we talked about—debris floating around, nasty chemicals, and microscopic troublemakers—they’re real threats lurking in water sources everywhere. But now? You know how to spot them and fight back.
DIY water filtration isn’t rocket science, and that’s the beauty of it. You don’t need fancy equipment or a degree in chemistry. Charcoal pulls out the chemical nasties and makes your water taste better. Sand and gravel? They’re like bouncers at a club, stopping the bigger particles from getting through. And when you boil water or use UV light, you’re basically giving those harmful microorganisms their eviction notice. The secret sauce is layering these methods—think of it like building a fortress with multiple walls of defense.
Building your own filter system is honestly pretty satisfying. (There’s something empowering about creating something that protects your family, right?) We’ve walked through the process step by step, but here’s what really matters: you’re not just following instructions—you’re developing a skill. That said, let’s be real for a minute. Sometimes DIY isn’t enough. If your water situation is seriously sketchy or you’re dealing with unknown contaminants, don’t mess around. Get professional help. Your health isn’t worth the gamble.
Ready to take this further? You’ve got options, and good ones. Our DIY water filtration tips dive deeper into the nitty-gritty—materials that work best, assembly tricks that actually matter, and troubleshooting when things go sideways. And since we’re talking about protecting your home, why stop at water? Check out our DIY home security guide to cover all your bases. Feeling ambitious? Our DIY flooring installation guide might be your next weekend project.
Want to think bigger picture? (And honestly, you should.) The cleaner our water sources stay, the less work your filter has to do. That’s where learning about strategies to reduce water pollution comes in handy. It’s like preventive medicine for your water supply—tackle the problem upstream, and everyone benefits.
You’ve got the knowledge now. You understand the why, the how, and the when. Every filter you build is a step toward independence—and peace of mind that’s hard to put a price on. Keep up with maintenance (seriously, don’t skip this), stay curious about new methods, and remember: there’s no shame in calling the pros when you need them. Clean water isn’t a luxury—it’s a necessity you can now provide for yourself.
Frequently Asked Questions
-
Can DIY water filters remove all contaminants?
- DIY filters typically handle many physical and chemical contaminants but may not remove all toxins or pathogens completely. Professional solutions might be necessary for severe contamination.
-
How often should I clean my DIY water filter?
- Cleaning frequency depends on usage and water quality. Regular maintenance including cleaning and replacing filter materials is essential to keep the system effective.
-
Is boiling water as effective as filtration?
- Boiling effectively kills microorganisms but does not remove chemical or physical contaminants, so combining boiling with filtration is recommended.
-
What materials work best for DIY filters?
- Activated charcoal, clean sand, and gravel are commonly effective materials for removing various types of contaminants in DIY filtration systems.
-
When should I consider professional water treatment?
- Professional treatment is advisable when contamination is severe, persistent, or uncertain, or if health risks are suspected beyond the scope of DIY filtration.