DIY Porch Swing Build: Carpenter-Backed Guide
Building a porch swing is one of the most rewarding DIY projects you can tackle, combining functional craftsmanship with the timeless appeal of outdoor relaxation. Whether you’re looking to add character to your home or create a cozy gathering spot, a handmade porch swing offers unmatched satisfaction. However, unlike quick weekend fixes, this project demands attention to structural integrity, material selection, and proper installation techniques to ensure safety and longevity.
This guide walks you through every step of constructing a durable porch swing that will withstand years of use and weather exposure. We’ll cover everything from choosing the right wood species to understanding load-bearing requirements, hardware selection, and finishing techniques that protect your investment. Whether you’re a seasoned woodworker or exploring beginner woodworking projects, this carpenter-backed approach ensures your swing is both beautiful and safe.
Understanding Porch Swing Structural Requirements
Before cutting a single board, you must understand the structural demands placed on a porch swing. A typical two-person swing must safely support at least 400 to 500 pounds of dynamic load—that’s the weight of occupants plus the stress created by swinging motion. Building codes and safety standards require that all structural components handle this load with a significant safety margin, typically 4:1 or greater.
The critical stress points in any porch swing are the suspension points where chains or ropes attach to the ceiling structure. These connection points experience loads that can exceed static weight during dynamic swinging. According to the International Code Council (ICC), residential structures must be designed to handle these dynamic forces without permanent deformation or failure. This means your porch frame itself must be engineered to accept hanging loads, which we’ll address in the installation section.
The seat itself—the platform where occupants sit—needs to distribute weight evenly across multiple support members. A single board cannot safely span the full width of a swing without significant deflection or failure risk. The wood grain direction, species selection, and joinery methods all contribute to load distribution and overall safety. Consider how your swing will move: the rocking motion creates compressive and tensile forces that vary throughout each swing cycle.
Selecting Materials and Hardware
Wood selection is paramount for outdoor applications. You need species that resist decay, handle moisture fluctuation, and maintain structural integrity over years of exposure. Premium choices include cedar, redwood, and tropical hardwoods like cumaru or ipe. Cedar offers natural rot resistance and beautiful grain patterns, making it popular for visible components. Redwood provides similar benefits with excellent workability. If budget allows, ipe delivers superior durability and can last 25+ years outdoors with minimal maintenance.
Avoid pressure-treated lumber for components where people make direct contact, as the chemical treatments can leach onto skin and clothing. However, pressure-treated wood works well for hidden structural supports or posts. Always verify that any wood meets grading standards for your region—the American Wood Council (AWC) maintains comprehensive standards for lumber strength and durability ratings.
Hardware selection directly impacts safety and longevity. Use galvanized or stainless steel bolts, eye bolts, and chains rated for outdoor use. Never substitute indoor-grade hardware; corrosion leads to failure. For a typical swing, you’ll need:
- Galvanized chain: Grade 70 or higher, rated for at least 2,000 pounds per chain (use two chains minimum)
- Eye bolts: 5/8-inch diameter, galvanized, rated for 500+ pounds each
- Lag bolts: For ceiling attachment, minimum 1/2-inch diameter, 6-8 inches long
- Stainless steel fasteners: Bolts, washers, and nuts for all exposed connections
- Wood screws: Exterior-grade, coated or stainless steel
Hardware ratings are critical. Each chain should independently support the full swing weight with a 4:1 safety factor minimum. This means each chain needs a working load limit of at least 125 pounds if your swing will hold 500 pounds total, with two chains sharing the load equally.
Building the Swing Seat
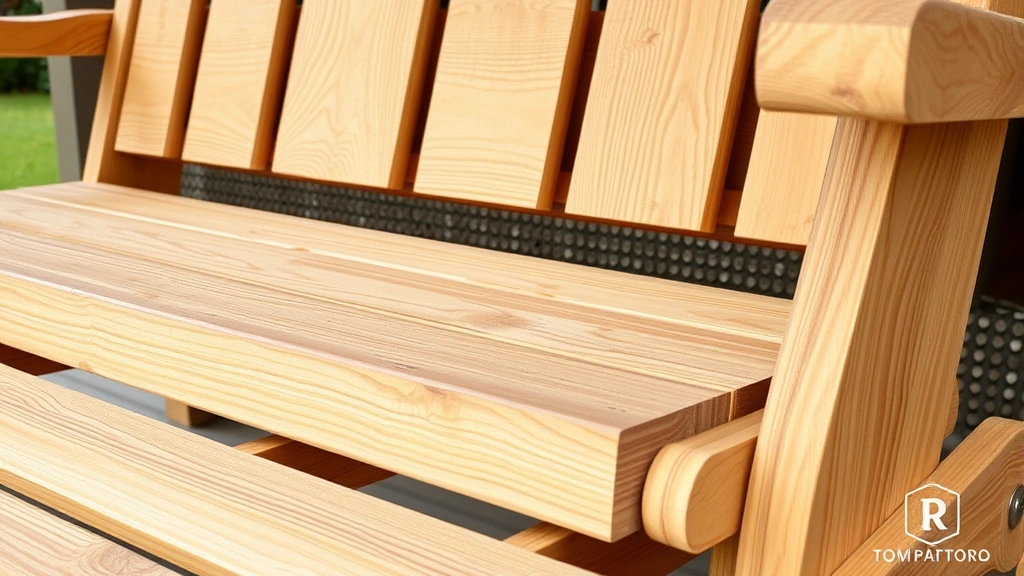
The seat platform forms the foundation of your swing. Start with boards measuring 1.5 inches thick by 6-8 inches wide and 48-60 inches long, depending on desired seating capacity. Cedar or redwood boards work well here. Select lumber with straight grain and no significant knots or defects that could compromise strength.
Laminate the seat by joining two boards edge-to-edge using waterproof wood glue and stainless steel bolts spaced every 12-16 inches. This creates a stronger, more stable platform than a single board. Drill pilot holes slightly smaller than bolt diameter to prevent wood splitting, then countersink bolts on the bottom surface where they won’t contact users.
Once the main seat platform is complete, reinforce it with cross-braces underneath. Install three support beams running perpendicular to the seat boards, positioned at each end and center. These 2×4 cedar beams should be bolted to the seat using the same technique as your seat lamination. The cross-braces distribute weight and prevent the seat from sagging or twisting during use.
Sand all exposed surfaces smooth, paying particular attention to edges and corners where people might make contact. Use progressively finer sandpaper, finishing with 120-150 grit to create a splinter-free surface. Round over sharp edges using a router with a 1/4-inch roundover bit for added safety and comfort.
Crafting Armrests and Backrest
Armrests add comfort and safety to your swing design. Construct them from 2×6 or 2×8 cedar boards, positioned 8-10 inches above the seat surface and extending 6-8 inches forward. The armrests should be bolted securely to the seat frame at multiple points, creating a unified structure rather than separate components.
Design the armrest with a slight downward slope toward the front—approximately 10 degrees—to encourage proper sitting posture and prevent users from leaning backward excessively. This subtle angle also sheds water away from the seat area, reducing moisture accumulation and decay risk.
The backrest should angle backward approximately 15-20 degrees from vertical, matching typical seating ergonomics. Build it from 1×8 or 1×10 boards oriented vertically, spaced 1-2 inches apart to allow water drainage and air circulation. Connect vertical boards to a horizontal frame using mortise-and-tenon joints or through-bolts for maximum strength.
Ensure the backrest extends at least 12-16 inches above the seat surface for proper lumbar support. The backrest attachment to the seat frame should use robust joinery—avoid simple nailing. Instead, use through-bolts with washers and lock washers to prevent loosening from vibration during swinging.
Installation and Mounting
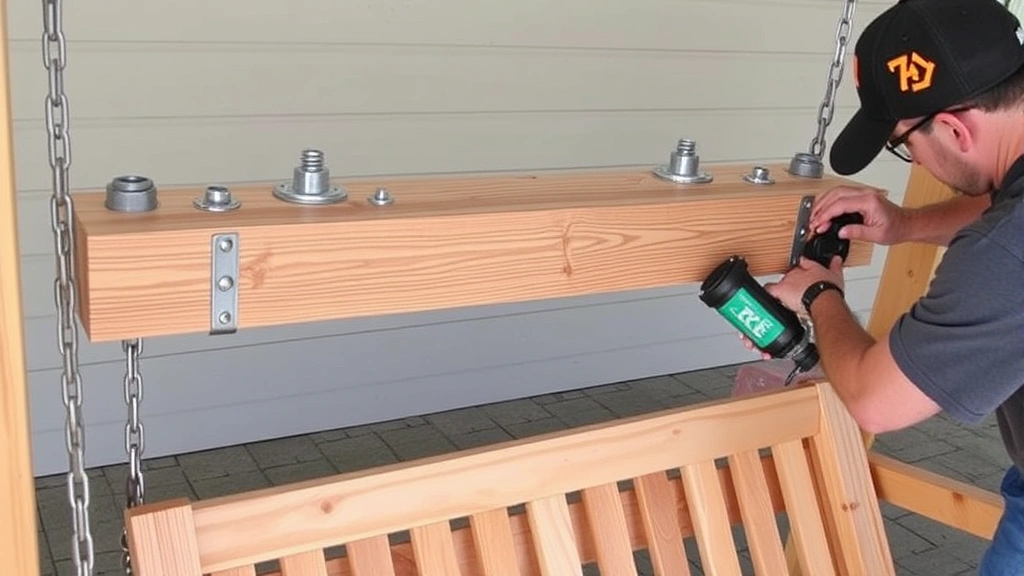
This is where many DIY projects fail. Your porch structure must be engineered to handle hanging loads safely. Before installation, inspect your porch ceiling or beam structure. Look for the porch’s main support beams—these are typically 4×6, 4×8, or larger members running perpendicular to your house.
The mounting point must attach directly to a structural beam, never to drywall, thin plywood, or decorative elements. Locate the beam using a stud finder designed for deep penetration, or drill exploratory holes to confirm solid wood. The beam should be at least 4 inches thick and composed of solid wood or engineered lumber rated for outdoor exposure.
Install lag bolts directly into the beam at an angle slightly upward—about 15 degrees from horizontal—to maximize holding power. Drill pilot holes precisely sized to the bolt diameter, then install bolts with large diameter washers. Tighten securely but avoid over-tightening, which can crack the wood or strip threads.
Attach eye bolts to the lag bolts using stainless steel bolts and lock washers. This creates a two-stage connection: the lag bolt anchors to the structure, and the eye bolt provides the attachment point for chains. Space the eye bolts 36-42 inches apart horizontally to distribute loads evenly and prevent the swing from tilting.
Connect galvanized chains from the eye bolts to the swing frame using additional eye bolts installed in the reinforced cross-braces beneath the seat. Ensure chain length allows 18-24 inches of clearance between the lowest point of the seat and any obstructions below. Adjust chain length equally on both sides to keep the swing level when unoccupied.
Test the installation before allowing full occupancy. Apply gradually increasing weight, observing for any movement, creaking, or unusual sounds. Check all bolts after the first week of use and monthly thereafter for the first season, as wood movement can loosen connections.
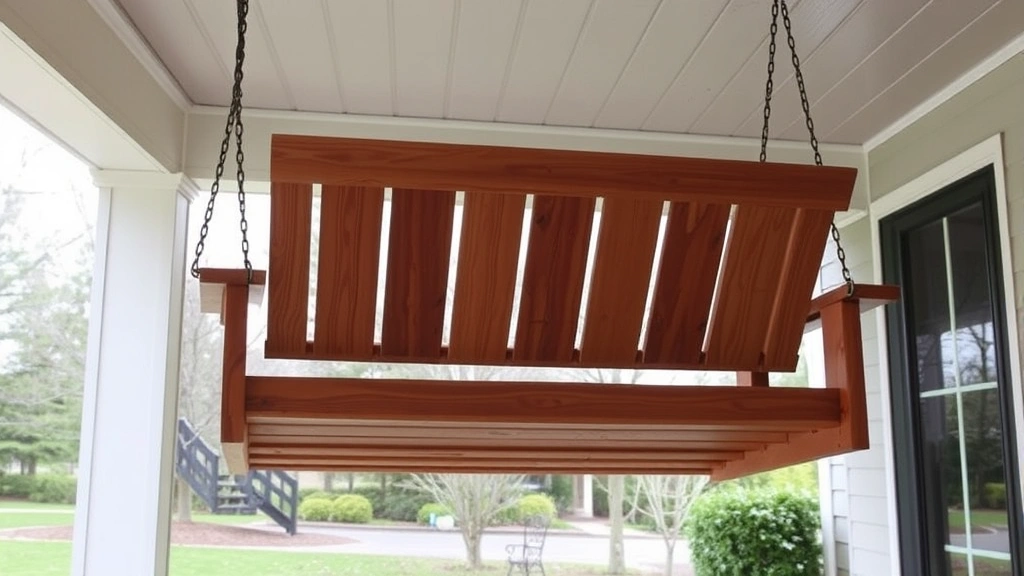
Finishing and Weatherproofing
Raw wood exposed to outdoor elements deteriorates rapidly. A quality finish protects your investment and maintains appearance for years. For a porch swing, you have several options: exterior paint, semi-transparent stain, or clear sealers. Each offers different aesthetics and protection levels.
Semi-transparent exterior stain provides excellent protection while showcasing the wood’s natural grain. Apply at least two coats, following the manufacturer’s drying time recommendations. Stain penetrates wood fibers, providing UV protection and water resistance without creating a surface film that can peel or flake.
Alternatively, exterior paint offers maximum protection and color options but requires more frequent maintenance—typically every 2-3 years versus 3-5 years for quality stain. If you choose paint, use 100% acrylic latex formulated for exterior wood, which offers superior flexibility and adhesion compared to oil-based paints.
Clear sealers preserve the wood’s natural appearance but provide the least UV protection. They work best for covered porches where the swing receives minimal direct sunlight. Reapply clear sealers annually or biannually to maintain water repellency.
Before finishing, ensure all wood is clean and dry. Pressure wash if necessary—using 1,500 PSI or less to avoid damaging the wood surface—and allow 48 hours drying time. Fill any gaps between boards with exterior-grade caulk, which remains flexible as wood expands and contracts seasonally.
Apply finish to all surfaces, including the underside and interior corners where moisture accumulates. Don’t skip hidden areas; they’re where decay begins. After finishing, allow full cure time per manufacturer specifications before occupying the swing—typically 7-14 days for stain or paint.
Consider how your swing relates to your overall home security and outdoor living space. A well-finished swing becomes an architectural feature that enhances curb appeal while providing functional outdoor furniture. If you’re tackling other home improvement projects, review our guide on basement finishing and other structural projects to understand broader building principles.
FAQ
How long does it take to build a porch swing?
A typical porch swing project requires 20-30 hours spread across 2-4 weeks, accounting for material curing and finishing time. Actual construction takes 10-15 hours if you’re experienced with woodworking. Inexperienced builders should allocate additional time for planning, measuring, and troubleshooting.
What wood species is best for outdoor porch swings?
Cedar, redwood, and tropical hardwoods like cumaru or ipe offer superior outdoor durability. Cedar provides the best balance of workability, appearance, and affordability. Avoid softwoods like pine or spruce for primary structural components, as they deteriorate rapidly outdoors despite treatment.
How much weight can a properly built porch swing support?
A well-constructed swing with proper hardware and installation can safely support 500-750 pounds, depending on frame design and attachment quality. Always design conservatively with a 4:1 safety factor minimum. Never exceed manufacturer ratings for chains, bolts, or hardware components.
Can I build a porch swing if my porch ceiling is metal or composite?
Metal porch ceilings can work if they’re structural members (not decorative panels). Composite materials typically aren’t suitable for swing attachment unless specifically engineered for hanging loads. Consult a structural engineer if you’re uncertain about your porch’s construction.
How often should I maintain my porch swing?
Inspect monthly for loose bolts, corrosion, or wood damage. Check hardware connections seasonally, especially before heavy use periods. Reapply finish every 2-5 years depending on climate exposure and finish type. Replace chains or hardware showing corrosion or damage immediately.
What’s the difference between indoor and outdoor wood sealers?
Outdoor sealers contain UV inhibitors and flexible resins designed to expand and contract with seasonal wood movement. Indoor sealers lack these additives and fail quickly when exposed to sunlight and moisture. Always use exterior-grade products for outdoor applications, even if indoor sealers seem cheaper initially.
Should I use pressure-treated wood for my porch swing?
Pressure-treated lumber works well for hidden structural supports but avoid it for surfaces where people make direct contact. Chemical treatments can leach onto skin, especially in warm weather. Use natural rot-resistant species like cedar for visible components instead.


