
How to Build a Deck: Expert Tips Inside
Building a deck transforms your outdoor space into a functional entertainment area while adding significant value to your home. Whether you’re a seasoned DIY enthusiast or tackling your first major project, constructing a deck requires careful planning, proper materials, and adherence to local building codes. This comprehensive guide walks you through every step of the deck-building process, from initial design and permit requirements to final finishing touches.
A well-built deck can last 15-20 years or more with proper maintenance. However, rushing through the planning phase or skipping critical steps like frost line depth calculations and proper fastening techniques can lead to costly repairs, safety hazards, and structural failure. This guide emphasizes best practices endorsed by the International Building Code (ICC) and the American Wood Council to ensure your deck meets all safety and durability standards.
Understanding Local Building Codes and Permits
Before purchasing a single board, consult your local building department about deck construction requirements. Most jurisdictions require permits for decks larger than 200 square feet or elevated more than 30 inches above ground. Building codes specify critical safety parameters including post spacing, joist sizing, railing height, and load capacity calculations.
Your local code will dictate frost line depth—the depth below ground where soil doesn’t freeze. Post footings must extend below this line to prevent frost heave, which can lift and destabilize your structure. Frost line depths vary dramatically by climate, ranging from zero inches in warm regions to 48+ inches in northern states. The Building Codes Forum provides regional specifications and interpretation guidelines.
Permits typically require detailed plans showing dimensions, material specifications, and structural calculations. Many building departments offer pre-approved deck plans or can recommend structural engineers for complex designs. Obtaining permits before construction protects you legally, ensures your deck meets safety standards, and prevents costly violations during inspection phases.
Planning Your Deck Design and Layout
Start by determining your deck’s primary purpose—entertaining, dining, or relaxation—as this influences size and layout decisions. Most residential decks range from 200-500 square feet, though custom designs vary widely. Sketch your design to scale, noting the house attachment point, existing trees or obstacles, and sun exposure patterns.
Calculate load capacity requirements based on intended use. Standard residential decks must support 40 pounds per square foot of live load plus 10 pounds per square foot of dead load (the deck’s own weight). Commercial or high-use decks require higher capacity. Working with DIY beginner woodworking projects principles helps you understand wood properties and fastening mechanics essential for deck construction.
Consider deck height carefully. Ground-level decks (under 30 inches) typically require minimal railing. Elevated decks need sturdy railings, properly spaced balusters, and accessible stairs. Deck height also affects post footing depth requirements and material selection—elevated decks demand pressure-treated lumber or composite materials resistant to moisture damage.
Site orientation matters significantly. South-facing decks receive maximum sun exposure, which can cause wood expansion and discoloration. North-facing decks stay cooler but may develop mold or mildew in humid climates. East or west exposure offers moderate sun with acceptable temperature swings. Plan shade structures like pergolas or umbrellas if you anticipate excessive heat.
Gathering Materials and Tools
Deck construction requires substantial material investment. Standard pressure-treated lumber costs $0.50-$1.50 per linear foot, while cedar or composite alternatives range from $1.50-$4.00 per linear foot. Calculate total linear footage by multiplying joist spacing requirements by total deck length, then add beam and rim joist dimensions plus 10-15% waste factor.
Essential materials include pressure-treated posts (typically 6×6 or 4×4), pressure-treated or naturally rot-resistant beams, pressure-treated joists (2×8, 2×10, or 2×12 depending on span), decking boards, galvanized or stainless steel fasteners, concrete for footings, and railing components. Avoid mixing fastener materials—galvanized nails in pressure-treated lumber can corrode and fail.
Critical tools include a circular saw, drill-driver, level (preferably 4-6 feet), tape measure, square, post hole digger or auger, and safety equipment (gloves, glasses, dust mask). Rental equipment like power augers makes post hole excavation significantly easier, particularly for larger decks or hard soil conditions. Invest in quality levels—deck levelness directly impacts drainage and longevity.
Material selection profoundly affects deck lifespan and maintenance requirements. Pressure-treated lumber offers affordability but requires regular staining every 2-3 years. Composite materials (wood-plastic blends) cost more upfront but eliminate painting and resist rot, mold, and insect damage. Cedar provides natural beauty but demands annual sealing. Tropical hardwoods like Cumaru or Ipe offer exceptional durability but present environmental concerns and installation challenges.
Preparing the Foundation and Posts
Proper foundation installation is absolutely critical—inadequate footings cause more deck failures than any other factor. Mark post locations using string lines and the 3-4-5 triangle method to ensure square corners. Typically, posts space 8-12 feet apart depending on beam size and load calculations, though local codes may specify different spacing.
Excavate post holes to frost line depth, extending at least 12 inches below this critical measurement. Holes should be 12 inches in diameter for standard 6×6 posts. Remove loose soil from hole bottoms and add 4-6 inches of gravel for drainage. Never set posts directly in soil—moisture infiltration causes rapid rot regardless of lumber treatment.
Install concrete footings using either pre-formed cardboard tubes or on-grade concrete pads. Pour concrete into holes, then insert post bases or J-bolts before concrete cures. Post bases (metal brackets bolted to concrete) keep wood posts elevated and prevent moisture wicking. This single component dramatically extends post life by preventing ground contact that causes decay.
Set posts plumb (perfectly vertical) using a level, then brace them temporarily with 2×4 stakes. Concrete requires 48-72 hours to cure before removing braces. Verify all posts are exactly level at the top—use a laser level for large decks to establish accurate reference heights. Posts must be exactly perpendicular to the ground; even slight angles create uneven loading that stresses connections.
Cut posts to final height only after all concrete has fully cured. Standard deck height from ground to decking surface is 8-12 inches, though this varies by preference and local conditions. Account for beam thickness when calculating final post height—typically 1.5 inches for dimension lumber.
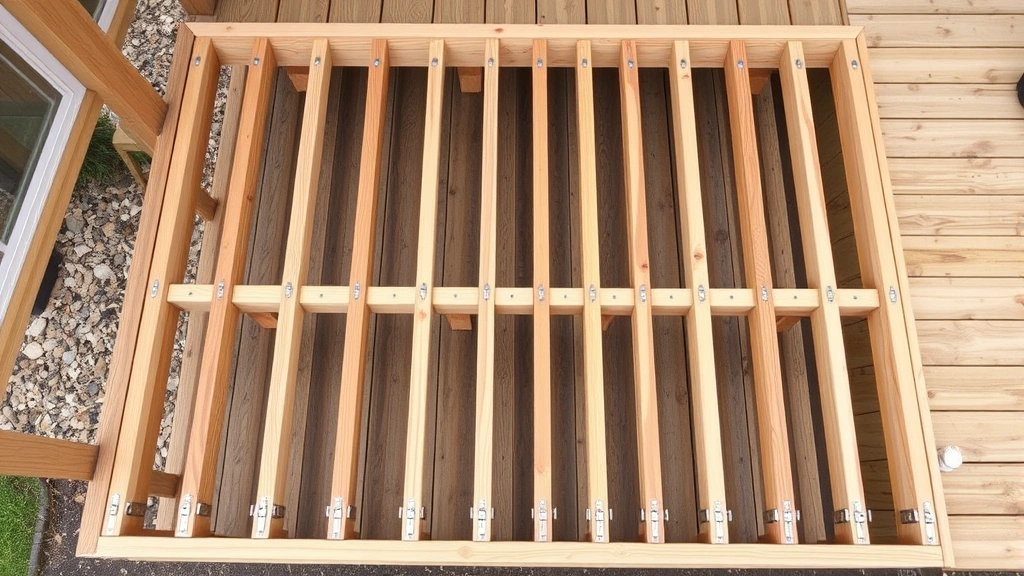
Installing the Frame and Joists
The frame consists of beams running perpendicular to the house and rim joists connecting posts around the deck perimeter. Install beams on top of posts using galvanized or stainless steel brackets rated for your deck’s load capacity. Double-check beam levelness before securing—this ensures proper drainage and prevents sagging.
Rim joists attach to the house band board using lag screws or bolts spaced 16 inches apart, extending through rim joists into solid framing members. Never attach decks directly to siding—remove siding and attach to the band board (the rim joist of the house). Improper attachment causes deck separation during heavy use or winter freeze-thaw cycles.
Install field joists (joists running perpendicular to beams) using galvanized joist hangers. Joist spacing typically follows 16-inch on-center standards, though 12-inch spacing increases load capacity and reduces deflection. Calculate joist size using span tables provided by the American Wood Council—undersized joists sag and create safety hazards.
Ensure all joists run parallel and level before fastening. Use a string line to check for crowning (natural bow in lumber). Position joists with crowns facing upward—loads cause slight sagging that counteracts the crown, leaving the deck level. Nail or screw joists to beams using three fasteners per connection, spacing them appropriately to avoid splitting.
Install blocking (short pieces of joist material) between joists every 4 feet for joists exceeding 12 feet in length. Blocking prevents joist rotation and lateral movement, significantly increasing structural rigidity. Secure blocking with fasteners driven at angles to maximize holding power—this technique is called toe-nailing.
Adding Decking Boards
Decking board selection impacts both aesthetics and maintenance requirements. Standard pressure-treated 2×6 boards cost less but require regular staining. Composite boards resist staining but can be slippery when wet. Tropical hardwoods offer exceptional durability but demand specialized tools and fasteners.
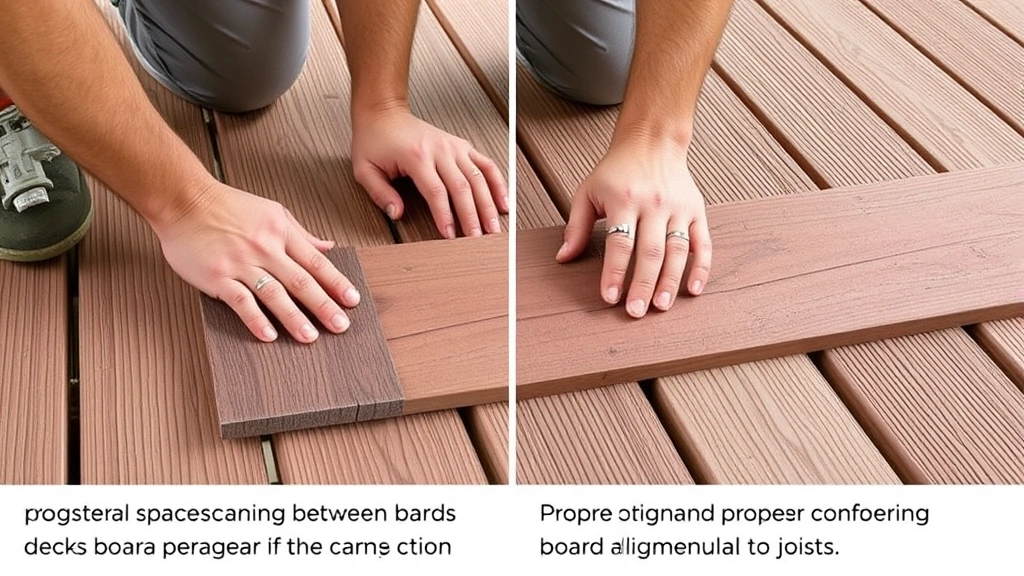
Space decking boards 1/8 inch apart to allow water drainage and wood expansion. Boards expand and contract with moisture content changes—insufficient spacing causes buckling and cupping. Use spacers during installation to maintain consistent gaps. Avoid tight spacing that traps water and promotes rot.
Run boards perpendicular to joists, starting from the house and working outward. Stagger board ends over joists rather than allowing them to align—this distributes stress and prevents weak points. Cut boards at consistent angles where they meet railings or obstacles, maintaining clean lines and professional appearance.
Secure boards with galvanized or stainless steel fasteners driven through boards into joists. Standard practice uses two fasteners per joist per board, positioned about 1.5 inches from board edges to prevent splitting. Predrill fastener holes in hardwoods to prevent splitting and make installation easier.
Consider fastening methods carefully. Ring-shank nails provide excellent holding power but are difficult to remove. Deck screws offer easier removal for repairs but cost more. Some builders use hidden fastening systems that attach boards from underneath, creating clean top surfaces without visible fastener heads. These systems cost significantly more but produce superior aesthetics.
Building Railings and Stairs
Deck railings serve critical safety functions—they prevent falls and contain children and pets. Building codes mandate railings for decks elevated more than 30 inches above grade. Standard railing height is 36-42 inches measured from the deck surface, though local codes may vary.
Railing balusters (vertical members) must space no more than 4 inches apart—test with a 4-inch sphere to ensure compliance. This prevents small children from becoming trapped or passing through. Horizontal rail spacing should also prevent 4-inch sphere passage. Railing systems must withstand 200 pounds of horizontal force applied at any point.
Install stairs for elevated decks using 7-8 inch rise and 10-11 inch tread depth—these standard dimensions ensure safe, comfortable stepping. Calculate total rise (vertical distance from grade to deck) and divide by 7.5 inches to determine required steps. Stairs must include handrails on at least one side for decks 4 or more steps high.
Stair stringers (angled support members) should be 2×10 or 2×12 lumber with treads and risers properly fastened. Stringers require three support points minimum—attach to the deck frame at top and anchor to concrete pads at the bottom. Stairs must be at least 36 inches wide for safe passage and emergency egress.
Build railings using pressure-treated lumber, composite materials, or metal systems. Composite railings resist weathering and require minimal maintenance. Metal railings (aluminum or steel) offer modern aesthetics and durability. Ensure all railing components are securely fastened using appropriate fasteners rated for outdoor exposure.
Finishing and Maintenance
New pressure-treated lumber requires 3-6 months to weather before staining or sealing. This allows excess moisture to escape. Premature staining traps moisture and can cause finish failure. Once weathered, apply quality exterior stain every 2-3 years to maintain appearance and protect wood from UV damage and moisture.
Composite decks require less maintenance but still benefit from annual cleaning to prevent mold and mildew growth. Pressure wash at low pressure (below 1500 PSI) to avoid surface damage. Use appropriate cleaners designed for your specific composite material to avoid discoloration.
Inspect your deck annually for structural issues. Check for soft spots indicating rot, loose fasteners, or separated connections. Probe suspected rot areas with a screwdriver—sound wood resists penetration while rotted wood compresses easily. Replace damaged boards or components immediately to prevent structural compromise.
Winter maintenance varies by climate. In snow regions, remove snow and ice promptly to prevent damage and dangerous conditions. Avoid salt-based ice melt products that accelerate corrosion of fasteners and concrete. In warmer climates, monitor for termite damage and treat as necessary using appropriate pest control methods.
Consider your deck’s long-term maintenance requirements during material selection. Pressure-treated lumber demands regular staining but offers affordability and repairability. Composite materials eliminate staining but cost more initially. Budget for maintenance—a well-maintained deck provides decades of enjoyment, while neglected decks deteriorate rapidly and become safety hazards.
For related projects that complement deck construction, explore DIY house painting techniques for finishing adjacent structures or DIY home security installation to protect your outdoor living space. Understanding comprehensive home improvement principles from the DIY Nests Hub Blog helps you approach multiple projects confidently.
Frequently Asked Questions
What size deck do I need?
Standard residential decks range from 200-500 square feet. A 12×16 foot deck (192 square feet) accommodates a dining table and provides circulation space. Larger decks (16×20 feet or bigger) support multiple entertainment zones. Consider your entertaining style and available yard space when determining size. Oversized decks dominate small yards, while undersized decks feel cramped during gatherings.
How deep should deck footings be?
Footings must extend below your local frost line depth. Check with your building department for your specific region—frost lines range from zero inches in warm climates to 48+ inches in northern states. Posts set above frost line heave upward during winter freeze-thaw cycles, causing structural failure and safety hazards. Never compromise on footing depth regardless of construction convenience.
Can I attach a deck directly to my house?
Yes, but only by properly fastening the rim joist to the house band board using lag screws or bolts spaced 16 inches apart. Remove siding to access solid framing. Never attach through siding—this creates gaps that allow water infiltration and eventual structural failure. Improper attachment causes deck separation, a common failure mode in older decks.
What’s the best deck material?
Material selection depends on budget, maintenance tolerance, and aesthetics. Pressure-treated lumber costs least but requires regular staining. Cedar provides natural beauty but demands annual sealing. Composite materials resist rot and mold but cost more upfront. Tropical hardwoods offer exceptional durability but present environmental concerns. Consider long-term maintenance costs when comparing initial material prices.
How often should I seal my deck?
Pressure-treated lumber typically requires sealing every 2-3 years after initial weathering. Cedar demands annual sealing to prevent graying and maintain appearance. Composite materials require minimal sealing but benefit from annual cleaning. Climate conditions affect sealing frequency—hot, sunny regions may require more frequent applications than cooler areas. Monitor your deck’s appearance and seal when water no longer beads on the surface.
Do I need a permit for my deck?
Most jurisdictions require permits for decks larger than 200 square feet or elevated more than 30 inches. Permits ensure your deck meets safety codes, structural standards, and local requirements. Unpermitted decks create liability issues, complicate property sales, and may require removal. Always consult your local building department before construction—permit costs are minimal compared to remediation expenses.
What’s the maximum joist span without support?
Maximum joist span depends on joist size, species, and load requirements. Standard 2×8 joists typically span 12-14 feet, while 2×10 joists span 16-18 feet. Consult span tables from the American Wood Council or your local building department for exact specifications. Undersized joists create sagging decks and potential safety hazards. When in doubt, use larger joists or reduce spacing—this prevents problems.


