Build a Wood Deck? Contractor-Backed Advice for DIY Success
Building a wood deck is one of the most rewarding outdoor projects a homeowner can undertake. Unlike Noah’s legendary ark construction—which biblical scholars estimate took approximately 120 years—your deck project will be completed in weeks, not centuries. Whether you’re a seasoned DIY enthusiast or tackling your first major home improvement, understanding the fundamentals of deck construction ensures safety, durability, and long-term satisfaction with your investment.
A well-built wood deck transforms your outdoor living space into an entertainment hub while potentially increasing your home’s resale value. However, success requires more than enthusiasm; it demands proper planning, quality materials, precise measurements, and adherence to local building codes. This comprehensive guide draws on contractor expertise and proven construction methods to walk you through every phase of deck building, from initial design through final finishing touches.
Understanding Deck Fundamentals and Local Requirements
Before you purchase a single board or dig the first post hole, familiarize yourself with local building codes and permit requirements. Every municipality has specific regulations governing deck construction, including setback distances from property lines, railing height specifications, and load-bearing capacity standards. The International Code Council (ICC) establishes the International Building Code (IBC), which most jurisdictions adopt or adapt for their own standards.
Obtaining a building permit isn’t just bureaucratic red tape—it protects you legally and ensures your deck meets safety standards. A professional inspector will verify that your construction meets frost line requirements (typically 3-4 feet deep in northern climates), proper post spacing, and adequate railing specifications. Most jurisdictions require permits for decks over 200 square feet or any deck structure more than 30 inches above grade.
Understanding frost heave—the upward movement of soil caused by freezing and thawing cycles—is critical for long-term deck stability. Posts must reach below the frost line to prevent shifting that can compromise structural integrity. This is why your deck’s longevity depends heavily on proper foundation work, which we’ll explore in detail later.
Planning Your Deck Design and Layout
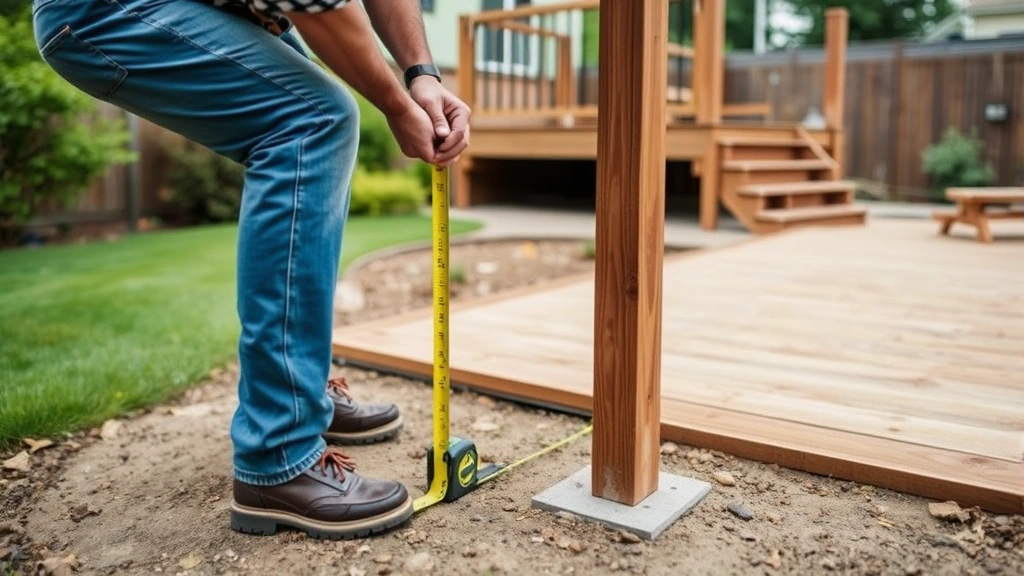
Successful deck projects begin with thorough planning and accurate measurements. Start by determining your deck’s purpose: entertaining large groups, creating an intimate seating area, or providing a transition space between indoors and outdoors. Your intended use dictates size, shape, and necessary features like built-in benches or shade structures.
Create detailed drawings showing your deck’s dimensions, joist placement, post locations, and any special features. Graph paper or free online deck design tools help visualize layouts before construction begins. Consider your home’s architecture and landscape when selecting deck height and placement. A deck that sits too high creates an awkward transition and requires extensive stairs; too low and you’ll have drainage issues around your foundation.
Mark your deck’s footprint with stakes and string, then verify measurements twice. Check for underground utilities—call your local utility locating service before digging—and identify any obstacles like trees or slope changes. The Call 811 national utility locating service provides free marking of underground cables and pipes, preventing dangerous and expensive mistakes.
Calculate your deck’s total load-bearing capacity based on the number of posts and joist sizing. Most residential decks are designed for a 40-pound-per-square-foot live load plus 10 pounds per square foot for dead load (the deck’s own weight). Contractors often exceed these minimums for safety margins and longevity.
When planning your layout, consider traffic patterns and sightlines from your home’s main living areas. A well-positioned deck feels like a natural extension of your house rather than an afterthought. Think about seasonal sun exposure—shade in summer and sun in winter might be ideal in many climates.
Materials Selection and Quality Considerations
Choosing the right materials is fundamental to deck longevity and performance. Pressure-treated lumber remains the most economical option for structural components (posts, beams, joists), while decking boards can be pressure-treated lumber, cedar, composite, or exotic hardwoods depending on your budget and maintenance preferences.
Pressure-treated lumber undergoes chemical treatment to resist decay and insect damage. Modern treatments (since 2004) use copper-based compounds that are safer than older arsenic-based formulations. Always verify that lumber meets American Wood Protection Association (AWPA) standards for your climate zone. Contractors prefer lumber graded for ground contact when building posts and structural elements.
Cedar and redwood offer natural beauty and rot resistance but require more maintenance than pressure-treated options. These premium woods cost significantly more and need regular sealing or staining to maintain appearance and protection. If you select these materials, budget for bi-annual maintenance to prevent weathering and decay.
Composite decking—made from wood fibers and plastic polymers—eliminates the need for staining or sealing, though initial costs run 2-3 times higher than pressure-treated lumber. Composites resist rot, insects, and fading but can be slippery when wet and may feel warmer underfoot in direct sunlight. Many contractors recommend composite for decking boards paired with pressure-treated structural framing for optimal cost-benefit.
For fasteners, use stainless steel or hot-dipped galvanized hardware that resists corrosion. Standard steel fasteners will rust and stain your deck within months. Invest in quality deck screws rather than nails—screws resist withdrawal better and won’t pop out as the wood shrinks and swells with seasonal moisture changes.
Foundation and Post Installation
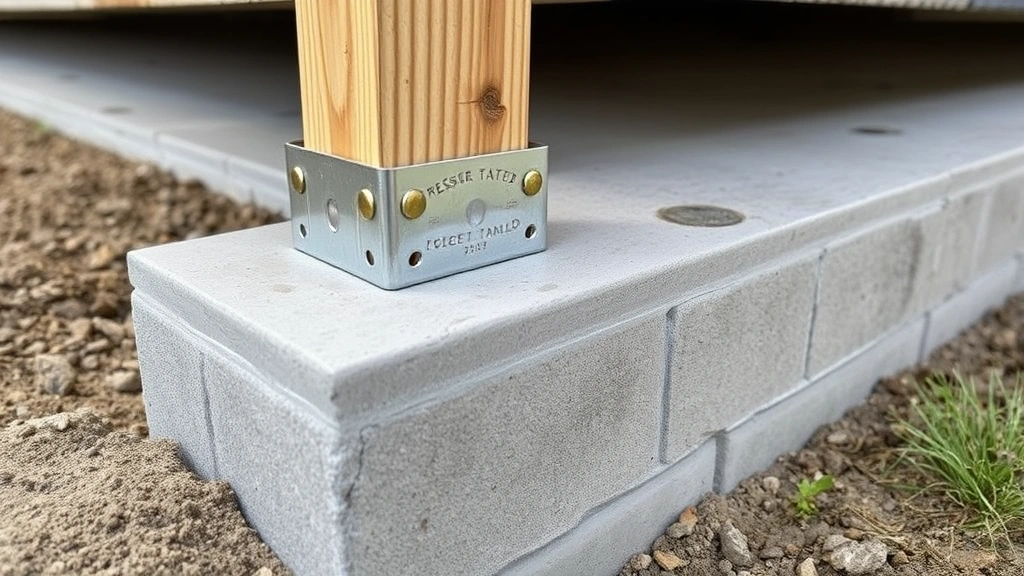
The foundation determines your deck’s structural integrity and lifespan. Posts must rest on solid footings that extend below the frost line—typically 3-4 feet deep in northern climates, 12-18 inches in milder regions. Contractors dig holes slightly deeper than the frost line, then backfill with gravel for drainage.
Post footings can be concrete piers set directly in the ground or concrete-filled post holes. The most durable method involves setting posts in concrete footings with galvanized post bases that elevate the wood slightly above soil contact. This critical detail prevents moisture wicking that leads to rot at the post base—the most common failure point in residential decks.
Space posts according to your joist span and local building codes, typically 8-12 feet apart for residential decks. Use a transit or laser level to ensure all posts sit at the exact same height before cutting them to final length. Uneven posts create unlevel decks that drain poorly and look unprofessional.
Install posts vertically—even slight tilts compound over time and stress connections. Use temporary bracing to hold posts plumb while you set concrete. Many contractors use adjustable post bases that allow fine-tuning of height and angle before final tightening.
The connection between posts and footings is critical. Use structural post bases rated for your deck’s load and fastened with stainless steel bolts or galvanized fasteners. Never rely on concrete alone to hold posts—mechanical fasteners provide the connection strength needed for long-term stability.
Building the Deck Frame and Joists
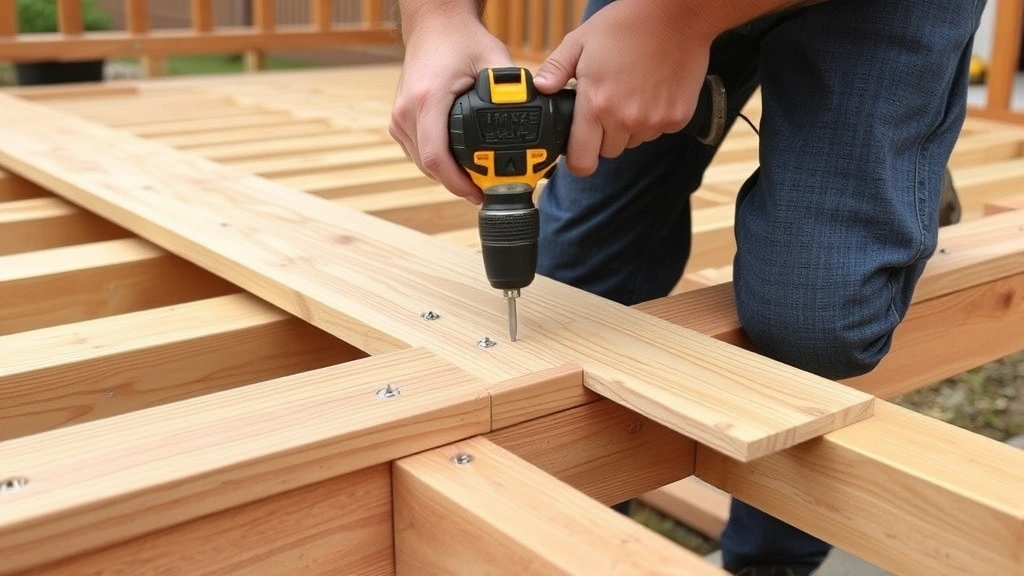
Once posts are set and concrete cured (typically 48 hours), install your beam and joist system. Beams sit on top of posts and support the joists that hold your decking boards. Joist spacing—typically 16 inches on center for residential decks—is determined by joist size, wood species, and local building codes.
Use galvanized joist hangers to connect joists to beams, ensuring connections meet code requirements for load transfer. Never rely on nails alone; use the fasteners specified by the joist hanger manufacturer. Contractors often use deck screws in addition to nails for redundancy and to prevent fastener withdrawal as wood shrinks.
Ensure proper slope for water drainage—at least 1/8 inch per foot of slope toward the yard so water runs off rather than pooling on your deck. This seemingly minor detail prevents water accumulation that accelerates rot and creates slippery surfaces.
Cantilever (extending joists beyond the beam) is acceptable for residential decks but limited by code, typically to 1/4 of the joist span. Never exceed local requirements for cantilever, as excessive overhang stresses connections and risks collapse.
Install rim joists around the deck’s perimeter and any interior beams. These perimeter boards close off the space beneath the deck and provide lateral bracing for the joist system. Properly installed rim joists prevent racking (lateral shifting) that compromises structural integrity.
Before installing decking boards, verify that your joist system is level and properly spaced. Walk the deck and listen for squeaking—this indicates movement between joists or fasteners, which you should address before proceeding. A solid, quiet frame is a properly built frame.
Installing Decking Boards and Railings
Decking board installation is where your deck’s appearance and functionality come together. Start by snapping chalk lines to ensure straight, evenly-spaced boards. Use spacers (typically 1/8 inch for wood to allow for seasonal expansion) between boards to maintain consistent gaps.
Lay out boards from the house outward, adjusting board width and spacing so the last board isn’t too narrow. Contractors often sacrifice one board’s width to avoid unsightly narrow boards at the deck’s edge. Plan your layout before fastening anything.
Secure boards with at least two fasteners per joist—typically galvanized screws driven perpendicular through the board into the joist. Avoid driving fasteners near board edges, which can cause splitting. Space fasteners about 1 inch from edges and 8-12 inches from each other along the joist.
Stagger end joints (the places where boards end) so they don’t align over the same joist, which creates weak points. Ensure end joints occur on joists, never between them. This distributes load more evenly and prevents board sagging.
Railings must meet code requirements—typically 36 inches high, able to resist a 200-pound horizontal force, and with balusters spaced so a 4-inch sphere can’t pass through (preventing child entrapment). Railings are non-negotiable safety features; don’t skip or compromise on these specifications.
Install posts for railings securely into the deck frame, not just into decking boards. Railing posts must be bolted to rim joists or beams to handle the lateral forces they’ll experience. Use galvanized lag bolts or through-bolts, never fasteners that rely solely on surface contact.
Choose between traditional vertical balusters, horizontal cable systems, or composite panels for railing infill. Each offers different aesthetics and requires different installation methods, but all must meet spacing requirements and handle the specified lateral load.
Finishing and Maintenance
After your deck structure is complete, finishing protects your investment and enhances appearance. If you used pressure-treated lumber or composite materials, allow 3-6 months before applying finish coatings, as fresh pressure-treated wood contains excess moisture that prevents proper adhesion of stains and sealers.
For wood decks, apply a quality deck stain and sealer rated for exterior use. Transparent stains show wood grain while providing UV protection; semi-transparent stains offer more color while allowing some wood visibility. Solid stains cover wood color entirely but may hide wood defects and require more frequent reapplication.
Contractors recommend applying finish in dry conditions (below 85°F and above 50°F) to ensure proper curing. Follow manufacturer instructions for application, drying time, and reapplication schedules. Most quality finishes require reapplication every 2-3 years depending on climate and foot traffic.
Regular maintenance extends deck life significantly. Sweep debris regularly to prevent moisture accumulation and organic growth. Clean mold and mildew with a deck cleaner appropriate for your wood type—never use bleach on cedar or redwood, as it can damage the wood. Pressure washing can be effective but risks driving water into the wood if done improperly; use low pressure (under 1500 PSI) if necessary.
Inspect your deck annually for signs of damage: soft spots indicating rot, loose fasteners, cracked boards, or damaged railings. Address problems promptly before they compromise structural integrity. Replace damaged boards immediately and tighten any loose fasteners.
For composite decks, maintenance is minimal but still necessary. Clean with mild soap and water, and address mold or mildew with appropriate cleaners. Composite doesn’t require staining or sealing but benefits from occasional cleaning to maintain appearance.
Your DIY Nests Hub Blog offers additional resources for maintaining your outdoor spaces. Consider exploring DIY beginner woodworking projects to develop skills applicable to deck maintenance and repairs. If you’re planning additional outdoor improvements, our guide to DIY house painting covers exterior finishes that coordinate beautifully with deck construction.
FAQ
How long does it take to build a wood deck?
A typical 16×12-foot deck takes 3-5 weeks for an experienced DIYer working weekends, or 1-2 weeks for a professional contractor. This timeline assumes permits are obtained, materials are on-site, and weather cooperates. Complex designs or difficult sites extend the timeline considerably.
Do I need a building permit for my deck?
Most jurisdictions require permits for decks over 200 square feet or any structure more than 30 inches above grade. Check with your local building department—permits exist to protect you and ensure code compliance. Unpermitted work can affect insurance claims and property resale.
What’s the best wood for a deck?
Pressure-treated lumber offers the best value for structural components. For decking boards, consider your budget and maintenance willingness: pressure-treated is economical, cedar/redwood offers beauty but needs maintenance, and composite eliminates maintenance but costs more upfront.
How deep should deck posts be?
Posts must reach below your area’s frost line, typically 3-4 feet in northern climates and 12-18 inches in mild regions. Check with your local building department for your specific frost line depth. Inadequate depth leads to frost heave that destabilizes your deck.
Can I build a deck myself, or do I need professionals?
Many homeowners successfully build decks themselves with proper planning and research. However, foundation work, electrical considerations, and complex designs may warrant professional help. Start with a simple design and build your skills; your safety depends on following code requirements precisely.
How often should I seal my deck?
Most wood decks need resealing every 2-3 years depending on climate, foot traffic, and finish quality. Inspect your deck annually; if water no longer beads on the surface, it’s time to reseal. Composite decks typically don’t require sealing but benefit from occasional cleaning.
What causes deck boards to rot?
Rot results from moisture exposure combined with poor air circulation and warm temperatures. Inadequate slope, clogged drainage beneath the deck, and poor post-to-footing connections create conditions that accelerate decay. Proper drainage and ventilation prevent most rot issues.


