How to Build a Shed: Expert-Approved Timeline
Building a shed is one of the most rewarding DIY projects you can undertake, combining practical carpentry skills with the satisfaction of creating a functional outdoor space. Whether you’re planning a small 8×10 storage shed or a larger workshop, understanding the complete timeline is essential for successful project planning. Most homeowners can complete a basic shed in 2-4 weeks, though this varies significantly based on size, complexity, weather conditions, and your experience level.
The shed construction process involves multiple phases, each with specific time requirements and dependencies. From initial site preparation through final finishing touches, proper planning ensures you won’t face unexpected delays. This guide breaks down every stage of shed building, providing realistic timelines that account for material drying times, weather considerations, and the seasonal impact on construction schedules. Understanding how external factors like how long does it take for snow to melt and other climate variables affect your project timeline helps you choose the optimal building season.
Pre-Construction Planning and Permits
Before breaking ground on your shed project, allocate 1-2 weeks for planning and obtaining necessary permits. This foundational phase determines your entire project’s success and prevents costly mistakes down the line. Start by checking local International Building Code (ICC) requirements and your municipality’s zoning regulations, as many areas require permits for structures exceeding 100-200 square feet.
During this phase, you’ll need to:
- Measure and mark your building site accurately
- Verify property lines and setback requirements
- Contact utility locating services to mark underground lines
- Obtain required building permits and inspections
- Gather detailed plans or purchase shed plans
- Create a material list and budget
The permitting process varies dramatically by location—some areas process permits in 3-5 business days, while others may take 2-3 weeks. Contact your local building department or National Association of Home Builders (NAHB) chapter early to understand specific requirements. Many shed builders underestimate this phase, so adding buffer time prevents frustration. Having permits approved before purchasing materials ensures you’re building to code and protects your property investment.
Site Preparation Phase
Plan 3-7 days for site preparation, depending on your lot’s current condition. This phase involves clearing vegetation, leveling ground, and establishing proper drainage—all critical for long-term shed durability. A properly prepared site prevents foundation settling, water damage, and structural problems that cost far more to fix than prevention.
Key preparation tasks include:
- Remove vegetation, rocks, and debris from the building area
- Mark the exact footprint using string and stakes
- Excavate and level the ground to within 1-2 inches
- Improve drainage by sloping ground away from the structure
- Compact soil to prevent settling
- Install landscape fabric to prevent weed growth
If your site has significant slope or poor drainage, allocate additional time for grading work. Heavy clay soils may require professional equipment rental, adding 1-2 days. Seasonal factors significantly impact this phase—working in wet conditions extends timelines considerably. If you’re building during spring thaw or rainy seasons, the soil may be too saturated for proper compaction. This is where understanding how long does it take for snow to melt in your region helps schedule your project during optimal ground conditions. Generally, wait 2-3 weeks after snow melt before beginning site work in northern climates to ensure adequate soil drainage.
Foundation Installation
Allocate 2-4 weeks for foundation work, including material delivery, installation, and curing time. Your foundation choice dramatically affects this timeline and overall project success. The three most common shed foundations are concrete piers, concrete slab, and treated skids, each with different time requirements.
Concrete Pier Foundations (5-7 days active work + 7 days curing): This popular option involves digging holes 3-4 feet deep below frost line, adding gravel base, and setting concrete piers. The concrete requires 7 days to cure properly before frame installation. This method works well for most climates and provides excellent drainage. Plan for excavation (1-2 days), gravel preparation (1 day), concrete pouring (1 day), and curing (7 days minimum).
Concrete Slab Foundations (3-5 days active work + 10-14 days curing): A monolithic slab provides excellent durability and weather resistance but requires longer curing time. Excavate 4-6 inches, add gravel base, install forms, pour concrete, and finish the surface. Full curing requires 10-14 days before frame installation. This option works best in stable climates and requires proper slope for drainage.
Treated Skid Foundations (1-2 days): For small sheds, pressure-treated timber skids offer quick installation with minimal curing time. Set skids on gravel pads with proper spacing for drainage. This budget-friendly option allows frame installation immediately but may require releveling over time. Understand the drying requirements similar to those detailed in our guide on how long polyurethane takes to dry, as weather affects material performance.
Weather significantly impacts foundation work. Avoid pouring concrete during rain, freezing temperatures, or extreme heat. Check NOAA weather forecasts for a 7-10 day window without precipitation before scheduling concrete work. Cold temperatures below 50°F slow curing dramatically—concrete cures at roughly one-third the speed at 40°F compared to 70°F.
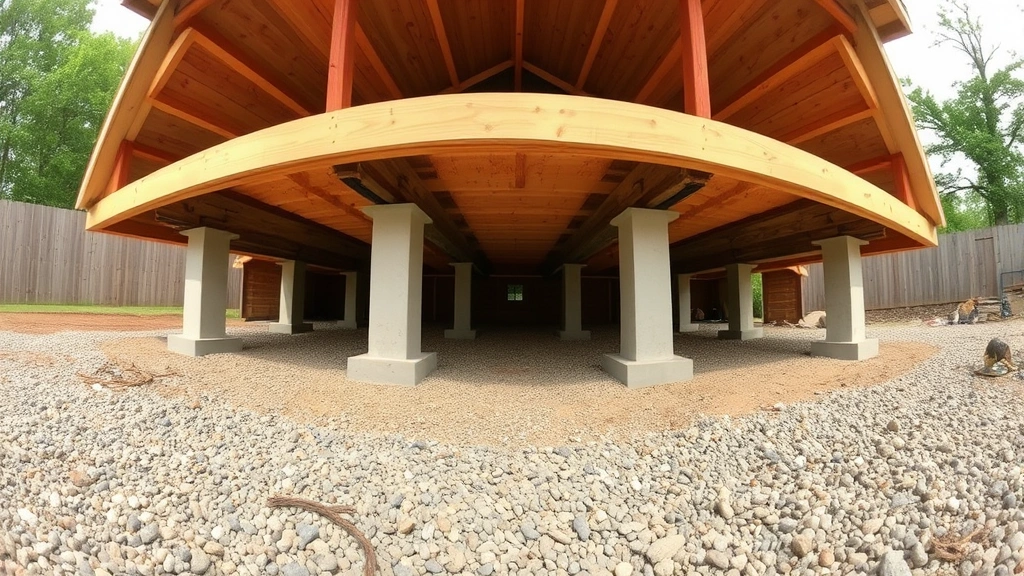
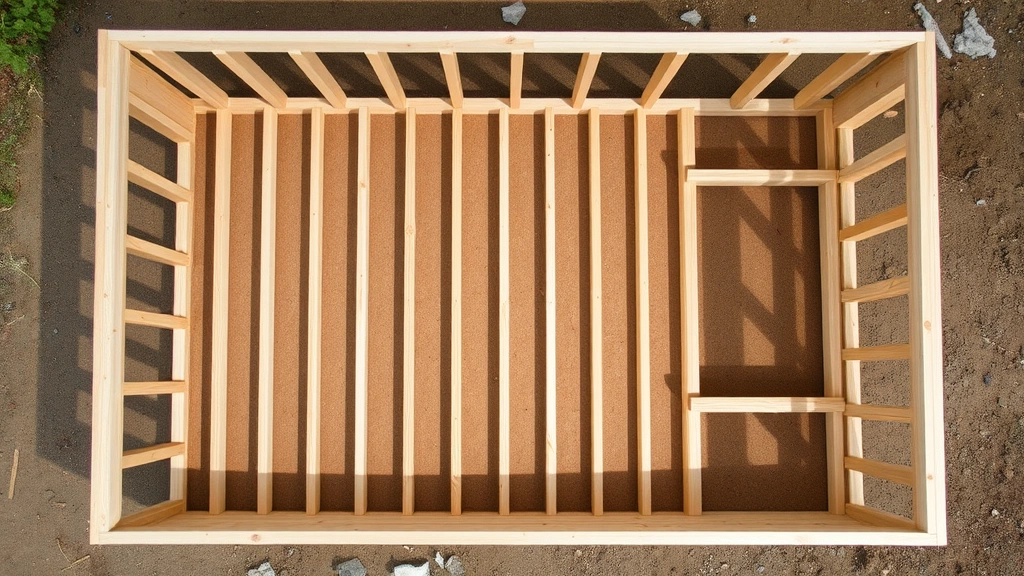
Framing the Structure
Plan 5-8 days for frame construction, though experienced builders may complete this faster. This phase involves assembling the wall frames, roof trusses, and ensuring structural square and level. Proper framing is absolutely critical—mistakes here cascade through remaining work and compromise structural integrity.
Framing sequence:
- Days 1-2: Prepare and cut lumber – Have all pieces pre-cut and organized for efficient assembly
- Days 2-3: Assemble wall frames – Build frames flat on the ground, then raise and brace them
- Days 3-4: Install rim board and roof trusses – Connect walls and install truss system
- Days 4-5: Install roof sheathing – Add plywood or OSB to complete roof structure
- Days 5-8: Install door and window frames – Cut openings and install frames with proper flashing
Material availability affects this timeline—order lumber 1-2 weeks in advance, as some suppliers have longer lead times. Coordinate your framing phase during favorable weather; high winds make raising frames dangerous, and wet conditions make lumber slippery and difficult to work with. Consider renting a small crane or boom lift if working alone on larger sheds—this adds cost but improves safety and speed significantly.
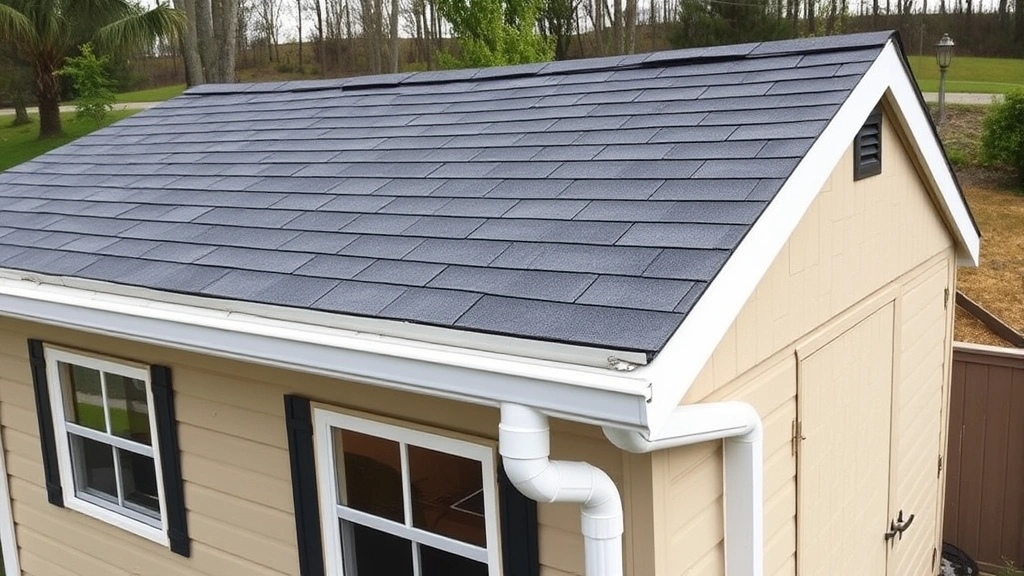
Roofing Installation
Allocate 3-5 days for roofing work, though this depends heavily on roof pitch and material selection. A properly installed roof is your shed’s primary defense against weather damage, so take time to do this correctly. Improper roofing causes water damage that destroys interior contents and compromises structural integrity.
Roofing materials and timelines:
- Asphalt Shingles (3-4 days): Most common choice for DIY builders. Install underlayment, drip edge, starter shingles, and field shingles. Shingles adhere better in temperatures above 50°F. Avoid installation during rain or high winds. Check National Roofing Contractors Association (NRCA) guidelines for proper installation specifications.
- Metal Roofing (2-3 days): Faster installation than shingles with superior durability. Requires special tools and careful fastening to prevent leaks. Metal roofing doesn’t require curing time and can be installed in various weather conditions.
- Wood Shingles (4-5 days): Beautiful aesthetic but requires more expertise. Slower installation and requires staggered layout. Plan additional time for proper spacing that allows wood movement.
Weather is critical for roofing. Avoid installation during rain—water prevents proper adhesion and creates dangerous footing. High winds (above 15 mph) make working on slopes hazardous. Temperature matters significantly; asphalt shingles require minimum 50°F for proper adhesion, and installation above 85°F can cause shingle slippage. Plan roofing work during mild, dry conditions.
Siding and Exterior Work
Budget 4-6 days for siding installation, depending on material choice and shed complexity. Proper siding installation protects framing from weather while creating finished appearance. This phase includes installing house wrap, siding material, and exterior trim.
Siding material options:
- Vinyl Siding (4-5 days): Most popular DIY choice. Lightweight, durable, and relatively quick to install. Requires careful measurement and cutting. Can be installed year-round without weather restrictions. Learn more about finishing techniques in our comprehensive guide on house painting and exterior finishing.
- Wood Siding (5-6 days): Beautiful but requires more maintenance. Install on dry days to prevent wood warping. Plan additional time for cutting and fitting around windows and doors. Requires painting or staining after installation.
- Composite Siding (4-5 days): Durable alternative combining wood fiber and plastic. Faster installation than wood, similar to vinyl. Requires proper fastening and expansion planning.
- Metal Siding (3-4 days): Durable and fast-installing. Requires special cutting tools and careful fastening. Excellent for long-term durability.
Installation sequence involves house wrap application, corner post installation, starter strip installation, field siding application, and trim installation. Each layer should be allowed to dry before proceeding, though most materials don’t require significant curing time. Weather considerations include avoiding installation during heavy rain and ensuring wood materials acclimate to local humidity before installation.
Interior Finishing
Plan 2-4 days for interior work, including shelving, workbenches, and organizational systems. This phase varies dramatically based on your shed’s intended use. A simple storage shed requires minimal interior work, while a workshop or hobby space needs substantial customization.
Interior finishing tasks:
- Install insulation if needed (1-2 days)
- Add interior wall covering like plywood or drywall (1-2 days)
- Install shelving and storage systems (1-2 days)
- Add workbenches or specialized features (1-3 days)
- Install electrical outlets and lighting if planned (1-2 days)
Interior work can proceed simultaneously with exterior work, helping compress overall timeline. Coordinate interior installation after roof completion to protect materials from weather. If adding insulation, allow proper ventilation to prevent moisture accumulation. For detailed guidance on similar interior projects, review our resource on basement finishing techniques, which apply similar principles to shed interiors.
Final Details and Weatherproofing
Allocate 2-3 days for final weatherproofing, painting, and small details that complete the project. This phase includes caulking, painting, installing gutters, and addressing any gaps or rough spots. Proper weatherproofing extends your shed’s lifespan significantly and protects interior contents.
Final weatherproofing steps:
- Caulking and Sealing (1 day): Seal all joints where different materials meet. Use quality exterior caulk rated for your climate. Apply caulk during dry conditions with temperatures between 40-85°F for proper curing.
- Painting and Staining (2-3 days): Apply primer and paint to exposed wood surfaces. Allow proper drying time between coats—typically 4-8 hours for latex paint, 24+ hours for oil-based products. Paint during mild, dry conditions without direct sun or rain.
- Gutter Installation (1 day): Install gutters and downspouts to direct water away from foundation and shed base.
- Final Inspection (1 day): Walk through and address any remaining issues before considering the project complete.
Paint and stain curing times significantly impact your timeline. Exterior paint typically requires 24-48 hours before the shed is fully weatherproof, though full hardness develops over weeks. If you need the shed immediately, use fast-drying exterior paint products, though these may not provide optimal durability. Plan your final painting phase 1-2 weeks before you need full shed functionality.
Weather protection is paramount during this phase. Rain prevents proper paint adhesion and caulk curing. Avoid painting during direct sunlight, which can cause lap marks and uneven coverage. Temperature significantly affects paint performance—most exterior paints require minimum 50°F for proper application and curing. High humidity slows drying dramatically. Check weather forecasts for a 2-3 day dry window before starting final painting.
FAQ
What’s the fastest realistic timeline for building a shed?
Experienced builders with pre-cut materials, favorable weather, and a simple design can complete a basic 10×12 shed in 10-14 days. This assumes foundation is ready, no permit delays, and no weather interruptions. Most DIY builders should plan 3-4 weeks for a quality build.
How does weather affect shed construction timelines?
Weather dramatically impacts every phase. Rain delays roofing and painting, cold temperatures slow concrete curing (potentially 2-3x longer below 50°F), wind makes framing and roofing dangerous, and extreme heat can cause roofing material problems. Plan projects during mild, dry seasons for optimal timelines. In northern climates, spring through early fall offers the best window.
Can I build a shed during winter?
Winter construction is challenging but possible with accommodations. Concrete curing slows dramatically in cold, requiring 2-3 weeks instead of 7-10 days. Roofing becomes hazardous on icy surfaces, and many materials become brittle. If building in winter, use cold-weather concrete, avoid roofing and painting during freezing temperatures, and allow extra time for everything. Spring construction is generally more practical.
Should I hire professionals or build it myself?
Professional builders complete sheds in 5-7 days but cost significantly more. DIY building takes 3-4 weeks but teaches valuable skills and saves money. For first-time builders, hiring for foundation and roofing while handling framing and finishing yourself offers a good balance of cost savings and risk management.
How does shed size affect construction timeline?
Larger sheds take proportionally longer. An 8×10 shed might take 2-3 weeks, while a 12×16 shed takes 4-6 weeks. Material preparation, framing, and roofing all scale with size. A 20×24 workshop-sized shed could take 6-8 weeks or more, especially if adding electrical or plumbing.
What permits do I need for shed construction?
Permit requirements vary by location. Most areas require permits for sheds over 100-200 square feet. Contact your local building department for specific requirements. Some areas require structural engineering for larger sheds. Permitting adds 1-3 weeks to your timeline but ensures code compliance and proper property records.
Can I work on multiple phases simultaneously?
Partially. While foundation cures, you can prepare materials and pre-cut framing lumber. Interior work can proceed during exterior finishing. However, some phases must complete sequentially—roofing requires completed framing, siding requires roof completion, painting requires all construction finished. Parallel work compresses timeline but requires careful coordination.
What’s the impact of foundation choice on overall timeline?
Concrete slab adds 10-14 days for curing compared to piers (7 days) or skids (0-1 days). If timeline is critical, concrete piers offer better balance than slabs. If durability is priority, longer curing time is worthwhile investment. Consider your climate and intended shed use when selecting foundation type.
How do I know if my shed is weather-ready?
Your shed is weather-ready once roofing is complete and sealed, siding is installed and painted, all caulking is dry, and gutters are functional. Full weatherproofing requires 24-48 hours after final painting for paint curing. Test by running a hose on the roof and checking for leaks inside before storing valuable items.


