
Build a Shed? Expert-Backed Steps You Need
Building a shed is one of the most rewarding DIY projects you can undertake. Whether you need extra storage, a workshop, or a garden retreat, constructing your own shed gives you complete control over design, materials, and functionality. This comprehensive guide walks you through every step of the process, from initial planning through final inspections, ensuring your shed is safe, durable, and built to last.
A well-built shed adds significant value to your property while providing practical space for your needs. Unlike hiring contractors, taking the DIY approach saves thousands of dollars and gives you the satisfaction of creating something with your own hands. However, successful shed construction requires careful planning, proper tools, and adherence to local building codes. We’ll cover everything you need to know to build a shed that meets professional standards.
Planning and Permits
Before you purchase a single board, invest time in thorough planning. The foundation of any successful shed project begins with understanding your local building codes and regulations. Most jurisdictions require permits for structures over 100-120 square feet, though some areas have stricter requirements. Contact your local building department to understand setback requirements, height restrictions, and material specifications that apply in your area.
Create detailed sketches or use design software to visualize your shed layout. Consider the shed’s purpose—will it store lawn equipment, serve as a workshop, or function as a garden studio? This determines your square footage needs, window placement, ventilation requirements, and interior layout. Most standard sheds range from 8×10 feet to 12×16 feet, providing adequate space without overwhelming your yard.
Document everything in writing before construction begins. Your building permit application will require site plans showing property lines, setback distances, and shed placement. Professional architectural resources can help you create compliant plans if you’re unfamiliar with technical drawings. Budget 2-4 weeks for the permit approval process, and never skip this step—unpermitted structures create legal and insurance complications.
Obtain quotes for materials and create a realistic budget. Factor in lumber costs, roofing materials, fasteners, windows, doors, and weatherproofing products. Building a shed typically costs $3,000-$8,000 for a 10×12 structure, depending on materials and finishes. Set aside 15-20% contingency for unexpected expenses or material price fluctuations.
Site Preparation and Foundation
Selecting the right location is crucial for long-term shed performance. Choose a site with good drainage—avoid low spots where water pools after rain. Ensure the location receives adequate sunlight for visibility and drying, while considering shade from existing trees. Mark the shed footprint using string and stakes, double-checking corners are square using the 3-4-5 triangle method (measure 3 feet along one side, 4 feet along the adjacent side; the diagonal should measure 5 feet).
Clear the site of vegetation, rocks, and debris. Remove topsoil and level the ground as much as possible—a slope exceeding 1 inch per 8 feet makes construction difficult and creates drainage problems. Grade the area so water naturally flows away from where your shed will sit.
Your foundation type depends on soil conditions and local codes. Concrete pad foundations work well for most climates and shed types. Excavate 4-6 inches deep, add a gravel base, and pour 4 inches of concrete reinforced with rebar or wire mesh. Allow concrete to cure fully (typically 7 days) before building. For areas with freeze-thaw cycles, extend the foundation below the frost line—consult local building officials for your area’s frost depth.
Gravel or stone foundations offer a budget-friendly alternative for temporary or smaller sheds. Compact 4-6 inches of gravel and add pressure-treated timber runners as a base. This method drains well but requires periodic maintenance.
Pier foundations elevate sheds above grade, excellent for damp climates. Set concrete piers at corners and mid-spans, then bolt pressure-treated beams to the piers. This approach prevents rot and provides understructure ventilation.
Whatever foundation type you choose, ensure it’s perfectly level—use a long level or laser level to check. An unlevel foundation creates structural stress, causes doors to swing incorrectly, and leads to water infiltration issues.
Framing the Structure
Framing creates your shed’s skeleton. Start by building the floor frame using pressure-treated 2×8 or 2×10 lumber, depending on span and snow load requirements in your region. Space floor joists 16 inches on center for adequate support. Sheath the frame with 3/4-inch plywood, leaving no gaps that could allow water intrusion.
Wall framing uses standard 2×4 lumber with studs spaced 16 inches on center. Design wall height based on your needs and local code requirements—8-foot walls are standard, but 9-foot walls provide better headroom. Build wall sections flat on the ground, then raise and brace them. Use temporary diagonal bracing to hold walls plumb and square while you secure them with nails or bolts to the floor frame.
Install a top plate across all walls, creating a continuous connection point for roof framing. Check that walls are perfectly plumb using a 4-foot level on multiple points. Unplumb walls create roof problems and affect door operation.
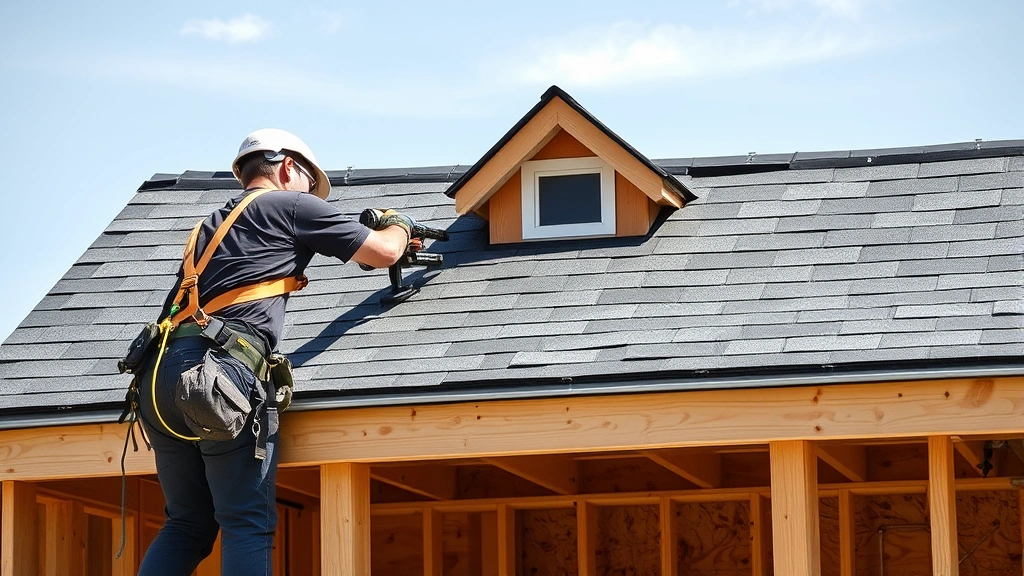
Roof framing is critical for proper water shedding. Most sheds use simple rafter systems with a pitch of 4/12 to 6/12 (4-6 inches of rise per 12 inches of run). Steeper pitches shed snow better but use more material. Calculate rafter length and angle using roof pitch tables or online calculators. Cut rafters precisely—poor cuts create gaps and weak connections.
Space rafters 16 or 24 inches on center, depending on your roofing material. Install collar ties halfway up the rafters to prevent spreading under snow load. Add gable vents for attic ventilation, preventing moisture buildup that causes rot and mold. Proper ventilation is essential for longevity, particularly if you’re storing items sensitive to humidity.
Consider reinforcing your framing if you live in a high-wind or heavy-snow area. FEMA provides guidance on wind-resistant construction that applies to sheds. Use hurricane ties connecting rafters to top plates, and install collar ties at regular intervals.
Roofing Installation
Proper roofing prevents water damage—the primary enemy of shed longevity. Start with roof sheathing, typically 1/2-inch plywood or OSB (oriented strand board), installed perpendicular to rafters. Leave 1/8-inch gaps between sheets to allow for expansion. Nail sheathing every 6 inches along edges and 12 inches in the field.
Install drip edge along all roof edges before adding underlayment. This metal flashing directs water into gutters and away from fascia boards. Underlayment—typically 30-pound felt or synthetic moisture barrier—provides a secondary water defense. Staple or nail underlayment horizontally, overlapping each row by 4-6 inches.
Asphalt shingles are the most common roofing material for sheds, offering affordability and reasonable durability (15-25 year lifespan). Snap chalk lines to guide shingle placement, ensuring straight rows. Nail shingles with 4 nails per shingle, positioned correctly according to manufacturer specifications. Metal roofing costs more but lasts 40-70 years and sheds snow excellently—ideal for snowy climates.
Install roofing materials according to manufacturer instructions—improper installation voids warranties and creates leaks. Ensure nails penetrate sheathing fully but don’t over-drive them, which can tear shingles. Stagger seams and maintain proper overlap so water flows downward across each course.
Install gutters and downspouts to direct roof runoff away from the shed foundation. This prevents water from pooling around the base, which causes rot and foundation problems. Slope gutters 1/4 inch per 10 feet toward downspouts, and extend downspouts at least 4-6 feet from the shed.
Exterior Finishing and Weatherproofing
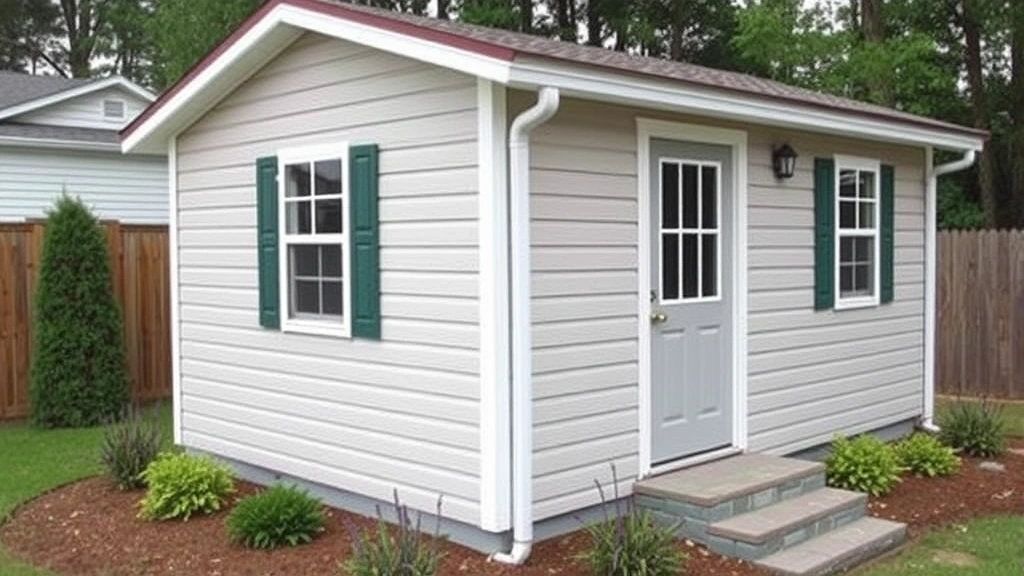
Exterior finishing protects wood from weather while enhancing appearance. Install weather-resistant siding or cladding materials—common options include wood siding, fiber cement board, vinyl, or metal panels. Wood siding requires regular maintenance but offers classic appearance. Fiber cement and vinyl provide durability with minimal upkeep. Metal panels suit modern designs and shed water efficiently.
Install house wrap or building paper under siding to create a moisture barrier. This allows vapor to escape while preventing liquid water from reaching framing. Overlap all seams and tape them according to manufacturer instructions. Proper moisture management prevents hidden rot that develops inside walls.
Trim all openings with flashing—metal barriers that direct water away from windows and doors. Install flashing before siding around openings, ensuring water flows over and past the trim. Use quality exterior-grade caulk and sealants to seal gaps around windows, doors, and trim boards.
Paint or stain exterior surfaces using exterior-grade products rated for your climate. Properly finished wood resists rot, insect damage, and UV degradation. Apply primer before paint for better adhesion and coverage. Plan on refinishing every 3-5 years depending on climate and product quality.
Install doors and windows carefully, ensuring they’re square, level, and properly flashed. Use exterior-rated shims and fasteners. Weather-strip doors and windows to prevent air leaks and water infiltration. Proper installation of these elements is critical—they’re the primary points where water enters structures.
Interior Setup and Organization
Once the shell is weathertight, focus on interior functionality. Install electrical wiring if needed, following electrical code requirements and using outdoor-rated boxes and fixtures. Include adequate outlets for power tools or equipment. Run wiring through conduit for protection and code compliance.
Add insulation if you’re using the shed year-round or storing temperature-sensitive items. Fiberglass batts between wall studs provide R-15 to R-21 value, while spray foam offers higher R-values in less space. Include a vapor barrier to prevent moisture problems in humid climates.
Install drywall, plywood, or other wall covering for finished appearance and durability. Plywood offers maximum durability in workshops where items might bump walls. Paint interior surfaces with moisture-resistant products that resist mold growth.
Plan storage strategically using shelving, wall-mounted racks, and pegboards. Maximize vertical space in smaller sheds. Store heavy items low and accessible, keeping lighter materials higher. Install proper ventilation through vents or small windows to prevent moisture and mold issues.
Consider your shed’s specific purpose when planning interior layout. A workshop shed benefits from workbench placement and tool storage, while a garden shed prioritizes shelving and potting space. A storage shed focuses on organized shelving systems and climate control.
If you’re building a shed for recreational use, ensure adequate lighting and ventilation. Include exhaust fans if you’re using power tools or storing chemicals. Proper ventilation prevents heat buildup and maintains air quality, making the space more comfortable and safer.
FAQ
How long does it take to build a shed?
A typical 10×12 shed takes 3-6 weeks for experienced builders, longer if you’re learning as you go. This timeline includes permit approval (2-4 weeks), foundation curing (1 week), framing (1-2 weeks), roofing (3-5 days), siding (1 week), and finishing (1-2 weeks). Breaking the project into phases and working weekends extends timelines but reduces stress.
Do I need a permit to build a shed?
Most jurisdictions require permits for sheds over 100-120 square feet or those exceeding certain heights. Some areas require permits regardless of size. Never skip the permitting process—unpermitted structures create legal liability, complicate insurance claims, and must be removed if discovered. Contact your local building department for specific requirements.
What’s the best foundation for a shed?
Concrete pads work best in most climates, providing durability and good drainage. Gravel foundations suit budget-conscious builders in dry climates. Pier foundations excel in damp areas with high water tables. Your choice depends on climate, soil conditions, local codes, and budget. Consult building officials for recommendations specific to your area.
How much does it cost to build a shed?
Materials for a 10×12 shed typically cost $3,000-$8,000, depending on materials and finishes. Basic shed with standard siding and asphalt roof: $3,000-$4,500. Mid-range shed with quality materials and better finishes: $4,500-$6,000. Premium shed with metal roofing, upgraded siding, and interior finishing: $6,000-$8,000+. Labor costs add significantly if hiring contractors.
What building codes apply to sheds?
Shed construction must comply with local building codes covering foundation depth, wall framing, roof loading, electrical systems, and setback distances. Most areas follow the International Building Code (IBC) or International Residential Code (IRC) with local modifications. Review your jurisdiction’s specific requirements before designing or building.
Should I insulate my shed?
Insulation depends on your shed’s purpose and climate. Uninsulated sheds work fine for storage in moderate climates. Insulation becomes essential if you’re using the shed as a workshop, studio, or storing temperature-sensitive items. In cold climates, insulation prevents moisture and frost issues. In hot climates, insulation reduces interior temperatures, protecting stored items.
How do I prevent shed rot and mold?
Proper ventilation is essential—install vents in gable ends or use continuous ridge vents. Ensure good drainage around the foundation with gutters and graded ground. Use pressure-treated lumber for any framing contacting soil or concrete. Paint or stain exterior wood regularly. Include a moisture barrier under siding. Avoid storing wet items or excessive moisture-generating activities inside.


