How to Build a Shed: Carpenter’s Top Tips
Building a shed is one of the most rewarding DIY projects you can undertake, combining practical construction skills with tangible results. Whether you need extra storage space, a workshop, or a garden retreat, a well-built shed adds value to your property while providing years of reliable use. This comprehensive guide draws from professional carpentry experience to walk you through every stage of the process, from initial planning through final touches.
A successful shed project requires careful planning, proper material selection, and attention to detail at every step. Unlike many quick DIY endeavors, shed construction demands respect for structural principles and building standards. By following proven techniques and understanding the foundational concepts behind proper construction, you’ll create a durable structure that withstands weather, time, and use. The key is taking your time during the planning phase and never rushing critical steps like foundation work and framing.
Planning and Permits
Before purchasing a single board, invest time in thorough planning. Start by determining your shed’s purpose, as this influences size, layout, and material choices. A storage shed requires different considerations than a workshop or hobby space. Measure your available space carefully, accounting for clearance from property lines, utilities, and existing structures. Most jurisdictions require setback distances from boundaries, typically ranging from 5 to 10 feet depending on local regulations.
Permits are non-negotiable for most permanent structures. Check with your local International Code Council (ICC) or building department to understand requirements in your area. Many regions have simplified permit processes for sheds under a certain size or square footage. Obtaining proper permits protects you legally, ensures your structure meets safety codes, and proves compliance when selling your property. The cost and time investment now prevents costly problems later.
Create detailed plans before construction begins. Your plans should include overall dimensions, roof pitch, door location, window placement, and material specifications. If you’re not confident drawing plans, numerous National Association of Builders resources provide shed plans that meet code requirements. Sketch your layout on graph paper, noting measurements and material quantities. This planning stage is where beginners often benefit from reviewing DIY beginner woodworking projects for foundational skills.
Foundation Fundamentals
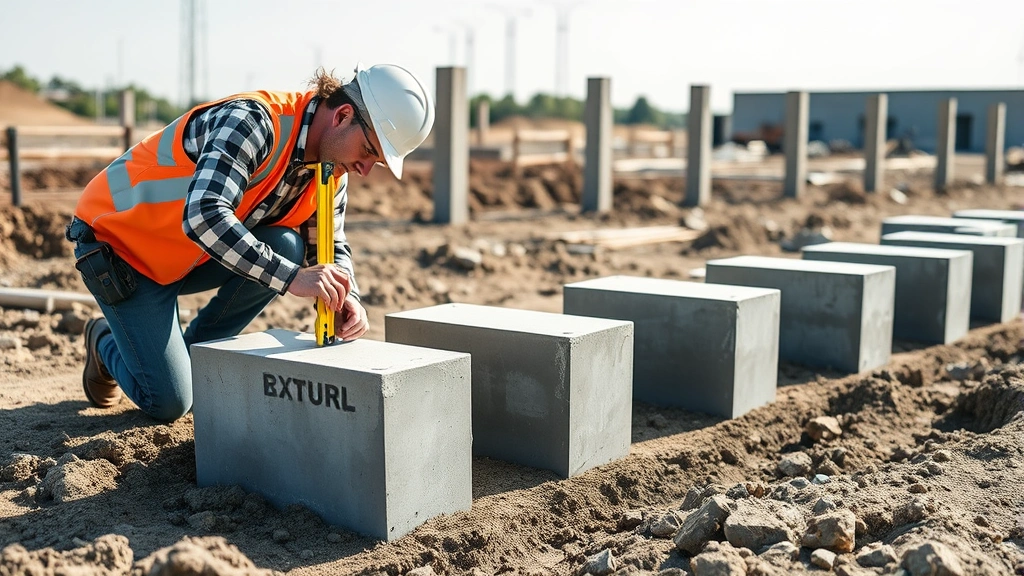
The foundation determines your shed’s longevity and structural integrity. A poor foundation leads to settling, shifting, rot, and eventual collapse. You have several options depending on soil conditions, climate, and local requirements. Concrete piers are popular for many climates, providing excellent drainage while keeping wood members off the ground. Gravel pads work for temporary structures in well-draining areas. Concrete slabs offer permanence but require excavation and proper drainage planning.
For most residential sheds, concrete piers spaced 4 to 6 feet apart provide ideal support. Begin by leveling your site, removing sod and high spots. Mark pier locations using string lines and stakes, then dig holes below the frost line depth for your region—typically 12 to 48 inches depending on climate. Install concrete pier blocks or pour concrete footings, ensuring they extend above grade to prevent water damage to the structure. Use a level to verify each pier is perfectly level before the concrete sets.
Proper drainage around your shed foundation prevents water accumulation and soil erosion. Slope the ground away from the structure at least 2 inches per 10 feet. If your site has clay soil or poor drainage, consider installing perimeter drainage or slightly elevating your shed on the foundation. This investment in proper foundation work prevents the most common shed failures. Many carpenters emphasize that 20 percent of your budget should go toward foundation work, as it’s the most critical investment.
Framing the Structure
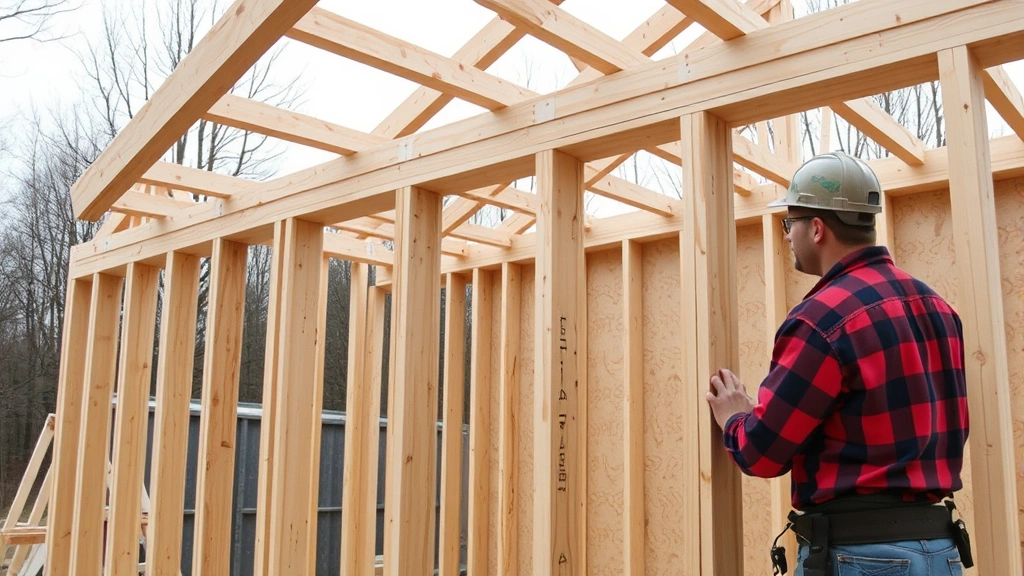
Once your foundation is set and cured, framing begins the actual structure. Start with the floor frame, using pressure-treated lumber to resist rot and insect damage. Typically, 2×6 or 2×8 joists spaced 16 inches on center create a strong, level floor platform. Install rim joists around the perimeter, then add cross joists, checking frequently with a level. Secure all connections with galvanized or stainless steel fasteners that resist rust and corrosion.
Wall framing follows standard construction practices with 2×4 studs spaced 16 inches on center. Lay out your walls on the floor platform, marking stud locations before assembly. Build walls in sections on the ground—this is far safer and more efficient than building in place. Each wall section includes top and bottom plates with studs attached. Once assembled, walls are tilted up and temporarily braced. This staged approach also helps if you’re learning new skills at a comfortable pace.
Door and window openings require header beams to carry loads. Size headers based on opening width and roof loads—most residential shed doors use 2×6 or 2×8 headers. Install rough openings slightly larger than your door or window frames, then trim precisely during finishing. Brace walls thoroughly before raising them, using temporary diagonal bracing and securing to the foundation. Check walls for plumb (vertical) and square using a level and measuring diagonal corners.
Roof framing is where many DIYers encounter challenges. Rafters must be precisely cut at correct angles to create your desired roof pitch. Common pitches range from 4:12 to 8:12, with steeper pitches shedding water better but requiring more materials. Calculate rafter length using the Pythagorean theorem or construction calculators. Pre-cut rafters from suppliers reduce complexity if you’re uncomfortable with angle calculations. Space rafters 16 or 24 inches on center, depending on roof load requirements in your region.
Roofing and Weatherproofing
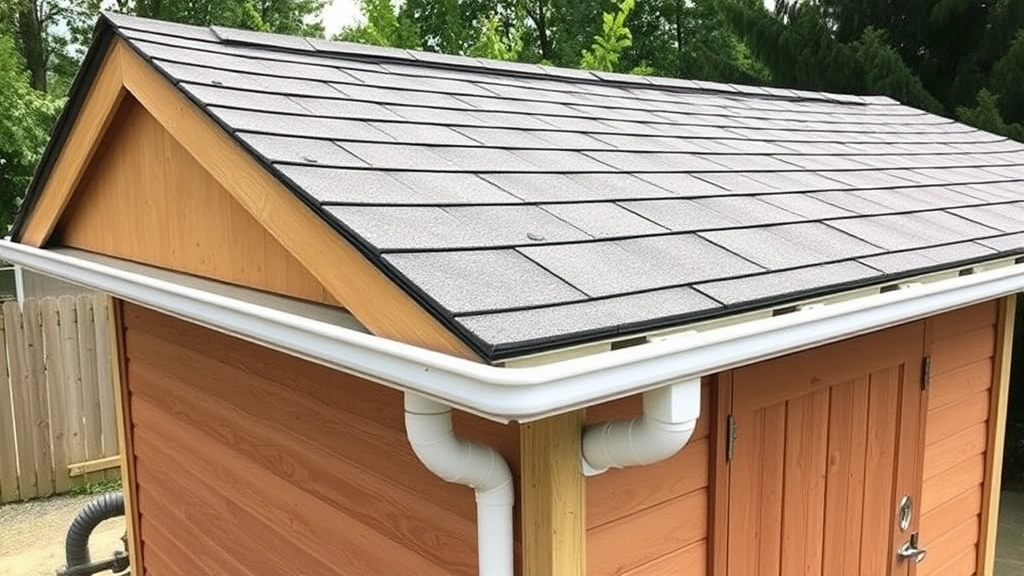
Roof sheathing provides the base for roofing materials and braces the rafter structure. Typically, 1/2-inch plywood or oriented strand board (OSB) covers rafters, installed perpendicular to rafter direction. Secure sheathing with galvanized nails or screws, leaving 1/4-inch gaps between sheets for expansion. Install roofing underlayment—typically synthetic or felt paper—over sheathing before applying final roofing material. This layering approach protects against water infiltration.
Asphalt shingles are the most common roofing choice for sheds due to cost-effectiveness and straightforward installation. Roll roofing or metal roofing offer alternatives with different longevity and aesthetics. Starter shingles along the eave establish a solid base for field shingles. Nail shingles according to manufacturer specifications—typically 4 nails per shingle in specified locations. Proper nailing prevents wind damage and premature failure. Extend shingles at least 1.5 inches beyond gutters to direct water away from walls.
Weatherproofing extends far beyond the roof. Seal all gaps where walls meet the foundation using caulk or flashing. Install flashing around windows and doors, directing water outward and downward. Caulk exterior wall seams and gaps, using exterior-grade caulk rated for your climate. Paint or stain exterior wood with quality finishes rated for outdoor use. These finishes protect wood from UV damage, moisture penetration, and insect attack. Reapply finishes every 3 to 5 years depending on climate and product specifications.
Gutters and downspouts manage water runoff, directing it away from your shed’s foundation. Install gutters along eaves, sloping slightly toward downspout locations. Downspouts should extend at least 4 to 6 feet from the foundation, with splash blocks or dry wells preventing water accumulation. In climates with heavy snow, consider roof snow guards or heated cables to prevent dangerous ice dam formation. These details prevent water damage, the most common shed failure cause.
Finishing Details
Interior finishing depends on your shed’s purpose. Storage sheds benefit from wall studs left exposed with plywood or pegboard for hanging tools and equipment. Workshops require better lighting, ventilation, and possibly electrical systems. Install circuits through conduit to code, or hire licensed electricians for complex work. Workbenches, shelving, and organizational systems make the space functional. Insulation is optional for storage but recommended for workshops or climate-sensitive storage.
Ventilation prevents moisture buildup and extends shed longevity. Install soffit vents at the eave and roof vents near the peak, creating air circulation. In humid climates, consider adding a small exhaust fan or leaving doors open on dry days. Proper ventilation prevents condensation, mold growth, and wood rot. This is especially important in sheds storing equipment or seasonal items prone to moisture damage.
Doors and windows should be quality, weathertight units. Standard pre-hung exterior doors simplify installation compared to building from scratch. Windows improve light and ventilation while adding cost. Single windows in storage sheds are common, while workshops might benefit from multiple windows for natural light and visibility. Install all doors and windows with proper flashing and caulking to prevent water infiltration.
Final touches include paint, stain, or other finishes. Exterior paint protects wood and improves appearance. Choose quality exterior paints rated for your climate zone. Interior finishes depend on use—storage sheds might skip interior paint, while workshops benefit from light-colored finishes improving visibility. Add hardware, hinges, and locks appropriate to your security needs. Consider DIY home security measures if storing valuable equipment.
Regular maintenance extends your shed’s lifespan significantly. Inspect roofing annually, checking for damaged or missing shingles. Clean gutters seasonally to prevent water backup. Inspect exterior caulk and flashing, resealing as needed. Check for signs of pest intrusion, especially around foundations and openings. Touch up paint or stain as weathering occurs. These preventive measures cost far less than major repairs caused by deferred maintenance.
FAQ
How long does building a shed typically take?
Timeline varies based on shed size and complexity. Small storage sheds (8×10 feet) typically take 2 to 3 weeks for an experienced builder, including foundation curing time. Larger or more complex structures extend this to 4 to 8 weeks. First-time builders should expect 50 percent longer timelines. Foundation curing adds 7 days minimum before framing can proceed. Planning and permitting add additional time before construction begins.
What’s the most important step in shed building?
Foundation work is universally considered most critical by professional carpenters. A poor foundation causes cascading problems affecting the entire structure. Unlike framing errors that can be corrected, foundation issues often require expensive remediation. Invest time and resources ensuring your foundation is level, properly drained, and below frost line. This foundation investment pays dividends throughout your shed’s lifespan.
Do I need permits for a shed?
Permit requirements vary by jurisdiction. Most areas require permits for permanent structures over 100 to 200 square feet, or for any structure with utilities. Check with your local building department before starting. Unpermitted structures can create legal issues and complicate property sales. The permit process ensures code compliance and structural safety. Costs typically range from $50 to $300 depending on location and structure size.
What materials are best for shed construction?
Pressure-treated lumber resists rot and insects, making it ideal for foundations, floors, and lower walls. Standard framing lumber works for walls and roofing. Exterior plywood or OSB handles sheathing. Asphalt shingles are affordable roofing; metal or rubber options offer longevity advantages. Use galvanized or stainless fasteners to prevent rust. Quality materials cost more initially but provide better durability and lower maintenance costs over time.
Can I build a shed on an existing concrete pad?
Yes, concrete pads provide excellent bases if properly sloped for drainage. Verify the pad is level and in good condition without significant cracks. Anchor the floor frame to the concrete using concrete anchors or bolts. Ensure the pad slopes away from the structure to prevent water pooling. If the pad is uneven, you may need to shim the floor frame to achieve proper level. Concrete pads are particularly effective in wet climates where drainage is critical.
What roof pitch should I use?
Roof pitch affects water drainage, snow load capacity, and interior height. Common pitches range from 4:12 to 8:12. Steeper pitches (8:12 or higher) shed water and snow more effectively but require more roofing material and present steeper climbing angles during installation. Flatter pitches (4:12 to 6:12) are easier to construct and use less material but require quality underlayment and flashing to prevent leaks. Choose based on your climate and local weather patterns.
Should I hire professionals or DIY the entire project?
This depends on your skills, time availability, and comfort with construction. Many builders tackle framing and finishing while hiring professionals for electrical work, complex roofing, or foundation work. Start with beginner woodworking projects to build confidence before attempting a full shed. Foundation and roofing are most critical—errors here create expensive problems. Consider hiring professionals for these stages while handling simpler framing and finishing yourself. This hybrid approach balances cost savings with quality assurance.
For additional building guidance, visit the DIY Nests Hub Blog or explore DIY website building for project documentation. Learn how learning new skills takes patience, much like mastering construction techniques. Consult your local American Wood Council for regional wood specifications and National Roofing Contractors Association for roofing standards.


