DIY Patio: Build Your Own Oasis – Expert Tips
Creating your own patio is one of the most rewarding DIY projects you can undertake. Unlike wondering how long is a flight to Australia, building a patio keeps you grounded at home, transforming your outdoor space into a personal retreat. Whether you’re starting from bare ground or upgrading an existing structure, a well-planned patio adds significant value to your property while providing a functional entertainment area for family and friends.
The beauty of a DIY patio project lies in its flexibility and scalability. You can build a simple gravel sitting area in a weekend or invest several months in an elaborate stone patio with integrated lighting and seating. This comprehensive guide walks you through every stage of patio construction, from initial planning and material selection to finishing touches that make your space truly special.
Planning Your Patio Space
Before breaking ground, invest time in thorough planning. Measure your available space carefully, accounting for permanent fixtures like trees, fences, and your home’s foundation. Consider how sunlight moves across your yard throughout the day—morning sun may be pleasant, while afternoon heat could make your patio uncomfortable in summer. Document prevailing wind patterns, as these affect both comfort and the lifespan of structures and furnishings.
Sketch your design on paper or use digital tools to visualize different configurations. Think about the patio’s primary purpose: entertaining, dining, relaxation, or a combination. The size should be proportional to your home and yard; a small patio under a large house looks inadequate, while an oversized patio dominates a small property. Most landscape designers recommend patios covering 5-10% of your total yard space.
Check local building codes and zoning regulations before finalizing your design. Many municipalities require permits for patios, especially those attached to structures or exceeding certain dimensions. Setback requirements typically mandate distance from property lines, usually 5-10 feet. Understanding these regulations prevents costly mistakes and ensures your project passes inspections.
Consider how your patio connects to your home’s architectural style. A rustic flagstone patio complements traditional homes, while modern pavers suit contemporary designs. Think about transitions—how people will move from your house to the patio and from the patio to other yard areas. Good flow makes spaces feel larger and more inviting.
Choosing the Right Materials
Material selection significantly impacts durability, maintenance requirements, and aesthetics. The most popular patio materials each offer distinct advantages and challenges:
Concrete Pavers provide excellent durability and come in countless colors, shapes, and textures. They’re relatively affordable and easier to repair than monolithic concrete—simply replace individual pavers if damage occurs. Permeable pavers reduce runoff and support environmental sustainability. Installation is labor-intensive but manageable for DIYers, and they work well for both traditional and modern designs.
Natural Stone including flagstone, bluestone, and granite offers timeless beauty and superior durability. Stone develops character as it weathers, often improving appearance over decades. However, natural stone costs significantly more than alternatives, requires professional-level skill to install properly, and needs regular sealing. Irregular shapes create a rustic aesthetic but demand careful layout planning.
Brick delivers classic charm and excellent longevity when properly installed. Bricks withstand freeze-thaw cycles better than many alternatives, making them ideal for cold climates. They’re relatively affordable and work beautifully in herringbone or running bond patterns. Brick does require regular maintenance and can become slippery when wet or covered in moss.
Gravel and Crushed Stone represent the most budget-friendly option, perfect for temporary or experimental layouts. While easy to install, gravel requires annual raking and topping, becomes muddy in wet weather, and spreads into landscaping. It works best in dry climates or as a temporary base for future upgrades.
Permeable Pavers address environmental concerns by allowing water infiltration, reducing flooding and supporting groundwater recharge. These come in recycled rubber, recycled plastic, or traditional materials and cost slightly more than standard options. They’re excellent for sustainable building practices and increasingly required by local environmental protection agencies.
When selecting materials, consider your climate’s freeze-thaw cycles, soil drainage characteristics, and typical weather patterns. Test samples in different light conditions—colors appear dramatically different under morning sun versus afternoon shade. Purchase 10-15% extra material to account for cuts, breakage, and future repairs.
Preparing the Foundation
Proper foundation preparation determines whether your patio lasts decades or develops problems within years. Begin by removing vegetation, topsoil, and debris from your patio area. Most patios require excavation of 4-6 inches, though this varies by material and local conditions. Compact the existing soil thoroughly using a hand tamper for small areas or a mechanical compactor for larger projects.
Assess drainage patterns carefully. Water should naturally slope away from your home at a minimum 1% grade (1 inch drop per 8 feet of distance). Poor drainage creates standing water, ice hazards, and structural damage. If your yard slopes toward your home, you may need to create a swale or install drainage tile to redirect water away from the foundation.
For comprehensive DIY guidance, consult multiple resources. Install a 4-6 inch gravel base layer, which provides drainage and allows for minor settling adjustments. Compact this base thoroughly in 2-inch lifts—poor base preparation causes uneven settling and cracked pavers within months. The base is invisible in the finished project but absolutely critical to longevity.
For permeable patio systems, install a geotextile fabric between the subgrade and base material to prevent soil migration into gravel layers. This maintains drainage efficiency over years of use. For traditional impermeable surfaces, a properly sloped base prevents water from pooling beneath the patio.
Mark the final patio height carefully using string lines and a level. This height should be at least 6 inches below your home’s siding to prevent water from entering the structure. Mark reference points on your home’s foundation or nearby trees so you can maintain consistent height across the entire project.
Installation Techniques
Installation methods vary by material, but several principles apply universally. Work methodically, completing small sections before moving forward. Most DIYers can install 100-200 square feet per day, depending on material complexity and experience level.
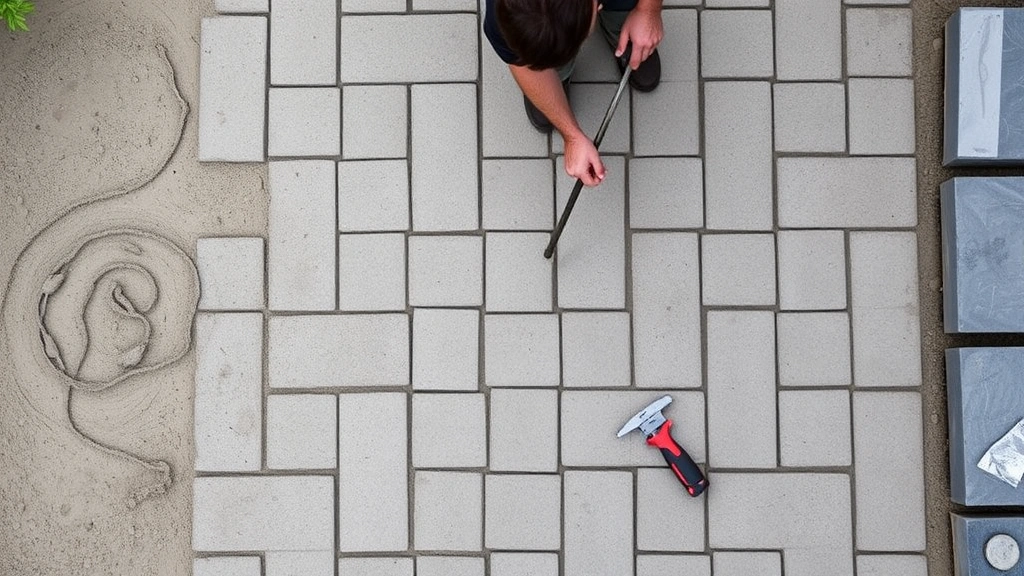
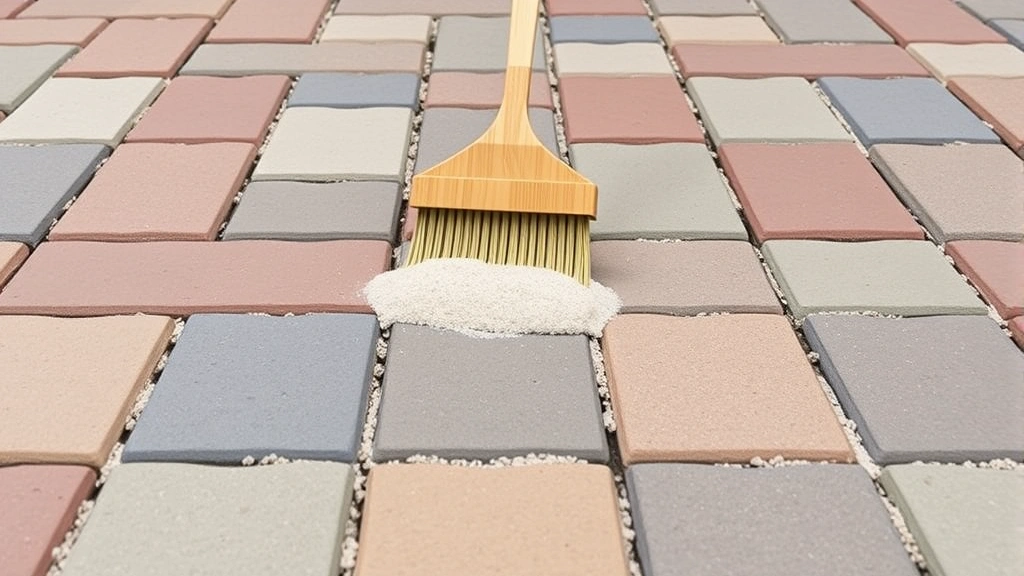
Paver Installation begins with laying out a dry run—place pavers without adhesive to verify fit and spacing. This reveals cutting requirements and helps you plan material placement aesthetically. Use a rubber mallet to tap pavers into the sand bed, maintaining consistent height by checking frequently with a straightedge. Fill joints with polymeric sand, which hardens when wet and locks pavers in place.
For complex construction projects like patios with integrated structures, consider professional consultation. Cut pavers using a wet saw with a masonry blade—this creates clean edges and is safer than hand tools. Always wear protective equipment including safety glasses and dust masks when cutting stone or concrete.
Concrete Installation requires careful mixing and finishing. For DIY projects, consider pre-mixed concrete bags to avoid equipment rental costs. Mix thoroughly according to package instructions—too much water weakens concrete, while insufficient water prevents proper mixing. Pour concrete into your prepared form, working out air bubbles by tapping forms and using a concrete vibrator if available.
Finish concrete surfaces with a broom for traction or a trowel for smoothness. Slope the surface 1/8 inch per foot away from structures for drainage. Allow concrete to cure for at least 7 days before applying sealant or allowing foot traffic. Premature use causes surface damage and reduces longevity.
Stone Installation typically uses a mortar bed rather than sand. Mix mortar to a consistency resembling peanut butter, then apply a 1-inch bed to the prepared base. Set each stone firmly, checking level frequently and adjusting mortar thickness as needed. After mortar sets (typically 24-48 hours), fill joints with grout, using a grout bag or trowel to pack material firmly into spaces.
Seal natural stone after mortar cures completely. Stone sealers prevent staining from food, beverages, and dirt while protecting against freeze-thaw damage. Quality sealers typically last 3-5 years and require reapplication following the manufacturer’s recommendations.
Drainage and Maintenance
Proper drainage protects your patio investment and prevents problems in surrounding areas. The critical slope of 1-2% away from structures prevents water accumulation. For large patios, create subtle valleys or swales that direct water to appropriate drainage areas. Never allow water to pool near your home’s foundation.
Install a drainage system if your property has poor natural drainage. French drains—trenches filled with gravel and perforated pipe—direct water away from problem areas. These are particularly important in clay soils that resist water infiltration. Ensure drainage outlets discharge water at least 5-10 feet from your home’s foundation.
Regular maintenance extends your patio’s lifespan dramatically. Sweep debris regularly to prevent organic material accumulation, which promotes moss and algae growth. Power wash annually to remove dirt, algae, and stains. However, use low pressure (below 1500 PSI) on natural stone and pavers—high pressure damages surfaces and forces water beneath materials, causing frost damage in winter climates.
Address spills promptly to prevent staining. Seal permeable surfaces regularly to maintain water resistance and prevent staining. Most sealers require reapplication every 2-3 years. In winter, use calcium chloride rather than rock salt for ice removal—rock salt damages most patio materials and harms surrounding vegetation.
Inspect joints annually, especially in freeze-thaw climates. Replace eroded polymeric sand or grout to prevent water infiltration and material movement. Small repairs now prevent expensive problems later. If pavers settle unevenly, remove affected stones, adjust the base, and reinstall—this is far easier than living with trip hazards.
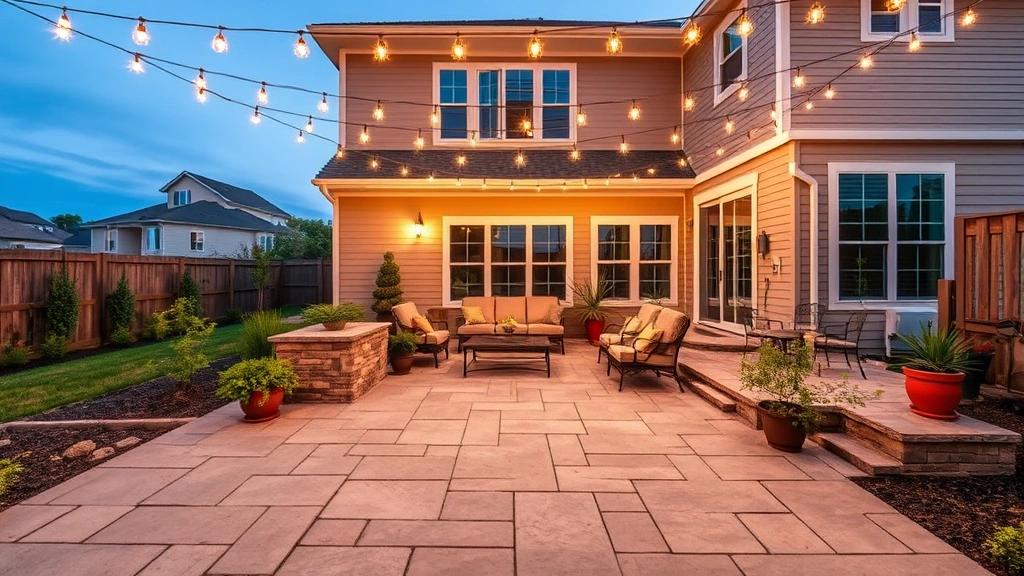
Adding Finishing Elements
Transform your basic patio into an outdoor oasis with thoughtful finishing touches. Lighting extends usability into evening hours and creates ambiance. Low-voltage LED lighting is affordable, energy-efficient, and easy to install. String lights overhead create festive atmosphere, while ground-level lights illuminate pathways safely. Solar options eliminate wiring but provide less brightness.
Consider privacy screens, pergolas, or shade structures. A pergola provides partial shade while maintaining openness, and you can grow vines for additional coverage. Privacy screens block unsightly views and create intimate spaces. These structures can be simple DIY projects or elaborate architectural elements—your choice depends on skills and time commitment.
Furniture and accessories personalize your space. Weatherproof cushions add comfort, while planters introduce greenery and color. Fire pits or outdoor heaters extend the season, though these require careful placement away from structures and vegetation. Check local fire codes before installing permanent fire features.
Water features add tranquility and visual interest. Small fountains or birdbaths are simple additions requiring only electrical outlets for pumps. Larger features like ponds demand more extensive planning but create stunning focal points. Even a small water element attracts wildlife and masks urban noise.
Integrate your patio with surrounding landscaping through thoughtful design planning. Plant trees or shrubs to frame the space and provide natural screening. Create transitions with pathways connecting patio areas to gardens or other yard features. Layered landscaping makes your patio feel like a natural extension of your property rather than an isolated structure.
Frequently Asked Questions
How much does a DIY patio cost?
Costs vary dramatically by material and size. A simple gravel patio might cost $200-500, while a permeable paver patio runs $1,500-3,000 for 200 square feet. Natural stone patios typically exceed $3,000-5,000 for the same area. Labor savings represent 40-60% of professional installation costs, making DIY projects significantly more affordable.
What’s the best patio material for freeze-thaw climates?
Brick and concrete pavers perform well in freeze-thaw conditions if properly installed with adequate drainage. Permeable pavers excel because they allow water drainage, reducing ice formation. Natural stone varies—slate handles freeze-thaw better than limestone. Avoid materials that absorb excessive water, which expands when frozen and causes cracking.
How long does a patio installation take?
Timeline depends on size, material, and experience level. Simple gravel patios take 1-2 days. Paver patios typically require 3-7 days for 200-400 square feet, including base preparation. Concrete patios take similar timeframes for installation but require curing time before use. Large projects or complex designs may extend over several weeks.
Do I need a building permit for my patio?
Most jurisdictions require permits for patios, especially those attached to structures or exceeding 200 square feet. Permits ensure proper drainage, setback compliance, and structural safety. Check with your local building department before starting—permit costs are typically modest, usually $50-200, and prevent expensive code violations.
How do I prevent weeds between pavers?
Polymeric sand hardens when moistened, creating a barrier that prevents weed growth. For existing patios with weeds, remove vegetation manually or use targeted herbicides. Prevent regrowth by maintaining polymeric sand between pavers. Geotextile fabric beneath base materials also prevents weed growth from below.
Can I install a patio over existing concrete?
Yes, but surface preparation is critical. Clean the concrete thoroughly and repair cracks or damage. For pavers, you can install directly on concrete if the surface is level and drains properly. For better results, add a sand base to allow drainage and minor adjustments. Overlay systems must account for height changes at transitions to other surfaces.


