Build a Shed? Expert Tips for Fast Results
Building a shed is one of the most rewarding DIY projects you can tackle, offering both practical storage solutions and a sense of accomplishment. Whether you need extra space for tools, gardening supplies, or recreational equipment, a well-constructed shed adds value to your property while providing years of reliable use. The key to completing your shed quickly without sacrificing quality lies in proper planning, material selection, and understanding the construction sequence.
Many homeowners underestimate the time required for shed construction, leading to rushed decisions that compromise structural integrity. By following expert guidance and implementing proven strategies, you can significantly reduce your building timeline while ensuring your shed meets local building codes and withstands weather challenges. This comprehensive guide reveals insider tips that professional builders use to accelerate projects while maintaining exceptional craftsmanship.

Planning and Permits: The Foundation of Success
Before breaking ground, invest time in comprehensive planning that will accelerate your actual construction work. Detailed plans serve as a roadmap, eliminating decision-making delays and material waste during the building process. Start by measuring your space precisely and determining your shed’s dimensions—standard sizes like 8×10, 10×12, or 12×16 feet align with readily available materials, reducing custom cutting and waste.
Check your local International Code Council building codes and zoning regulations before purchasing materials. Many jurisdictions require permits for structures over 200 square feet, and building code compliance ensures your shed is structurally sound and insurable. Contact your local building department early; permit approval timelines vary significantly by location, and obtaining permits upfront prevents costly delays or demolition orders later.
Create a detailed material list organized by construction phase. This approach allows you to purchase items strategically, potentially taking advantage of sales or bulk discounts. Group related items together—all framing lumber, all fasteners, all roofing materials—so you’re not making multiple supply runs during critical construction windows.
Consider whether you’ll use pre-designed plans or hire a designer. Stock shed plans accelerate the process since they’ve been optimized for buildability and typically include cutting lists, reducing calculation time. If you’re familiar with DIY beginner woodworking projects, adapting existing plans to your needs takes minimal additional time.
Material Selection for Speed and Durability
Choosing the right materials directly impacts both construction speed and long-term shed performance. Pressure-treated lumber resists rot and insect damage, extending your shed’s lifespan significantly. While slightly more expensive than untreated wood, pressure-treated materials eliminate the need for extensive maintenance treatments, saving time and money over the shed’s lifetime.
For faster assembly, select materials pre-cut to standard lengths whenever possible. Many building suppliers offer pre-cut framing packages designed for specific shed dimensions. These kits substantially reduce on-site cutting, a time-consuming step that generates sawdust, requires safety precautions, and demands precision.
Metal roofing panels install faster than traditional asphalt shingles and provide superior durability. A typical metal roof installation requires one-third the time of shingled roofs while offering 50+ year lifespans compared to 20-30 years for asphalt. The initial material cost is higher, but the speed advantage and longevity make it economically sensible for most projects.
Composite siding materials like fiber cement boards or vinyl panels offer significant time savings over traditional wood siding. They require no painting or staining, install quickly with simple fastening systems, and withstand weather without maintenance. Compare this to wood siding, which demands surface preparation, painting, and periodic repainting throughout the shed’s life.
Select hardware and fasteners strategically. Deck screws work faster than nails because they require no pilot holes in many applications and provide superior holding power. Invest in quality tools like impact drivers that dramatically accelerate fastening tasks—a $100-150 impact driver pays for itself in time saved on your first major project.
Site Preparation Essentials
Proper site preparation prevents foundation problems and eliminates delays caused by settling or water damage. Begin by clearing vegetation, rocks, and debris from your building footprint, extending at least 2 feet beyond all sides. This clearance allows equipment access and prevents moisture-retaining vegetation from contacting your structure.
Level your site using basic tools—a long straightedge, level, and shovel handle the job efficiently for small sheds. For larger projects, rent a laser level ($40-60 per day) that speeds leveling work dramatically. Uneven foundations cause frame misalignment, door and window problems, and structural stress, so investing time here prevents hours of frustrating adjustments later.
Ensure proper drainage by sloping your site away from the shed location. A 2-3% slope (roughly 2-3 inches of drop per 10 feet) directs water away from the foundation, preventing moisture accumulation that causes rot, mold, and structural decay. This simple step during site preparation prevents major problems that surface months or years later.
Compact your soil after clearing and leveling. Walk the area thoroughly or use a hand tamper to settle loose soil. Loose soil compacts under the shed’s weight, causing uneven settling and frame stress. Proper compaction takes minimal time but eliminates foundation problems that require expensive remediation.
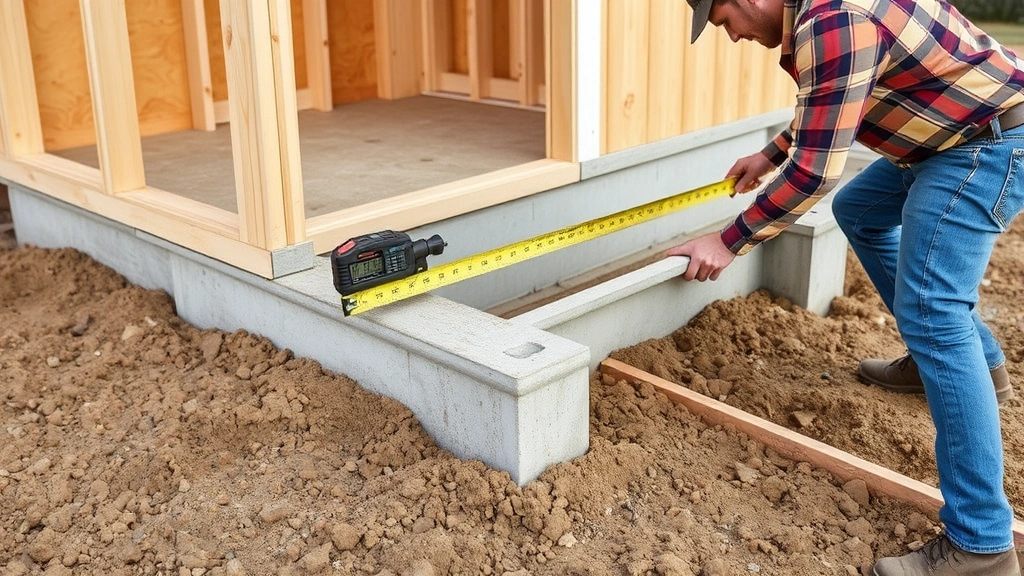
Foundation Options That Save Time
Your foundation choice significantly impacts construction speed and long-term durability. Concrete piers offer the fastest installation for shed projects. Pre-formed concrete blocks or piers set directly on compacted soil create a level building surface without extensive excavation or concrete work. This approach takes 2-4 hours for a typical 10×12 shed, compared to 1-2 days for poured concrete slabs.
Pier spacing typically runs 4-6 feet apart in a grid pattern beneath your shed’s perimeter and interior. Use a string line and level to ensure piers sit at identical heights—this single step prevents frame twisting and alignment issues that plague hastily constructed foundations. A laser level accelerates this verification process significantly.
Pressure-treated skids (heavy timber runners) set on properly spaced and leveled piers create a traditional shed foundation that allows air circulation underneath, reducing moisture problems. This approach works exceptionally well in humid climates and takes minimal additional time compared to pier-only systems.
For sheds in particularly wet locations, gravel or crushed stone bases under piers improve drainage. Lay 4-6 inches of gravel, compact it thoroughly, then set piers on top. This prevents water from pooling under your shed and extends the foundation’s lifespan dramatically.
Avoid direct soil contact for any wood components. Even pressure-treated lumber deteriorates rapidly when in constant contact with moist soil. The small additional effort required to create proper separation through piers or gravel bases prevents foundation failure and eliminates costly rebuilding work.
Framing Techniques for Rapid Construction
Framing represents the structural backbone of your shed and offers substantial opportunities for time optimization. Pre-assemble wall sections on the ground before raising them—this approach is faster and safer than building walls in place. Lay out your wall components on level ground, ensure corners are square using the 3-4-5 triangle method, fasten all connections, then raise completed walls as units.
Use 2×4 lumber for walls in most climates, as it’s readily available, cost-effective, and sufficiently strong for shed applications. Space wall studs 16 inches on center (standard framing) rather than 12 inches, reducing material costs and cutting time without compromising structural performance for typical shed loads.
Pre-drill nail holes and screw holes in exterior connections to prevent wood splitting, which causes fastening delays and weak connections. A cordless drill with appropriate bit sizes handles this task quickly and ensures clean, reliable joints.
Roof framing benefits from pre-calculated rafter designs. Simple shed roofs with single-slope designs frame faster than gable roofs. Rafter spacing of 24 inches on center (versus 16 inches) reduces material and labor while maintaining adequate strength for typical snow and wind loads in most regions. Verify your design against ICC structural standards to ensure compliance with your local climate zone requirements.
Install collar ties and ceiling joists to tie your roof structure together, preventing spreading under load. These components take minimal time to install but dramatically improve structural integrity and prevent long-term sagging or failure.
Roofing Solutions for Quick Installation
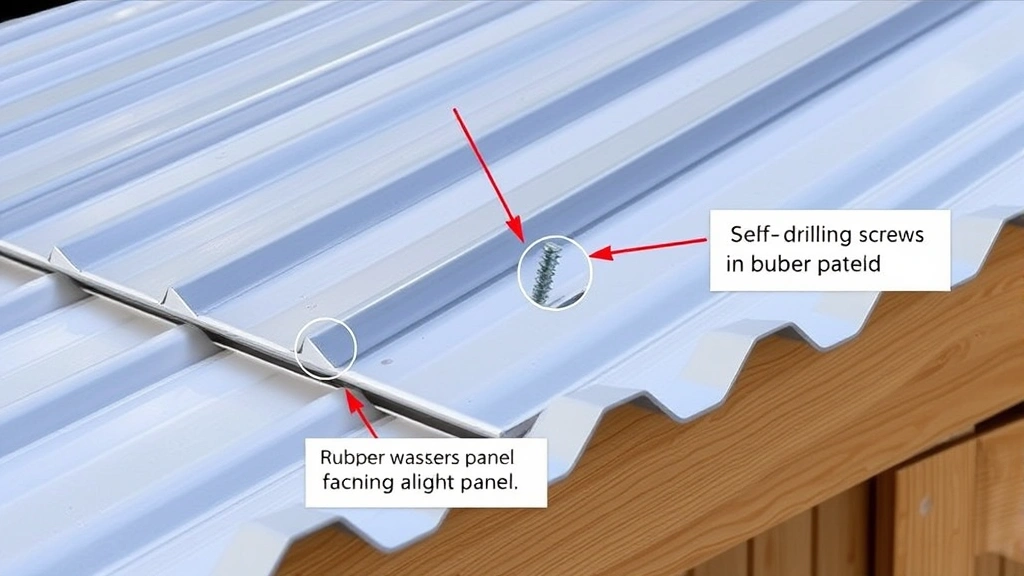
Roofing installation typically consumes 15-25% of total shed construction time, making material selection critical for project acceleration. Metal roofing panels install with remarkable speed—a typical 10×12 roof completes in 4-6 hours with two workers. Asphalt shingles require 12-16 hours for the same area due to individual shingle placement, nailing, and overlapping requirements.
Metal roofing panels attach with self-drilling screws fitted with rubber washers that seal against weather. This fastening system is straightforward and forgiving compared to shingling, which demands precision and experience to prevent leaks. The learning curve is minimal, making metal roofing ideal for DIY builders.
Ensure proper roof slope for your climate. A minimum 4-in-12 slope (4 inches of vertical rise per 12 inches of horizontal run) sheds water effectively in most regions. Steeper slopes shed snow faster in heavy-snow climates, reducing snow-load stress on your structure. Check NOAA climate data for your region’s typical snow loads and rain intensity to design appropriate slope.
Install metal flashing around any penetrations—vent pipes, chimneys, or skylights—before installing roofing panels. Flashing prevents water intrusion at vulnerable points and takes minimal time when installed before panels are in place. Retrofitting flashing after roofing installation requires removing panels, significantly increasing labor.
Consider metal roofing colors carefully—lighter colors reflect heat, reducing interior temperatures in sunny locations. Darker colors absorb heat, which can be advantageous in cold climates. This aesthetic and functional choice costs nothing additional but impacts your shed’s comfort and usability.
Siding and Finishing Touches
Siding installation follows roof completion and offers several speed-oriented material choices. Vinyl siding panels snap together with minimal fastening, installing in roughly half the time required for wood siding. Fiber cement boards offer superior durability and weather resistance while maintaining straightforward installation procedures.
Horizontal lap siding (boards overlapped like fish scales) installs faster than vertical board-and-batten styles, which require additional vertical strips and more precise alignment. Horizontal applications work well with most shed aesthetics and provide excellent weather protection.
Paint or stain your siding before installation when possible. Pre-finishing components reduces on-site painting time and produces superior results compared to painting installed siding. This approach also protects wood edges and joints that are difficult to reach after installation.
Install doors and windows after siding completion. Pre-hung doors and windows arrive as complete units, dramatically reducing installation time compared to building frames and hanging doors individually. Verify opening dimensions match your door and window specifications before framing—a simple verification prevents frustrating adjustments later.
Consider the relationship between your shed and your home’s architecture. Matching roofing materials, siding colors, or architectural details creates visual coherence that increases property appeal. This aesthetic coordination costs nothing additional but significantly impacts curb appeal.
Interior finishing depends on your shed’s purpose. Tool storage sheds benefit from wall-mounted pegboard and shelving that maximize vertical space. Garden sheds work well with potting benches and organized tool storage. DIY home security considerations might include motion-sensor lighting for nighttime visibility and security. Plan interior layouts before construction completion, allowing you to pre-install mounting hardware and shelving systems efficiently.
Safety Considerations Throughout the Build
Prioritize safety throughout your shed construction to prevent injuries that derail projects and create lasting damage. Wear appropriate personal protective equipment—safety glasses protect against flying debris and wood chips, work gloves prevent splinters and improve grip, and steel-toed boots protect feet from dropped materials and tools.
Use proper fall protection when working at heights above 6 feet. Roof work creates particular hazards; secure yourself with a harness attached to stable anchor points. Many serious injuries occur when builders skip safety measures they perceive as slowing progress, but safety delays prevent far more serious project interruptions caused by injuries.
Operate power tools with both hands and maintain firm footing. Cordless drills and impact drivers have substantial rotational forces that cause wrist injuries if tools bind unexpectedly. Maintain focus and avoid fatigue—most accidents occur when builders work too long without breaks, leading to reduced concentration and coordination.
Ensure proper ventilation when using pressure-treated lumber, especially during cutting operations. Pressure-treatment chemicals create dust that irritates respiratory systems. Work outdoors whenever possible and wear a dust mask when cutting pressure-treated materials indoors.
Inspect all tools before use. Dull saw blades bind and kick back; damaged drill bits break and spin dangerously; frayed electrical cords create shock hazards. Spending 5 minutes on tool inspection prevents injuries that might require emergency room visits and project delays.
Maintain a clean work site throughout construction. Scraps, fasteners, and debris create tripping hazards and hide dangerous obstacles. Spending 10 minutes daily on site cleanup prevents injuries and keeps your work area organized for efficient progress.
Follow OSHA construction safety guidelines for shed building projects. While OSHA regulations technically apply to commercial construction, the safety principles apply equally to DIY projects and prevent serious injuries.
FAQ
How long does it typically take to build a shed?
A standard 10×12 shed takes 3-5 days for an experienced builder working alone, or 2-3 days with two workers. Timelines vary based on foundation type, material selection, weather, and builder experience. Simpler designs with pre-cut materials complete faster than complex designs requiring extensive customization.
What’s the most time-consuming part of shed building?
Roofing typically consumes the most time, followed by siding installation and foundation preparation. Material selection and proper planning at the project’s beginning prevent delays that consume far more time during actual construction. Weather delays also impact timelines substantially—plan projects during dry seasons when possible.
Can I build a shed in one weekend?
A small 8×8 shed with pre-cut materials and a simple foundation might complete in one intensive weekend with two workers. Larger structures or complex designs require multiple weekends. Realistic timelines prevent rushed decisions that compromise quality and safety.
What’s the minimum foundation requirement for a shed?
Most jurisdictions require sheds to sit on foundations that prevent direct soil contact and allow drainage. Concrete piers, gravel bases with treated skids, or concrete slabs all meet these requirements. Check your local building code for specific requirements—some areas mandate frost-protected foundations to prevent frost heave damage.
Do I need a permit to build a shed?
Permit requirements vary by jurisdiction. Most areas require permits for structures over 200 square feet or for permanent structures. Some require permits regardless of size. Contact your local building department to verify requirements—unpermitted structures might face removal orders or insurance complications.
What’s the best roofing material for a shed?
Metal roofing offers the best combination of speed, durability, and cost-effectiveness for shed projects. Asphalt shingles work well for budget-conscious builders, though installation takes longer. Metal roofing typically lasts 50+ years while asphalt shingles last 20-30 years, making the initial material cost difference worthwhile.
Should I hire a contractor or build myself?
Building yourself saves significant money but requires time and skill. Contractors complete projects faster but cost substantially more. Consider your skill level, available time, and budget carefully. Many builders hire contractors for foundation and roofing work while handling framing and finishing themselves—a compromise approach that balances cost and timeline.


