How to Build a Shed: Expert Tips Inside
Building a shed is one of the most rewarding DIY projects you can undertake. Whether you need extra storage space, a workshop, or a garden retreat, constructing your own shed gives you complete control over design, materials, and functionality. This comprehensive guide walks you through every step of the process, from initial planning through final finishing touches.
A well-built shed not only adds value to your property but also provides practical storage solutions and potential workspace for hobbies and projects. Unlike purchasing a prefabricated structure, building your own allows customization to match your specific needs and aesthetic preferences. With proper planning, the right tools, and attention to detail, even first-time builders can create a sturdy, long-lasting structure.
Planning, Permits, and Site Selection
Before breaking ground on your shed project, invest time in thorough planning. Start by determining your shed’s purpose—will it serve as a storage facility, workshop, garden studio, or multipurpose space? This decision influences size, ventilation requirements, electrical needs, and interior layout. Most homeowners find that a 8×10 or 10×12 shed provides excellent versatility without overwhelming the landscape.
Check your local building codes and zoning regulations before proceeding. Many municipalities require permits for structures over a certain size (typically 100-200 square feet), and setback requirements dictate how far your shed must sit from property lines. Visit your local building department or check their website for specific regulations. Some areas also have HOA restrictions that may affect shed placement, size, or appearance.
Select a level or slightly sloping site with good drainage. Avoid low-lying areas where water collects, as moisture is a shed’s primary enemy. Ensure the location receives adequate sunlight if you plan to use solar panels or work inside during daylight hours. Clear the area of vegetation, rocks, and debris before construction begins. Consider proximity to utilities—knowing where underground pipes and electrical lines run prevents costly and dangerous mistakes.
Foundation and Base Preparation
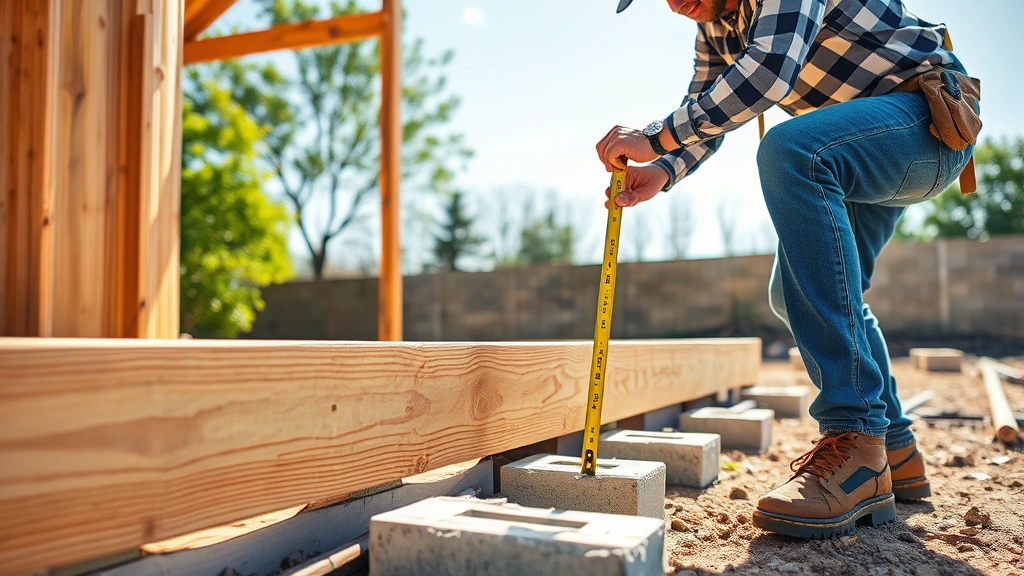
A solid foundation is absolutely critical for shed longevity. Poor foundation work leads to structural problems, pest infiltration, and premature deterioration. Your foundation choice depends on local climate, budget, and soil conditions. Common options include concrete slabs, concrete piers, gravel beds, and skid foundations.
Concrete Slab Foundation: This is the most durable option for long-term durability. Excavate 4-6 inches, compact the soil, add a gravel base, and pour reinforced concrete. This method prevents ground moisture from wicking into wood framing and resists frost heave in cold climates. Consult ICC (International Code Council) standards for proper thickness based on your region.
Concrete Pier System: Frost-protected footings extend below the frost line (typically 36-48 inches in northern climates) to prevent heaving. This method works well in freeze-thaw environments and requires less excavation than a full slab.
Gravel Base: For small sheds in moderate climates, a compacted gravel base topped with landscape fabric offers budget-friendly support. This method allows better drainage but requires more maintenance and doesn’t prevent ground moisture as effectively.
Measure diagonals to ensure your foundation is perfectly square—both diagonals should measure identically. Use a transit level or laser level to verify proper slope for water drainage (typically 1/8 inch per foot). A foundation that’s off-square by even a few inches causes problems during framing and roofing.
Before starting any major construction project like basement finishing, understanding foundation principles proves invaluable. The same attention to detail applies whether you’re building up or out.
Framing the Structure
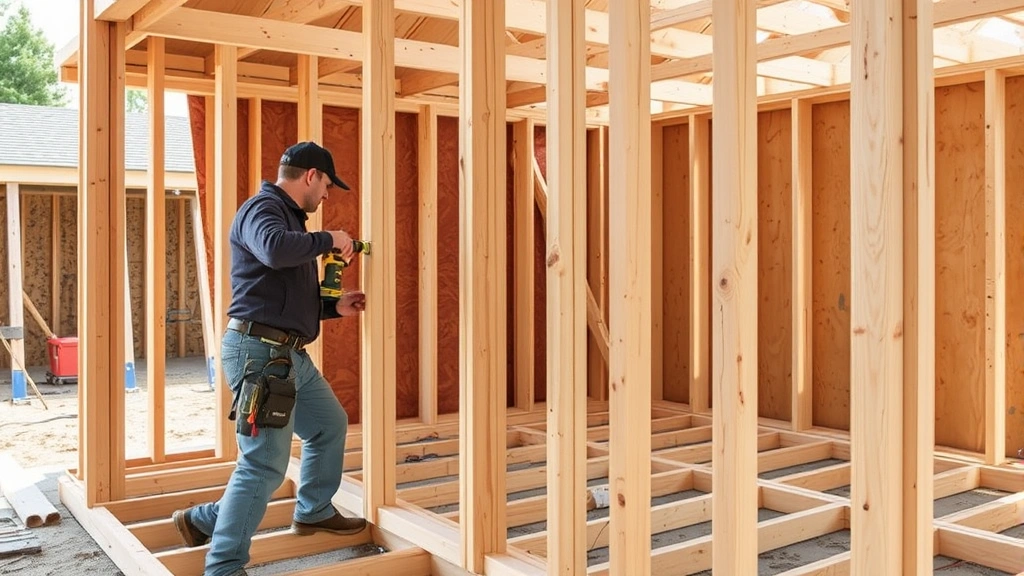
Proper framing creates the skeleton that supports your entire shed. Most sheds use conventional wood framing with 2×4 or 2×6 lumber. Start by constructing the floor frame if you’re using a concrete slab with perimeter support. For pier foundations, the floor frame becomes your actual base.
Floor Frame Construction: Use pressure-treated lumber rated for ground contact. Space floor joists 16 inches on center for standard residential loads. Install rim joists around the perimeter and add cross-bracing to prevent racking. The floor should be slightly higher than surrounding grade to shed water away from the structure.
Wall Framing: Build wall frames on the floor, then tip them up into place. Typical wall height ranges from 7 to 10 feet, depending on your design and local preferences. Use 2×4 studs spaced 16 inches on center for single-story sheds. Install a top plate, bottom plate, and vertical studs with proper blocking between studs for lateral bracing.
Include rough openings for windows and doors during framing—don’t cut them out afterward. Header size depends on opening width and load requirements. For openings wider than 4 feet, consult a structural engineer or reference NFPA building guidelines for proper sizing.
Roof Framing: Roof pitch (slope) affects both appearance and water drainage. A 4:12 pitch (4 inches of rise per 12 inches of run) is common for sheds and provides good water shedding while maintaining reasonable construction difficulty. Rafters typically use 2×6 lumber spaced 24 inches on center. Install collar ties and ceiling joists to prevent racking and distribute loads properly.
Ensure all framing is plumb (perfectly vertical) and level before proceeding. Use a 4-foot level and check in multiple directions. Diagonal bracing or shear walls prevent racking—the tendency of rectangular frames to distort into parallelograms under stress.

Roofing Systems
Your roof is the first line of defense against weather. Poor roofing leads to interior damage, structural rot, and mold growth. Shingles, metal roofing, and polycarbonate panels each offer distinct advantages.
Asphalt Shingle Roofing: This is the most economical choice and offers 15-30 year lifespans depending on quality. Install roofing felt or synthetic underlayment before shingles to add protection against water infiltration. Nail shingles properly—4 nails per shingle placed correctly prevents wind damage and premature failure. Ensure proper ventilation in the attic space to prevent moisture accumulation and extend shingle life.
Metal Roofing: Standing seam or corrugated metal panels last 40-70 years and handle snow and ice better than shingles. Metal reflects heat, keeping interiors cooler. Installation requires more precision—improper sealing leads to leaks. Thermal expansion and contraction means fasteners must allow movement.
Polycarbonate Panels: Translucent panels allow natural light inside while providing weather protection. They work well for garden studios or greenhouses but don’t offer the insulation value of solid roofing.
Install gutters and downspouts to direct water away from the foundation. Gutters prevent water from cascading down siding and pooling at the base. Downspouts should discharge at least 4-6 feet from the structure’s foundation. Clean gutters seasonally to prevent clogs that cause overflow and water damage.
Siding, Doors, and Windows
Siding protects framing from weather while defining your shed’s appearance. Wood, vinyl, metal, and composite options each have merits. Before selecting siding, review your local building code requirements—some HOAs restrict materials or colors.
Wood Siding: Traditional cedar or pine siding offers authentic appearance and easy customization through paint colors. However, wood requires regular maintenance—staining or painting every 3-5 years prevents rot. Ensure proper ventilation behind siding to prevent moisture accumulation.
Vinyl Siding: Durable, low-maintenance, and cost-effective, vinyl resists rot and insects. Installation is straightforward, and color options are extensive. Vinyl doesn’t accept stain but accepts paint if you prefer customization later.
Metal Siding: Corrugated or panel metal siding is economical, durable, and works well for utilitarian structures. Metal conducts heat, so consider insulation if your shed will have temperature-sensitive contents.
Composite Materials: Fiber cement boards and recycled composite siding offer durability and low maintenance while accepting stain or paint for customization.
Install house wrap or weather barriers before siding to add an additional moisture barrier. Proper flashing around windows and doors prevents water infiltration—a common cause of interior damage. Flashing should overlap sheathing and siding in a way that sheds water downward and outward.
Choose doors and windows appropriate for your climate and intended use. Standard prehung exterior doors simplify installation. Ensure doors are hung plumb and square, with proper weatherstripping to prevent air and water infiltration. Windows improve natural lighting and ventilation—operable windows allow moisture management in humid climates.
For those interested in broader home improvement, our guide to DIY house painting techniques provides valuable finishing strategies applicable to shed exteriors as well.
Interior Finishing and Organization
Interior finishing transforms your shed from bare structure to functional space. Insulation, electrical work, and storage solutions maximize usability and protect contents.
Insulation: If your shed will house temperature-sensitive items or serve as a workspace, insulation becomes important. Fiberglass batts, blown-in cellulose, or foam boards all work. Install vapor barriers on the warm side of insulation to prevent moisture migration. Proper ventilation prevents condensation issues that lead to mold growth.
Electrical Systems: If you need power for tools, lighting, or climate control, hire a licensed electrician to run circuits safely. Improper electrical work creates fire hazards and safety risks. Ground fault circuit interrupter (GFCI) outlets protect against shock in damp environments. Ensure all work meets NECA (National Electrical Contractors Association) standards and local code requirements.
Flooring: Concrete slabs work well for utility sheds. For climate-controlled spaces, plywood subfloors with finished flooring (vinyl, laminate, or hardwood) create comfortable workspaces. Proper underlayment prevents moisture wicking from concrete.
Storage Solutions: Install wall-mounted shelving, pegboards, and cabinetry to maximize vertical space. Overhead storage racks use ceiling height efficiently. Label storage areas and organize by frequency of use—items you access daily should be most accessible.
Ventilation and Climate Control: For sheds in humid climates, install vents or small fans to prevent moisture accumulation. If storing sensitive items or using the space as a workshop, dehumidifiers may be necessary. Proper air circulation prevents mold and extends the life of stored items and the structure itself.
The same organizational principles we discuss in our home security guide apply to shed organization—knowing what you have and where it is increases efficiency and safety.
Frequently Asked Questions
Do I need a permit to build a shed?
Most jurisdictions require permits for structures over 100-200 square feet. Check your local building department’s specific requirements. Permits exist to ensure structures meet safety codes and don’t violate zoning regulations. Building without required permits can result in fines, difficulty selling your property, and problems with insurance claims.
What’s the best foundation for a shed?
Concrete slabs offer the best long-term durability, especially in freeze-thaw climates. Concrete piers work well for areas with significant frost heave. Gravel bases suit small sheds in moderate climates with good drainage. Your choice depends on local climate, budget, and intended use.
How long does it take to build a shed?
A typical 8×10 shed takes 2-4 weeks for an experienced builder, or 4-8 weeks for a first-time builder. This timeline assumes good weather and assumes you’re doing the work yourself. Foundation curing may add 1-2 weeks if using concrete.
Can I build a shed on my own?
Yes, with proper planning and research. Many people successfully build sheds as DIY projects. However, some tasks (electrical work, complex roofing) may warrant professional help. Start with detailed plans, gather quality tools, and don’t hesitate to consult professionals for specialized work.
What tools do I need to build a shed?
Essential tools include a circular saw or miter saw, power drill, level, measuring tape, square, hammer, and safety equipment. A table saw, reciprocating saw, and nail gun accelerate the process. Rent specialized tools like concrete mixers or roof nailers rather than purchasing them for one project.
How do I prevent rot in my shed?
Use pressure-treated lumber for framing and any wood contacting soil or concrete. Install proper flashing around openings to prevent water infiltration. Ensure good drainage around the foundation and install gutters and downspouts. Maintain siding with regular staining or painting. Install proper ventilation to prevent moisture accumulation.
What’s the best roofing material for a shed?
Asphalt shingles offer the best value for most applications. Metal roofing lasts longer (40-70 years) but costs more. Polycarbonate panels work well for light-transmitting roofs. Consider your climate, budget, and maintenance tolerance when choosing.
Should I insulate my shed?
Insulation is worthwhile if you’ll use the shed as a workspace, store temperature-sensitive items, or live in an extreme climate. Basic fiberglass batts provide good insulation at reasonable cost. Ensure proper vapor barriers and ventilation to prevent moisture problems.
For additional DIY project inspiration and detailed guidance, visit the DIY Nests Hub Blog for comprehensive home improvement resources.


