How to Build a Deck: Expert-Approved Guide
Building a deck transforms your outdoor space into a functional entertainment area while adding significant value to your home. Whether you’re a seasoned DIY enthusiast or tackling your first major project, this comprehensive guide walks you through every step of deck construction—from initial planning and material selection to final finishing touches. A well-built deck not only enhances your property’s aesthetic appeal but also provides a safe, durable space for family gatherings and outdoor relaxation for years to come.
Before you break ground, understanding local building codes, obtaining necessary permits, and mastering proper construction techniques is essential. This guide covers everything you need to know to build a deck that meets safety standards, withstands weather conditions, and delivers the outdoor living space you’ve envisioned. We’ll explore material choices, structural requirements, and step-by-step construction methods that professional builders use.
Planning Your Deck and Understanding Permits
The foundation of any successful deck project begins with thorough planning. Start by determining your deck’s purpose, size, and location. Consider how you’ll use the space—will it accommodate dining, lounging, or entertaining? Measure your available space carefully and sketch preliminary designs. A typical residential deck ranges from 12×16 feet to 20×20 feet, though custom sizes are common based on specific needs.
Obtaining building permits is non-negotiable, despite tempting shortcuts. Permits ensure your deck meets local structural codes, safety standards, and zoning requirements. Contact your local building department to understand specific regulations for your area. Most jurisdictions require deck plans showing post spacing, beam sizing, railing height, and stair dimensions. According to the International Code Council (ICC), deck posts must be spaced no more than 6 feet apart, and railings must be 36-42 inches high with balusters spaced less than 4 inches apart to prevent child entrapment.
Inspect your site for underground utilities—call before you dig to locate gas lines, electrical conduits, and water pipes. Check for drainage issues, tree roots, and soil conditions that might affect post installation. Document your findings and adjust your design accordingly. Understanding these preliminary steps prevents costly mistakes and ensures your deck project starts on solid ground.
Choosing the Right Materials
Material selection dramatically impacts your deck’s longevity, appearance, and maintenance requirements. You have three primary categories: pressure-treated lumber, composite decking, and premium hardwoods. Each offers distinct advantages and considerations.
Pressure-Treated Lumber remains the most economical choice for structural components and decking. Modern treatments using copper-based preservatives are safe and effective against rot and insect damage. Pressure-treated wood is ideal for posts, beams, and joists. However, it requires regular staining or sealing every 2-3 years to maintain appearance and protection.
Composite Decking combines wood fibers with plastic polymers, offering superior durability and minimal maintenance. While more expensive upfront—typically two to three times the cost of pressure-treated wood—composite materials resist fading, staining, and rot without seasonal maintenance. They’re excellent for visible decking surfaces where appearance matters long-term. Popular brands include Trex, TimberTech, and Azek, each with specific installation requirements documented in their technical specifications.
Hardwoods like cedar, redwood, and tropical species provide natural beauty and decay resistance. Cedar and redwood contain natural oils that repel insects, though they still benefit from occasional sealing. Tropical hardwoods like Ipe and Cumaru offer exceptional durability but require specialized tools for cutting and fastening.
For structural components, always use pressure-treated lumber rated for ground contact. Never use interior-grade lumber for posts or beams. Select lumber graded for structural use—look for stamps indicating Southern Pine, Hem-Fir, or Spruce-Pine-Fir species with appropriate stress ratings.
Essential Tools and Equipment
Proper tools ensure efficiency, accuracy, and safety throughout your deck project. Essential hand tools include a tape measure, circular saw, power drill-driver, level, square, and adjustable wrench. A miter saw significantly speeds up crosscutting lumber to length. A reciprocating saw helps with post cutting and adjustments.
Power equipment recommendations include a cordless drill-driver (18V minimum), impact driver for fastening, and a quality circular saw with a fine-toothed blade for clean cuts. A post-hole digger or power auger expedites foundation work. Rent a power auger if digging multiple post holes—it saves considerable time and physical strain.
Safety equipment is non-negotiable: wear safety glasses, work gloves, hearing protection, and a dust mask when cutting. Use fall protection if working at heights. Have a first-aid kit accessible and maintain a clean, organized work area to prevent accidents. Proper tool maintenance—sharp blades, clean equipment, secure handles—prevents injuries and improves work quality.
Building the Foundation and Posts
A solid foundation determines your entire deck’s structural integrity. Posts must transfer all deck weight safely to the ground below the frost line. In most climates, frost line depth ranges from 2-4 feet—check your local building department for specific requirements in your region.
Post Hole Installation: Dig post holes to appropriate depth, typically 3-4 feet for residential decks. Holes should be 12 inches in diameter for 4×4 posts. Space posts no more than 6 feet apart along the ledger and rim joists. Use a post-hole digger or power auger for efficiency. Ensure holes are straight and holes at similar depths prevent uneven settling.
Concrete Footings: Place 6 inches of gravel in each hole for drainage, then set 4×4 posts in concrete footings. Use concrete rated for outdoor use that resists freeze-thaw cycles. Mix concrete per manufacturer instructions and fill holes to ground level. Allow 48 hours for curing before loading. Some builders prefer adjustable post bases that sit above ground, simplifying future replacement if rot occurs.
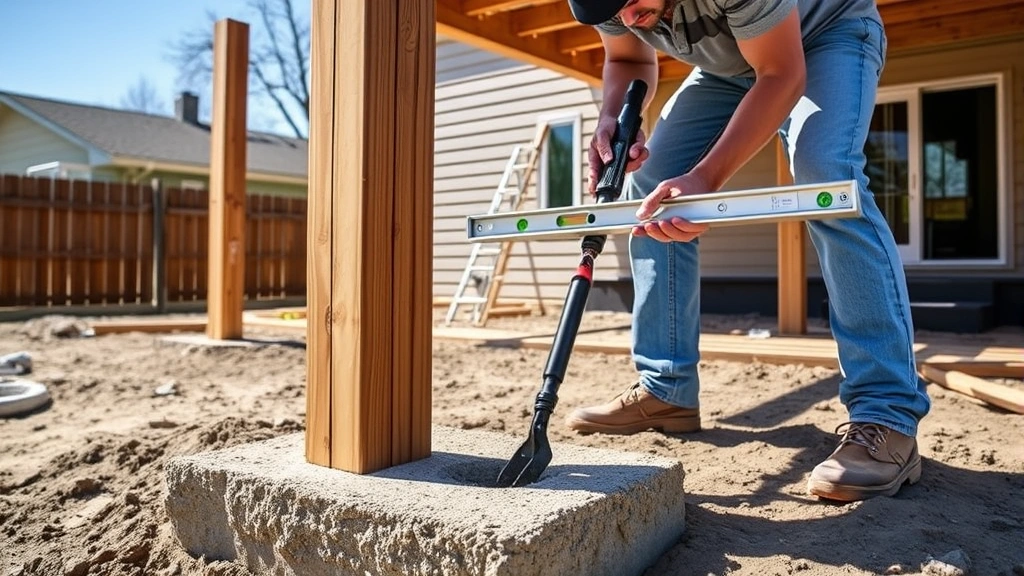
Post Height and Leveling: Calculate post heights by measuring from ground to desired beam height. Typically, deck surface sits 8-10 inches above ground for proper drainage. Use a water level or transit to ensure all posts are cut to the same height. Uneven posts create sloping decks and structural stress. Double-check measurements before cutting—cutting too short requires replacing the post.
Posts must be perfectly vertical. Use a 4-foot level on two perpendicular sides to verify plumb. Adjust post position slightly if necessary before concrete fully cures. Proper post installation is foundational—time invested here prevents structural problems later.
Framing the Deck Structure
Once posts are set, install beams and joists to create the deck’s structural frame. Beams rest on posts and support joists, which in turn support decking boards. Proper sizing and spacing are critical for safety and durability.
Beam Installation: Beams typically consist of doubled 2×10 or 2×12 lumber, sized based on span distance and load requirements. Beams are bolted to posts using lag bolts or through-bolts. Position bolts below the beam’s neutral axis—typically 2-3 inches from the top—to prevent splitting. Use large washers under bolt heads to distribute load and prevent fastener pull-through.
Joist Installation and Spacing: Joists are typically 2×8 or 2×10 lumber spaced 16 inches on-center, though 12-inch spacing provides additional support for heavier loads or longer spans. Joists span perpendicular to beams and are fastened with joist hangers—metal brackets that support joists from above while allowing for wood shrinkage. Never rely on nails alone; use joist hanger fasteners as specified by the hanger manufacturer.
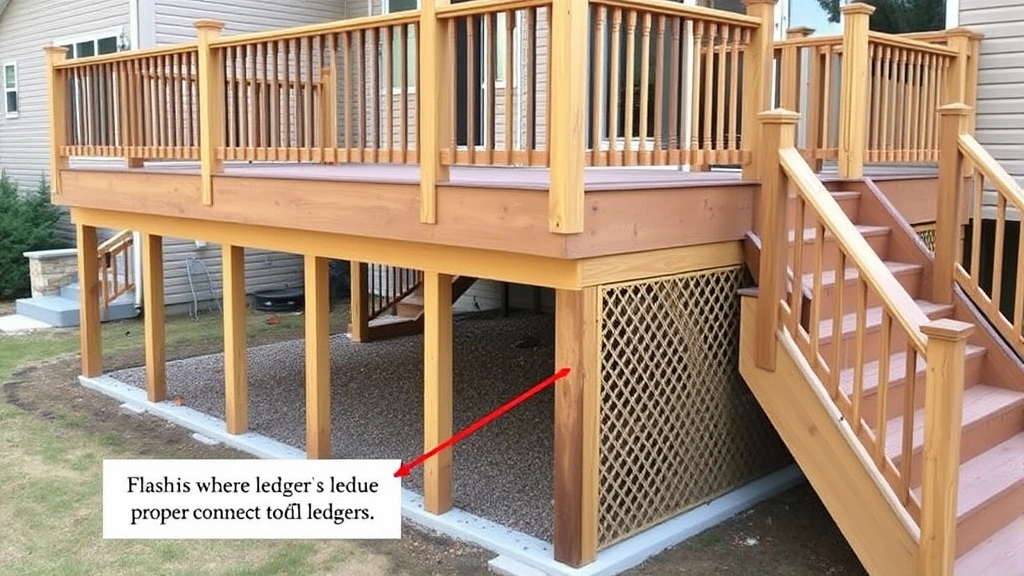
Ledger Board Connection: The ledger board connects your deck to your house, transferring lateral loads and providing support. This connection is critical for safety and must be flashed properly to prevent water intrusion and rot. Install the ledger board directly to the house’s rim joist using lag bolts or through-bolts spaced 16 inches apart. Install flashing—typically aluminum or rubber membrane—between the ledger and house exterior to direct water away from the structure. This prevents water from pooling behind the ledger and causing rot in your home’s framing.
Bracing and Blocking: Add diagonal bracing under joists spanning more than 12 feet to reduce movement and bounce. Install blocking between joists at mid-span for longer joists to prevent twisting. These elements improve structural rigidity and user comfort.
Installing Decking Boards
Decking boards are the visible surface where people walk and relax. Proper installation ensures safety, longevity, and aesthetic appeal. Begin installation at the house or most visible area, working toward the outer edge.
Board Selection and Preparation: Choose boards free from major knots, splits, or warping. Allow pressure-treated lumber to acclimate to local humidity for several days before installation—this reduces cupping and warping after fastening. Composite boards should also acclimate per manufacturer specifications, typically 48 hours in the installation environment.
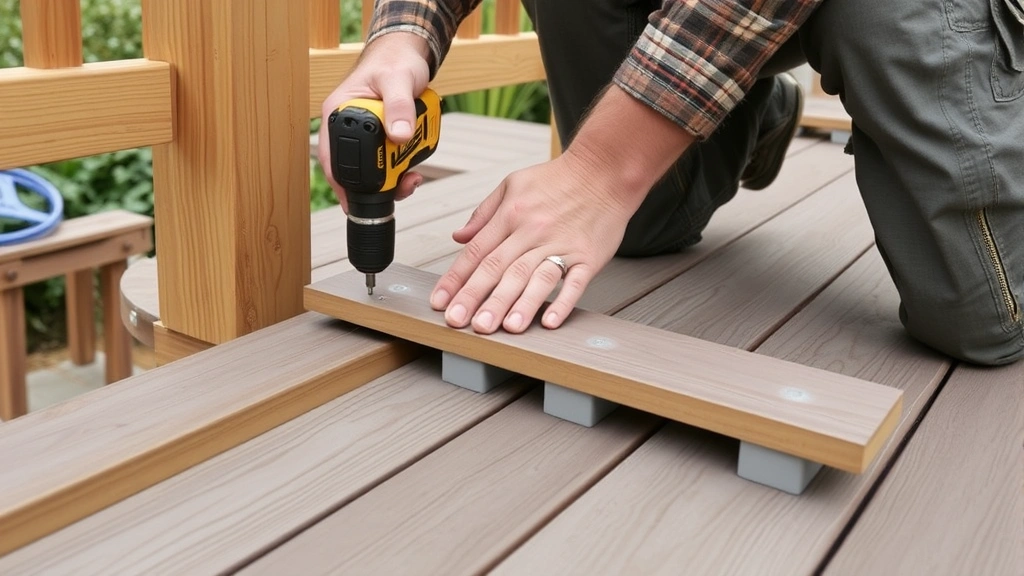
Fastening Methods: Use corrosion-resistant fasteners—stainless steel or hot-dipped galvanized—to prevent rust staining and fastener failure. Install 2.5-inch deck screws or 3-inch ring-shank nails, using two fasteners per board per joist. Screws are preferable to nails as they resist withdrawal from wood shrinkage. Pre-drill screw holes in hardwoods to prevent splitting.
Board Spacing and Layout: Space boards 1/8 inch apart for pressure-treated lumber to allow for wood swelling in wet conditions. Composite boards typically require 1/4-inch spacing per manufacturer specifications. Use spacer blocks to maintain consistent spacing. Stagger board joints across joists, never allowing joints to align in adjacent rows—this creates weak lines and potential failure points.
Edge Details: Install fascia boards along the deck’s outer edges for a finished appearance and to protect joist ends from weather exposure. Fascia boards are typically 1×8 or 1×10 lumber matching your decking material. They cover exposed joist ends and provide a clean transition to the ground.
Proper decking installation creates a safe, durable surface that remains attractive and functional for years. Take time during this phase—rushing fastening or spacing creates problems that are difficult to correct later.
Adding Railings and Stairs
Railings are essential safety components required by code on decks elevated more than 30 inches above ground. Stairs provide safe access and must meet specific dimensional requirements for user safety.
Railing Specifications: Railings must be 36-42 inches high measured from the deck surface. Balusters (vertical spindles) must be spaced less than 4 inches apart—measured with a 4-inch sphere—to prevent child entrapment. The railing must resist 200 pounds of horizontal force without failing. Build railings from pressure-treated lumber, composite materials, or metal to ensure durability.
Railing Installation: Install vertical posts (4×4) at each corner and intermediate locations, typically 4-6 feet apart. Posts are bolted to the rim joist or deck frame. Horizontal top and bottom rails connect posts, with balusters fastened between them. Ensure all connections are secure and bolts are tightened properly.
Stair Dimensions: Stairs must have consistent rise (vertical height) and run (horizontal depth). Building codes typically require 7-8 inch risers and 10-11 inch treads. Calculate total rise by measuring from deck surface to ground. Divide by desired riser height to determine number of steps. Adjust dimensions slightly to achieve equal risers—uneven steps create tripping hazards.
Stair Construction: Build stairs using stringers—angled support beams with cut notches for treads. Use 2×12 lumber for stringers, cutting notches using a circular saw and jigsaw. Install 2×10 or 2×12 treads across stringers using corrosion-resistant fasteners. Install railings on both sides of stairs if width exceeds 44 inches. Ensure stairs are securely bolted to the deck and grounded at the bottom to prevent movement.
Finishing and Maintenance
Proper finishing protects your deck investment and maintains its appearance. The finishing process varies based on your chosen materials and climate conditions.
Pressure-Treated Wood Finishing: Allow newly installed pressure-treated lumber to weather for 3-6 months before applying finishes. This allows the wood to dry and stabilize. Apply exterior deck stain or sealer using a brush, roller, or sprayer. Choose semi-transparent stains that penetrate wood while providing UV protection. Avoid solid stains that peel and flake. Reapply finishes every 2-3 years to maintain protection.
Composite Finishing: Composite materials typically require minimal finishing—usually just manufacturer-recommended cleaning. Some composites benefit from UV-protective coatings in extremely sunny climates. Follow manufacturer specifications carefully, as improper finishing can void warranties.
Hardwood Finishing: Cedar and redwood benefit from annual sealing with exterior wood sealers. Tropical hardwoods are naturally durable but may be finished for appearance. Use penetrating sealers rather than film-forming finishes that can trap moisture.
Long-Term Maintenance: Inspect your deck annually for signs of damage, rot, or fastener corrosion. Check that bolts remain tight and railings are secure. Clear debris from under the deck to promote air circulation and prevent moisture accumulation. Trim nearby vegetation to allow sunlight and air exposure. Address repairs promptly—replacing a single rotted board is far less expensive than structural repairs resulting from neglected damage.
When you’re ready to tackle other home improvement projects, our guides on DIY basement finishing, DIY house painting, and DIY home security provide comprehensive instructions for other outdoor and indoor improvements that enhance your home’s value and functionality.
Frequently Asked Questions
How much does it cost to build a deck?
Deck costs vary significantly based on size, materials, and complexity. A basic 12×16 foot pressure-treated wood deck costs $2,000-$4,000 for materials. Composite decking increases costs to $4,000-$8,000 for the same size. Premium hardwoods and custom designs can exceed $10,000. Labor adds $3,000-$8,000 depending on local rates and project complexity.
Can I build a deck without a permit?
Building without a permit violates local codes and creates liability issues. Unpermitted decks may not be insured, can create problems when selling your home, and expose you to fines. Permits ensure your deck meets safety standards. The permit cost is modest compared to potential problems.
What’s the best decking material?
The best material depends on your priorities. Pressure-treated wood offers affordability but requires regular maintenance. Composite materials provide durability and low maintenance but cost more upfront. Hardwoods offer natural beauty and longevity for premium budgets. Consider your climate, maintenance preferences, and budget when choosing.
How long does a deck last?
Properly maintained pressure-treated wood decks last 15-20 years. Composite decks last 25-30 years with minimal maintenance. Hardwood decks can last 20-40 years depending on species and maintenance. Regular sealing, cleaning, and repairs extend deck life significantly.
Do I need a foundation for my deck?
Yes, a proper foundation below the frost line is essential for structural integrity and safety. Decks built on ground-level posts without proper footings settle unevenly, creating safety hazards and structural damage. Always install posts below frost line depth in your region.
What’s the proper spacing between deck boards?
Pressure-treated wood boards should have 1/8-inch spacing to allow for swelling when wet. Composite boards typically require 1/4-inch spacing per manufacturer specifications. This spacing prevents buckling and allows water drainage.
How often should I seal my deck?
Pressure-treated wood decks should be sealed every 2-3 years. Composite decks rarely need sealing but may benefit from cleaning. Hardwood decks benefit from annual sealing. Climate conditions—extreme sun, moisture, freeze-thaw cycles—may require more frequent maintenance.
Can I build a deck myself?
Yes, with proper planning, tools, and attention to safety and codes. Deck building is achievable for experienced DIYers but requires understanding structural principles, building codes, and proper fastening techniques. Start with smaller projects and consult building codes and manufacturer specifications throughout. Consider hiring professionals for complex aspects like ledger installation or stair stringers if uncertain.


