DIY Shed Roof? Builder-Backed Guide to Installation & Maintenance
Building a shed roof is one of the most rewarding DIY projects you can tackle, combining structural integrity with practical skill development. Whether you’re adding a new shed to your property or replacing an aging roof, understanding the fundamentals of roof construction will save you thousands in contractor fees while ensuring your structure stands strong for decades. This comprehensive guide walks you through every phase of shed roof installation, from material selection to final weatherproofing, using industry-standard techniques that professional builders rely on.
A properly constructed shed roof protects your tools, equipment, and stored items from the elements while adding functional outdoor space to your property. The roofing system you choose affects everything from installation difficulty to long-term maintenance requirements and weather resistance. We’ll explore the most popular roofing materials, explain the step-by-step installation process, and provide insider tips that only experienced builders typically share with their crews.
Choosing Your Shed Roof Material
The material you select for your shed roof determines not only the aesthetic appearance but also the durability, installation complexity, and maintenance schedule. Each option carries distinct advantages and trade-offs that should align with your climate, budget, and skill level. Understanding these differences prevents costly mistakes and ensures your investment performs as expected.
Asphalt Shingles remain the most popular choice for residential shed roofs due to their affordability, ease of installation, and proven performance. Standard three-tab shingles cost between $100-$300 per square (100 square feet), while architectural shingles run $150-$400 per square. They typically last 15-25 years depending on climate exposure and maintenance. The installation process is straightforward enough for most DIYers, requiring basic carpentry skills and standard tools. However, asphalt shingles perform poorly in extreme heat or cold and may require replacement sooner in harsh climates.
Metal Roofing has gained tremendous popularity among DIY builders seeking longevity and low maintenance. Standing seam metal panels cost $300-$600 per square but last 40-70 years, providing exceptional value over the roof’s lifespan. Metal roofs reflect solar heat, reducing interior temperatures significantly during summer months. Installation requires more precision than shingles, with careful attention to panel overlap and fastening specifications. Metal roofing performs exceptionally well in snowy climates where snow slides off easily, preventing dangerous accumulation.
Wood Shingles and Shakes offer rustic charm and excellent insulation properties, though they demand considerable maintenance. Cedar shingles cost $400-$800 per square and require regular treatment to prevent rot, moss growth, and insect damage. They’re best suited for dry climates and builders comfortable with annual maintenance routines. Many building codes now restrict wood roofing in fire-prone areas, so verify local requirements before selecting this option.
Rubber and Synthetic Materials like EPDM rubber membranes cost $150-$300 per square and work well for flat or low-slope shed roofs. These materials excel in wet climates and require minimal maintenance beyond occasional cleaning. Installation involves seaming panels together, which demands precision but remains achievable for careful DIYers. Rubber roofing typically lasts 20-30 years and handles freeze-thaw cycles better than many alternatives.
Corrugated Panels provide budget-friendly coverage at $50-$150 per square, making them popular for agricultural sheds and utilitarian structures. Polycarbonate and fiberglass options offer light transmission benefits for workspace sheds. However, corrugated panels typically last only 10-15 years and may require more frequent replacement. They’re excellent for learning basic roofing principles before tackling more permanent installations.
Structural Preparation and Framing
Before any roofing material touches your shed, the underlying structure must be absolutely solid. Proper framing determines whether your roof sheds water effectively, withstands wind loads, and provides adequate support for snow accumulation. This foundation work cannot be rushed or compromised, as structural failures lead to catastrophic water damage and safety hazards.
Roof Pitch and Slope dramatically affects both water drainage and installation methods. A minimum 3:12 pitch (three inches of rise per twelve inches of horizontal run) is standard for most roofing materials, though some require steeper slopes. Steeper pitches shed water faster and accommodate snow better, but increase installation difficulty and material requirements. Your shed’s design and local climate should drive pitch selection. The International Code Council provides detailed specifications for roof pitch requirements based on roofing material and geographic location.
Rafter Sizing and Spacing must comply with local building codes and support expected loads. Standard shed roofs use 2×6 or 2×8 rafters spaced 16 or 24 inches apart, depending on span and load calculations. Undersized rafters cause sagging, premature wear, and potential collapse under snow load. Consult American Wood Council span tables to verify your rafter dimensions suit your shed width and local snow loads.
Decking Installation provides the base surface for roofing materials. Most builders use 1/2-inch plywood rated for exterior use (CDX or better), laid perpendicular to rafters with 1/8-inch spacing between sheets to allow for expansion. Fasten decking with 8d nails or 1-1/4-inch screws spaced 6 inches apart around edges and 12 inches in field areas. Ensure decking is smooth and free of gaps, as irregularities telegraph through finished roofing and create weak points.
Underlayment Selection provides critical secondary moisture protection. Traditional 15-pound felt offers basic protection at minimal cost but deteriorates in UV exposure. Synthetic underlayments cost more but resist tearing, perform better in wet conditions, and last longer without degradation. The Asphalt Roofing Manufacturers Association recommends synthetic underlayment for most applications, citing superior durability and moisture resistance.
Flashing Installation prevents water intrusion at roof edges, valleys, and penetrations. Install drip edge flashing along gable ends and eaves before underlayment, ensuring proper overlap sequences. For any roof penetrations (vents, chimneys, skylights), install flashing before roofing material and seal all joints with roofing cement or silicone caulk rated for exterior use.
Installation Step-by-Step Process
The actual roofing installation follows a logical sequence that maximizes water shedding and structural integrity. Rushing through these steps or skipping procedures leads to leaks, premature failure, and costly repairs. Whether you’re installing asphalt shingles or metal panels, attention to detail at each stage determines long-term performance.
Underlayment Application begins at the lowest roof edge, rolling material horizontally across the entire roof surface. Overlap each course by 4-6 inches and secure with roofing nails or staples spaced 12-16 inches apart. Allow underlayment to extend over drip edge slightly, creating a continuous moisture barrier. This step is often rushed but proves essential in preventing ice dam damage and wind-driven rain penetration.
Starter Strip Installation (for shingle roofing) requires placing a full-width shingle upside-down along the eave edge. This creates a solid foundation and ensures proper shingle overlap at the critical lower edge. Secure with four nails per shingle, positioned above the adhesive strip. Many leaks originate from improperly installed starter strips, making this step non-negotiable.
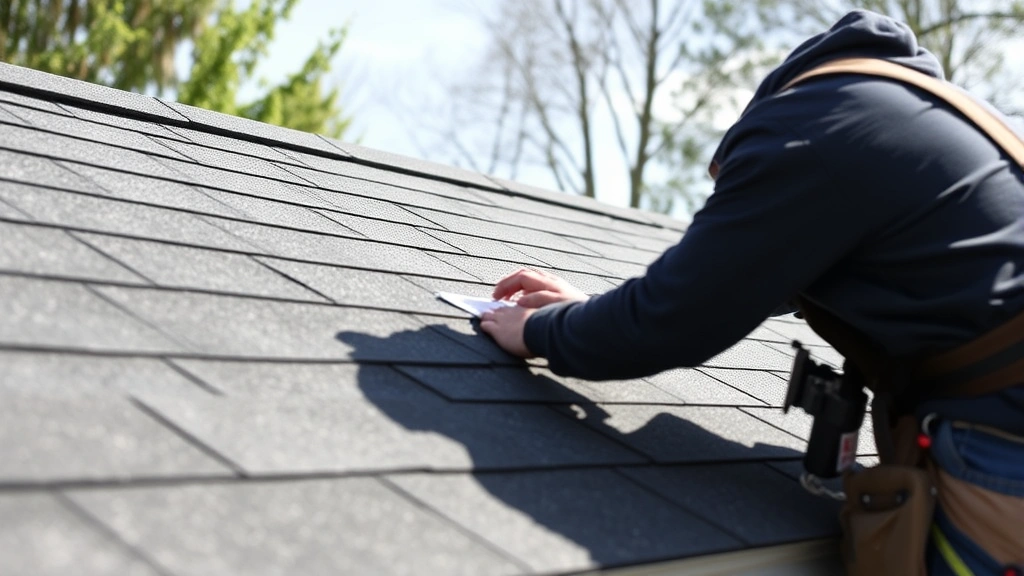
Shingle Course Application proceeds upward from the eaves, with each course offset to create the distinctive shingle pattern. Standard three-tab shingles use five nails per shingle—four through the nailing line and one above each tab cutout. Position nails 5/8 inch above the adhesive strip, driving perpendicular to the roof surface. Nails driven too deep rupture shingles; nails driven too shallow allow wind uplift. This seemingly simple step requires practice to master.
Valley Treatment manages water concentration at roof angles. Woven valleys integrate shingles from both roof planes, while open valleys use metal flashing. Open valleys shed water faster and suit wet climates better, though they’re more visible. Regardless of method, valleys demand careful attention as they concentrate water flow and represent primary leak sources.
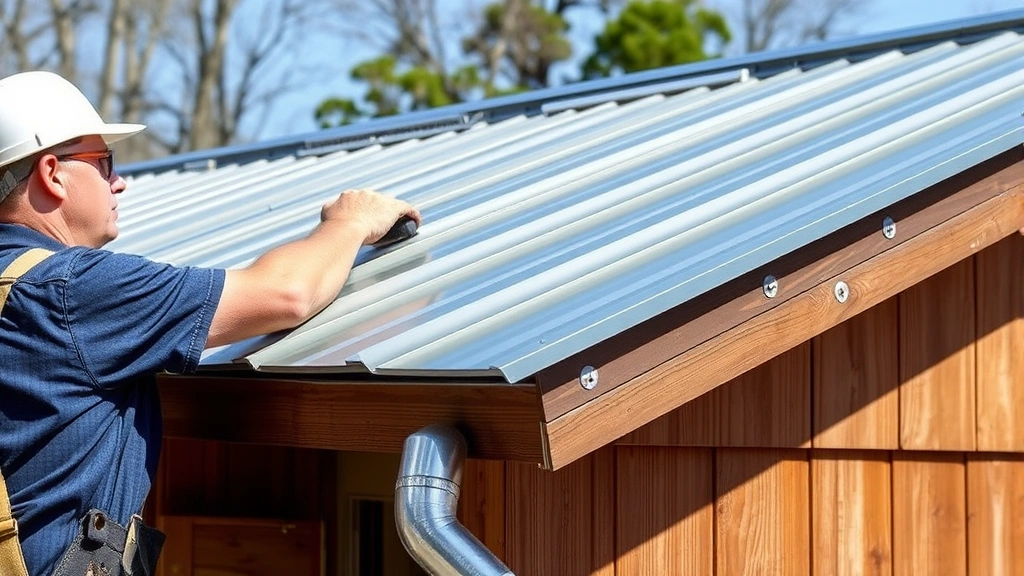
For metal roofing installation, the process differs significantly. Begin with ridge cap installation, working downward from the peak. Overlap each panel by the manufacturer’s specifications (typically 1-1.5 inches) and fasten according to panel design—some use exposed fasteners while others employ concealed fastening systems. Seal all fastener penetrations with appropriate sealant, as fastener holes represent the primary leak points in metal roofing systems.
Ventilation and Moisture Control
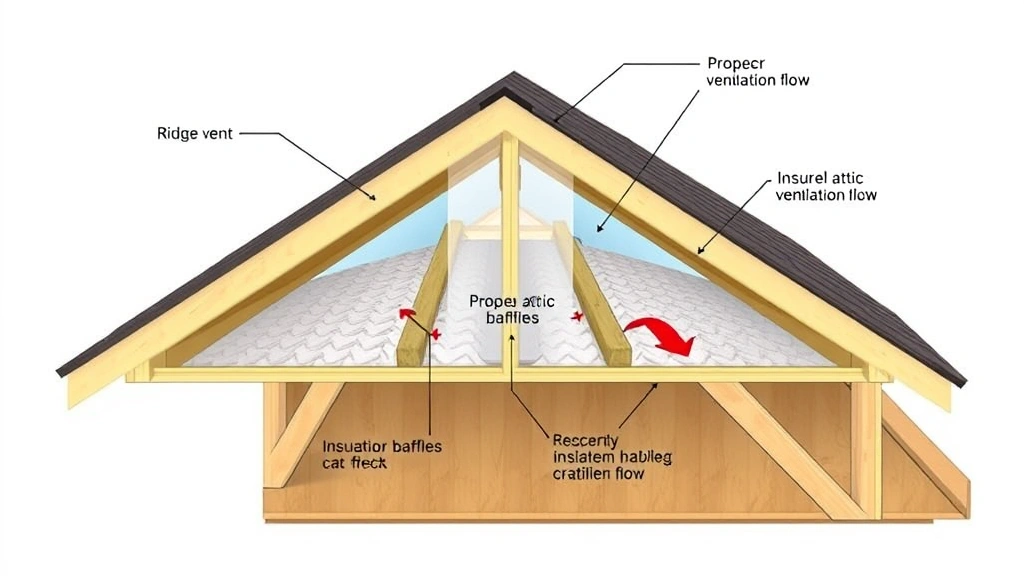
Adequate ventilation extends roof life dramatically by preventing moisture accumulation and temperature extremes beneath the roof surface. Without proper airflow, moisture becomes trapped, promoting mold growth, wood rot, and premature shingle degradation. Even in dry climates, ventilation prevents heat buildup that accelerates material aging.
Soffit and Fascia Ventilation establishes intake airflow at the roof’s lower edge. Perforated soffit panels or individual soffit vents allow air entry while excluding insects and debris. Size soffit vents to provide 1 square foot of net free area per 150 square feet of attic space (or per local code requirements). Position vents continuously along soffit edges, spacing them evenly for balanced airflow.
Ridge Ventilation Systems create exhaust pathways at the roof peak. Ridge vents allow warm, moist air to escape while preventing rain entry through careful design. Install ridge vents before final ridge cap installation, ensuring continuous ventilation along the entire ridge length. Combination of soffit intake and ridge exhaust creates natural convection airflow, eliminating moisture problems without powered ventilation.
Gable and Roof Vents supplement primary ventilation in complex roof configurations. Triangular gable vents or circular roof vents (installed away from valleys) provide additional exhaust capacity. Size these vents proportionally to maintain balanced intake-to-exhaust ratios. Improperly sized vents create pressure imbalances that reduce effectiveness.
Attic Insulation Considerations work synergistically with ventilation. Install baffles between rafters to maintain airflow channels, preventing insulation from blocking soffit vents. Proper insulation plus ventilation creates a climate-controlled attic that resists moisture damage and reduces heating/cooling loads. This combination proves especially critical in cold climates where ice dams form from roof heat loss.
Finishing Touches and Trim Work
The final details distinguish professional-quality roofing from amateur work. Proper trim installation, ridge cap finishing, and edge treatment protect vulnerable areas while creating clean, finished appearance. These steps often receive insufficient attention despite their importance to overall performance.
Ridge Cap Installation covers the peak where roof planes meet. Use ridge shingles (often included with roofing bundles) or specialized ridge cap material. Overlap ridge shingles 5-6 inches and secure with two nails per shingle, positioning fasteners to be covered by the next shingle. Ridge caps prevent wind-driven rain from entering the peak area and complete the visual appearance.
Rake and Eave Trim provides finished edges and protects roof decking from weather exposure. Install fascia boards (typically 1×8 or 1×10) along roof edges before installing gutters. Seal all seams and fastener holes with exterior-grade caulk. Paint or stain fascia to match shed siding, creating cohesive appearance.
Gutter and Downspout Installation directs water away from shed foundation and prevents erosion. Slope gutters 1/8 inch per 10 feet toward downspouts for proper drainage. Install gutters after roofing is complete, securing with hangers spaced 30 inches apart. Extend downspouts at least 4-6 feet from foundation, directing water into splash blocks or drain systems.
Flashing Sealant Application ensures all penetrations remain watertight. Apply roofing cement or silicone sealant to all flashing joints, nail heads, and seams. Use products rated for exterior exposure and compatible with your roofing material. Reapply sealant annually as part of maintenance, as UV exposure gradually degrades these materials.
Maintenance and Longevity
A properly installed shed roof requires ongoing maintenance to achieve its designed lifespan. Regular inspections and preventive care dramatically extend roof life while catching problems before they become expensive. Developing a maintenance routine ensures your roofing investment performs reliably for decades.
Annual Inspection Protocol should occur each spring and fall, examining the entire roof surface for damage. Look for missing, cracked, or curled shingles; missing or deteriorated flashing; moss or algae growth; and debris accumulation. Walk the roof carefully using a safety harness, or use binoculars to inspect from the ground. Document findings with photos to track changes over time.
Debris Removal prevents moisture retention and promotes drainage. Clear leaves, branches, and dirt from roof surface and gutters quarterly. Use soft-bristled brooms rather than pressure washers, which can damage roofing materials. Pay special attention to valleys and gutters where debris concentrates.
Moss and Algae Treatment becomes necessary in damp climates. Copper or zinc strips installed near the ridge shed metals that inhibit moss growth naturally. For existing growth, apply commercial moss killer (typically zinc sulfate or copper sulfate-based) according to product directions. Avoid pressure washing, which damages shingles and spreads spores.
Flashing and Sealant Maintenance prevents leaks at vulnerable areas. Inspect all flashing annually, resealing joints as needed. Replace deteriorated sealant before gaps appear, as water quickly exploits any opening. This simple maintenance task prevents major water damage.
Shingle Replacement addresses individual damaged shingles before they compromise the roof system. Remove nails from damaged shingle and surrounding shingles, slide out the damaged piece, and install replacement using roofing cement and nails. This small repair takes 30 minutes and costs under $10, preventing exponential damage.
Understanding home improvement fundamentals helps you approach shed roofing with proper perspective. Like other home security considerations, roof protection safeguards your property investment. Even DIY car maintenance shares similar maintenance principles with roofing—regular inspection and preventive care prevent expensive failures.
Professional Inspection Intervals should occur every 5-10 years depending on roof age and material type. Professional roofers identify subtle damage that homeowners miss and can address problems before they become serious. This modest investment in professional evaluation prevents catastrophic failures and extends roof lifespan significantly.
FAQ
How long does a typical shed roof last?
Lifespan depends entirely on material selection and maintenance. Asphalt shingles last 15-25 years, metal roofing 40-70 years, wood shakes 20-40 years, and rubber membranes 20-30 years. Quality installation and regular maintenance extend these timelines significantly. Neglected roofs fail years earlier than expected.
Can I install roofing in cold weather?
Asphalt shingles become brittle below 50°F and should not be installed in cold conditions. Metal roofing can be installed year-round with proper technique. Rubber membranes require temperature-specific sealing procedures. Check manufacturer specifications for your chosen material before scheduling installation.
What’s the proper roof pitch for a shed?
Minimum 3:12 pitch suits most roofing materials and climates. Steeper pitches (6:12 or higher) improve drainage and snow shedding but increase installation difficulty. Flat roofs (under 3:12) require specialized materials and demand excellent maintenance. Choose pitch based on climate, material requirements, and personal preference.
Should I remove old roofing before installing new?
Removing old roofing (called tearoff) is best practice, allowing inspection of underlying decking and proper underlayment installation. Reroofing over existing shingles is possible but hides potential damage and creates weight accumulation. Most building codes allow only one reroofing layer, so eventual tearoff becomes necessary.
How much does DIY shed roofing save compared to hiring professionals?
Labor costs typically represent 40-60% of roofing expenses. DIY installation saves $1,500-$5,000 depending on shed size and material selection. However, mistakes prove expensive—improper installation causes leaks costing thousands to repair. Invest in learning proper techniques rather than rushing to save money.
What safety equipment do I need for roof work?
Proper safety equipment is non-negotiable. Use a fall protection harness rated for roofing work, secured to a fixed anchor point. Wear non-slip shoes with good grip, and use a sturdy ladder rated for your weight plus equipment. Never work on wet roofs or during windy conditions. Consider renting professional scaffolding for larger projects.
Can I repair a leaking shed roof myself?
Simple leaks from missing shingles or deteriorated flashing can be repaired by confident DIYers. Locate the leak source (often upslope from the water stain), remove damaged materials, and reinstall with proper fasteners and sealant. For complex leaks or structural damage, professional diagnosis prevents wasted effort on incorrect repairs.


