DIY Carport Plans: Expert-Recommended Designs for Every Budget
Building a carport is one of the most practical home improvement projects you can undertake. Unlike a full garage, a carport provides weather protection for your vehicles at a fraction of the cost and complexity. Whether you’re protecting a car, truck, or boat, a well-designed carport adds both functionality and property value to your home. This comprehensive guide walks you through expert-recommended carport designs, materials, building codes, and step-by-step construction methods that even intermediate DIYers can manage.
Before you start hammering nails, understanding local regulations, permit requirements, and structural considerations is essential. The good news is that carports are typically simpler than enclosed structures, which means fewer regulatory hurdles than building a full garage. However, you’ll still need to comply with setback requirements, height restrictions, and foundation specifications outlined in your local building codes.
Understanding Carport Basics and Benefits
A carport is an open-sided structure designed to protect vehicles from the elements. Unlike a garage, it typically lacks walls and doors, making it significantly cheaper and faster to build. The basic components include a roof, support posts or columns, a foundation, and often a concrete floor. Carports are ideal for homeowners who need vehicle protection without the investment required for a full garage addition.
The primary advantages of carport construction include lower material costs, simpler electrical requirements, reduced labor intensity, and faster completion timelines. A single-car carport typically requires 8-12 weeks for an experienced DIYer, while a professional contractor might complete it in 3-4 weeks. Additionally, carports don’t require HVAC systems, extensive insulation, or complex interior finishing work that drives up garage construction costs.
Cost savings are substantial when compared to enclosed structures. While adding a bathroom or full garage involves extensive interior work, carport construction focuses on structural integrity and weather protection. A basic single-car carport might cost $3,000-$6,000 in materials, while a professional installation adds $2,000-$4,000 in labor.
Choosing the Right Design for Your Needs
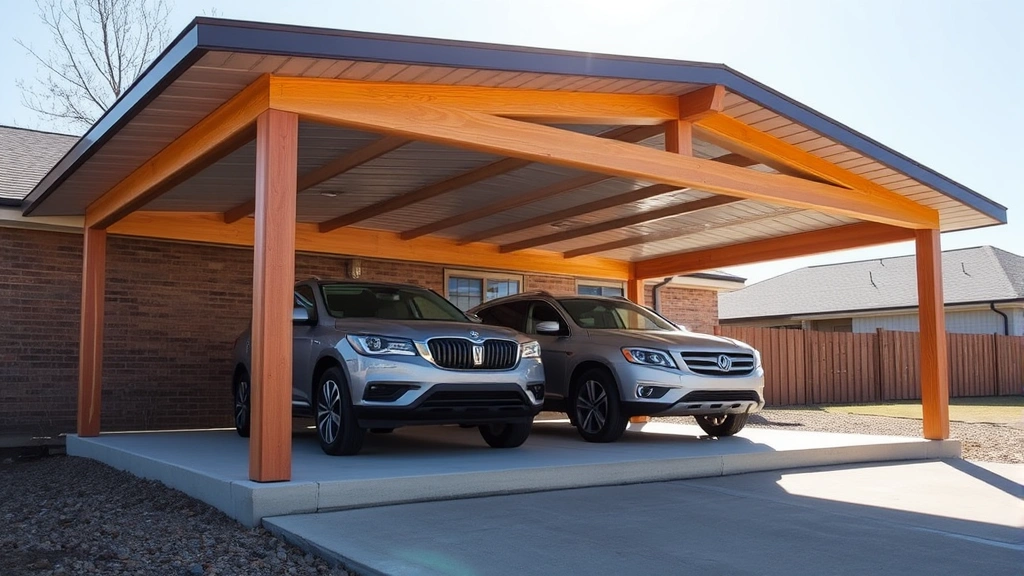
Carport designs vary based on vehicle count, aesthetic preferences, and available space. The most common configurations include single-car, double-car, and three-car designs. Single-car carports typically measure 12 feet wide by 20 feet deep, providing adequate coverage for standard vehicles. Double-car carports require approximately 20 feet of width and 20 feet of depth, while three-car models need 30 feet of width.
Single-Car Carports are ideal for homeowners with limited space or budget constraints. They’re perfect for protecting a daily driver, motorcycle, or recreational equipment. These designs often incorporate lean-to or gable roof styles and can be constructed against an existing structure for added stability and material savings.
Double-Car Carports provide flexibility for households with multiple vehicles or those needing storage space alongside parking. This design allows you to park side-by-side or use one section for storage. The additional width requires more substantial support posts and roof framing but remains well within DIY capability.
Three-Car Carports are popular for families with multiple vehicles or those who want to park a truck alongside standard cars. These require careful post placement to avoid creating obstacles and typically benefit from professional-grade roof trusses to handle the extended span.
Roof styles significantly impact both aesthetics and functionality. Gable roofs (peaked center) provide excellent water drainage and create usable space above. Lean-to designs attach to existing structures and are simpler to build. Flat roofs maximize interior space but require excellent drainage systems. Arched and barrel vault designs offer contemporary aesthetics while maintaining structural efficiency.
Materials and Cost Breakdown
Material selection affects both durability and total project cost. Quality materials ensure your carport withstands weather, wind, and time. Here’s a detailed breakdown for a standard double-car carport:
- Pressure-Treated Posts: 6×6 or 4×6 lumber for support columns ($400-$600)
- Roof Framing: 2×8 or 2×10 beams, trusses, and purlins ($800-$1,200)
- Roofing Material: Metal panels ($600-$1,000) or asphalt shingles ($400-$700)
- Foundation: Concrete footings, posts, and floor ($1,000-$2,000)
- Hardware: Bolts, brackets, nails, and connectors ($200-$400)
- Miscellaneous: Sealant, paint, gutters ($200-$400)
Metal roofing offers superior longevity (40-70 years) compared to asphalt shingles (15-25 years), making it a smart investment despite higher upfront costs. Metal also reflects heat, keeping vehicles cooler in summer months. For Florida homeowners, metal roofing provides excellent wind resistance, crucial for hurricane-prone regions.
Pressure-treated lumber resists rot and insect damage, essential for structures exposed to elements. Alternatively, composite materials offer lower maintenance but higher initial costs. Steel posts provide maximum strength for wider spans but require rust protection and professional installation.
For a comprehensive understanding of related construction costs, explore septic system expenses and basement finishing projects to understand typical home improvement investment ranges.
Foundation and Site Preparation
A solid foundation prevents settling, tilting, and structural failure. Carport foundations typically use either concrete footings with posts or a complete concrete slab. Concrete slab foundations ($1,500-$2,500 for double-car) provide smooth parking surfaces and superior durability. Post-and-footing foundations ($800-$1,200) work well in areas with excellent drainage and stable soil.
Site Preparation Steps:
- Clear the area of vegetation, rocks, and debris
- Mark post locations using chalk and a measuring tape
- Check for underground utilities (call 811 before digging)
- Dig holes 3-4 feet deep (below frost line in your region)
- Set posts in concrete, ensuring proper alignment
- Allow concrete to cure for 7 days before adding framework
Frost line depth varies by region—Florida typically requires 12-18 inches, while northern states need 3-4 feet. Consult your local International Code Council for specific requirements. Posts must be perfectly vertical and spaced according to your design plan, typically 8-12 feet apart for residential carports.
Concrete quality matters significantly. Use 3,000 PSI concrete mix and ensure proper water-to-cement ratios. In high-humidity climates like Florida, add air-entrainment to prevent freeze-thaw damage, though this is less critical in warmer zones.
Building Codes and Permits
Building codes exist to ensure structural safety and property value protection. Most jurisdictions require permits for carports exceeding certain dimensions or those attached to primary structures. Permit costs typically range from $150-$500, and inspections occur at foundation, framing, and completion stages.
Key code requirements include:
- Setback Requirements: Minimum distance from property lines (typically 5-15 feet)
- Height Restrictions: Maximum clearance from ground (usually 12-15 feet)
- Wind Load Rating: Must withstand local wind speeds (critical in coastal areas)
- Snow Load Capacity: Based on regional precipitation patterns
- Post Size and Spacing: Determined by roof span and local codes
- Electrical Requirements: If adding lights or outlets
The National Frame Builders Association provides design guidelines for residential structures. Your local building department will specify which codes apply in your jurisdiction. For Florida residents, Florida’s Building Code includes specific hurricane wind speed requirements that significantly impact design specifications.
Permit applications require detailed plans showing dimensions, materials, post locations, and roof specifications. Many jurisdictions now accept digital submissions, accelerating approval timelines. Never skip the permit process—unpermitted structures can complicate insurance claims, home sales, and create liability issues.
Step-by-Step Construction Process
Phase 1: Preparation and Planning
Begin with detailed measurements and a scaled drawing. Use graph paper or digital tools to map post locations, roof dimensions, and material quantities. Gather all tools before starting: circular saw, miter saw, drill-driver, level, tape measure, concrete mixer, and safety equipment including hard hat, safety glasses, and work gloves.
Phase 2: Foundation Installation
Mark post locations using batter boards and string lines. Dig holes to the appropriate depth for your region’s frost line. Set posts in concrete, checking for plumb with a level. Use temporary bracing to hold posts vertical while concrete cures. This 7-day waiting period is critical—rushing creates structural problems.
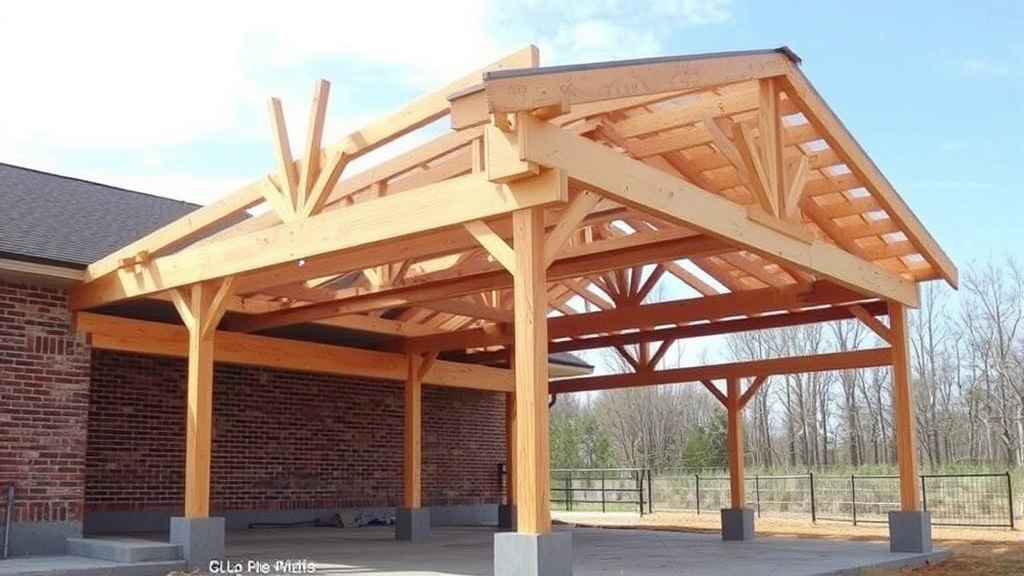
Phase 3: Frame Assembly
Once posts are set, attach beams using bolts, brackets, or notched connections. Ensure all connections are level and square using a 4-foot level and framing square. Attach roof trusses or rafters according to your design plan. Space trusses typically 24 inches on center for residential carports.
Phase 4: Roof Installation
Install roof decking (plywood or metal purlins) over the truss framework. Add roofing felt or underlayment before installing final roofing material. Whether using metal panels or asphalt shingles, follow manufacturer specifications for fastener types, spacing, and overlap requirements.
Phase 5: Finishing Work
Install gutters and downspouts to direct water away from the foundation. Add trim work around posts and roof edges. Apply sealant to protect wood from weathering. Paint or stain exposed wood surfaces for aesthetic appeal and UV protection.
Roof Options and Installation
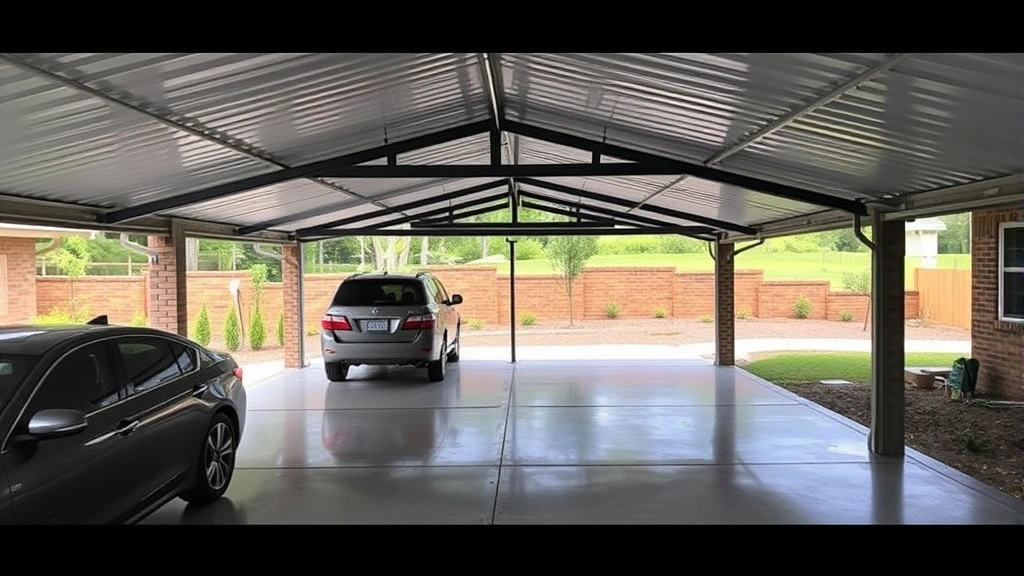
Roof selection impacts durability, maintenance requirements, and aesthetics. Metal roofing offers exceptional longevity and wind resistance, ideal for hurricane-prone regions. Corrugated or standing seam panels install quickly and require minimal maintenance. Cost ranges from $600-$1,200 for a double-car carport.
Asphalt Shingles provide a traditional appearance and lower initial cost ($400-$700). However, they require replacement every 15-25 years and offer less wind resistance than metal. Install with roofing nails spaced according to manufacturer specifications, typically 6 inches from the edge and 12 inches apart across the field.
Polycarbonate Panels allow light transmission while providing UV protection. These translucent panels create bright, naturally-lit spaces but may require additional support due to panel weight. They’re excellent for areas with moderate weather conditions but less suitable for high-wind regions.
Wood Shake or Cedar Shingles offer rustic aesthetics but require regular maintenance, staining, and replacement every 20-40 years. They’re labor-intensive to install and more expensive than metal or asphalt alternatives.
Proper roof installation includes:
- Installing roof decking at proper spacing (typically 24 inches for trusses)
- Adding underlayment to prevent water penetration
- Fastening roofing material according to manufacturer specifications
- Installing gutters with 4-6 inch downspouts
- Ensuring proper slope (minimum 3:12 pitch) for water drainage
- Sealing all penetrations and joints
Finishing Touches and Maintenance
Finishing work transforms a basic structure into an attractive, functional addition. Staining or painting exposed wood protects against UV damage and weathering while enhancing curb appeal. Exterior paint rated for high moisture environments resists mildew and fading. Consider colors that complement your home’s exterior.
Lighting improves functionality for evening vehicle access and security. Install weatherproof fixtures with motion sensors for convenience and energy efficiency. Ensure electrical work complies with local codes—hire a licensed electrician if you’re uncertain about requirements.
Long-Term Maintenance:
- Inspect roof annually for damage, debris, or deterioration
- Clean gutters quarterly to prevent clogs and water damage
- Check post connections annually for rust or looseness
- Reseal wood every 3-5 years to prevent rot
- Pressure wash the structure annually to remove mold and mildew
- Inspect concrete for cracks or settling that might indicate foundation issues
Regular maintenance extends your carport’s lifespan from 25-30 years to 40+ years. Address minor issues promptly before they become expensive problems. Pressure washing removes mold and algae that thrive in humid climates, protecting both appearance and structural integrity.
If you’re considering other home improvement projects, explore the DIY Nests Hub Blog for additional guides and cost comparisons. For property security considerations during construction, review home security strategies to protect your property and materials.
Frequently Asked Questions
Do I need a permit to build a carport?
Most jurisdictions require permits for carports, especially those attached to primary structures or exceeding certain dimensions. Permit requirements vary by location, so contact your local building department before starting construction. Unpermitted work can complicate insurance claims and home sales.
How much does it cost to build a carport?
A basic single-car carport costs $3,000-$6,000 in materials, while double-car models range from $5,000-$10,000. Professional installation adds $2,000-$5,000 depending on complexity. Material quality, design choices, and regional labor costs significantly impact final expenses.
What’s the best roofing material for a carport?
Metal roofing offers superior longevity (40-70 years) and wind resistance, making it ideal for areas with harsh weather. Asphalt shingles provide lower initial costs but require replacement every 15-25 years. Choose based on your budget, climate, and aesthetic preferences.
How long does carport construction take?
A DIYer with moderate experience typically completes a double-car carport in 8-12 weeks. Professional contractors usually finish in 3-4 weeks. Timeline depends on weather conditions, permit processing, concrete curing time, and project complexity.
Can I build a carport myself?
Yes, carports are excellent DIY projects for those with basic carpentry skills and proper tools. Start with a detailed plan, ensure all electrical work meets code, and don’t hesitate to hire professionals for specialized tasks like concrete work or electrical installation.
What’s the difference between a carport and a garage?
Carports lack walls and doors, making them simpler and cheaper to build. Garages provide enclosed storage and protection but require HVAC, insulation, and extensive finishing work. Carports typically cost 40-60% less than comparable garages.
How deep should a carport be?
Standard carports are 20 feet deep, providing adequate coverage for most vehicles. Some homeowners prefer 22-24 feet for additional protection during heavy rain or snow. Minimum depth is typically 18 feet for adequate overhang protection.


