How to Build a Shed: Expert Tips Inside
Building a shed is one of the most rewarding DIY projects you can undertake. Whether you need extra storage for gardening tools, a workshop space, or a peaceful retreat, a well-constructed shed adds functionality and value to your property. This comprehensive guide walks you through every step of the shed-building process, from initial planning through final touches, ensuring your project succeeds regardless of your experience level.
A shed serves multiple purposes on residential properties. It protects equipment from weather damage, keeps your yard organized, and provides dedicated workspace away from your home. The good news is that building a shed doesn’t require advanced carpentry skills or expensive equipment. With proper planning, quality materials, and attention to detail, you can create a sturdy structure that lasts for decades.
Planning Your Shed Project
Successful shed construction begins with thorough planning. Before purchasing a single board, determine your specific needs and constraints. Consider what you’ll store or do in the shed, how much space you require, and your budget. Most homeowners find that starting with a modest 8×10 or 10×12 structure provides ample space without overwhelming complexity.
Choose between three primary approaches: building from scratch using your own design, purchasing a shed kit, or hiring a contractor. Building from scratch offers maximum customization but requires more planning. Shed kits provide pre-cut materials and detailed instructions, reducing decision-making but limiting design flexibility. Professional contractors handle everything but cost significantly more.
Create a detailed project plan that includes dimensions, materials list, timeline, and budget. Research basement finishing projects if you’re interested in expanding your DIY skills beyond outdoor structures. Document your design with sketches or digital drawings. This planning phase prevents costly mistakes and ensures you have all necessary materials before starting construction.
Budget realistically for your shed. A basic 8×10 shed typically costs $1,500 to $3,000 for materials when building yourself. Premium materials, larger dimensions, or special features increase costs. Factor in tool rentals if you don’t own necessary equipment. Having adequate budget prevents mid-project compromises that affect quality.
Understanding Local Building Codes
Before breaking ground, research your local building codes and zoning regulations. Most jurisdictions require building permits for sheds exceeding certain dimensions, typically 200 square feet. Setback requirements specify how far structures must be from property lines. Height restrictions may limit roof pitch or peak height.
Contact your local building department to understand specific requirements. Some areas require engineering drawings for larger structures. Others mandate specific foundation types or materials. Wind and snow load ratings affect roof and structural design in different regions. Ignoring these regulations results in fines, forced demolition, or inability to sell your property.
Obtain necessary permits before construction begins. The permitting process includes plan review, inspection during construction, and final approval. While permits add time and cost, they ensure your structure meets safety standards and protects your property investment. Inspectors verify proper foundation installation, structural integrity, electrical work (if applicable), and weatherproofing.
Check American Wood Council guidelines for wood construction standards. These resources provide detailed specifications for lumber sizing, spacing, and fastening. Following established codes ensures your shed withstands weather, supports intended loads, and maintains structural integrity long-term.
Selecting the Right Location
Location dramatically impacts shed functionality and longevity. Choose a spot with good drainage to prevent water accumulation around the foundation. Avoid low-lying areas where water pools during heavy rain. Observe your yard during rainfall to identify drainage patterns. Slightly elevated or sloped terrain naturally sheds water away from structures.
Consider sun exposure and shade. Full sun accelerates wood deterioration unless you use quality siding and finishes. Excessive shade promotes mold and mildew growth. Ideally, choose a location receiving moderate sunlight with some afternoon shade. Proximity to trees requires consideration—falling branches damage roofs, and roots can compromise foundations.
Accessibility matters for practical use. Position your shed near the items you’ll store most frequently. If it’s a workshop, locate it conveniently close to your home. Ensure adequate space for door swing and materials movement. Consider sight lines from your house and neighbors’ properties. A well-placed shed enhances rather than detracts from your landscape.
Verify utility locations before finalizing placement. Contact your local utility locating service to mark underground gas, electric, and water lines. Building over utilities creates safety hazards and expensive complications. Allow adequate clearance from existing structures, fences, and property lines per local codes.
Foundation Preparation
A proper foundation prevents settling, shifting, and structural failure. Four common options suit different situations: concrete slab, concrete pier, gravel bed, and skid foundation. Concrete slabs provide excellent stability and create usable floor space but require excavation and concrete work. Concrete piers support the structure above ground while allowing water drainage beneath—ideal for many climates.
For smaller sheds, gravel beds with treated lumber runners offer simplicity and economy. This method works well in areas with good drainage. Skid foundations consist of pressure-treated beams placed directly on compacted ground or gravel. Each method has advantages and limitations depending on your climate, soil type, and intended use.
If using a concrete slab, excavate the area to proper depth, add gravel base for drainage, and pour concrete to recommended thickness (typically 4-6 inches). Reinforce with rebar or wire mesh. Slope the surface slightly for water runoff. Allow concrete to cure fully (7-10 days) before building on it.
For pier foundations, dig holes below frost line depth (varies by region, typically 12-48 inches) and set concrete piers. The frost line marks how deep ground freezes in winter—building above this line prevents frost heave that damages foundations. Attach pressure-treated beams to piers using appropriate fasteners. This approach combines stability with excellent drainage.
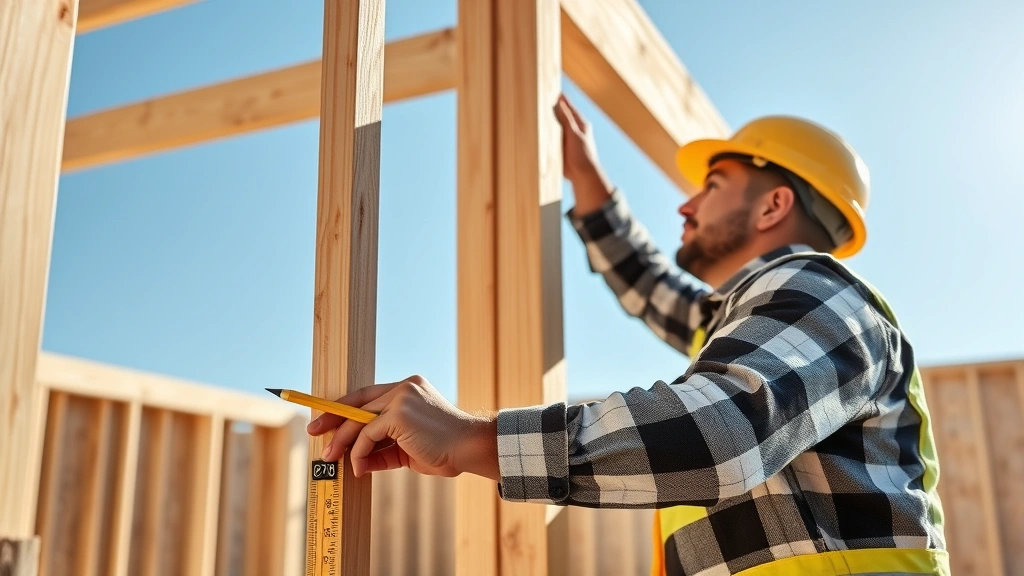
Framing the Structure
Framing creates your shed’s skeleton and determines its strength and shape. Standard lumber dimensions (2×4, 2×6) work well for most residential sheds. Floor joists span the foundation and support interior weight. Space joists 16 inches apart for standard residential loads, or 12 inches apart for heavier storage needs.
Wall framing typically uses 2×4 studs spaced 16 inches on center. This spacing balances strength with material efficiency. Install studs from floor to top plate, securing with 16-penny nails or 2.5-inch screws. Add horizontal blocking between studs for racking resistance—this prevents walls from shifting diagonally under wind or seismic stress.
Roof framing determines your shed’s appearance and weather resistance. Simple gable roofs (peaked design) shed water effectively and provide attic space. Shed roofs (single slope) cost less but offer less interior headroom. Roof pitch (slope steepness) affects water drainage and snow load handling. Steeper pitches shed snow and water more effectively but require more materials. Most sheds use 4:12 to 8:12 pitch (4-8 inches of rise per 12 inches of horizontal run).
Install collar ties connecting opposing roof rafters. These structural elements prevent roof spread and improve stability. Properly spaced collar ties are essential safety components, not optional details. Add diagonal bracing to resist wind loads. In high-wind areas, additional bracing and hurricane ties securing rafters to walls are essential.
When learning home security measures, remember that structural integrity contributes to security. A well-built shed with secure framing resists break-ins better than poorly constructed alternatives.
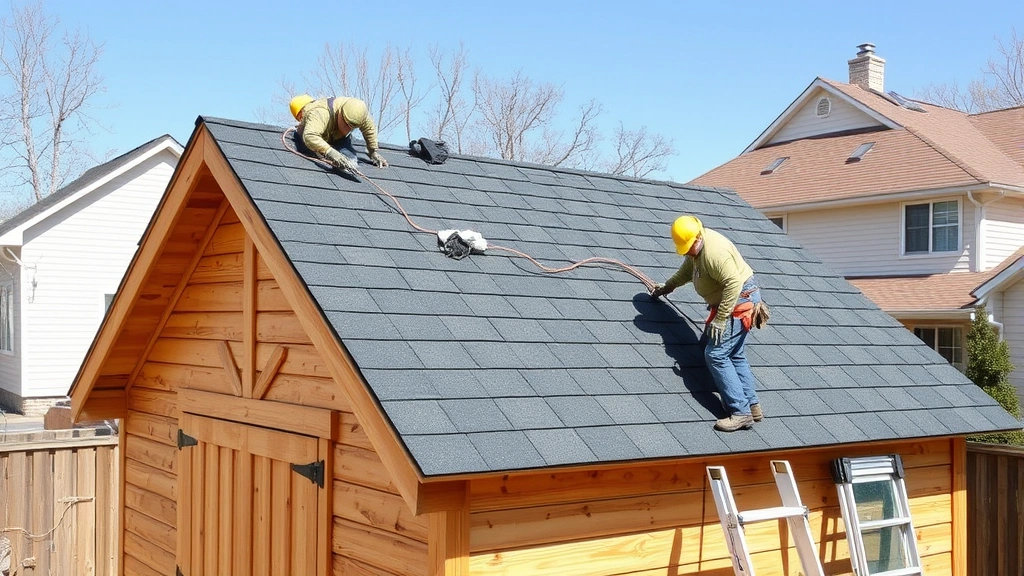
Roof Installation
Your roof protects everything inside from weather damage, making proper installation critical. Begin by installing roof decking—typically 1/2-inch plywood or OSB (oriented strand board) secured to rafters with nails or screws. Proper fastening prevents wind uplift and racking. Use 8-penny nails spaced 6 inches apart along edges and 12 inches in field areas.
Install underlayment before shingles. Roofing felt or synthetic underlayment provides secondary weather protection if shingles fail. Overlap courses by 4-6 inches and secure with roofing nails. In areas with ice dams, use ice and water shield under shingles in vulnerable areas.
Asphalt shingles remain the most economical roofing choice for sheds. Start at the eave with starter shingles, then work upward, staggering joints. Nail each shingle with four fasteners placed per manufacturer specifications. Proper nailing prevents wind damage and premature failure. Metal roofing offers durability and longevity but costs more initially. Metal’s reflective properties reduce interior heat in sunny climates.
Install flashing around any roof penetrations (vents, chimneys) to prevent leaks. Flashing is metal (usually aluminum or galvanized steel) that directs water away from openings. Poor flashing installation causes interior water damage despite otherwise quality roofing.
Add gutters and downspouts to manage water runoff. These simple additions dramatically extend foundation and siding life by directing water away from the structure. Gutters should slope toward downspouts at 1/16 inch per foot. Downspouts should discharge water at least 4-6 feet from the foundation.
Siding and Weatherproofing
Siding protects your frame from weather while defining your shed’s appearance. Wood siding offers classic aesthetics but requires regular maintenance. Pressure-treated lumber resists rot but needs periodic staining or painting. Cedar and redwood naturally resist decay but cost more. Vinyl siding requires minimal maintenance and comes in numerous colors and styles. Metal siding provides durability and clean appearance. Composite materials offer wood appearance with vinyl durability.
Install siding horizontally or vertically depending on your design preference. Horizontal (lap) siding sheds water naturally and works well in most climates. Vertical siding creates contemporary appearance and sheds water effectively when properly installed. Ensure siding overlaps adequately to prevent water penetration. Gaps and improper overlaps allow moisture behind siding, causing rot and structural damage.
Weatherproofing extends your shed’s lifespan significantly. Caulk all joints where materials meet—where siding meets roof, around windows and doors, at corners. Use quality exterior-grade caulk designed for wood movement. Caulk gaps prevent water infiltration that causes rot and mold. Inspect caulking annually and reapply as needed.
Paint or stain exterior surfaces for protection and aesthetics. Quality exterior paint protects wood from UV damage and weathering. Stain penetrates wood, enhancing grain while providing protection. Primer is essential for new wood—it seals the surface and improves paint adhesion. Apply primer and two finish coats for optimal protection.
Install proper ventilation to prevent moisture accumulation inside. Soffit and ridge vents allow air circulation under the roof, preventing moisture buildup that causes rot and mold. In humid climates, consider additional ventilation like louvers or fans. Proper ventilation extends roof life and prevents interior moisture problems.
Interior Finishing
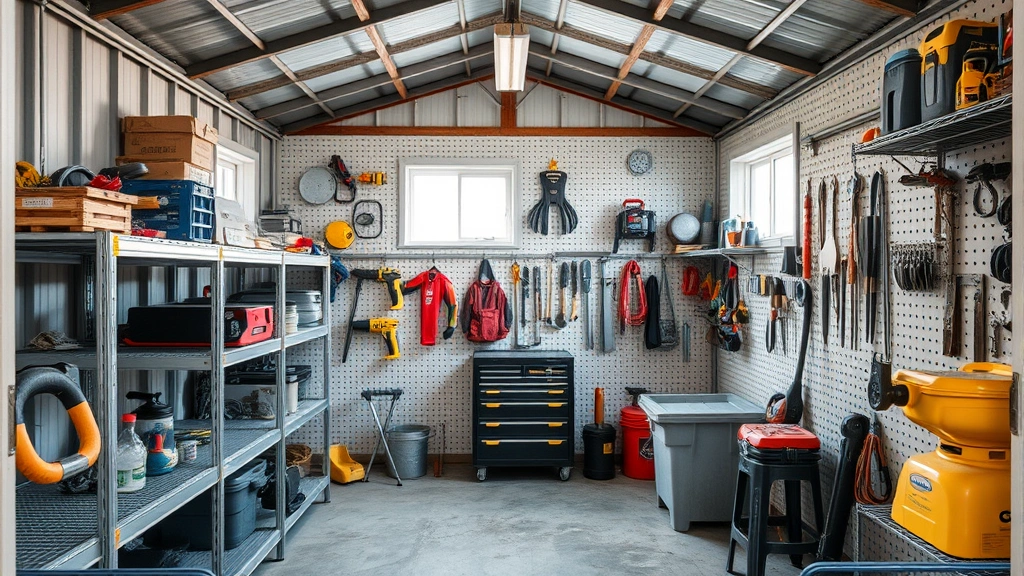
Interior finishing determines your shed’s functionality. For basic storage, simple shelving and wall-mounted organization systems suffice. Heavy-duty metal shelving handles substantial weight and resists damage. Wall-mounted pegboards provide flexible tool storage. Hooks and brackets accommodate various items.
If your shed serves as a workshop, consider electrical installation. Run power from your home’s electrical panel or install a subpanel for dedicated circuits. Hire a licensed electrician—electrical work requires permits and professional expertise. Proper grounding and circuit protection prevent fire and shock hazards. Outdoor-rated fixtures and outlets resist weather damage.
Insulation improves comfort in all-season workshops or storage areas. Fiberglass batts, spray foam, or rigid foam board between wall studs reduce temperature extremes. Vapor barriers prevent moisture damage in humid climates. Insulation combined with proper ventilation creates healthy interior conditions.
Flooring options range from simple concrete to finished wood. Sealed concrete handles moisture and heavy equipment well. Pressure-treated plywood creates warmer, more finished appearance. Epoxy coatings on concrete improve durability and aesthetics. Choose flooring matching your intended use and budget.
For sheds serving multiple purposes, consider learning about painting techniques for interior walls. Quality paint improves aesthetics and simplifies cleaning. Moisture-resistant paint prevents mold in damp environments.
Install adequate lighting for safety and functionality. Overhead fixtures provide general illumination. Task lighting focuses on work areas. Motion-sensor lighting enhances security and convenience. LED fixtures reduce energy consumption. Battery-powered options work where electrical installation isn’t practical.
Climate control may be necessary depending on what you store. Humidity-sensitive items need dehumidifiers. Temperature-sensitive materials benefit from insulation and ventilation. Proper climate control prevents damage to tools, equipment, and stored items.
FAQ
Do I need a building permit for a shed?
Most jurisdictions require permits for sheds exceeding 200 square feet or structures with permanent foundations. Check with your local building department for specific requirements. Permits ensure your shed meets safety codes and protects your property investment. Skipping permits risks fines and forced demolition.
How long does shed construction typically take?
Simple 8×10 sheds take 2-4 weeks for experienced builders with adequate help. Larger or more complex structures require 4-8 weeks. Weather delays, material availability, and inspection scheduling affect timelines. Plan for flexibility and avoid rushing—quality construction takes time.
What’s the best shed foundation type?
Concrete slabs provide excellent stability but cost more. Concrete piers offer good drainage and stability at moderate cost. Gravel beds with treated lumber work for smaller structures in good-drainage areas. Choose based on your climate, soil type, and intended use. Consult local building codes for requirements.
Can I build a shed without professional help?
Yes, with proper planning and learning. Start with simpler designs and smaller dimensions. Watch instructional videos from reputable sources. Don’t hesitate to hire professionals for specialized work like electrical installation or complex roofing. Combining DIY work with professional help balances cost and quality.
How do I prevent rot and mold in my shed?
Use pressure-treated lumber for ground-contact areas. Install proper ventilation and gutters for water management. Apply quality exterior finishes and maintain them regularly. Ensure adequate drainage around the foundation. Monitor for signs of moisture and address problems promptly. Proper construction prevents most rot and mold issues.
What tools do I need for shed construction?
Essential tools include circular saw, drill/driver, level, measuring tape, square, hammer, and safety equipment. A miter saw improves cutting accuracy and speed. A table saw handles larger materials efficiently. Tool rental is economical for expensive equipment you’ll use briefly. Invest in quality basics you’ll use repeatedly.
How much does a DIY shed cost?
Basic 8×10 sheds cost $1,500-$3,000 for materials. Larger structures or premium materials increase costs. Kits range from $2,000-$5,000 depending on size and quality. Professional construction costs $5,000-$15,000+ depending on specifications. Your budget determines material choices and design complexity.
What should I store in my shed?
Sheds safely store garden tools, lawn equipment, seasonal items, and tools. Avoid storing hazardous materials, propane, or gasoline unless properly ventilated and compliant with local codes. Keep moisture-sensitive items elevated and protected. Organize systematically for easy access and safety.


