
Build a Shed? Carpenter’s Step-by-Step Guide
Building a shed is one of the most rewarding DIY projects you can undertake. Whether you need extra storage for garden tools, a workshop space, or a quiet retreat, constructing your own shed gives you complete control over the design, size, and functionality. This comprehensive guide walks you through every phase of shed construction, from initial planning through final touches, ensuring you have the knowledge and confidence to complete this project successfully.
A well-built shed not only adds value to your property but also provides practical storage solutions and can serve as a dedicated workspace. Unlike many home improvement projects, shed building doesn’t require advanced carpentry skills—just patience, proper planning, and attention to detail. Throughout this guide, we’ll cover foundation preparation, framing techniques, roofing systems, and finishing touches that transform raw materials into a functional structure you’ll use for years to come.
Planning and Preparation
Before you purchase a single board or pick up a hammer, thorough planning is essential. Start by determining the shed’s purpose—storage, workshop, garden structure, or hobby space—as this influences size, ventilation, and interior layout. Consider your local building codes and zoning regulations, which often specify setback distances from property lines, maximum footprint sizes, and permit requirements. Many municipalities require permits for structures over 100-150 square feet, and checking these requirements prevents costly removals or fines.
Next, select an appropriate location on your property. Choose level ground with good drainage to prevent water accumulation around the foundation. Assess sunlight exposure—full sun areas may require additional ventilation, while shaded locations stay cooler but may experience moisture issues. Mark out your shed’s footprint using string and stakes, then verify the measurements diagonally to ensure perfect rectangles. Measure from corner to corner; both diagonal measurements should be identical.
Create detailed plans or purchase shed plans that match your vision. Plans should include dimensions, material lists, and step-by-step assembly instructions. Sketch electrical layouts if you’re adding outlets or lighting, and plan for adequate ventilation through windows or vents. Document everything—this becomes invaluable when ordering materials and prevents mid-project discoveries of missing components.
Foundation Types and Installation
The foundation is arguably the most critical component of your shed. A poor foundation leads to settling, warping, and structural failure. Three primary foundation types suit most DIY shed projects: concrete pads, gravel beds, and pressure-treated skids.
Concrete Pads: Dig holes approximately 3-4 feet deep below the frost line in your region (check local frost line maps for your area). Set concrete piers or posts in these holes, extending above grade level. This prevents frost heave during winter freeze-thaw cycles. Pour concrete around the posts to a depth of 12-18 inches, ensuring posts are perfectly vertical using a level.
Gravel Beds: For temporary or portable sheds, excavate 6 inches of soil and replace with compacted gravel. Grade the surface with a slight slope for drainage. This method is economical and adequate for lighter structures but requires periodic raking to maintain level surfaces.
Pressure-Treated Skids: Pressure-treated 6×6 or 4×6 lumber laid directly on the ground works for small sheds. Treat the ground with landscape fabric to prevent weed growth, then position skids perpendicular to your shed’s length. This method is quick but may require releveling over time.
Regardless of foundation type, ensure the surface is level to within ½ inch across the entire footprint. Use a 4-foot level and a long straightedge to verify levelness. Spend extra time here—correcting foundation issues later becomes exponentially more difficult.
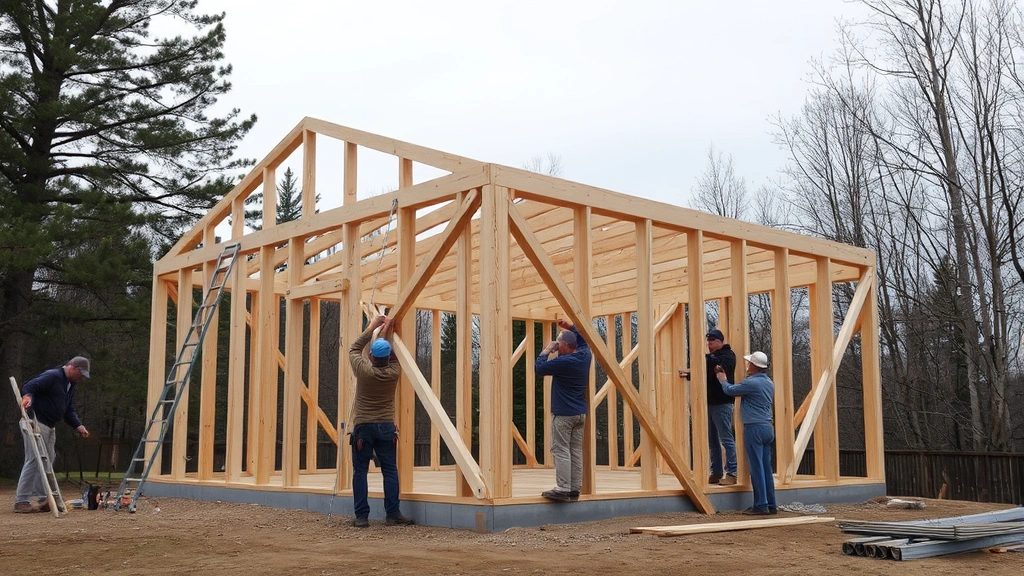
Framing the Shed Structure
Framing creates your shed’s skeleton and determines its strength and longevity. Most residential sheds use standard 2×4 or 2×6 lumber for walls, with 16-inch or 24-inch on-center spacing between studs (the distance from the center of one stud to the center of the next).
Begin by constructing wall frames on the ground. Lay out two horizontal plates (top and bottom boards) and mark stud positions every 16 or 24 inches. Cut studs to length—this equals the desired wall height minus 3.5 inches (accounting for the thickness of top and bottom plates). Assemble walls by nailing or screwing studs between plates using 3-inch nails or 2.5-inch screws. Use a square to ensure studs are perpendicular to plates.
For door and window openings, frame headers (horizontal beams above openings) using double 2x4s or 2x6s depending on opening width. Building code requirements specify header sizes based on span length, so verify local codes. Install cripple studs (short studs above windows) and jack studs (vertical supports under headers) to properly distribute loads.
Once all walls are framed, raise them into position on your foundation. Brace walls temporarily with diagonal 2x4s nailed to stakes in the ground to keep them plumb (perfectly vertical). Check plumb using a 4-foot level on multiple points of each wall. Connect walls at corners using 3-inch nails driven through the outer wall into the corner studs of adjacent walls, spacing nails every 12 inches.
Install ceiling joists or roof trusses after walls are secured. Ceiling joists tie walls together, preventing them from spreading outward under load. Space joists 16 or 24 inches on-center, matching stud spacing for load alignment. Nail joists to wall plates with 3-inch nails, using at least two nails per connection.
Roof Installation
The roof protects your entire shed from weather, making proper installation critical. Two common approaches suit DIY builders: pre-built trusses or site-built rafters.
Pre-Built Trusses: Engineered trusses arrive ready to install, saving considerable time and ensuring structural adequacy. Rent a crane or arrange delivery to position trusses on your walls, spacing them 24 inches on-center. Nail each truss to the wall plate with multiple nails, and brace them temporarily with diagonal boards until sheathing is installed.
Site-Built Rafters: If building rafters on-site, calculate rafter length and angle using your roof pitch (typically 4:12 to 8:12, meaning 4-8 inches of rise per 12 inches of horizontal run). Mark bird’s mouth cuts where rafters sit on wall plates, then nail pairs of rafters together at the peak using a collar tie. Install collar ties every third rafter pair to prevent spreading.
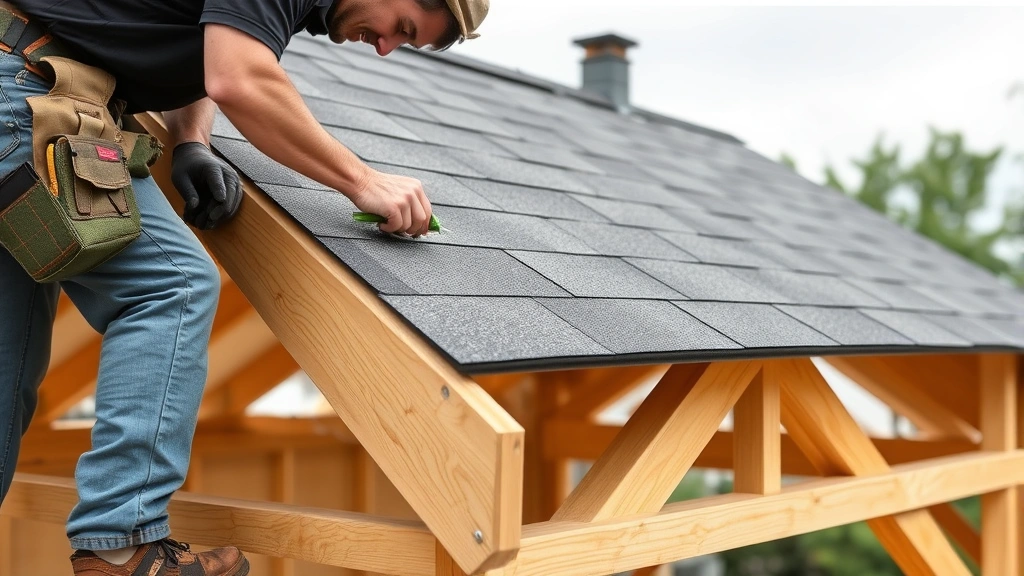
Once rafters or trusses are secured, install roof sheathing using ½-inch plywood or OSB, nailing every 6 inches along framing members. Sheathing provides structural bracing and a surface for roofing attachment. Install underlayment (roofing felt or synthetic barrier) over sheathing, overlapping each course by 4 inches and nailing every 12 inches.
Choose roofing material based on climate and durability needs. Asphalt shingles are economical and widely used; install using 4 nails per shingle, spaced ¾ inch below the cutout lines. Metal roofing offers longevity and superior weather protection but requires specialized fastening and flashing knowledge. Hire a professional roofer if uncomfortable with heights or complex flashing details.
Install gutters and downspouts to direct water away from the foundation. Gutters mounted at the fascia edge (the board at the roof’s edge) prevent water from running down walls. Slope gutters slightly toward downspouts, and position downspouts to discharge water at least 4-6 feet from the foundation.
Siding and Weatherproofing
Siding protects wall sheathing from weather while defining your shed’s appearance. Options include wood, vinyl, metal, and composite materials, each with distinct advantages regarding cost, maintenance, and aesthetics.
Wood Siding: Horizontal lap siding (clapboard) or vertical board-and-batten creates a traditional shed appearance. Install sheathing (½-inch plywood) over studs first, then apply house wrap or tar paper. Begin siding at the bottom, overlapping each course by 1-1.5 inches. Nail siding every 16 inches through studs, using galvanized or stainless steel nails to prevent rust. Leave ½-inch gaps at corners and windows for caulking.
Vinyl and Metal Siding: These materials install over sheathing and house wrap, following manufacturer specifications. Snap-together systems simplify installation for DIY builders. Ensure proper fastening to prevent wind damage—nail fasteners should be slightly loose to allow material movement with temperature changes.
Weatherproofing: Seal all exterior joints, gaps, and penetrations with paintable caulk or expanding foam. Install flashing around windows and doors to direct water outward and downward, preventing interior leaks. Flashing materials include aluminum, galvanized steel, or rubber, depending on application.
Paint or stain exterior surfaces within a season of construction. Unprotected wood rapidly develops mildew and rot. Use exterior-grade paint or stain rated for your climate zone. Apply two coats for optimal protection, and consider periodic maintenance—repainting every 5-10 years depending on material and climate.
Windows, Doors, and Finishing
Windows and doors add functionality and light while requiring careful installation to prevent leaks. Pre-hung doors and windows simplify DIY installation compared to site-built alternatives.
Door Installation: Position the pre-hung door unit in the opening, ensuring it’s plumb and level. Shim (insert thin wedges) around the frame to hold it square while checking with a level. Nail through the frame into studs using 2.5-inch finish nails, spacing nails every 12 inches. Caulk around the exterior frame, and install trim on both interior and exterior sides.
Window Installation: Windows follow similar procedures—position in rough openings, shim level and plumb, nail through flanges into studs, then caulk and trim. Consider operable windows for ventilation; casement or awning windows work well for sheds lacking electricity for fans.
Interior finishing depends on your shed’s purpose. Unfinished interiors work for pure storage, but workshops benefit from drywall or plywood wall covering, concrete floors, and electrical circuits. Install electrical systems per National Electrical Code requirements, using GFCI-protected outlets in damp areas and adequate lighting for work tasks. Insulation becomes important if your shed will be occupied during cold months or if temperature-sensitive items are stored inside.
For enhanced functionality, consider adding shelving, workbenches, or pegboards. These elements maximize storage and usability without compromising structure. Install shelving securely into studs using appropriate brackets rated for your storage loads.
Finally, landscape around your shed to manage drainage and aesthetics. Grade soil away from the foundation at least 6 inches over 10 feet to prevent water pooling. Plant shrubs or flowers to integrate the shed into your yard design, and maintain adequate clearance (typically 3 feet) around the structure for inspection and maintenance access.
FAQ
Do I need a permit to build a shed?
Permit requirements vary by location. Many jurisdictions require permits for sheds exceeding 100-150 square feet or those with permanent foundations. Check with your local building department before construction begins. Permits ensure your shed meets safety codes and protects your property value and insurance coverage.
What’s the best foundation for a shed?
Concrete piers set below the frost line provide the most durable foundation for permanent sheds. Gravel beds suit temporary structures, while pressure-treated skids work for smaller sheds. Choose based on your climate, intended permanence, and budget. Proper foundation prevents settling, warping, and structural failure.
How much does it cost to build a shed?
Costs vary dramatically based on size, materials, and finishes. A basic 8×10 shed with simple construction might cost $1,500-$3,000 in materials, while larger or finished structures can exceed $10,000. Create a detailed material list and obtain quotes from suppliers to establish accurate budgets.
Can I build a shed without roofing experience?
Yes, pre-built trusses eliminate complex rafter calculations and cuts. However, roofing installation—particularly shingle application and flashing—requires comfort with heights and attention to detail. If uncomfortable with roof work, hire a professional roofer for this critical phase.
How long does shed construction take?
A basic 8×10 shed typically requires 40-60 hours spread over 2-4 weeks, accounting for foundation curing, material delivery, and weather delays. Larger or more complex sheds require proportionally more time. Plan for weekends and occasional evenings rather than expecting completion in days.
What tools do I need for shed building?
Essential tools include a circular saw or miter saw, drill-driver, level, tape measure, square, hammer or pneumatic nailer, and safety equipment (glasses, gloves, dust mask). A table saw, reciprocating saw, and power miter saw accelerate cutting tasks. Rent specialized tools like pneumatic nailers rather than purchasing if you won’t use them regularly.
Should I insulate my shed?
Insulation benefits temperature-sensitive storage and makes the space comfortable for work during cold months. Fiberglass batts between studs cost $100-$300 and are DIY-friendly. Add vapor barriers to prevent condensation, and ensure adequate ventilation to manage moisture.
How do I prevent rot in my wooden shed?
Use pressure-treated lumber for foundations and any ground-contact wood. Paint or stain exterior surfaces within one season of construction. Ensure proper drainage around the foundation and maintain gutters. Install vents to allow air circulation, reducing moisture accumulation inside. Inspect annually for signs of rot or pest damage.
Building your own shed is an achievable goal that delivers satisfaction and practical value. By following these detailed steps and prioritizing proper foundation work, framing, and weatherproofing, you’ll create a durable structure serving your needs for decades. Don’t hesitate to consult local building officials, experienced builders, or specialized resources when questions arise. For additional DIY expertise, explore our DIY Nests Hub Blog for related home improvement projects. If you’re planning larger structural projects, our guide on DIY basement finishing covers foundational construction principles applicable to shed building. For those interested in protecting their property, our DIY home security guide complements shed construction with valuable property protection strategies.


