DIY Pergola Plans: Builder-Endorsed Designs
A pergola transforms any outdoor space into an inviting retreat that combines functionality with aesthetic appeal. Whether you’re looking to create a shaded dining area, a cozy garden sanctuary, or an attractive focal point for your backyard, a well-designed pergola offers the perfect solution. These open-roof structures provide partial shade while allowing air circulation, making them ideal for various climates and purposes.
Building a pergola yourself is an achievable project for DIYers with moderate carpentry skills and the right plans. This comprehensive guide walks you through builder-endorsed designs, essential materials, construction techniques, and safety considerations to help you create a stunning outdoor structure that adds value to your home.
Understanding Pergola Basics and Design Types
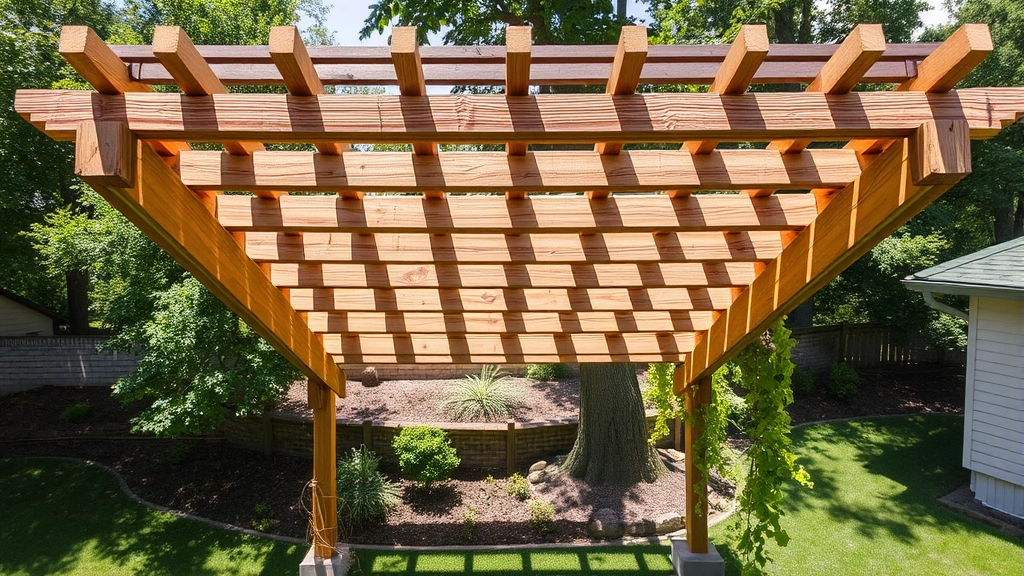
Pergolas come in several distinct styles, each serving different purposes and aesthetic preferences. The traditional open pergola features a lattice roof with evenly spaced beams that allow dappled sunlight to filter through while providing some shade. Modern pergolas often incorporate solid roofing panels, retractable canopies, or polycarbonate sheets for enhanced weather protection. Before selecting a design, consider your climate, the amount of shade you need, and how the structure will complement your existing landscape.
Builder-endorsed designs typically follow established architectural principles that ensure structural integrity and longevity. The most popular dimensions range from 10×12 feet to 16×20 feet, though custom sizes are certainly possible. Standard designs account for local wind loads, snow accumulation, and proper drainage. When planning your pergola, measure your intended location carefully and consider sight lines from your home’s windows and patio areas.
The pitch and angle of roof beams significantly impact both appearance and function. Beams running east-west provide better summer shade in northern climates, while north-south orientation works better in southern regions. Consulting International Code Council building standards ensures your design meets local requirements. You should also review local zoning regulations and homeowner association guidelines before beginning construction.
Essential Materials and Tools
Selecting quality materials is crucial for a pergola that withstands weather and time. Pressure-treated lumber remains the most economical choice, offering natural rot resistance for 15-20 years. Cedar and redwood provide superior aesthetics and natural durability but require regular maintenance. For maximum longevity, consider composite materials or vinyl-clad wood, which eliminate the need for painting or staining.
Your material list for a standard 12×12-foot pergola typically includes:
- Four 6×6-inch posts (8-10 feet long)
- 2×10 or 2×12-inch beams for the main structure
- 2×6-inch or 2×8-inch rafters for the roof
- 1×2 or 1×3-inch boards for lattice work
- Concrete mix for post footings (approximately 12 bags)
- Galvanized or stainless steel fasteners (3-inch lag bolts, 2.5-inch deck screws)
- Metal post bases and brackets
Essential tools include a circular saw, miter saw, power drill, level, tape measure, post hole digger, and a socket set. Renting a power auger significantly speeds up post hole digging. A reciprocating saw proves invaluable for cutting notches and making adjustments. When working with large beams, consider renting scaffolding or adjustable work platforms for safety.
Foundation and Post Installation
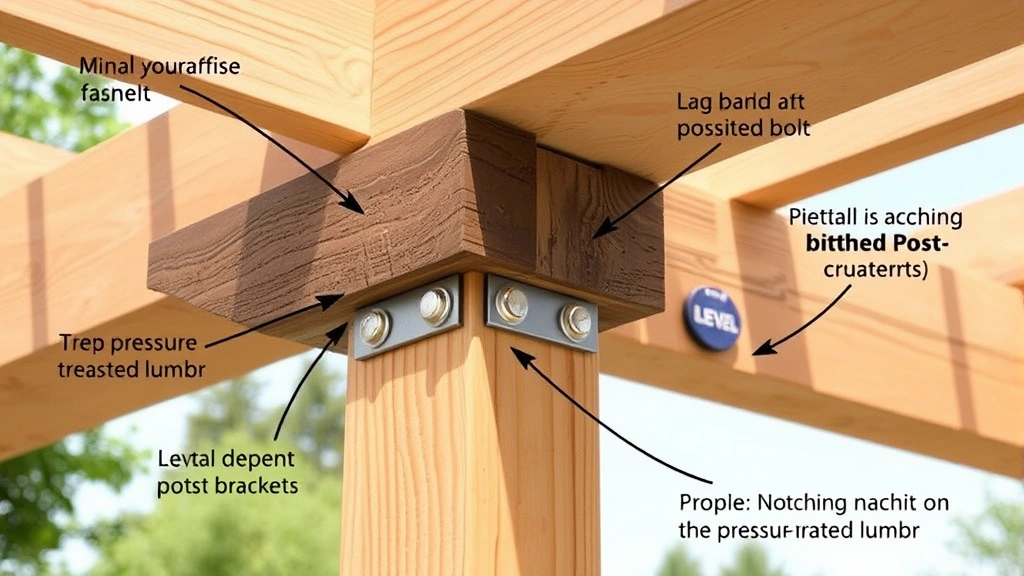
Proper foundation work ensures your pergola remains stable and level for decades. Begin by marking your post locations with string and chalk. Posts should be positioned at least 4 feet apart, though 8-10 feet is standard for larger structures. Dig holes 2-3 feet deep, extending below your local frost line—consult your regional building code requirements for specific depth specifications.
For each post hole, add 4-6 inches of gravel for drainage, then position a metal post base. Pour concrete around the base, ensuring it’s level and extends slightly above ground to shed water. Allow concrete to cure for 48 hours before proceeding. This step is critical—inadequate foundations lead to settling, shifting, and structural failure.
When setting posts, use a 4-foot level on multiple sides to ensure vertical alignment. Temporary bracing with 2x4s helps maintain plumb during concrete curing. Posts should extend 8-10 feet above ground for standard pergolas. Mark the exact height where beams will attach using a chalk line or laser level across all posts.
Building the Frame Structure
The main frame consists of large beams connecting the four corner posts. For a 12×12-foot pergola, use 2×10 or 2×12-inch beams. Attach these using lag bolts (3/8-inch diameter) with washers, drilling pilot holes to prevent splitting. Space bolts approximately 16 inches apart. The beams should sit on top of posts or be notched into them, depending on your design.
Creating proper notches requires precision. Mark the beam width on the post, then use a circular saw or reciprocating saw to cut the notch. Test fit before finalizing. Some designs use metal brackets instead of notches—these are easier for beginners but less aesthetically pleasing. Ensure all connections are secure and cannot shift under wind load.
Cross beams running perpendicular to the main beams create the secondary structure. These 2×8 or 2×10-inch members are typically spaced 2-4 feet apart. Attach them using joist hangers or by notching into the main beams. Proper spacing affects both appearance and shade quality—wider spacing creates more dramatic light patterns, while closer spacing provides denser shade.
Before proceeding to roof installation, step back and verify that your frame is square, level, and plumb. Measure diagonals—they should be equal. Any deviation now becomes more difficult to correct later. This is also an excellent time to apply finish or sealant if you’re using untreated wood.
Adding Roof Beams and Lattice
Roof beams create the characteristic pergola appearance while providing structural support for climbing plants or shade fabric. Rafters (typically 2×6 or 2×4-inch lumber) are spaced 12-24 inches apart, running perpendicular to cross beams. Attach them using joist hangers, lag bolts, or notching, depending on your design preference. Ensure consistent spacing for visual appeal.
Lattice panels add decorative appeal and help support climbing vines. Pre-made lattice panels (typically 4×8 feet) simplify installation, though custom-built lattice offers superior durability. If building custom lattice, use 1×2 or 1×3-inch boards, cutting 45-degree angles at intersections for a professional appearance. Space lattice strips 4-8 inches apart, depending on desired shade and aesthetic.
Consider incorporating a pergola-mounted lighting system during this stage. Running electrical wire through the structure before installing final lattice panels simplifies the process. Install weather-resistant fixtures rated for outdoor use, and ensure all work complies with local electrical codes.
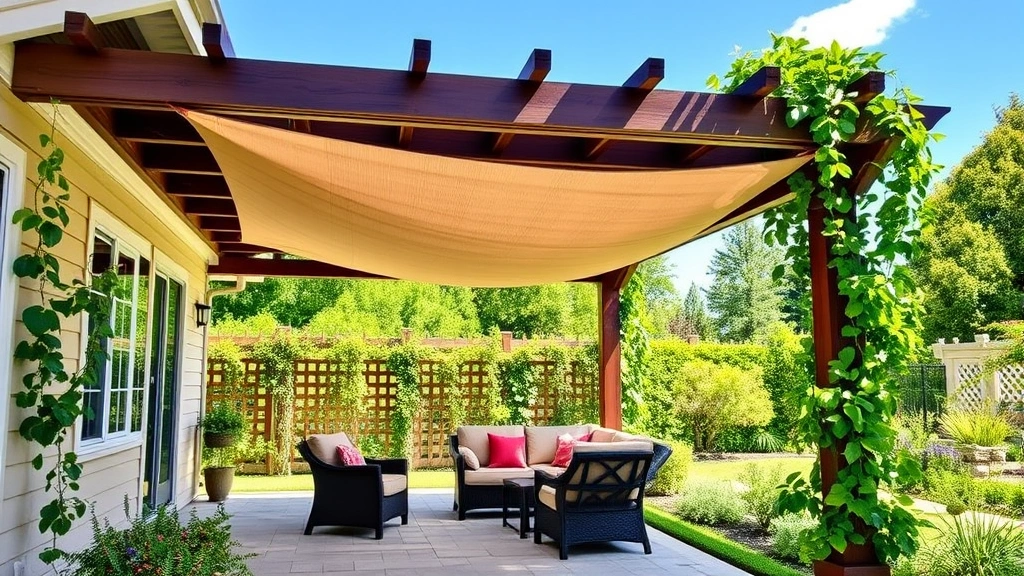
Climbing vines add living dimension to pergolas. Clematis, jasmine, and climbing roses are popular choices that provide seasonal interest. Plan for vine support by ensuring your lattice spacing accommodates tendrils or twining stems. Some gardeners prefer annual vines for easier maintenance, while perennial varieties offer long-term coverage.
Finishing Touches and Weatherproofing
Proper finishing protects your investment and enhances curb appeal. Untreated wood should receive a water-resistant sealant every 2-3 years. Pressure-treated lumber can be stained or left to weather naturally, though staining extends its lifespan. Cedar and redwood benefit from regular sealing to maintain color and prevent graying.
Consider adding retractable shade cloth or a removable canopy system for enhanced protection. These solutions attach to the pergola frame and provide adjustable coverage. Some modern designs incorporate motorized retractable panels controlled via remote or smartphone, though these require professional electrical installation.
Drainage is essential for pergola longevity. Ensure the structure slopes slightly toward one edge to shed water rather than pooling on beams. If adding a solid roof section, install gutters and downspouts to direct water away from the structure and surrounding areas. Poor drainage accelerates wood decay and weakens connections.
Your pergola enhances your outdoor living space similar to how basement finishing projects expand interior living areas. Both require careful planning, quality materials, and attention to building codes. For additional outdoor enhancements, explore exterior painting techniques to refresh your pergola’s appearance.
Safety considerations throughout construction include proper use of power tools, fall protection when working at heights, and ensuring all fasteners are secure. Wear safety glasses, work gloves, and steel-toed boots. Never work alone on elevated sections, and use sturdy ladders or scaffolding rated for your weight plus tool weight.
Once construction is complete, perform a thorough inspection. Check all bolts and fasteners, ensuring nothing is loose. Walk the structure and observe any movement or flex. Minor movement is normal, but excessive flex indicates structural problems requiring reinforcement. Document your construction with photos and maintain records of materials used and installation dates.
FAQ
How much does it cost to build a DIY pergola?
A basic 12×12-foot pergola using pressure-treated lumber typically costs $800-1,500 in materials. Cedar or redwood designs run $1,500-2,500. Premium materials and custom designs can exceed $3,000. Labor costs for professional installation typically range from $2,000-5,000 depending on complexity and location.
Do I need a building permit for a pergola?
Permit requirements vary by jurisdiction. Many areas exempt pergolas under 200 square feet or those not attached to the home, but some require permits for any permanent structure. Contact your local building department before beginning. Obtaining proper permits protects your property value and ensures code compliance. Check your local building code office for specific requirements.
How long does a pergola last?
Properly constructed pergolas last 15-20 years with pressure-treated lumber, 20-30 years with cedar or redwood, and 30+ years with composite materials. Lifespan depends on climate, maintenance frequency, and wood quality. Regular sealing and inspections significantly extend durability.
Can I attach a pergola to my house?
Yes, attached pergolas require additional structural considerations. The attachment point must connect to solid framing, typically the house rim joist or band board. Use bolts or lag screws spaced 16 inches apart. Consult a structural engineer if attaching to masonry or if your home has unusual framing. Most building codes require engineer approval for attached structures.
What’s the best wood for outdoor pergolas?
Cedar and redwood offer natural beauty and durability but require maintenance. Pressure-treated lumber provides excellent rot resistance at lower cost but requires periodic staining. Composite materials eliminate maintenance but cost more initially. For budget-conscious builders, pressure-treated lumber with regular sealing provides excellent value.
How much shade does a pergola provide?
Open pergolas provide approximately 30-50% shade depending on beam spacing and latitude. Denser lattice increases shade to 60-75%. Solid roofing or shade cloth provides 85-95% shade. Consider your climate and intended use when selecting shade density.
Can I build a pergola without digging post holes?
Surface-mounted post bases eliminate digging but compromise stability, particularly in windy areas. Ground-level deck blocks offer a middle ground, though frost heave can cause movement over time. Building codes typically require below-frost-line installation for permanent structures. Invest in proper foundation work for long-term stability.
What climbing plants work best on pergolas?
Popular choices include clematis, jasmine, climbing roses, honeysuckle, and grapevines. Consider your climate, sunlight conditions, and desired maintenance level. Perennial vines provide permanent coverage but require annual pruning. Annual vines like morning glories offer seasonal interest with easier cleanup.
Should I seal untreated wood before installation?
Sealing before installation is ideal but impractical for large beams. Apply sealant immediately after construction while wood is still fresh. Pressure-treated lumber contains moisture that requires 3-6 months to stabilize before staining. Cedar and redwood can be sealed immediately after installation.
How do I prevent rot in my pergola?
Proper drainage is essential—slope beams to shed water, install gutters if needed, and ensure posts don’t sit in standing water. Choose naturally rot-resistant wood or pressure-treated lumber. Apply water-resistant sealant every 2-3 years. Inspect regularly for signs of decay and address immediately.


