How to Change a Faucet: Complete Plumber Tips and Installation Guide
Replacing a faucet is one of the most rewarding DIY plumbing projects you can tackle. Whether you’re upgrading to a modern fixture, fixing a persistent leak, or simply refreshing your kitchen or bathroom aesthetic, learning how to change a faucet saves you hundreds in professional plumbing fees. This comprehensive guide walks you through every step, from shutting off the water supply to installing your new fixture, with insider tips from experienced plumbers to ensure your project succeeds.
A leaky faucet wastes approximately 3,000 gallons of water annually, making replacement not just a cosmetic upgrade but an environmental and financial responsibility. Many homeowners discover that faucet replacement is far more manageable than they anticipated, requiring only basic tools and a few hours of your time. By following this detailed walkthrough, you’ll gain the confidence and knowledge to complete this project yourself while avoiding costly mistakes.
Tools and Materials You’ll Need
Before beginning any faucet replacement project, gather all necessary tools and materials. Having everything prepared prevents frustrating mid-project trips to the hardware store and keeps your workflow efficient. Most faucet installations require only basic plumbing tools that many homeowners already possess.
Essential Tools:
- Adjustable wrench (8-10 inch)
- Basin wrench or specialized faucet wrench
- Screwdrivers (Phillips and flathead)
- Adjustable pliers or slip-joint pliers
- Flashlight or headlamp for under-sink visibility
- Bucket or towels to catch residual water
- Plumber’s putty or silicone caulk
- Teflon tape (plumber’s tape)
- New faucet with installation hardware
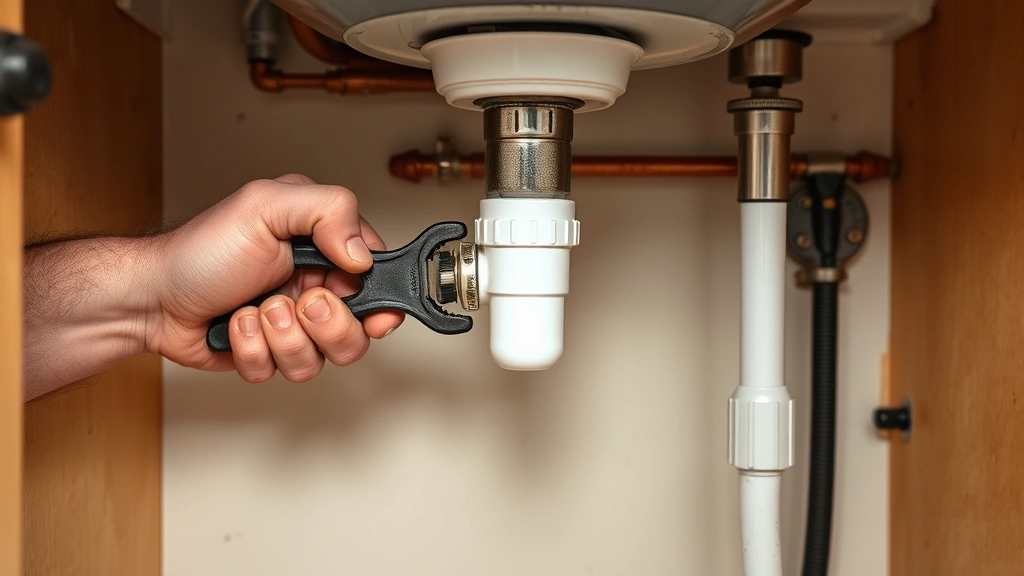
A basin wrench deserves special mention—this specialized tool reaches tight spaces behind sinks that standard wrenches cannot access. If you don’t own one, they cost under $15 and make faucet removal significantly easier. Before purchasing your replacement faucet, verify your sink’s configuration: single-hole, widespread (three-hole), or center-set designs require different fixtures.
Safety Precautions and Water Shutoff
Safety is paramount when working with plumbing systems. Improper water shutoff or negligent handling of components can lead to water damage, flooding, or injury. Understanding proper shutoff procedures protects both your home and your safety throughout the installation process.
Step 1: Locate Your Water Shutoff Valve
Every sink has individual shutoff valves beneath it. Look under your sink cabinet for two valves—one supplies hot water, the other cold. These oval or round knobs control water flow to your specific fixture without affecting the rest of your home’s water supply. If individual shutoff valves don’t exist, you’ll need to use your home’s main water shutoff valve, typically located in the basement, crawlspace, or exterior meter box.
Step 2: Turn Off the Water Supply
Rotate both shutoff valves clockwise until they stop. You should feel resistance but don’t force them—excessive pressure can damage the valves. Turn them gently but firmly. To confirm the water is truly off, turn on your sink faucet. If water continues flowing, the shutoff valve may be faulty or you may need to use the main water shutoff instead. Never proceed with faucet removal if water still flows.
Step 3: Drain Remaining Water
Even with water shut off, residual water remains in the pipes. Open the faucet and let any remaining water drain into your sink. Place a bucket or towels under the supply lines to catch additional water that may drip during removal. This simple precaution prevents water damage to your cabinet and flooring.
Removing Your Old Faucet
Removing the old faucet requires patience and the right technique. Older fixtures may have corroded connections or mineral buildup, making removal more challenging. Understanding the proper sequence prevents damage to your sink and supply lines.
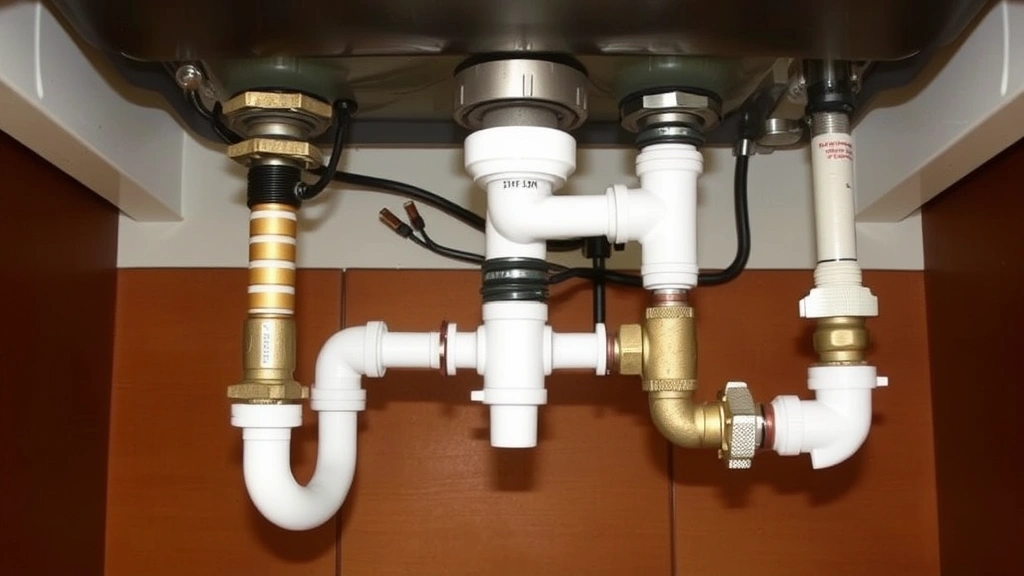
Step 1: Disconnect the Supply Lines
Located under the sink, supply lines connect the shutoff valves to the faucet. Using your adjustable wrench, hold the fitting at the shutoff valve with one wrench while turning the compression nut counterclockwise with another. This two-wrench technique prevents damage to the valve. Loosen both hot and cold lines completely. If the lines are corroded or stuck, apply penetrating oil and wait 15 minutes before attempting removal again.
Step 2: Remove the Faucet Base Fasteners
From under the sink, you’ll see bolts or nuts holding the faucet base to the sink deck. Using your basin wrench in the tight space, turn these fasteners counterclockwise. If your basin wrench won’t fit, an adjustable wrench or pliers may work. Some faucets have screws accessed from above—remove these with your screwdriver. Work slowly to avoid stripping fasteners or damaging the sink surface.
Step 3: Lift Away the Old Faucet
Once all fasteners are removed, gently lift the old faucet from the sink. You may encounter mineral deposits or sealant creating resistance—gently rock the faucet side-to-side while lifting. Once removed, set it aside carefully to avoid damaging your sink.
Preparing the Sink for Installation
Proper preparation ensures your new faucet sits correctly and functions optimally. This often-overlooked step prevents future leaks and extends your fixture’s lifespan significantly.
Step 1: Clean the Sink Deck
Using a cloth and appropriate cleaner, remove all old putty, caulk, mineral deposits, and debris from the faucet mounting holes. For stubborn buildup, use a plastic scraper—avoid steel wool or abrasive pads that scratch sink surfaces. The mounting area must be completely clean for your new faucet to create a proper seal. Inspect the sink for cracks or damage; if significant damage exists, sink replacement may be necessary.
Step 2: Verify Hole Alignment
Check that your new faucet’s mounting holes align with your sink’s holes. Most modern sinks accommodate standard hole spacing, but older sinks occasionally have unusual configurations. If holes don’t align, you may need a different faucet style or sink modification. Verify this before proceeding with installation to avoid frustration later.
Step 3: Apply Sealant
Apply a thin bead of plumber’s putty or silicone caulk around the faucet base mounting area. This creates a watertight seal preventing water from seeping between the faucet and sink. Don’t overapply—excess sealant creates messy cleanup and may prevent proper seating. Follow your new faucet’s manufacturer instructions regarding sealant type, as some fixtures specify particular products.
Installing Your New Faucet
Installation reverses the removal process but requires attention to proper connection techniques and torque specifications. Rushing this phase leads to leaks and future problems, so work deliberately and carefully.
Step 1: Position the Faucet
Carefully insert the faucet’s mounting posts through your sink’s holes. Align the faucet so the spout points correctly and handles are properly oriented. From beneath the sink, hand-thread the mounting nuts onto the posts, ensuring they sit straight and don’t cross-thread. If resistance occurs, stop and realign—forcing misaligned threads damages both faucet and sink.
Step 2: Tighten Mounting Hardware
Using your wrench or basin wrench, gradually tighten the mounting nuts in a crisscross pattern, similar to tightening wheel lug nuts. This ensures even pressure and proper seating. Tighten until snug but don’t over-torque—you want the faucet secure without cracking the sink deck. Most residential faucets require only hand-tight plus a quarter-turn with your wrench.
Step 3: Connect Supply Lines
Attach the new faucet’s supply lines to the shutoff valves. If your new faucet came with supply lines, use those; if not, purchase new flexible supply lines rated for your water pressure (typically 80-100 PSI for residential applications). Apply two wraps of Teflon tape to the male threads before connecting compression fittings. This tape prevents leaks at connection points. Hand-tighten first, then use your wrench to snug the connections—about a quarter-turn past hand-tight. Avoid over-tightening, which can crack fittings.
Step 4: Install Aerator and Handles
If your faucet came disassembled, install the aerator into the spout tip by hand-twisting clockwise. Install handles according to manufacturer instructions—some press-fit, others screw on. Ensure handles operate smoothly and return to their original position. Test handle operation before turning on water pressure.
Testing and Troubleshooting
Before considering your project complete, thorough testing prevents future water damage and ensures proper operation. This critical phase catches problems while you still have tools and materials available.
Step 1: Turn Water Back On Gradually
Slowly open the shutoff valves counterclockwise, beginning with cold water. Open just a quarter-turn initially, allowing air to purge from the lines. You may hear sputtering or see discolored water—this is normal and clears within minutes. Gradually open the valves fully while observing all connections for leaks.
Step 2: Check All Connections
With water running at moderate pressure, inspect every connection point—supply line connections, faucet base, and handle connections. Even small drips indicate improper sealing. If you notice leaks at supply line connections, turn off water and tighten the compression nut an additional quarter-turn. If leaks persist, you may need to disconnect and reapply Teflon tape.
Step 3: Test Hot and Cold Water
Operate both handle positions, confirming hot and cold water flow correctly. Check that handles operate smoothly without excessive resistance or play. Some new faucets have slightly stiff handles initially—this loosens with use. If handles operate roughly or don’t return to center position, you may have an installation issue requiring adjustment.
Step 4: Verify Water Pressure and Flow
Run water at various flow rates, ensuring proper pressure and no unusual sounds like squealing or vibration. These symptoms indicate air in lines (usually resolves within hours) or improper installation. Fill a container at the sink to verify adequate flow rate—modern aerators typically deliver 2.2 gallons per minute or less, helping conserve water while maintaining adequate pressure.
Maintenance Tips for Longevity
Your new faucet requires minimal maintenance to function optimally for years. Simple preventive care extends its lifespan and prevents common problems. Understanding basic DIY home maintenance principles helps you keep all fixtures in excellent condition.
Regular Cleaning
Wipe your faucet weekly with a soft cloth to prevent mineral buildup and water spots. For hard water areas, use a mixture of equal parts white vinegar and water, applied with a soft cloth. Avoid abrasive scrubbers or harsh chemicals that damage finishes. For aerator cleaning, unscrew it from the spout tip annually and rinse thoroughly under running water to remove mineral deposits.
Handle Care
Operate handles gently through their full range of motion regularly. Avoid forcing handles or using excessive pressure. If handles become stiff, apply a small amount of penetrating oil around the handle base and work it in with gentle operation. Never use handles to support your weight or hang items—they’re precision components, not structural supports.
Connection Inspection
Monthly inspections under your sink catch developing leaks before they cause damage. Look for water drips, discoloration, or moisture around connections and the faucet base. Early detection of minor leaks allows simple fixes before extensive damage occurs. Keep the area under your sink clear and dry to spot problems immediately.
Water Pressure Regulation
Excessive water pressure stresses faucet components and causes premature failure. If your water pressure exceeds 80 PSI, install a pressure regulator on your main water line. This inexpensive device protects all plumbing fixtures and reduces water waste. Your local water company can test pressure if you’re uncertain.
If you’re comfortable with this project, you might also consider learning how to change a ceiling fan or tackling other DIY home improvement projects with similar methodical approaches. Many plumbing and fixture installation techniques apply across different home systems.
Frequently Asked Questions
How long does faucet replacement typically take?
Most homeowners complete faucet replacement in 1-3 hours, depending on experience level and fixture complexity. First-time installers may require 3-4 hours, while experienced DIYers finish in under an hour. Complications like corroded connections or unusual sink configurations extend timeline. Never rush—taking your time prevents mistakes and ensures proper installation.
What if I can’t turn off the water at the shutoff valves?
Corroded or seized shutoff valves are common in older homes. Try applying penetrating oil and waiting 30 minutes before attempting again. If valves still won’t budge, use your home’s main shutoff valve instead. Consider replacing individual shutoff valves during your faucet installation—they’re inexpensive and prevent future issues. Main shutoff valves sometimes require professional attention if they won’t operate.
Can I reuse my old supply lines with a new faucet?
New supply lines are recommended for safety and reliability. Old lines may have internal corrosion, mineral deposits, or weakened connections. New flexible supply lines cost under $20 for a pair and provide peace of mind. Some newer faucets include supply lines—use those when provided. Never reuse old supply lines if they show visible damage or have been in service over 10 years.
Why is my new faucet leaking at the base?
Base leaks typically result from improper sealant application or incomplete fastener tightening. Turn off water, remove the faucet, clean the mounting area completely, reapply fresh sealant, and reinstall. Ensure all mounting fasteners are snug but not over-tightened. If leaking persists after reinstallation, the sink deck may be damaged and require professional repair or replacement.
Should I use plumber’s putty or silicone caulk?
Check your faucet manufacturer’s specifications—different materials require different sealants. Plumber’s putty works well for traditional faucets but doesn’t cure and may stain porous materials. Silicone caulk is permanent, waterproof, and suitable for most modern fixtures. If manufacturer instructions aren’t available, silicone caulk is the safer choice for contemporary installations.
What water pressure is normal for residential faucets?
Typical residential water pressure ranges 40-80 PSI. Most faucets operate optimally in this range. Pressure below 40 PSI may cause weak flow, while pressure exceeding 80 PSI stresses components and causes premature failure. If you’re uncertain about your water pressure, contact your local water utility or purchase an inexpensive pressure gauge to test your system.
Can I install a single-hole faucet in a three-hole sink?
Yes, using a faucet escutcheon plate. This decorative plate covers extra holes, creating a clean appearance. Escutcheon plates are available at hardware stores and come in various finishes matching your faucet. Some single-hole faucets include escutcheon plates—verify before purchasing. Alternatively, you can have a plumber fill extra holes if you prefer permanent closure.
How often should I clean my faucet aerator?
Clean your aerator annually or more frequently if you notice reduced water flow or spray pattern changes. Hard water areas may require more frequent cleaning. Unscrew the aerator from the spout tip and rinse under running water, using an old toothbrush to remove mineral deposits. Soak stubborn buildup in white vinegar for 30 minutes before scrubbing.


