How to Change Acoustic Guitar Strings: Expert Tips Inside
Changing acoustic guitar strings is one of the most essential maintenance skills every guitarist should master. Whether you’re a beginner picking up your first instrument or an experienced player maintaining your prized collection, knowing how to properly replace worn strings will save you money and keep your guitar sounding its best. Fresh strings not only restore brightness and resonance to your tone but also improve playability and reduce the risk of unexpected breakage during performance.
This comprehensive guide walks you through every step of the string-changing process, from removing old strings to tuning and stretching new ones. We’ll cover the tools you’ll need, techniques that professionals use, and troubleshooting tips for common issues. By following these expert recommendations, you’ll develop confidence in maintaining your acoustic guitar and extend the life of your instrument.
Tools and Materials You’ll Need
Before you start the string-changing process, gather all necessary tools and materials. Having everything prepared prevents frustration and ensures a smooth experience. Unlike more complex home maintenance projects, guitar string replacement requires minimal equipment.
Essential Tools:
- Wire cutters – High-quality cutters designed for guitar strings make clean cuts without damaging the string or bridge
- String winder – This mechanical device dramatically speeds up the tuning process and reduces hand fatigue
- Tuner – A digital chromatic tuner ensures accurate pitch; clip-on tuners are convenient and reliable
- Cleaning cloth – Use microfiber or soft cotton to wipe down your fretboard during the process
- Neck rest – A pillow, towel, or dedicated neck rest prevents damage to your instrument while working
Materials to Have Ready:
- New acoustic guitar string set (check your guitar’s specifications for gauge and material)
- Bridge pins (usually included with string sets)
- Optional: fretboard conditioner or linseed oil
- Optional: string lubricant for smoother operation
Understanding the fundamentals of DIY maintenance applies to guitar care just as it does to other projects. Proper preparation prevents problems and makes the entire process more enjoyable.
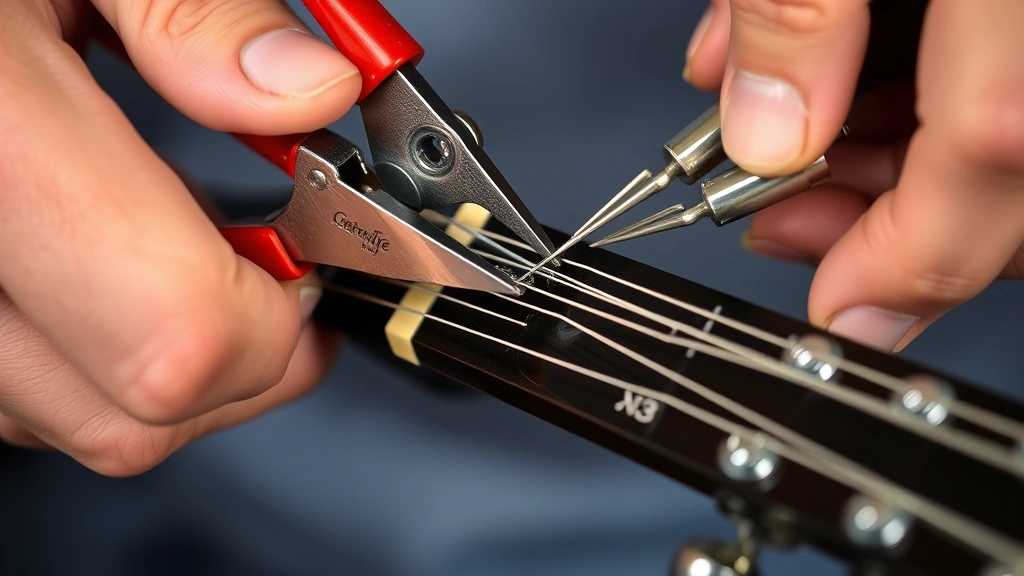
Removing Old Strings Safely
The removal process requires patience and care to avoid damaging your guitar’s neck and hardware. Never remove all strings simultaneously, as this releases tension that helps maintain the neck’s structural integrity.
Step-by-Step Removal Process:
- Loosen the tuning pegs – Turn the tuning machines counterclockwise to reduce string tension gradually. Work slowly to avoid sudden stress on the headstock
- Remove one string at a time – After loosening a string, unwind it completely from the tuning peg
- Extract the bridge pin – At the bridge, gently pull out the bridge pin (the small wooden or plastic pin holding the string in place). A specialized bridge pin puller works well, or you can use the rounded end of a string winder
- Pull out the string – Once the bridge pin is removed, the string should slide out easily from the bridge hole
- Repeat for each string – Continue this process for all six strings, one at a time
This methodical approach mirrors the care you’d take when performing other precision DIY repairs. Rushing the process risks damaging valuable equipment.
Cleaning Your Fretboard
With the strings removed, you have a perfect opportunity to clean areas normally inaccessible. This maintenance step significantly extends your guitar’s life and improves playability.
Safe Cleaning Methods:
- Dry cleaning first – Use a soft brush or dry cloth to remove dust and debris from frets and the fretboard surface
- Microfiber cloth – Gently wipe the fretboard with a slightly dampened microfiber cloth; never use excessive moisture
- Fretboard conditioner – For rosewood or ebony fretboards, apply a specialized conditioner following the manufacturer’s instructions. Maple fretboards typically require different care—check your guitar’s documentation
- Fret polishing – If frets show oxidation or tarnish, use a fret polisher or fine steel wool (0000 grade) with light pressure
Proper instrument care demonstrates the same attention to detail you’d apply to finishing projects, where preparation and maintenance determine final results.

Installing New Strings
Installing new strings requires attention to detail and proper technique to ensure optimal tone and longevity. Each string type—wound versus plain steel—has slightly different installation considerations.
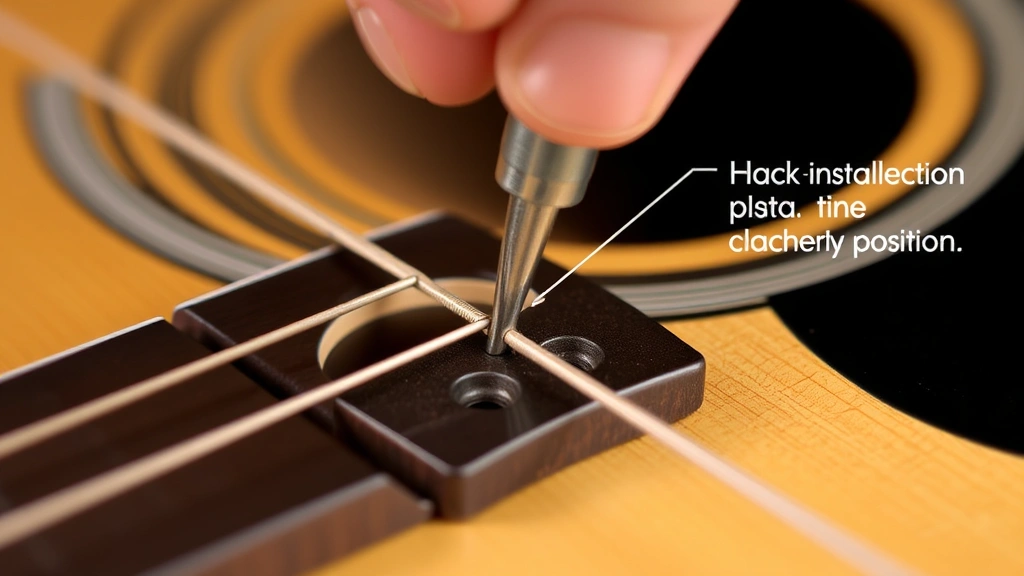
Bridge Installation Process:
- Prepare the bridge pins – Place new bridge pins beside their corresponding bridge holes. Some players prefer soaking pins in water briefly to ensure a snug fit
- Insert the string ball end – Take the thickest string (low E) and insert the ball end into the bridge hole. The string should sit firmly against the bridge saddle
- Install the bridge pin – Push the bridge pin down into the hole, seating it firmly but not forcing it. The groove in the pin should align with the string
- Repeat for remaining strings – Work from the thickest to thinnest strings, ensuring each sits properly against the saddle
Tuning Peg Installation Process:
- Thread the string – Pull the string up toward the headstock with appropriate tension to avoid slack
- Insert through the tuning peg hole – Most tuning pegs have a hole; thread the string through, leaving 2-3 inches of slack
- Begin winding – Turn the tuning peg to wind the string. For bass strings (wound strings), wind downward; for treble strings (plain steel), wind upward. This creates proper string angle over the nut
- Create neat wraps – Wind the string in neat, descending wraps around the post. Each wrap should sit below the previous one without overlapping
- Cut excess string – Once the string reaches pitch, use wire cutters to trim excess string about one inch from the post
Proper installation technique ensures strings stay in tune longer and reduces tuning instability. This precision-focused approach parallels other mechanical maintenance tasks where proper technique prevents future problems.
Proper Tuning Techniques
Tuning newly installed strings requires patience, as new strings stretch and require multiple tuning adjustments before stabilizing.
Initial Tuning Steps:
- Use a reliable tuner – Clip-on tuners, pedal tuners, or smartphone apps work well. Choose a tuner that responds quickly and displays clearly
- Tune to pitch slowly – Bring each string up to pitch gradually. New strings are more prone to breaking if tuned too quickly
- Retune multiple times – After tuning all strings, retune each one as they’ll drop slightly after initial tensioning
- Check intonation – Use a tuner to check harmonic intonation at the 12th fret; this indicates whether your guitar needs professional setup
Tuning Peg Technique:
- Turn tuning pegs smoothly and deliberately
- For sharp notes, turn the peg to loosen the string
- For flat notes, turn the peg to tighten the string
- Listen for the target pitch as you approach it rather than overshooting and backing off
Stretching and Stabilizing New Strings
New strings require stretching to stabilize their pitch and reduce tuning instability. This critical step is often overlooked by beginners but dramatically improves playing experience.
Stretching Methods:
- Gentle pulling method – Gently pull each string away from the fretboard at various points along its length. Apply moderate pressure—enough to feel resistance but not enough to risk breakage
- Tuning peg method – Turn the tuning peg past the target pitch (sharp) then back down to the correct pitch. This creates controlled stretching
- Multiple retune cycles – Retune your entire guitar 3-4 times over 15-20 minutes. Each cycle stretches strings further and stabilizes pitch
Stability Timeline:
- First hour – Strings drop noticeably; expect to retune multiple times
- First day – Strings continue settling; additional retuning may be necessary
- First week – New strings reach relative stability, though slight pitch variation may occur
- First month – Complete stabilization occurs; strings maintain tuning reliably
Patient stretching prevents frustration during early playing sessions and ensures your instrument stays in tune during practice and performance.
Maintenance Tips for String Longevity
Proper maintenance extends string life and preserves tone quality. Fresh strings represent an investment; caring for them properly maximizes that investment.
Daily Care Practices:
- Wipe strings after playing – Use a clean cloth to remove sweat, oils, and dirt from strings and fretboard. This single habit dramatically extends string life
- Wash hands before playing – Clean hands reduce the transfer of oils and corrosive substances to strings
- Store properly – Keep your guitar in a case or gig bag when not in use. Stable humidity and temperature prevent excessive string wear
- Avoid extreme conditions – Never leave your guitar in direct sunlight, near heat sources, or in very dry environments
Long-Term Maintenance:
- Replace strings every 3-6 months – Frequency depends on how often you play. Daily players should change strings more frequently than occasional players
- Monitor for warning signs – Dull tone, tuning instability, visible corrosion, or visible wear indicate replacement time
- Use quality strings – Investing in reputable brands (check manufacturer specifications) ensures better tone and durability
- Consider string coating – Coated strings last 2-3 times longer than uncoated strings, though they cost more initially
Consistent maintenance reflects the same principles that apply to other DIY home and equipment care. Prevention always proves more economical than replacement.
FAQ
How often should I change my acoustic guitar strings?
Most guitarists change strings every 3-6 months, depending on playing frequency and style. Daily players might change monthly, while casual players might go 6-12 months. Signs of aging include dull tone, tuning instability, visible corrosion, or fraying at the ends.
Can I change one string at a time or must I change all six together?
You can replace individual strings as they break or wear out. However, changing all strings together is often preferable because strings age together, and replacing the entire set ensures consistent tone. If you must replace individual strings, match the brand and material of your existing set.
Why do new strings keep going out of tune?
New strings stretch significantly during the first few hours and days of use. This stretching causes pitch to drop, requiring repeated retuning. Proper stretching techniques (as described in Section 6) minimize this issue. After one week, new strings typically stabilize completely.
What’s the difference between bronze, phosphor bronze, and steel strings?
Bronze strings (80/20 bronze) offer bright tone but corrode quickly. Phosphor bronze adds phosphorus for longer life and warmer tone. Steel strings are the most durable but produce a brighter, more metallic sound. Choose based on your preferred tone and how frequently you want to change strings. Check your guitar manufacturer’s recommendations for guidance.
Is it necessary to use a string winder?
While not absolutely necessary, a string winder dramatically speeds up the installation process and reduces hand fatigue. They cost $10-20 and are worthwhile investments for anyone planning regular string changes. Manual winding works fine but takes significantly longer.
What should I do if a string breaks during installation?
If a string breaks while being installed, simply remove the broken pieces and start with a fresh string from your set. If a string breaks during playing, you can temporarily continue with five strings until you can change it. Always keep spare strings in your guitar case for emergencies.
Can I reuse old bridge pins?
Old bridge pins can be reused if they’re not cracked or damaged. However, new pins typically come with string sets and are inexpensive. New pins provide better fit and seal, so replacing them simultaneously with strings is recommended practice.
How tight should bridge pins be seated?
Bridge pins should be seated firmly but not forced. Push them down until they’re snug—you should feel resistance but shouldn’t need excessive force. Over-tightening can crack the bridge or damage the pin. The pin should hold the string securely without wobbling.
What’s the correct string angle over the nut?
Strings should approach the nut at a slight angle, creating downward pressure on the nut slots. This angle (typically 15-20 degrees) is achieved by proper tuning peg winding technique. Correct angle prevents string slipping and improves tuning stability. If strings slip frequently, your winding technique may need adjustment.
Should I clean my fretboard every time I change strings?
You should clean your fretboard whenever strings are removed, as this is the only time you have full access. A quick wipe with a soft cloth takes minutes and significantly extends fretboard life. Deep conditioning can be done less frequently—every 6-12 months depending on your climate and playing style.


