How to Change a Recessed Light Bulb: Essential Electrician Tips
Recessed lighting fixtures add a sleek, modern aesthetic to any home while providing excellent task and ambient lighting. However, many homeowners hesitate when it comes time to replace burned-out bulbs in these fixtures, unsure about the proper technique or safety precautions. The good news is that changing a recessed light bulb is a straightforward DIY task that requires minimal tools and just a few minutes of your time. Understanding the correct procedure not only saves you money on electrician visits but also ensures your safety and protects your fixtures from damage.
Whether you’re dealing with standard incandescent bulbs, energy-efficient LED recessed lights, or halogen fixtures, the fundamental process remains consistent. This comprehensive guide walks you through every step, from preparation to installation, while highlighting critical safety considerations electricians want you to know. By following these professional tips, you’ll confidently handle bulb replacements and maintain optimal lighting throughout your home.

Safety First: Essential Precautions Before You Start
Before touching any recessed light fixture, safety must be your top priority. Electrical hazards pose genuine risks, and professional electricians emphasize that proper preparation prevents injuries and damage. The first critical step involves turning off the power to the lights you’re working on. Locate your circuit breaker panel and switch off the breaker controlling the recessed lights. If you’re uncertain which breaker controls your lights, flip it off and have someone verify the lights are dark, or use a light switch tester to confirm the power is disconnected.
Always allow adequate cooling time before touching the bulb. Recessed lights generate significant heat, and touching a recently used bulb causes severe burns. Wait at least 15-20 minutes after switching off the lights, or better yet, allow them to cool for 30 minutes if you have time. Some electricians recommend working on bulb replacements during daylight hours when you don’t need the lights on, eliminating the cooling-time concern entirely.
Wear safety glasses to protect your eyes from dust and debris that may fall from the fixture when you’re working above your head. Additionally, consider wearing cotton gloves to improve your grip on the bulb and provide a slight thermal barrier. Never use wet hands when handling electrical fixtures or bulbs, as moisture increases electrical conductivity and shock risk.

Understanding Your Recessed Light Fixtures
Recessed lighting comes in several configurations, and identifying your specific fixture type determines the correct bulb replacement approach. The most common recessed light fixtures use one of three bulb connection types: bayonet (twist-in), medium screw base (standard threaded), or GU10 pin-based connectors. Bayonet bulbs require a quarter-turn twist motion to secure and release, while screw-base bulbs follow the traditional clockwise-to-tighten, counterclockwise-to-remove pattern. GU10 fixtures feature two small pins that align with slots in the fixture.
Recessed fixtures also vary by trim style and depth. Shallow fixtures (2-3 inches deep) fit in areas with limited attic space, while standard fixtures (4-6 inches deep) provide more flexibility in installation. Understanding your fixture’s specifications helps you purchase the correct replacement bulb and ensures proper fit. Check your fixture’s label or consult your home’s electrical documentation to identify the bulb type, wattage, and voltage requirements.
Modern recessed lights increasingly feature integrated LED technology, which differs significantly from traditional incandescent or halogen bulbs. LED recessed lights often have longer lifespans (25,000-50,000 hours versus 1,000-3,000 hours for incandescent), reduced heat output, and improved energy efficiency. When exploring DIY lighting projects, LED options often prove superior for long-term cost savings despite higher initial investment.
Halogen bulbs deserve special attention because they operate at extremely high temperatures and require careful handling. Never touch halogen bulbs with bare skin, as skin oils create hot spots that cause premature failure and potential shattering. Always wear gloves when handling halogen bulbs, and dispose of old halogen bulbs properly according to local regulations.
Tools and Materials You’ll Need
Fortunately, changing recessed light bulbs requires minimal equipment. Most homeowners already possess the necessary tools. You’ll need a sturdy step ladder or small stepstool to safely reach ceiling-mounted fixtures—never stand on chairs, counters, or other unstable surfaces. Choose a ladder positioned directly below the fixture, ensuring stable footing and minimizing reaching.
Gather the correct replacement bulbs before starting your project. Verify the bulb type (bayonet, screw-base, or GU10), wattage, voltage, and color temperature. Purchasing the wrong bulb wastes time and frustration. Keep the old bulb’s packaging or take a photo of the specifications to reference when shopping. If you can’t identify your bulb type, bring the old bulb to the hardware store for staff assistance.
Additional helpful items include cotton gloves or clean cloth for handling bulbs, safety glasses, and a flashlight or headlamp to illuminate the fixture clearly. Some electricians recommend keeping a damp cloth nearby to wipe dust from fixtures during bulb changes, improving light output and fixture longevity. A small container for organizing removed bulbs prevents accidental breakage and keeps your workspace tidy.
Step-by-Step Bulb Replacement Process
Step 1: Prepare Your Work Area
Clear the space below and around the recessed light fixture. Remove furniture, decorations, or other items that might obstruct your ladder or create tripping hazards. Ensure adequate lighting by opening curtains or using additional lighting sources. Position your ladder directly under the fixture, checking that all four legs rest firmly on level ground.
Step 2: Turn Off Power and Allow Cooling Time
Switch off the circuit breaker controlling the recessed lights. Wait 20-30 minutes for the bulb and fixture to cool completely. This prevents burns and protects the bulb from thermal shock, which can cause premature failure or shattering. Use this waiting period to gather your replacement bulbs and tools.
Step 3: Climb Safely and Position Yourself
Ascend the ladder slowly, maintaining three points of contact at all times. Position yourself so the fixture is directly in front of you at eye level or slightly above. Never lean excessively to the side or twist your torso awkwardly, as this compromises balance and safety. If the fixture is too far to reach comfortably, reposition your ladder rather than overextending.
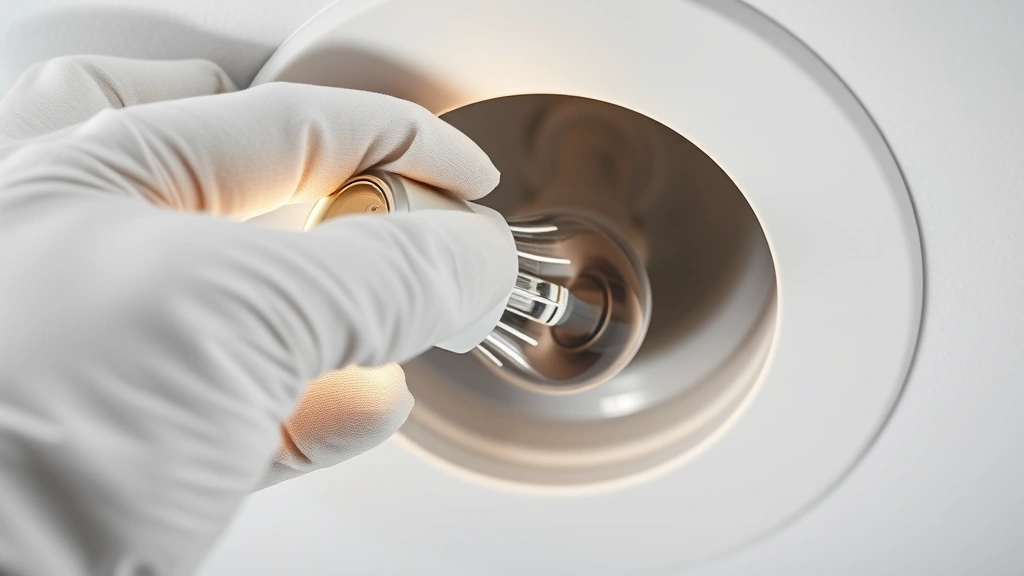
Step 4: Locate and Release the Bulb
Look closely at how the bulb connects to the fixture. For bayonet-style bulbs, gently push the bulb straight up into the socket, then rotate it counterclockwise approximately one-quarter turn until it releases. The bulb should come free without excessive force. For screw-base bulbs, turn counterclockwise using a gentle, steady motion until the bulb loosens and can be removed by hand. GU10 pin-based bulbs require pushing straight in and rotating counterclockwise about one-eighth turn before releasing.
Step 5: Remove the Old Bulb Carefully
Once loosened, carefully withdraw the bulb straight out from the socket. Avoid twisting or tilting the bulb, which strains the base and socket connections. Place the old bulb in a safe container where it won’t roll away or break. If the bulb feels stuck, stop immediately and don’t force it—excessive force damages the socket and creates a hazardous situation.
Step 6: Inspect the Socket and Fixture
Before installing the new bulb, take a moment to inspect the socket for corrosion, debris, or visible damage. A small amount of dust is normal and can be gently wiped away with a clean cloth. If you notice significant corrosion (greenish-white deposits), burnt marks, or melted plastic inside the socket, the fixture requires professional attention and shouldn’t be used until repaired.
Step 7: Install the New Bulb
Hold the new bulb by its base, never touching the glass portion. For screw-base bulbs, insert the bulb into the socket and turn clockwise until snug—firm but not overly tight, as excess force damages the socket and bulb base. For bayonet bulbs, insert straight up into the socket and rotate clockwise one-quarter turn until you feel it lock in place. For GU10 bulbs, align the pins with the socket slots, push straight in, and rotate clockwise about one-eighth turn until secure.
Step 8: Verify Proper Installation
Once installed, gently tug the bulb to confirm it’s secure and won’t fall out. The bulb shouldn’t rotate or move side-to-side. Descend the ladder carefully and return to the circuit breaker to restore power. If you’ve replaced multiple bulbs, turn on the lights and verify all fixtures illuminate properly.
Common Mistakes to Avoid
Electricians frequently encounter damage caused by common bulb replacement mistakes. The most prevalent error involves forcing stuck bulbs, which breaks the socket and requires fixture replacement. If a bulb feels stuck, stop immediately. Apply a tiny amount of penetrating oil around the base, wait 10 minutes, then try again gently. Never apply excessive force.
Another frequent mistake involves touching halogen or high-intensity bulbs with bare skin. Skin oils create microscopic hot spots on the bulb surface that cause localized overheating, premature failure, and potential shattering. Always wear clean cotton gloves when handling these bulbs. Similarly, many people install bulbs while the fixture remains hot, risking burns and thermal shock to the bulb.
Selecting incorrect bulb specifications causes numerous problems. Installing a bulb with wattage exceeding the fixture’s rating creates excessive heat, potentially damaging the fixture and creating fire hazards. Check your fixture’s maximum wattage rating and never exceed it. Additionally, some people install incompatible bulb types—for example, attempting to use a screw-base bulb in a bayonet fixture—which causes poor electrical contact and creates safety hazards.
Neglecting to turn off power before working on fixtures is extremely dangerous. Even though changing a bulb doesn’t involve touching electrical contacts directly, unexpected power surges or accidental contact with metal components can cause shock. Always flip the breaker first, and never assume the lights are off without verification.
Troubleshooting Tips for Stubborn Fixtures
Occasionally, recessed light bulbs resist removal due to corrosion, dust accumulation, or manufacturing defects. If a bulb feels stuck, resist the urge to force it. Instead, try these professional techniques. For screw-base bulbs, apply a tiny drop of penetrating oil (like WD-40) around the base where the bulb meets the socket. Wait 10-15 minutes for the oil to penetrate, then attempt removal again with a gentle, steady counterclockwise motion.
For bayonet bulbs that won’t release, ensure you’re pushing straight up while turning. Sometimes the bulb sits at a slight angle, preventing proper rotation. Try pushing a bit harder while rotating gently—occasionally the bulb needs full pressure to register the rotation. If this doesn’t work, apply penetrating oil and wait before trying again.
If a bulb breaks inside the socket, never attempt removal with your bare hands or metal tools, as this risks electrical shock and cuts. Turn off the circuit breaker and leave the fixture alone until you can consult a qualified electrician. Attempting to remove broken glass from a socket is dangerous and often requires professional equipment and expertise.
Sometimes the entire fixture needs replacement rather than just the bulb. If you notice melted plastic, severe corrosion, or burnt marks inside the socket, or if the fixture doesn’t hold bulbs securely, the fixture has reached the end of its lifespan. Professional electricians can replace fixtures safely while ensuring proper installation and code compliance.
When to Call a Professional Electrician
While most bulb changes are straightforward DIY tasks, certain situations require professional intervention. If the fixture doesn’t turn on after installing a new bulb, the problem likely involves wiring or a faulty fixture rather than the bulb. Contact a licensed electrician to diagnose and repair the issue. Similarly, if you notice any burning smell, melted plastic, or visible damage inside the fixture, stop using it immediately and call a professional.
If you’re uncomfortable working on electrical fixtures for any reason, hiring a professional is the right choice. Electricians complete bulb replacements quickly and safely, and the small expense provides peace of mind. Additionally, if your fixture requires specialized bulbs or installation (such as low-voltage systems or dimmable fixtures), a professional can ensure proper setup.
For complex recessed lighting systems, such as those integrated with smart home technology or requiring specific dimmer compatibility, professional installation and maintenance ensures everything functions correctly. When in doubt about fixture type, bulb specifications, or safety concerns, contacting a qualified electrician prevents mistakes and potential hazards. You might also explore related electrical projects like changing a ceiling fan or upgrading light switches with professional guidance.
FAQ
How long do recessed light bulbs typically last?
Standard incandescent recessed bulbs last 1,000-2,000 hours, while halogen bulbs typically reach 2,000-4,000 hours. LED recessed lights significantly outperform traditional options, lasting 25,000-50,000 hours or more. The exact lifespan depends on usage patterns, fixture quality, and environmental factors. LED bulbs cost more initially but provide superior long-term value through extended lifespan and reduced energy consumption.
Can I use LED bulbs in any recessed fixture?
Most modern recessed fixtures accept LED replacements, but compatibility varies. Some older fixtures or specialized applications (like low-voltage systems) may require compatible LED bulbs or fixture modifications. Check your fixture’s specifications or consult the manufacturer before purchasing LED bulbs. Additionally, if your fixture has a dimmer switch, ensure the LED bulbs are specifically rated as dimmable to prevent flickering or damage.
What’s the difference between GU10 and bayonet bulbs?
GU10 and bayonet bulbs use different connection mechanisms. GU10 bulbs feature two small pins that align with socket slots and require a quarter-turn twist for installation. Bayonet bulbs have a similar twist mechanism but use a different base design. These bulbs aren’t interchangeable—you must use the correct type for your fixture. Consulting your fixture’s documentation or checking the old bulb prevents purchasing incompatible replacements.
Why does my recessed light bulb keep burning out quickly?
Premature bulb failure typically results from excessive heat, voltage fluctuations, or using bulbs exceeding the fixture’s wattage rating. If your fixture is in an insulated ceiling cavity without proper ventilation, heat accumulation shortens bulb lifespan. Consider upgrading to LED bulbs, which generate less heat and tolerate temperature extremes better. If the problem persists with multiple new bulbs, contact a licensed electrician to inspect the fixture and electrical circuit for issues.
Is it safe to change recessed light bulbs myself?
Yes, changing recessed light bulbs is a safe DIY task when you follow proper safety procedures. Always turn off the circuit breaker, allow adequate cooling time, wear safety glasses, and use a stable ladder. Never work on hot fixtures, force stuck bulbs, or touch bulbs with bare skin. If you feel uncomfortable at any point, contact a professional electrician. For additional electrical DIY projects, explore home security and safety upgrades that complement your lighting improvements.
What should I do with old recessed light bulbs?
Incandescent and halogen bulbs can typically be disposed of in regular trash, though some communities have specific recycling programs. LED bulbs and certain fluorescent bulbs may contain materials requiring special handling—check local regulations for proper disposal. Many hardware stores accept old bulbs for recycling. Never throw halogen bulbs in regular trash if local regulations prohibit it, and always handle broken bulbs carefully to prevent cuts and contamination.
How do I know what wattage bulb my fixture requires?
The fixture’s maximum wattage rating appears on a label inside the fixture or on the trim ring. This label typically states “Maximum [X] Watts” or similar language. Never exceed this wattage rating, as doing so creates excessive heat and fire hazards. If you can’t locate the label, consult your home’s electrical documentation or contact a professional electrician for fixture specifications.


