DIY Privacy Screen: Honest Guide for Builders
Privacy screens are one of the most practical outdoor additions you can build yourself. Whether you’re shielding your patio from nosy neighbors, blocking unsightly views, or creating a windbreak for your garden, a well-constructed privacy screen combines functionality with aesthetic appeal. This comprehensive guide walks you through everything you need to know about designing, planning, and building a durable privacy screen that will stand up to weather and time.
Unlike some DIY projects that prioritize shortcuts, building a proper privacy screen requires honest assessment of your skills, realistic timelines, and appropriate material selection. We’ll focus on proven construction methods that ensure your screen is safe, structurally sound, and built to last. You’ll learn about local building codes, material options, foundation requirements, and step-by-step installation techniques that professionals use.
Understanding Privacy Screen Basics
A privacy screen is a vertical structure designed to block sightlines while allowing airflow and, depending on materials, some light penetration. The most common residential privacy screens are fence-like structures, though they can also be living walls using plants or hybrid designs combining wood, metal, and vegetation. Understanding the fundamental difference between a fence and a privacy screen helps you determine which is appropriate for your situation.
Privacy screens typically range from 4 to 8 feet tall, though local zoning laws may restrict maximum heights. The key to any successful privacy screen is proper post installation—this is where most DIY builders fail. Posts must be set deep enough to resist wind loads, which increase exponentially with height. A 6-foot screen experiences significantly more wind force than a 4-foot screen, requiring deeper footings and potentially thicker posts.
Before starting any privacy screen project, assess whether you need a comprehensive home security approach that includes privacy as one component, or if a standalone screen meets your needs. Many homeowners combine privacy screens with other protective measures for maximum effectiveness.
Local Codes and Permits
This is the section where honesty matters most. Many DIY builders skip permit requirements, but this creates serious problems: insurance won’t cover damage or liability, you may face fines, and you’ll need to remove the structure if discovered. Building codes exist to ensure structures are safe and won’t harm people or property.
Check with your local building department about height restrictions, setback requirements (how far from property lines), and whether permits are required. The International Code Council (ICC) provides model codes adopted by most jurisdictions. Your county or city building department website typically lists specific requirements.
Common code requirements include:
- Height limits: Usually 6-8 feet in residential areas, sometimes less in front yards
- Setback distances: Typically 1-5 feet from property lines, varying by location
- Post depth: Generally one-third to one-half the above-ground height
- Wind load considerations: Varies by region; coastal and high-wind areas have stricter requirements
- Visibility at intersections: May be restricted for safety sight lines
Permits usually cost $50-$300 and take 1-3 weeks. This investment protects your property investment and ensures the structure won’t fail unexpectedly. Inspectors check post depth, material quality, and structural connections before and after installation.
Material Selection and Planning
Your material choice dramatically affects durability, maintenance requirements, and total cost. Let’s examine the honest pros and cons of common options.
Wood Privacy Screens: The most popular choice, wood offers natural aesthetics and moderate cost ($15-$30 per linear foot). Pressure-treated lumber resists rot but requires periodic staining or sealing every 2-3 years. Cedar and redwood look beautiful but cost more ($25-$40 per linear foot) and still need maintenance. Expect 10-15 years lifespan with proper care, sometimes less in wet climates. Wood is relatively easy to work with, making it ideal for beginner builders.
Composite Materials: Composite boards ($30-$50 per linear foot) combine wood fibers and plastic, offering low maintenance and 20+ year lifespans. They’re heavier than wood, requiring stronger posts and more labor during installation. Composites don’t rot or splinter but can fade and aren’t as easily customizable.
Vinyl Privacy Screens: The most durable option ($40-$60 per linear foot), vinyl resists fading, rot, and insect damage with virtually no maintenance. Installation is more complex, and repairs require replacing entire sections. Vinyl is less forgiving for beginner builders but worth the investment for long-term durability.
Metal Screens: Aluminum or steel screens ($20-$50 per linear foot) provide modern aesthetics and excellent durability. They require different installation techniques and can conduct heat. Rusting is a concern with steel unless properly treated.
Living Screens: Fast-growing plants like bamboo, privet, or evergreens create natural privacy over 2-3 years. This requires less structural investment but demands ongoing maintenance, watering, and pruning. Often used in combination with temporary screens.
For your first project, pressure-treated wood offers the best balance of affordability, workability, and durability. Plan for 20-30% material waste, especially if you’re learning.
Tools and Equipment You’ll Need
Proper tools make the difference between a professional-looking result and a frustrating experience. Here’s what you genuinely need versus what’s nice-to-have:
Essential Tools:
- Circular saw or miter saw for cutting lumber
- Power drill with bits for pilot holes and screws
- Level (4-foot minimum for checking posts)
- Tape measure (25-foot minimum)
- Shovel or post hole digger for footings
- Carpentry square for marking cuts
- Clamps for holding pieces during assembly
- Safety equipment: work gloves, safety glasses, dust mask
Helpful Equipment:
- Power auger for digging multiple post holes (rental: $40-$60/day)
- Miter saw for precise angle cuts
- Pneumatic nailer for faster assembly
- Reciprocating saw for cutting existing materials
Many hardware stores offer tool rental programs, making it affordable to use specialized equipment without ownership. Renting a power auger for a day costs less than hand-digging four deep holes.
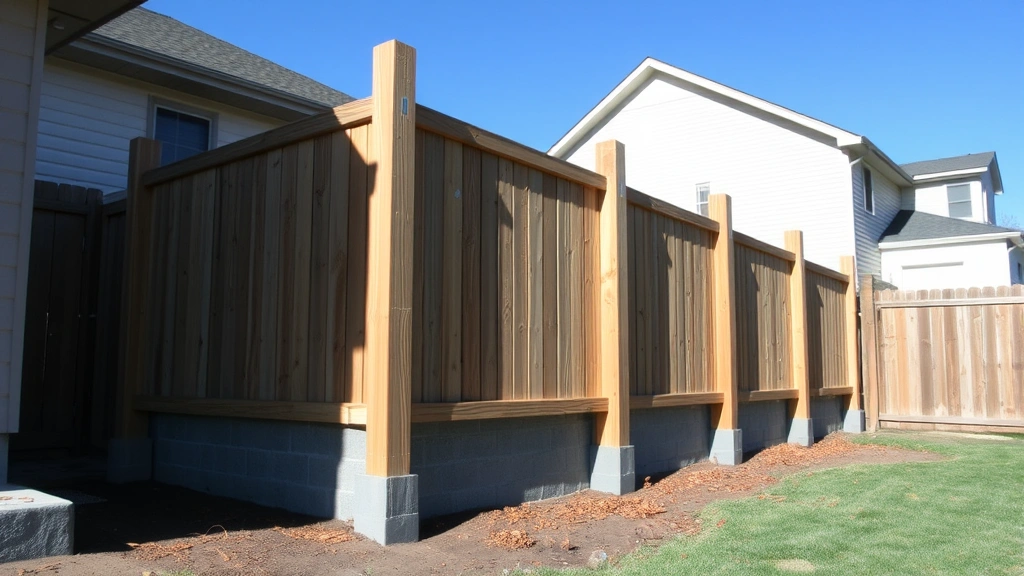
Foundation and Post Installation
This section deserves your full attention—proper post installation determines whether your screen lasts 5 years or 25 years. This is where cutting corners causes catastrophic failure.
Post Depth Calculation: The standard rule is one-third to one-half the above-ground height, with a minimum of 2 feet. For a 6-foot screen, dig 2-3 feet deep. In areas with frost lines (ground freezing in winter), posts must extend below the frost line, sometimes requiring 3-4 feet depth. Check your local frost line depth with your building department.
Step-by-Step Post Installation:
- Mark post locations: Use string lines to ensure posts are perfectly aligned. Spacing is typically 4-6 feet apart for wood panels, 6-8 feet for metal or composite.
- Dig holes: Use a power auger or post hole digger. Holes should be slightly larger than posts (typically 10-12 inches diameter). Keep holes vertical—use a level to check.
- Add gravel base: Place 4-6 inches of gravel in each hole for drainage. This prevents water from pooling around the post base, which causes rot.
- Set posts: Place posts in holes and use a level to ensure they’re perfectly vertical in all directions. This step determines your entire project’s quality.
- Secure posts: Concrete is the standard choice—use fast-setting concrete (ready-mix bags) or premixed concrete trucks for large projects. Mix according to package directions and fill around posts. Overfill slightly and taper downward to shed water.
- Let concrete cure: Wait 24-48 hours before attaching any panels. Rushing this step risks posts shifting.
For critical information on post spacing and loading, consult the American Wood Council’s structural guidelines, which provides engineering data for residential structures.
Building the Frame and Panels
Once posts are set and concrete has cured, you’re ready for the visible part of your project. This is where design choices become apparent.
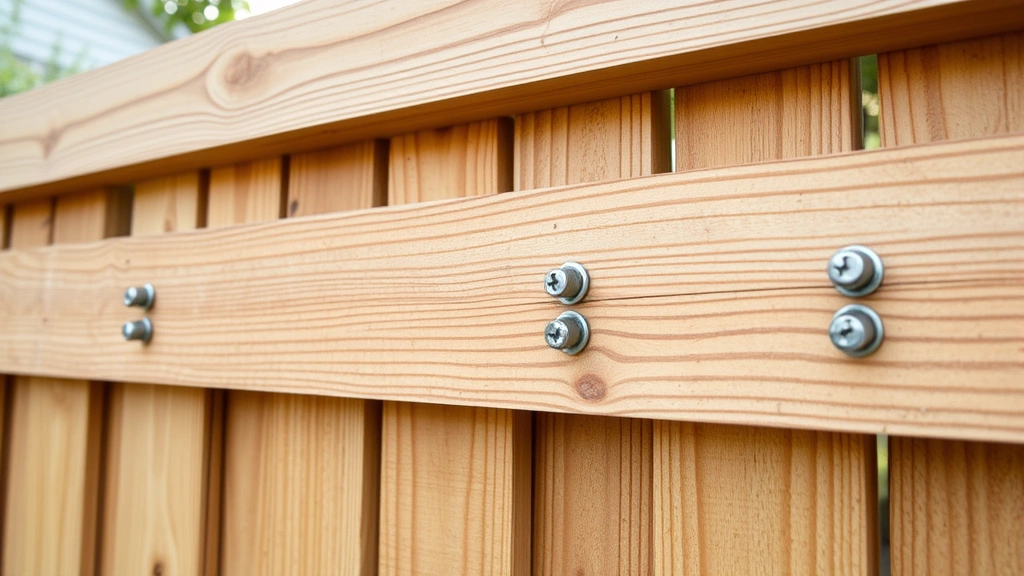
Attaching Rails: Horizontal rails (typically 2×4 or 2×6 lumber) connect posts and provide support for panels. Most privacy screens use two rails—one near the top and one near the bottom—positioned about 12 inches from edges. Use galvanized or stainless steel bolts, not nails, for connections. Bolts resist vibration and wind movement far better than fasteners.
Panel Assembly Options:
Board-on-Board: Overlapping vertical boards create a solid, attractive appearance. Boards are typically 1×6 or 1×8 pressure-treated lumber, installed vertically with slight overlaps (usually 1-2 inches). This style completely blocks sightlines and wind. Installation is straightforward: screw or bolt boards to horizontal rails.
Lattice Top: Combining solid boards with lattice panels at the top adds visual interest while maintaining privacy at eye level. This reduces wind load on upper sections and looks more refined than solid screens.
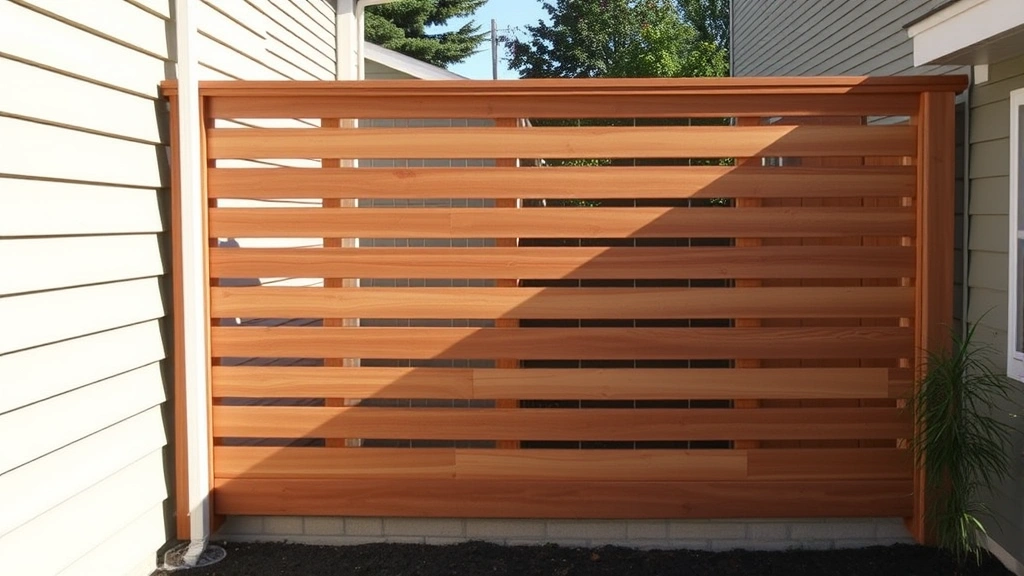
Horizontal Slat Design: Boards installed horizontally create a modern look while allowing some airflow and light penetration. Spacing between slats affects privacy—closer spacing increases privacy but reduces airflow. This style requires careful measurement to ensure even spacing across the entire screen.
Horizontal slat installation requires:
- Precise spacing guides or jigs
- Careful measurement and marking
- More fasteners than vertical board designs
- Attention to drainage (horizontal boards can trap water)
Fastening Recommendations: Use exterior-grade screws (not nails) rated for your lumber type. Galvanized, stainless steel, or ceramic-coated screws resist corrosion. For pressure-treated wood, use screws rated for treated lumber, as some older fastener types corrode quickly. Pre-drill holes to prevent splitting, especially near board ends.
For composite or vinyl boards, follow manufacturer specifications for fastening—some materials require specific fastener types and spacing to prevent damage during thermal expansion.
Finishing and Maintenance
Finishing protects your investment and determines long-term appearance. Different materials have different requirements.
Wood Finishing: Pressure-treated wood comes pre-treated but still benefits from protective coatings. Options include:
- Semi-transparent stain: Shows wood grain while providing 3-5 year protection. Reapplication is easier than paint.
- Solid stain: Hides wood grain and provides 5-7 year protection. Offers more color choices.
- Paint: Provides 5-10 year protection and unlimited color options. Requires more maintenance but looks polished.
- Natural finish: Allows wood to weather to gray. Requires no maintenance but offers no protection.
Apply finishes 3-6 months after installation, once the wood has stabilized. Reapply every 3-5 years depending on climate and product type. This maintenance schedule is essential for longevity—skipping maintenance causes rapid deterioration.
Composite and Vinyl Maintenance: These materials require minimal maintenance—occasional washing with soap and water removes dirt and mildew. Inspect fasteners annually and tighten if necessary. Check for cracks or damage, especially after severe weather.
Seasonal Maintenance:
- Spring: Inspect for winter damage, check post stability, clean debris
- Summer: Monitor for wood splitting in heat, check fastener integrity
- Fall: Clear leaves and debris, prepare for winter winds
- Winter: Inspect after storms, check for ice damage, monitor posts for heaving
Keep the area around posts clear of debris and standing water. Good drainage prevents rot and extends screen lifespan significantly. If you notice soft spots in wood, address them immediately—early intervention prevents major damage.
For wood finishing guidance, the Engineered Wood Association provides detailed finishing specifications for different lumber types and climates.
FAQ
Do I need a permit for a privacy screen?
Most jurisdictions require permits for permanent structures over 4 feet tall. Check your local building department. Getting a permit protects you legally and ensures the structure is safe. The permit cost is minimal compared to potential fines or removal requirements.
How deep should post holes be?
Posts should extend one-third to one-half the above-ground height into the ground, with a minimum of 2 feet. In areas with frost lines, posts must extend below the frost line depth, sometimes requiring 3-4 feet. Your building department can provide your area’s specific frost line depth.
What’s the best material for a privacy screen?
Pressure-treated wood offers excellent value for beginners, balancing cost, workability, and durability. Vinyl provides maximum longevity with minimal maintenance but costs more. Composite materials offer a middle ground. Choose based on your budget, maintenance tolerance, and desired lifespan.
How long does a privacy screen last?
Wood screens last 10-15 years with proper maintenance, composite 15-20 years, and vinyl 20+ years. Lifespan depends heavily on maintenance—neglecting finishes dramatically reduces longevity. Climate also affects durability; wet climates shorten wood lifespan significantly.
Can I install a privacy screen myself?
Yes, with proper planning and tools. The most critical step is post installation—this requires precision and attention to detail. If you’re comfortable with basic carpentry and willing to invest time in proper techniques, you can build a quality screen. The key is honesty about your skill level and not rushing.
How much does a DIY privacy screen cost?
Material costs range from $10-$60 per linear foot depending on material choice. A 50-foot screen costs $500-$3,000 in materials. Labor, if you hire professionals, adds $30-$100 per linear foot. Building it yourself saves labor costs but requires time investment and tool rental or purchase.
What’s the best spacing for vertical boards?
For privacy screens, boards typically have minimal gaps, using board-on-board or tight spacing. For visual interest while maintaining privacy, 1-2 inch gaps work well. Wider spacing (3+ inches) allows more light and airflow but reduces privacy. Horizontal slat designs typically use 1-3 inch spacing depending on privacy goals.
How do I prevent rot in wooden privacy screens?
Use pressure-treated lumber rated for ground contact for posts. Apply protective finishes every 3-5 years. Ensure proper drainage around posts and keep the area clear of debris. Install gravel bases under posts to promote drainage. Address any damage or soft spots immediately.


