
DIY Shed Building Tips: Expert-Backed Guide
Building your own shed is one of the most rewarding DIY projects you can undertake. Whether you need extra storage, a workshop, or a peaceful retreat, constructing a shed from the ground up teaches valuable skills while saving thousands in contractor fees. This comprehensive guide draws on building codes, structural engineering principles, and real-world construction experience to help you create a safe, durable structure that will serve your property for decades.
Before you break ground or purchase materials, understanding the fundamentals of shed construction is essential. From site preparation and foundation work to framing, roofing, and finishing touches, each step builds upon the last. Mistakes early in the process compound downstream, potentially compromising structural integrity or requiring costly repairs. This guide walks you through every phase with expert-backed recommendations, safety considerations, and practical troubleshooting tips.
Planning and Permits
The first and most critical step in any shed project is planning. Many DIYers skip this phase or minimize its importance, but proper planning prevents costly mistakes and legal complications. Begin by determining your shed’s purpose—storage only, workshop space, studio, or recreational area. This decision influences size requirements, ventilation needs, electrical considerations, and building materials.
Check with your local building department or municipality regarding zoning regulations and permit requirements. Most jurisdictions require permits for structures over 100-150 square feet, though some enforce stricter rules. The International Code Council (ICC) provides model building codes that most municipalities adopt. Setback requirements (distance from property lines) vary significantly by location—typically ranging from 3 to 10 feet. Ignoring these requirements can result in fines, forced demolition, or legal disputes with neighbors.
Create detailed plans before purchasing materials. You don’t need architectural drawings for small sheds, but sketch dimensions, door placement, window locations, and roof pitch. Consider how the structure will interact with existing utilities—avoid building over septic systems, water lines, or electrical conduits. If you’re uncertain about underground utilities, contact your local utility locating service (usually free) to mark their locations.
Research snow load, wind speed, and seismic requirements for your region. These factors directly impact roof pitch, rafter sizing, and wall bracing. The National Fire Protection Association (NFPA) provides guidelines for structures near buildings, and local building codes incorporate weather-specific requirements based on historical data.

Site Selection and Preparation
Selecting the right location sets your shed up for long-term success. Choose a spot with good drainage—water pooling around the foundation accelerates rot and structural deterioration. Avoid low-lying areas that collect runoff during heavy rain. If your yard naturally slopes, position the shed on higher ground or create a French drain system to divert water away.
Sunlight exposure affects the shed’s longevity and usability. Excessive sun exposure can warp wood siding and fade paint, while too much shade promotes mold and mildew growth. Ideally, select a location with partial shade and good air circulation. Proximity to trees offers natural windbreaks but creates maintenance challenges—falling branches, root systems, and leaf debris accumulation. Keep the shed at least 10 feet from large trees to minimize damage risk.
Clear the site completely before beginning construction. Remove grass, weeds, and debris down to bare soil. This prevents vegetation growth under the shed, which harbors moisture and pests. Use a level to check the site’s slope—if it exceeds 1 inch per 8 feet, you’ll need to level it or incorporate sloped foundations. Remove topsoil and rocks that could compromise foundation stability.
Mark out your shed’s footprint using string lines and stakes. Double-check diagonal measurements—they should be equal for rectangular structures. This simple verification prevents costly framing mistakes later. If building on a slope, establish a baseline using a long level or laser level to ensure consistent height references during construction.
Foundation Options
The foundation is your shed’s most critical component, yet it’s often rushed or improperly executed. A poor foundation leads to settlement, racking (diagonal misalignment), rotting wood, and structural failure. Your choice of foundation depends on climate, soil conditions, budget, and local codes.
Concrete Slab Foundations work well in regions without frost heave concerns. They’re economical and create a durable work surface. However, they require proper grading, vapor barriers, and reinforcement. Slabs must extend below the frost line in cold climates—typically 3-4 feet deep—or frost heave will crack the concrete and shift the structure. In warmer regions, a 4-6 inch slab on compacted gravel (with perimeter footings) suffices.
Frost-Protected Shallow Foundations (FPSF) use insulation to prevent frost heave in cold climates. This method reduces excavation costs while maintaining stability. The foundation extends below grade with rigid insulation on the exterior, allowing the ground beneath to remain unfrozen. This approach requires careful design but works excellently in most northern regions.
Concrete Piers are ideal for sloped terrain or when frost depth is extreme. Individual piers extend below the frost line at corners and mid-span points (typically every 4-6 feet), with beams connecting them. Piers allow water drainage underneath and simplify site preparation. However, they’re labor-intensive and require proper spacing calculations.
Concrete Blocks or Posts on prepared gravel work for temporary or small structures in mild climates. This method is budget-friendly but offers minimal frost protection and can shift over time. Building codes increasingly restrict this approach, so verify local requirements before choosing it.
Regardless of method, proper drainage is essential. Install gravel beneath all foundations to promote water movement. Slope the ground away from the structure at least 1 inch per 8 feet. In wet climates, consider installing perimeter French drains or gutters that direct water away from the foundation.
Framing and Structure
Proper framing creates the structural skeleton that bears all loads. Understanding load paths—how forces transfer from roof to walls to foundation—is fundamental. Snow, wind, and the structure’s own weight must travel efficiently through these components without causing failure.
Wall Framing typically uses 2×4 lumber spaced 16 inches on center (OC) for small sheds. Larger structures or high-wind areas may require 2×6 lumber or closer spacing. Space studs by measuring 15.25 inches from the centerline of one stud to the next—this accounts for standard 16-inch on-center spacing when accounting for the width of the framing square.
Install headers above all door and window openings. A header transfers loads above openings to the studs on either side, preventing sagging and cracking. For openings under 3 feet wide in single-story structures, a 2×4 header suffices. Wider openings require 2×6, 2×8, or even doubled members depending on the load.
Properly brace all walls to resist racking (diagonal misalignment). Diagonal bracing using 2x4s at 45-degree angles or plywood sheathing provides lateral strength. Corner bracing is critical—it prevents the shed from parallelogram-ing under wind or seismic forces. Building Codes Blog provides detailed bracing requirements for your region.
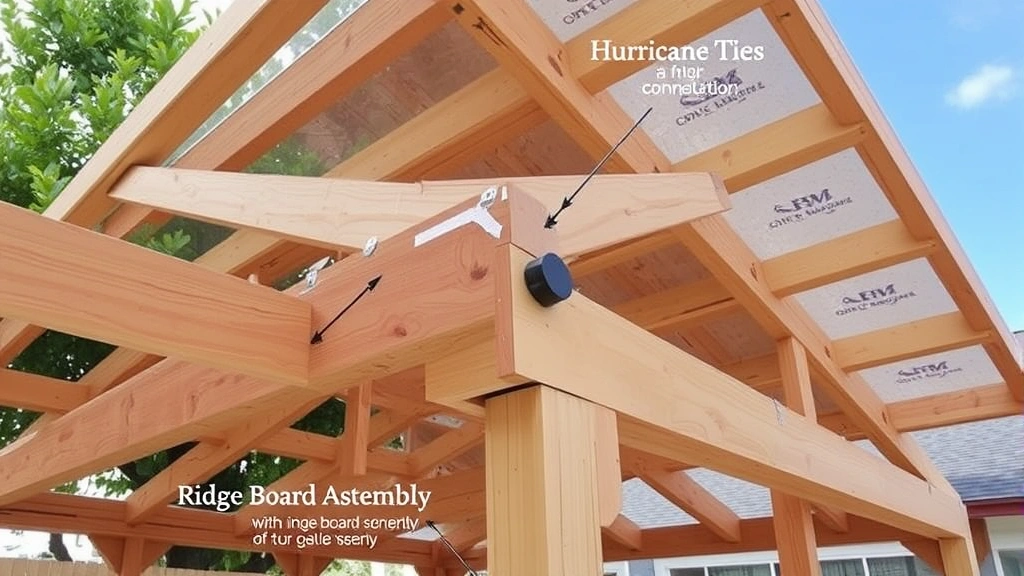
Roof Framing requires careful load calculations. Rafter size depends on span, spacing, roof pitch, and local snow/wind loads. Use a rafter calculator or sizing tables from the NFPA to determine proper dimensions. Rafters must be securely attached to walls with hurricane ties or rafter ties to resist uplift forces during high winds.
The roof pitch (slope) affects water drainage and structural loads. A 4:12 pitch (4 inches of rise per 12 inches of horizontal run) works for most regions, shedding water effectively while remaining walkable for maintenance. Steeper pitches (6:12 or higher) shed snow better in snowy climates but require more material and are harder to work on. Shallower pitches (3:12 or less) should be avoided unless you live in a very dry climate—they don’t shed water efficiently and require high-quality roofing materials.
Connect all framing members securely with appropriate fasteners. Use galvanized or stainless steel nails and bolts to resist corrosion. For structural connections, ICC building codes specify fastener types, quantities, and spacing. Undersizing fasteners or using too few creates weak points that fail under stress.
Roofing Systems
The roof protects everything beneath it from weather. Choosing the right roofing material and installing it correctly determines your shed’s longevity. Common options include asphalt shingles, metal roofing, and wood shakes, each with distinct advantages and drawbacks.
Asphalt Shingles are the most common and affordable choice. Three-tab shingles cost $50-100 per square (100 square feet), while architectural shingles run $100-200 per square. They’re relatively easy to install and repair, though they typically last 15-20 years. Proper ventilation extends their lifespan—install soffit vents and a ridge vent to allow air circulation under the roof, which reduces heat buildup and moisture accumulation.
Metal Roofing costs more upfront ($300-500 per square) but lasts 40-70 years with minimal maintenance. Metal reflects sunlight, reducing cooling costs, and sheds snow effectively. Installation requires special skills and tools, so professional installation is often recommended. Metal roofing works particularly well when your shed will be used as a workshop or storage area where durability is paramount.
Wood Shakes offer aesthetic appeal but require regular maintenance and cost $300-400 per square. They’re susceptible to rot, insect damage, and fire (unless treated). Most building codes in fire-prone areas restrict wood roofing, so verify local regulations before choosing this option.
Install roofing over proper underlayment—at minimum, 15-pound felt, though synthetic underlayment or ice-and-water shield is preferable. Underlayment provides a secondary water barrier if shingles fail or leak at seams. In cold climates, install ice-and-water shield along eaves and valleys to prevent ice dam leaks.
Ensure proper flashing around any penetrations—vents, chimneys, skylights. Flashing directs water away from openings and prevents leaks. Use metal flashing with proper overlap—at least 4 inches above the roof penetration and 8 inches below on sloped roofs. Seal all flashing seams with roofing cement rated for your climate.
Siding and Weatherproofing
Siding protects the structure from weather while providing aesthetic appeal. Your choice of siding material affects durability, maintenance requirements, and appearance. When considering exterior finishes, think about how they’ll complement your home’s existing architecture and withstand local weather conditions.
Wood Siding offers classic appeal but requires regular maintenance. Cedar and redwood resist rot naturally but still need painting or staining every 3-5 years. Treated lumber is more affordable but less attractive and still requires finishing. Install siding over a moisture barrier (tar paper or house wrap) to prevent water infiltration behind the siding.
Metal Siding (aluminum or steel) is durable, low-maintenance, and affordable ($3-8 per square foot installed). It won’t rot or warp but can dent and may show rust if damaged. Metal siding works well in wet climates where rot is a concern.
Vinyl Siding is popular for its low maintenance and reasonable cost ($4-12 per square foot). However, it can warp in extreme heat and crack in cold climates. Ensure proper ventilation behind vinyl to prevent moisture accumulation.
Fiber Cement Board combines durability and aesthetic appeal, lasting 25+ years with minimal maintenance. It costs more ($8-15 per square foot) but resists rot, insects, and fire. Installation requires proper tools and techniques to prevent cracking.
Install house wrap or tar paper under all siding to create a drainage plane. This layer sheds water that penetrates the siding, directing it downward and outward rather than into the wall cavity. Overlap all seams with house wrap by at least 6 inches, and seal seams with compatible tape.
Ensure proper ventilation in wall cavities, especially in humid climates. Vented siding or battens over house wrap allow air circulation that prevents moisture accumulation. Moisture trapped in walls promotes mold growth, rot, and structural failure.
Caulk all gaps and seams—around windows, doors, corners, and where siding meets the foundation. Use paintable, exterior-grade caulk compatible with your siding material. High-quality caulk remains flexible and weathers well, preventing water infiltration.
Interior Finishing
Interior finishing transforms a bare structure into a functional space. Your finishing approach depends on the shed’s purpose and budget. A storage shed requires minimal finishing, while a workshop or studio demands climate control and proper lighting.
Insulation is important if you’ll use the shed year-round or store temperature-sensitive items. Fiberglass batts ($0.50-1 per square foot) are affordable and easy to install between studs. Closed-cell spray foam ($1.50-3 per square foot) provides superior air sealing and R-value but requires professional installation. In most climates, R-15 to R-21 wall insulation suffices for sheds.
Vapor Barriers prevent moisture from traveling into insulation. Install a polyethylene sheet or kraft-faced batts on the warm side of walls (inside in winter, outside in summer). In humid climates, this step is critical to prevent mold and insulation degradation.
Flooring options range from bare concrete to finished wood. Concrete is durable and easy to maintain but cold and hard. Plywood subfloors with finished flooring are more comfortable but require proper moisture control. If installing wood flooring, ensure adequate ventilation underneath to prevent rot.
Lighting and Electrical improve functionality and safety. Even basic sheds benefit from a single overhead light and exterior light. If you’ll use power tools or run equipment, install a dedicated 20-amp circuit with GFCI protection. Have a licensed electrician run any permanent wiring to ensure code compliance and safety.
Shelving and Storage maximize space efficiency. Wall-mounted shelving, pegboards, and overhead racks keep tools and materials organized. Install shelving securely to wall studs using appropriate fasteners—shelving loaded with heavy items creates significant forces that must transfer to the structure.
Paint or seal all interior surfaces to protect wood from moisture and UV damage. Exterior-grade paint or stain withstands temperature and humidity fluctuations better than interior products. In damp climates, consider moisture-resistant drywall or plywood instead of standard materials.
FAQ
Do I need a building permit for a shed?
Most jurisdictions require permits for sheds over 100-150 square feet, but requirements vary. Check with your local building department before starting. Permits ensure your shed meets code requirements for safety and property values. Unpermitted structures can complicate insurance claims and property sales.
What’s the best foundation for a shed in a wet climate?
In wet climates, concrete piers or frost-protected shallow foundations work best. These methods elevate the structure above ground water and allow drainage underneath. Ensure gravel and proper sloping direct water away from the foundation. Avoid wood posts directly on soil in wet areas—they rot quickly without proper protection.
How deep should shed foundations go in cold climates?
Foundations must extend below the frost line, which varies by location (typically 3-4 feet in northern climates). Check with your building department for your specific frost depth. Shallow foundations shift and crack when frost heave occurs, compromising structural integrity.
What roof pitch should I use for a shed?
A 4:12 pitch works for most regions, shedding water effectively while remaining accessible for maintenance. In snowy climates, a 6:12 or steeper pitch sheds snow better. In very dry climates, 3:12 suffices. Avoid pitches shallower than 3:12 unless using premium roofing materials—they don’t shed water efficiently.
Can I build a shed on my property line?
No—setback requirements mandate distance from property lines. Most jurisdictions require 3-10 feet depending on zoning. Verify requirements with your building department before site selection. Violating setback rules can result in fines or forced demolition.
How often should I maintain my shed?
Inspect your shed annually, checking the roof for damaged shingles, siding for rot or gaps, and the foundation for cracks or settling. Repaint or stain wood siding every 3-5 years. Clean gutters and vents to prevent water damage. Address problems promptly—small issues compound into major repairs if ignored.
What’s the most cost-effective siding for a shed?
Metal siding offers the best value—it’s durable, low-maintenance, and affordable ($3-8 per square foot). Vinyl siding is also economical but requires replacement eventually. If budget is tight, treated wood with basic paint is functional though requires maintenance.
Should I insulate my shed?
Insulation is worthwhile if you’ll use the shed year-round, store temperature-sensitive items, or live in an extreme climate. For occasional storage in moderate climates, insulation isn’t essential. If you insulate, also install a vapor barrier to prevent moisture damage.


