How to Clean a Grinder: Pro Tips for Best Results
A grinder is one of the most versatile tools in any DIYer’s workshop, whether you’re working with metal, stone, concrete, or other materials. However, keeping your grinder clean is essential for maintaining its performance, extending its lifespan, and ensuring safe operation. Dust accumulation, metal shavings, and debris can clog the motor, reduce grinding efficiency, and create fire hazards if left unchecked.
This comprehensive guide walks you through professional-grade cleaning techniques that will keep your angle grinder, bench grinder, or specialty grinder in top condition. From basic maintenance routines to deep-cleaning procedures, we’ll cover everything you need to know to protect your investment and work safely.
Why Grinder Maintenance Matters
Regular grinder cleaning prevents several critical issues that can compromise both your tool and your safety. When dust and debris accumulate inside the motor housing, they restrict airflow needed for proper cooling. This causes the motor to overheat, reducing efficiency and potentially causing permanent damage. Metal particles and grinding residue can also create conductive pathways that increase electrical hazard risks.
A clean grinder performs noticeably better, offering improved torque, consistent grinding results, and longer wheel life. The OSHA guidelines on grinding operations emphasize equipment maintenance as a fundamental safety requirement. Additionally, when you invest time in regular maintenance routines featured on our DIY blog, you’ll notice your grinder remains more balanced and vibration-free during operation.
Neglecting grinder cleanliness can lead to bearing wear, brush deterioration, and eventual motor failure. By establishing a cleaning schedule, you’re essentially performing preventative maintenance that saves money on repairs or replacement.
Safety Precautions Before Cleaning
Safety must always come first when maintaining any power tool. Before you begin any cleaning procedure, disconnect your grinder from the electrical outlet or remove the battery pack if it’s cordless. Never attempt to clean a plugged-in grinder, as accidental activation could cause serious injury.
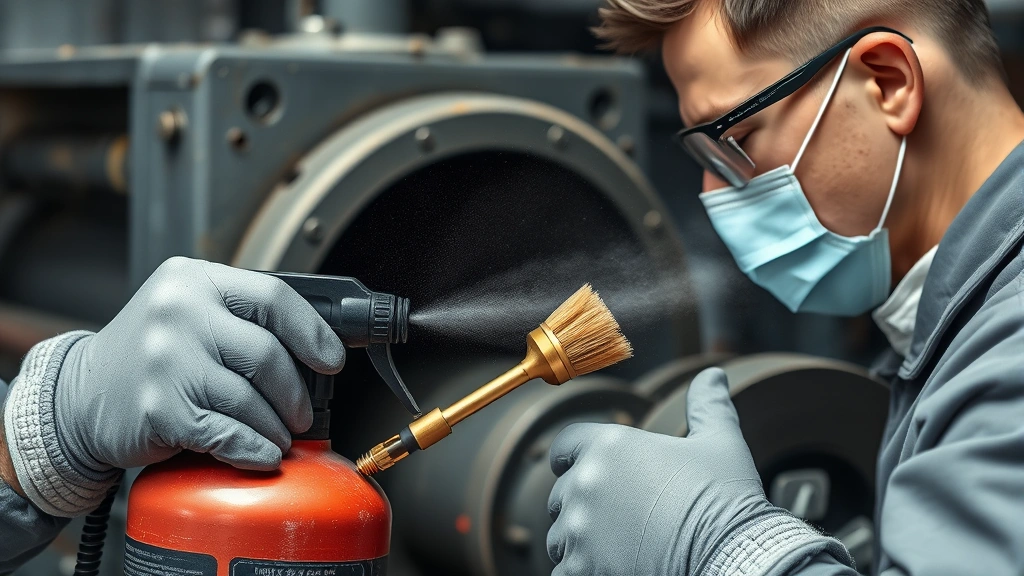
Allow the grinder to cool completely if you’ve been using it recently. Grinding generates significant heat, and touching hot components can cause burns. Wait at least 15-20 minutes after the last use before starting your cleaning process. Wear appropriate personal protective equipment including safety glasses, work gloves, and a dust mask or respirator, especially when dealing with accumulated dust that may contain harmful particles.
When working with compressed air or water-based cleaners, ensure you’re in a well-ventilated area. Some grinding dust, particularly from certain materials, can be hazardous if inhaled. If you’re cleaning a bench grinder, make sure it’s secured properly and won’t tip during the cleaning process. Always read the manufacturer’s manual for your specific grinder model, as some components may have unique cleaning requirements or restrictions.
Tools and Materials You’ll Need
Gathering the right supplies before you start makes the cleaning process more efficient and effective. Here’s what professionals recommend:
- Compressed air canister or air compressor: Essential for blowing out dust and debris from motor vents and hard-to-reach areas
- Small soft-bristled brush: Wire brushes can damage components, so use brass or nylon brushes instead
- Microfiber cloths: These trap dust without scratching surfaces and are reusable
- Degreaser or mineral spirits: For removing stubborn buildup on external surfaces
- Isopropyl alcohol: Excellent for cleaning electrical contacts and drying quickly
- Cotton swabs and pipe cleaners: Perfect for accessing tight spaces around vents
- Safety glasses and dust mask: Non-negotiable protective equipment
- Work gloves: Protect hands from sharp metal particles and chemicals
- Drop cloth or newspaper: Contains the mess and makes cleanup easier
- Small vacuum with HEPA filter: Captures fine dust effectively and safely
Having these items on hand ensures you can address any cleaning challenge your grinder presents. For detailed guidance on similar cleaning projects, check out our comprehensive grilling equipment cleaning guide, which emphasizes similar preparation principles.
Step-by-Step Cleaning Process
Follow this methodical approach for effective routine grinder cleaning:
Step 1: Disconnect and Cool Unplug the grinder completely and allow it to cool for at least 20 minutes. This is non-negotiable for safety.
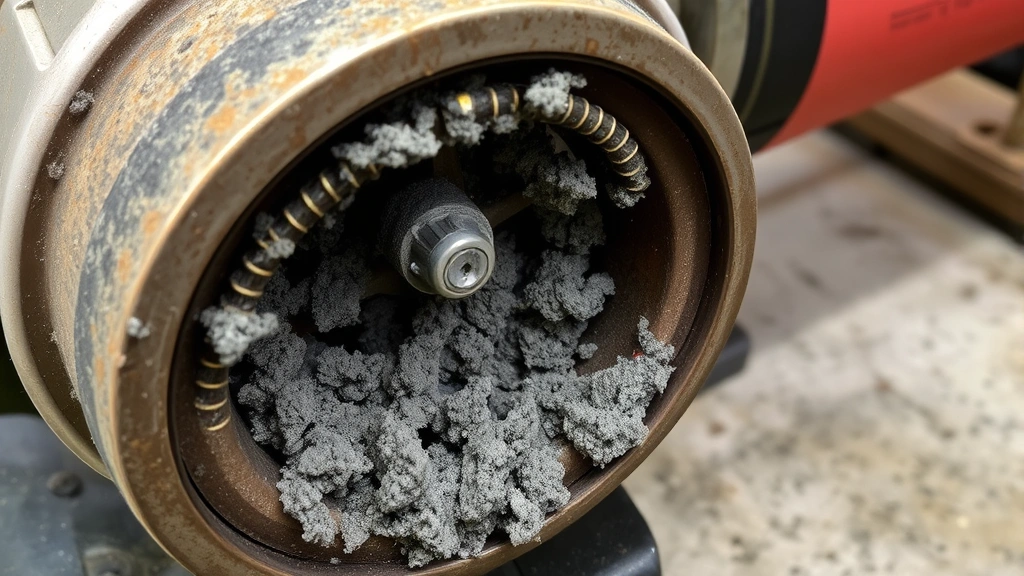
Step 2: Remove Loose Debris Using compressed air, blow out the vents and air intake areas with short bursts. Hold the grinder steady and work from multiple angles to dislodge trapped particles. This initial step removes the bulk of accumulated dust.
Step 3: Wipe External Surfaces Use a slightly dampened microfiber cloth to wipe down the outer casing, handle, and base. This removes dust that can otherwise be blown into the motor during operation. For stubborn grime, apply a small amount of degreaser to the cloth rather than spraying directly on the tool.
Step 4: Clean the Air Vents Most grinders have multiple vent openings for cooling. Use a soft brush and compressed air to thoroughly clean these areas. Clogged vents are the primary cause of motor overheating. Work carefully around any electrical connections.
Step 5: Address the Chuck or Collet If your grinder has a removable chuck or collet, clean this area thoroughly. Use a brush to remove metal particles and dust, then wipe with a clean cloth. If the chuck is stuck, refer to the manufacturer’s instructions before applying any force.
Step 6: Clean the Dust Collection System If your grinder has an integrated dust collection bag or system, empty and clean it. Shake out loose debris over a trash can, then wipe the interior with a dry cloth. For fabric collection bags, tap them gently to release trapped dust.
Deep Cleaning Your Grinder
Perform this more intensive cleaning procedure every 3-6 months, depending on usage frequency and working environment:
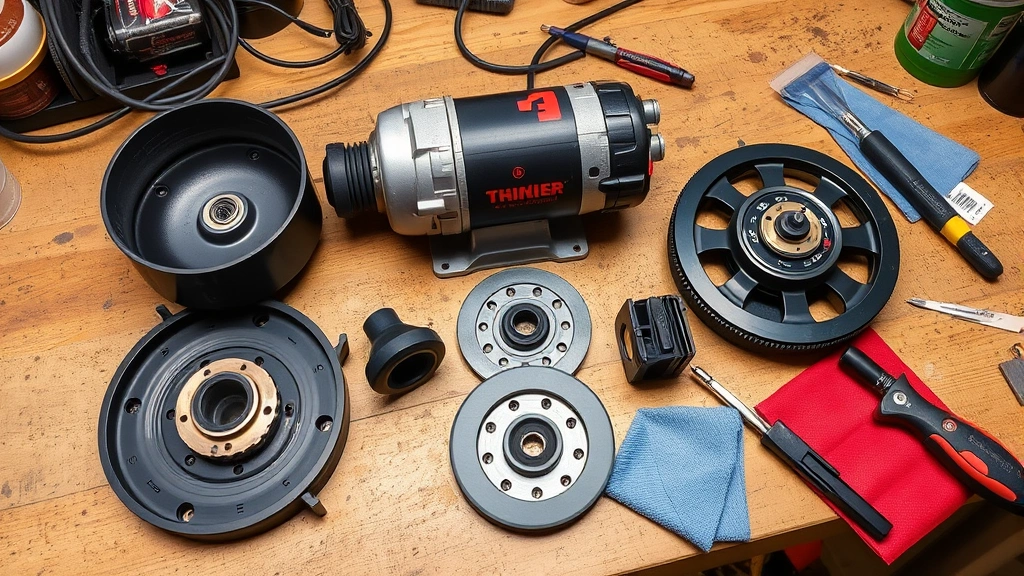
Disassembly (If Manufacturer Allows) Consult your grinder’s manual to determine which components can be safely removed. Some models allow access to the motor housing after removing a few bolts. Document the disassembly process with photos so reassembly is straightforward. Never force components apart, as this can damage internal mechanisms.
Motor Housing Cleaning With careful access to the motor area, use compressed air with a fine nozzle attachment to blow out accumulated dust around the motor windings and cooling fins. Work slowly and methodically, holding the grinder at different angles. The goal is to remove dust without damaging delicate electrical components.
Brush Inspection and Cleaning Many grinders have carbon brushes that conduct electricity to the rotor. These naturally wear over time, but you can extend their life by keeping them clean. If accessible, gently brush away dust around the brush holders using a soft-bristled brush. Replace brushes if they’re worn to less than one-quarter inch thickness, following manufacturer specifications.
Bearing Lubrication Some grinder models have accessible bearing points. After thorough cleaning and drying, apply a small amount of light machine oil or the lubricant specified in your manual. This prevents rust and reduces friction. Don’t over-lubricate, as excess oil can attract dust.
Electrical Contact Cleaning If your grinder has exposed electrical contacts or terminals, clean these with isopropyl alcohol on a cotton swab. This removes oxidation that can impede electrical flow. Allow the alcohol to evaporate completely before reassembling.
Reassembly and Testing Carefully reassemble any removed components, referring to your photographic documentation. Double-check that all connections are secure before plugging in the grinder. Run it briefly in a safe location to ensure normal operation before returning to work.
Preventative Maintenance Tips
Consistent preventative care dramatically reduces deep cleaning frequency and extends grinder lifespan:
Establish a Cleaning Schedule Clean your grinder after every use if you’re working in dusty conditions, or at minimum weekly if you use it regularly. This prevents dust from accumulating to problematic levels. Set a phone reminder if necessary to maintain consistency.
Use Dust Collection Equipment Attach a dust collector or shop vacuum to your grinder if it has a dust port. This captures particles at the source, dramatically reducing internal accumulation. Many workshop fires start with accumulated grinding dust, so effective collection is a safety priority.
Work in Clean Environments Whenever possible, use your grinder outdoors or in well-ventilated areas. This minimizes dust recirculation and settling on the tool. If working indoors, use a shop vacuum with HEPA filtration to capture airborne particles.
Store Properly Keep your grinder in a clean, dry location. Cover it with a breathable cloth to prevent dust settlement while allowing moisture to escape. Moisture trapped in motor windings can cause rust and electrical issues. Never store a grinder in damp basements or uninsulated garages where condensation forms.
Inspect Regularly Before each use, visually inspect your grinder for obvious damage, loose parts, or excessive dust accumulation. This catches problems early before they become serious. Check that the power cord is intact and free of damage.
Follow Similar Practices to Other Equipment Just as we recommend in our guide to cleaning tools with vinegar solutions, establish maintenance routines for all your workshop equipment. Consistency across your tool care practices leads to better overall workshop safety and efficiency.
Common Grinder Problems and Solutions
Excessive Vibration If your grinder vibrates more than usual, this often indicates dust accumulation around the motor or wheel. Start with a thorough compressed air cleaning of all vents. If vibration persists, the wheel may be unbalanced or damaged. Check the wheel for cracks or uneven wear. Unbalanced wheels must be replaced, as they’re unsafe to operate.
Reduced Grinding Power Diminished performance usually means dust is clogging vents and causing motor overheating. The motor automatically reduces power when it gets too hot to prevent damage. Clean all vents thoroughly and allow the grinder to cool completely. If power doesn’t return after cleaning, the motor may need professional service.
Strange Noises Grinding, squealing, or rattling sounds indicate internal problems. Stop using the grinder immediately and investigate. Noises often result from debris in the bearing area or loose internal components. After cleaning, if noises persist, discontinue use and consult a professional repair service or the manufacturer.
Sparks or Electrical Issues If you notice reduced sparking during metal grinding or the grinder won’t start, dirty electrical contacts are likely responsible. Clean the power cord connections, battery terminals (for cordless models), and any accessible electrical contacts with isopropyl alcohol. For persistent electrical problems, have the grinder professionally inspected.
Overheating During Short Use A grinder that gets excessively hot quickly indicates motor cooling problems. Blocked vents are the primary cause. Perform a complete vent cleaning with compressed air. If the motor still overheats, reduce usage duration and allow longer cooling periods between work sessions.
Wheel Wobbling If the grinding wheel appears to wobble, this is a serious safety concern. The wheel may be improperly seated in the chuck. Remove the wheel according to manufacturer instructions and reinspect the seating surface for debris. Clean the chuck interior thoroughly, then reinstall the wheel, ensuring it seats fully and tightens securely.
FAQ
Can I use water to clean my grinder?
Generally, avoid using water directly on your grinder, as moisture can damage electrical components and cause rust inside the motor. However, a slightly dampened cloth for external surfaces is acceptable if you immediately dry the tool. Never submerge any part of the grinder or spray water directly into vents. Isopropyl alcohol is a better choice for internal cleaning since it evaporates quickly.
How often should I replace my grinder?
With proper maintenance, a quality grinder can last 10-20 years or longer. Regular cleaning, appropriate usage, and prompt repairs extend lifespan significantly. Replace the tool only if damage is severe or repair costs exceed replacement costs.
Is it safe to use compressed air on all grinder parts?
Compressed air is generally safe for external surfaces and vents, but use short bursts rather than continuous streams. Avoid directing compressed air directly at electrical components or bearings for extended periods. The pressure can force dust deeper into sealed areas. If you have a sealed-bearing grinder, check the manual before using compressed air.
What should I do if my grinder has a dust collection system?
Empty the dust collection bag or container after every use, or when it reaches three-quarters full. A full collection system reduces suction and increases dust escape. Clean the collection system components with a soft brush and dry cloth. Never wash fabric collection bags with water unless the manual specifically allows it.
Can I use the same cleaning methods for angle grinders and bench grinders?
The basic principles are identical, but specific steps may differ. Angle grinders are typically lighter and have different cooling characteristics than bench grinders. Always consult your specific grinder’s manual for component-specific guidance. For additional maintenance insights, review our comprehensive equipment maintenance approach, which applies similar systematic principles.
What’s the best lubricant for grinder bearings?
Use only the lubricant recommended in your grinder’s manual. Many manufacturers specify lightweight machine oil or specialized bearing lubricant. Over-lubrication attracts dust and can damage bearings, so apply sparingly. Some modern grinders have sealed bearings that require no lubrication.
How do I know if my grinder needs professional service?
Seek professional service if you notice persistent strange noises after cleaning, electrical problems that don’t resolve with contact cleaning, excessive vibration that cleaning doesn’t correct, or any signs of internal damage. Professional technicians have specialized equipment and expertise to safely address internal motor issues.


