DIY Solar Water Heater? Expert Tips Inside!
Building your own solar water heater is one of the most rewarding and cost-effective home energy projects you can undertake. Unlike complex electrical upgrades or structural modifications, a solar water heater leverages passive and active heating principles that homeowners can realistically implement with proper planning and safety awareness. This guide walks you through everything from system selection to installation, ensuring your project delivers reliable hot water while maximizing your investment.
Solar water heating systems have been proven to reduce water heating costs by 50-80%, making them an attractive alternative to traditional gas or electric heaters. Whether you’re interested in an active system with pumps and controllers or a passive thermosiphon design, understanding the fundamentals helps you make informed decisions about what works best for your climate, budget, and skill level.
Understanding Solar Water Heater Types
Before purchasing materials or breaking ground on your project, you need to understand the two primary solar water heating architectures: passive and active systems. Each has distinct advantages, installation complexity levels, and performance characteristics that directly impact your DIY feasibility.
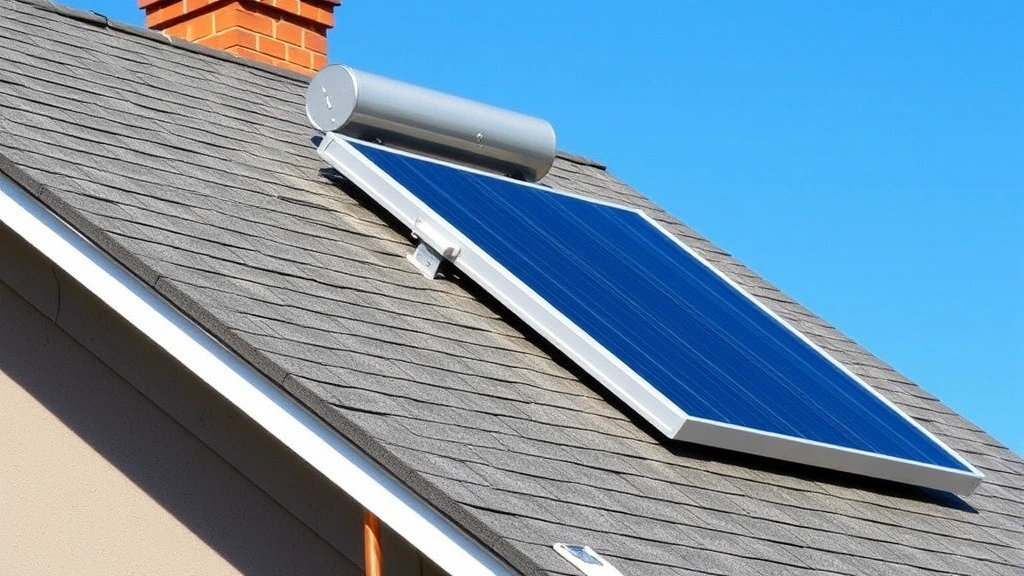
Passive thermosiphon systems operate without pumps or controllers, relying on natural convection to circulate water. When solar radiation heats fluid in the collector, it becomes less dense and rises naturally into the storage tank positioned above. As the fluid cools, it sinks back down into the collector, creating continuous circulation. This simplicity makes passive systems ideal for DIY builders because they have fewer components, lower electricity costs, and minimal maintenance requirements. However, they require careful positioning—the storage tank must be higher than the collector—and work best in moderate climates without severe freezing conditions.
Active systems use electric pumps, sensors, and controllers to move heat transfer fluid through collectors and into storage. These systems perform better in cold climates because they can drain collectors during freezing conditions, preventing catastrophic damage. Active systems also offer superior performance in varied weather and allow flexible tank placement. The tradeoff is increased complexity: you’ll need to understand electrical wiring, sensor calibration, and controller programming. For most DIY enthusiasts, starting with a passive system is more manageable.
Both system types require a well-planned approach to integration with your existing plumbing infrastructure. The choice between them should factor in your climate zone, available roof space, and comfort with electrical work.
Pre-Installation Planning and Assessment
Successful solar water heater projects begin with thorough site assessment and careful planning. This phase determines whether your project will succeed or encounter costly mid-project complications.
Evaluate your roof orientation and shading. Solar collectors need unobstructed southern exposure (in the Northern Hemisphere) with minimal shade between 9 AM and 3 PM during winter—the season when heating demands peak. Use a solar pathfinder tool or smartphone app to track shadow patterns across your roof throughout the day and seasons. Even 10-15% shading can reduce collector efficiency by 30-50%. Identify trees, chimneys, dormers, or neighboring structures casting shadows.
Calculate your hot water demand. Average household usage ranges from 40-80 gallons daily. Check your current water heating bills and usage patterns. A family of four typically needs a 40-60 gallon storage tank with 40-80 square feet of collector area, depending on climate. Cold climates require larger collectors because winter sun angles are lower and days shorter. Consult the U.S. Department of Energy’s solar heating guidance for your specific region.
Check building codes and permitting requirements. Most jurisdictions require permits for solar installations. Contact your local building department to understand setback requirements, structural load limits, electrical codes (if installing an active system), and plumbing code compliance. The International Code Council (ICC) publishes solar installation standards that many municipalities adopt. Permits ensure your system meets safety standards and may qualify you for tax credits or rebates.
Plan your budget comprehensively. A basic DIY passive solar water heater costs $800-2,000 in materials, while active systems range $2,000-4,000. Factor in permits, specialized tools you may need to rent, and potential modifications to your roof structure or plumbing. Many homeowners find that other home improvement investments can be prioritized alongside solar installation.
Essential Materials and Tools
Gathering the right materials before starting prevents frustrating delays. Here’s what you’ll need for a basic passive system:
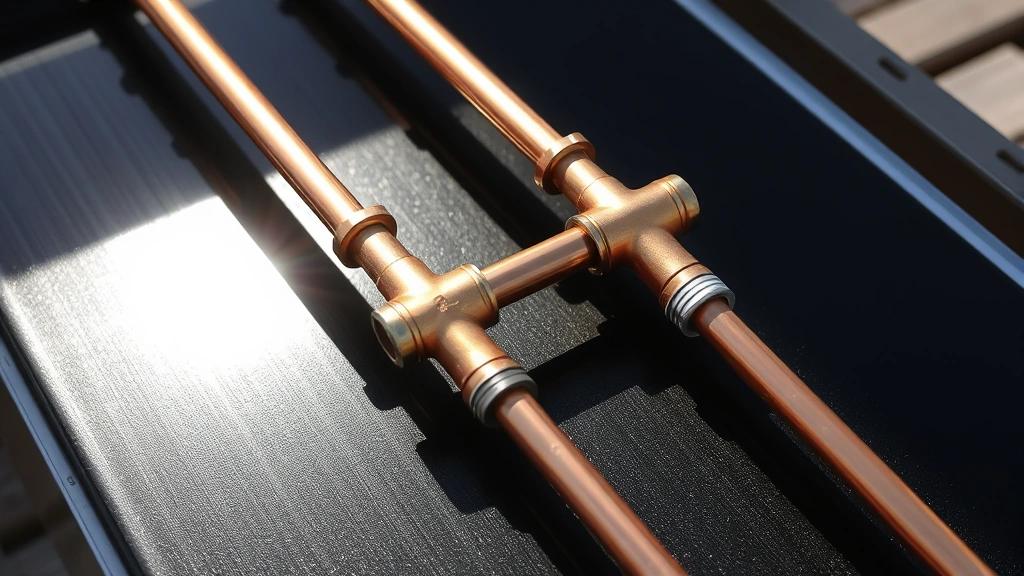
Collector assembly materials: Copper tubing (1/2-inch for headers, 3/8-inch for risers), copper fittings and solder, a sheet of 1/2-inch exterior plywood for the collector box, rigid foam insulation (2-4 inches), tempered glass or polycarbonate glazing, aluminum or copper absorber plate (or DIY black-painted copper tubing matrix), weather-resistant sealants, and exterior-grade paint or coating.
Storage and plumbing: An insulated 40-80 gallon storage tank (food-grade if using potable water directly), copper or PEX tubing for connections, ball valves, check valves, pressure relief valves, temperature and pressure gauges, insulation wrap for pipes, mounting brackets, and fittings rated for your system’s operating pressure.
Installation tools: A reciprocating saw or circular saw for roof access, a drill-driver, a tube bender, a propane torch and solder for copper connections, a level, a tape measure, a roofing nailer, flashing materials, and safety equipment including fall protection, gloves, and eye protection.
Testing and monitoring equipment: A thermometer (preferably digital with remote sensors), a pressure gauge, and a flow meter help you verify system performance during commissioning.
Building Your Solar Collector
The solar collector is your system’s heart—it captures solar radiation and converts it to heat. Building one properly determines overall efficiency and longevity.
Construct the collector box. Cut your plywood to dimensions appropriate for your roof (typically 4×8 feet or 4×10 feet). Create a frame using 2×4 lumber that will mount to your roof. Ensure the frame is square and rigid. Attach the plywood as a backing, then install 2-4 inches of rigid foam insulation inside the frame. The insulation minimizes heat loss through the collector’s back and sides.
Create or install the absorber plate. The absorber converts sunlight to heat. For a DIY approach, you can create a simple absorber by coiling copper tubing in a serpentine pattern and soldering it to a copper sheet, then painting everything flat black with high-temperature paint. Alternatively, purchase a pre-made absorber plate. Mount the absorber inside the box, ensuring good thermal contact with the insulation base. Leave air space between the absorber and the glazing—this air gap prevents heat loss while allowing heat transfer to the fluid circulating through the tubing.
Install glazing. Tempered glass (preferred) or polycarbonate sheets cover the absorber, allowing solar radiation through while trapping heat via the greenhouse effect. Tempered glass is more durable and maintains optical clarity longer, but costs more. Polycarbonate is lighter, easier to work with, and more impact-resistant, though it yellows over time. Install glazing with a slight slope (5-15 degrees) to encourage water runoff and minimize debris accumulation. Seal edges with weatherproof silicone.
Seal and weatherproof. All seams, penetrations, and connections must be sealed against water infiltration. Use exterior-grade silicone caulk or polyurethane sealant rated for solar applications. This is crucial because water intrusion degrades insulation and promotes corrosion inside the collector box.
Installation and Integration
Proper installation ensures your collector transfers heat efficiently to your storage tank and home water system. This phase requires attention to plumbing principles and structural safety.
Prepare your roof for mounting. Your collector adds significant weight—typically 100-150 pounds when full of fluid. Verify your roof structure can handle this load. Consult your home’s construction documents or hire a structural engineer if uncertain. Install roof flashing around penetrations to prevent leaks. Use corrosion-resistant lag bolts or lag screws to anchor the collector frame securely to roof rafters or trusses, not just roof sheathing. Spacing bolts 2-3 feet apart provides adequate support.
Position the storage tank. For passive systems, the tank must be positioned above the collector’s highest point to enable thermosiphon circulation. Ensure the tank location has adequate structural support—a 60-gallon tank filled with water weighs approximately 500 pounds. Insulate the tank with 2-4 inches of foam or fiberglass wrap to minimize standby heat loss. Leave access space around the tank for maintenance.
Connect the plumbing circuit. Run copper or PEX tubing from the collector outlet to the top of the storage tank, then from the bottom of the tank back to the collector inlet. Install a check valve in the return line to prevent reverse thermosiphon circulation at night (which would cool the tank). Size tubing to minimize flow resistance—typically 1/2-inch or larger for the main circuit. Insulate all exposed pipes with foam pipe insulation to reduce heat loss during distribution.
Integrate with your existing water heater. Your solar tank can serve as a pre-heater for your conventional water heater, or replace it entirely if your system is sized appropriately. Connect the solar tank outlet to your conventional heater’s cold water inlet, then feed the conventional heater’s output to your home’s hot water lines. This arrangement lets your conventional heater provide backup heating on cloudy days or during high-demand periods. Install a thermometer on the solar tank so you can monitor performance.
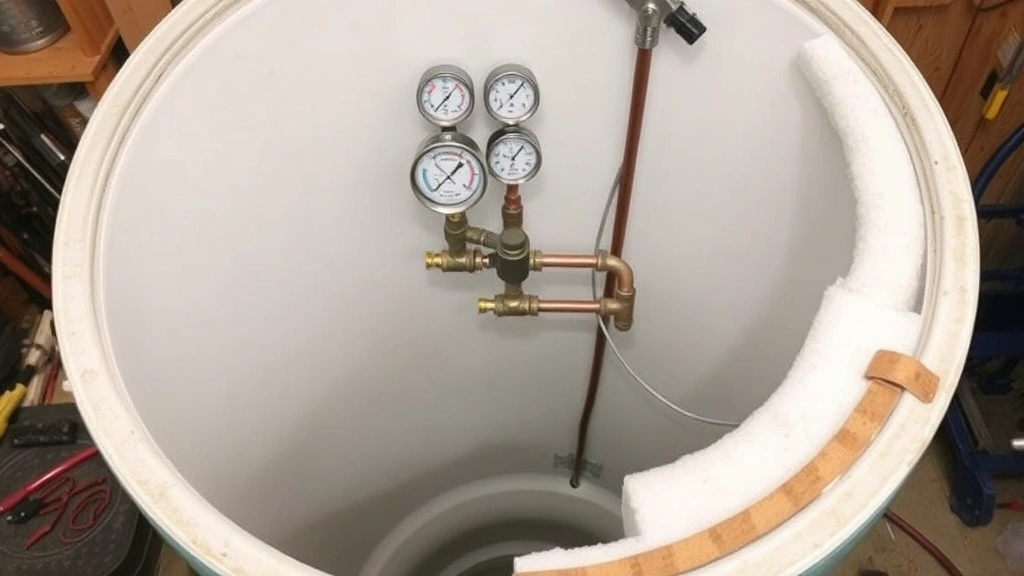
Install safety valves and monitoring. A temperature and pressure relief valve protects against dangerous pressure buildup. Set it to 150 PSI and 180°F—standard settings for residential systems. Install a drain valve at the lowest point of the system for maintenance. Add a pressure gauge and thermometer so you can monitor system performance and identify problems early.
Testing, Troubleshooting, and Maintenance
After installation, thorough testing ensures your system operates safely and efficiently. This phase reveals problems before they cause damage or injury.
Perform initial fill and circulation testing. Fill the system slowly while watching for leaks at every connection. Run the system for 1-2 hours on a sunny day and observe temperature rise in the storage tank. You should see a noticeable increase—typically 10-20°F in good conditions. If temperature rises slowly or not at all, check for air pockets in the collector loop, which block fluid circulation. Vent air by opening bleeder valves at high points in the system.
Monitor pressure and temperature. Healthy systems maintain steady pressure and show rising tank temperature during sunny periods. Pressure should remain below 80 PSI during normal operation. Temperature should increase steadily, reaching 120-140°F on clear days. If pressure rises excessively (above 100 PSI), you may have a blockage or the system may be overheating—both require investigation.
Diagnose common issues. Slow temperature rise suggests poor collector orientation, excessive shading, or air in the system. No temperature rise indicates a blockage, broken check valve, or circulation failure. Pressure relief valve discharge means the system is overheating—this can happen if circulation stops. Leaks at connections typically indicate insufficient solder joints or loose fittings—tighten or resolder as needed.
Establish maintenance routines. Inspect collector glazing annually for dirt, leaves, or algae growth—clean gently with a soft brush and mild soap. Check all exposed piping and connections for corrosion or leaks. Drain and flush the system every 3-5 years to remove sediment and mineral deposits that reduce heat transfer efficiency. Test the pressure relief valve annually by manually lifting its handle—it should discharge water briefly then reseal. For active systems, monitor controller function and sensor calibration annually.
Maximize long-term performance. Keep the area around your collector clear of vegetation that might create shade as trees grow. Monitor your hot water temperature and usage to identify performance changes. Maintain your conventional backup water heater—it still provides essential function. Consider upgrading to a more efficient backup heater over time if your budget allows.
FAQ
How much money will I save with a DIY solar water heater?
Most homeowners save $500-1,200 annually on water heating costs, depending on climate, system size, and energy prices. With DIY installation reducing labor costs by $1,500-3,000 compared to professional installation, payback periods typically range 5-8 years. After that, you enjoy essentially free hot water for 20+ years.
Can I install a solar water heater in a cold climate?
Yes, but you’ll need an active system with freeze protection rather than a passive thermosiphon design. Active systems can drain collectors during freezing conditions, preventing damage. Cold climates require larger collectors (60-100 square feet) because winter sun angles are low. Consult regional solar data before committing to a cold-climate system.
What’s the difference between a solar water heater and solar pool heater?
Solar water heaters heat potable water for showers and washing, using insulated storage tanks and smaller collectors. Solar pool heaters heat large water volumes to modest temperatures (75-85°F) using uninsulated collectors and the pool itself as storage. Pool heaters are simpler but less efficient for potable water heating.
Do I need a permit for DIY solar water heater installation?
Most jurisdictions require permits for solar installations. Permits ensure your system meets electrical codes (if active), plumbing codes, structural safety standards, and fire codes. Unpermitted work may void homeowner insurance coverage and complicate future property sales. Check with your local building department before starting.
How do I winterize my solar water heater?
Passive systems in freezing climates need draining before winter—use a ball valve at the lowest point to empty the collector and lines. Active systems drain automatically via controller logic. After draining, cap all open connections to prevent debris entry. Refill in spring and bleed air from the system before operation.
What maintenance does a solar water heater require?
Annual tasks include cleaning glazing, inspecting connections and pipes for corrosion, testing pressure relief valves, and checking tank insulation. Every 3-5 years, drain the system and flush lines to remove sediment. For active systems, verify controller and sensor function. Proper maintenance extends system life to 25-30 years.
Can I use my solar water heater year-round?
Yes, though performance varies seasonally. Summer systems produce abundant hot water and may overheat without proper load management. Winter performance depends on climate—sunny regions continue producing useful heat, while cloudy regions may generate minimal solar contribution. Your backup heater handles seasonal shortfalls, making year-round hot water reliable.


