
DIY Studio Setup: Producer’s Essential Guide to Getting Started
Building a professional music production studio from your home might seem daunting, but with the right planning and equipment choices, you can create a space that rivals commercial facilities. Whether you’re learning DIY fundamentals from our blog or tackling a dedicated studio build, understanding the technical requirements and acoustic principles is essential for success. Modern producers no longer need massive budgets—they need knowledge, strategy, and quality gear selection.
This comprehensive guide walks you through every aspect of setting up your own music production studio, from room selection and acoustic treatment to equipment choices and software configuration. Whether you’re converting a bedroom, basement, or spare office into your creative space, the principles remain consistent: proper isolation, accurate monitoring, and reliable recording equipment form the foundation of professional-quality work.
Choosing Your Studio Space
The room you select will directly impact your studio’s acoustic characteristics and your ability to create professional recordings. Ideally, choose a space that’s isolated from external noise sources like traffic, HVAC systems, and household activity. Smaller rooms (approximately 100-150 square feet) work well for home studios because they’re easier to treat acoustically and require less equipment to achieve proper monitoring conditions.
Avoid rooms with parallel walls if possible, as they create standing waves and flutter echo that muddy your mixes. If your room has parallel walls, you’ll need more aggressive acoustic treatment. Consider ceiling height too—rooms with 8-foot or higher ceilings provide better low-frequency response. Before committing to a space, test it by clapping loudly and listening to the reflections. Excessive echo indicates you’ll need substantial treatment work.
If you’re finishing a basement for your studio, you’ll have advantages like natural isolation and climate control, but you’ll also need to address moisture and HVAC noise. Windows should be secondary considerations—they’re poor acoustic barriers and can introduce reflections. Position your monitoring position away from windows and doors where possible.
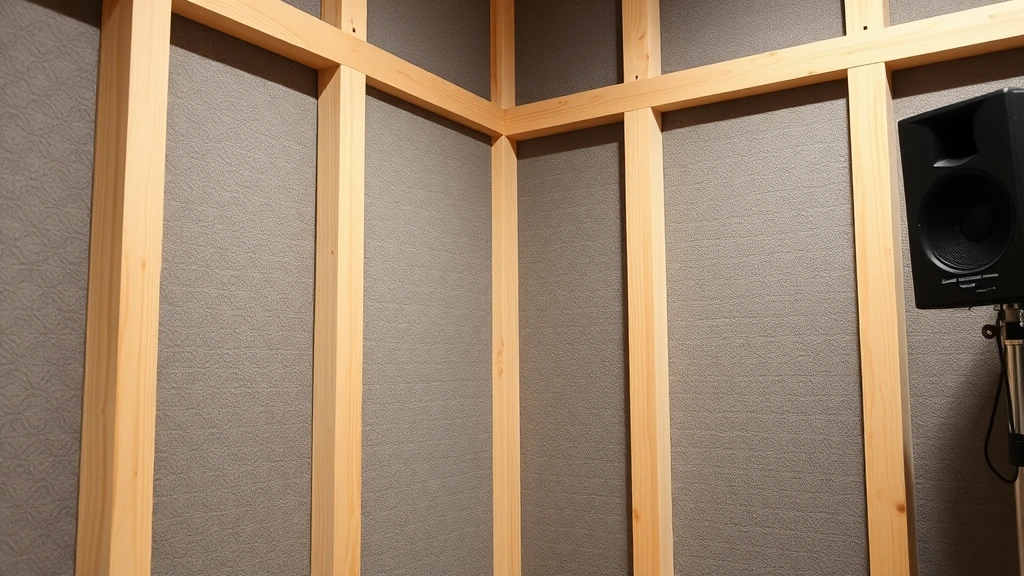
Acoustic Treatment Essentials
Professional acoustic treatment separates amateur home studios from serious production spaces. You need to control three acoustic problems: absorption (removing excess sound energy), diffusion (scattering reflections), and isolation (preventing sound transmission between rooms). Start with absorption panels positioned at first-reflection points—the areas where sound from your monitors bounces directly to your ears.
Calculate your room’s frequency response issues by measuring dimensions using the Acoustic Engineering Society guidelines. Room modes (standing waves) occur at specific frequencies determined by your room’s dimensions. These create peaks and nulls in your frequency response, making accurate mixing impossible. Bass traps address this problem by absorbing low-frequency energy. Position them in corners and along bottom walls where bass energy accumulates.
Invest in quality absorption materials with appropriate noise reduction coefficients (NRC ratings). Fiberglass panels with 2-4 inch thickness provide excellent absorption across frequencies. Mineral wool alternatives offer similar performance. Avoid cheap foam—it only absorbs mid and high frequencies while leaving problematic bass untreated. A proper treatment approach includes:
- Absorption panels on side walls and ceiling (4-6 panels minimum)
- Bass traps in all four corners and behind monitoring position
- Diffusers on one wall to maintain liveliness while controlling reflections
- Door sealing with weatherstripping and acoustic seals
- Window treatment with heavy curtains or acoustic panels
If you’re also concerned with home security systems in your studio space, ensure cables and equipment don’t interfere with detection zones. Acoustic panels can actually help hide security equipment while improving sound quality simultaneously.

Core Equipment Requirements
Your equipment chain determines recording and mixing quality. Start with an audio interface—this device converts analog signals to digital and vice versa. Choose interfaces with at least 2 inputs and 2 outputs minimum, with 24-bit/192kHz capability for professional quality. Popular options include Focusrite Scarlett, Universal Audio Apollo, and RME Babyface models.
A microphone is essential for vocal recording and instrument capture. Large-diaphragm condenser microphones like the Neumann U87, Audio-Technica AT4040, or budget-friendly alternatives work well for vocals and acoustic instruments. You’ll also need a microphone preamp to boost weak signals before converting to digital. Many interfaces include preamps, but dedicated units provide superior sound quality and coloration options.
Headphone monitoring is critical because you can’t rely entirely on room speakers until your space is properly treated. Invest in closed-back studio headphones with flat frequency response—brands like Sennheiser HD 650, Beyerdynamic DT 990, and Audio-Technica AT-M50x provide accurate reference points. Open-back headphones sound more pleasant for casual listening but don’t provide accurate bass representation for mixing.
Essential equipment checklist:
- Audio interface (Thunderbolt, USB-C, or USB 3.0)
- Studio microphone with appropriate polar pattern
- Microphone stand and pop filter
- XLR cables (quality shielded versions)
- Monitor speakers (nearfield, 5-inch woofers minimum)
- Studio headphones for reference monitoring
- MIDI keyboard (optional but highly useful)
- Monitor stands or isolation pads
- Cables and adapters (quality matters significantly)
Monitoring and Mixing Setup
Accurate monitoring is non-negotiable for professional mixes. Position your monitor speakers at ear level, forming an equilateral triangle with your listening position. This setup ensures proper stereo imaging and frequency response. Nearfield monitors (5-8 inches) are ideal for home studios because they emphasize direct sound from speakers over room reflections. Keep speakers at least 2 feet from walls to minimize bass buildup.
Your mixing position should be centered in the room, away from walls and corners where bass accumulates. Sit approximately 1 meter from your monitors for accurate frequency perception. Some producers use monitor controllers to adjust output level without changing mix levels—this prevents ear fatigue and helps you maintain perspective during long sessions.
Calibration is essential. Use ITU-R BS.1770 standard measurement practices to set your monitoring level to 85dB SPL at your listening position. This reference level helps your mixes translate to consumer playback systems. A sound pressure level meter (smartphone apps work adequately) helps establish this baseline.
Consider room correction software like DIRAC Live or Sonarworks Reference which measures your room’s frequency response and applies digital correction. These tools significantly improve accuracy, especially in untreated rooms. They’re not substitutes for proper acoustic treatment but valuable supplements.
Recording Quality Standards
Professional recordings start with proper gain staging. Set your input level so the signal peaks around -12dB to -6dB on your interface’s meter—this provides headroom to prevent clipping while maintaining good signal-to-noise ratio. Never record at maximum input levels; you need dynamic range for mixing flexibility.
Microphone technique dramatically affects recording quality. Position mics 6-12 inches from sound sources unless you want exaggerated proximity effect (bass boost from close miking). Use pop filters for vocal recordings to reduce plosive sounds. Maintain consistent mic positioning throughout recording sessions—moving the microphone changes tone and presence, making edits obvious.
Invest in quality cables that shield against electromagnetic interference. Balanced XLR cables are superior to unbalanced instruments cables for microphone connections. Keep cable runs organized and separated from power cables to minimize noise. When painting your studio walls, use matte finishes rather than glossy paint, which can reflect sound frequencies and create acoustic problems.
Record at 24-bit/48kHz minimum for professional work. Higher sample rates (96kHz, 192kHz) provide benefits for mastering but require significantly more storage and processing power. For most home producers, 24-bit/48kHz represents the optimal balance between quality and practicality. Always use lossless formats (WAV, AIFF) for recording—never use lossy compression like MP3.
Software and DAW Selection
Your Digital Audio Workstation (DAW) is your primary production tool. Popular options include Ableton Live, Logic Pro, Pro Tools, Cubase, and Reaper, each with different strengths. Logic Pro integrates seamlessly with Mac systems and includes excellent built-in plugins. Pro Tools remains the industry standard for professional studios. Reaper offers excellent value and flexibility. Ableton excels at live performance and electronic production.
Choose a DAW that matches your music style and budget. Most offer free or discounted versions for learning. Don’t obsess over DAW selection—the producer matters far more than the software. You can create professional work in any modern DAW. Focus instead on learning your chosen DAW thoroughly and mastering its workflow.
Essential plugins include:
- Equalization for frequency shaping (parametric EQ minimum)
- Compression for dynamic control and character
- Reverb for spatial dimension
- Delay for timing-based effects
- Saturation for harmonic enhancement
Many quality plugins are free or affordable. iZotope, Fabfilter, and Universal Audio provide professional-grade tools. Don’t fall into the plugin trap—three high-quality plugins used skillfully beat twenty mediocre ones. Master fundamental mixing techniques with basic tools before expanding your toolkit.
Cable Management and Organization
Professional studios maintain organized cable systems that reduce noise and simplify troubleshooting. Use cable ties and management solutions to keep cables organized and prevent kinks that degrade signal quality. Label everything clearly—mark cable ends with tape indicating source and destination. This simple practice saves hours when troubleshooting issues.
Separate audio cables from power cables to minimize interference. Keep microphone cables away from AC power lines. Use star-grounding techniques where all cables connect to a central ground point rather than daisy-chaining connections. Grounding loops (humming noise) result from multiple ground paths—proper grounding eliminates this problem.
Invest in quality power distribution. A dedicated power conditioner protects equipment from voltage fluctuations while reducing noise. Keep your audio interface on a separate power circuit from computer monitors and other digital equipment when possible. This simple step dramatically reduces electrical noise in recordings.
Your studio desk should accommodate all equipment while maintaining ergonomic positioning. Position your computer monitor at eye level, roughly 20-30 inches away. Your keyboard and mouse should be at elbow height with arms at 90-degree angles. Proper ergonomics prevent repetitive strain injuries during long production sessions.
FAQ
How much does a basic home studio cost to set up?
A functional home studio requires $1,500-$3,000 minimum for quality equipment: audio interface ($300-600), monitors ($400-800), microphone ($200-500), headphones ($150-300), and acoustic treatment ($300-800). Budget constraints shouldn’t prevent you from starting—many successful producers began with minimal equipment and upgraded gradually as skills and income improved.
Can I produce music in a small bedroom?
Yes, small bedrooms work well for home studios. They’re easier to treat acoustically and require less equipment for proper monitoring. Challenges include limited space for equipment placement and potential sound transmission to adjacent rooms. Address isolation concerns by using door seals and acoustic panels. Small rooms actually provide advantages for certain music genres.
Do I need acoustic treatment if I’m using headphones for mixing?
Acoustic treatment benefits even headphone-based workflows. A treated room reduces ambient noise during recording and provides a more pleasant working environment. Some treatment (particularly bass traps) helps control reflections that affect microphone recordings. While headphone mixing is viable, some room treatment is still recommended.
What’s the difference between absorption and diffusion?
Absorption removes sound energy by converting it to heat in material like fiberglass. Diffusion scatters sound waves in different directions without removing energy. Absorption controls reflections and reduces reverberation time. Diffusion maintains room liveliness while preventing problematic reflections. Most studios need both: absorption for control and diffusion for maintaining acoustic character.
How do I know if my studio is acoustically treated enough?
Conduct a clap test: clap loudly and listen to decay time. A properly treated room should have minimal echo (1-2 second reverberation time). Use measurement tools like room analysis software to identify frequency response problems. Trust your ears—if mixes sound good and translate well to other playback systems, your treatment is adequate.
Should I buy expensive cables for better sound quality?
Quality cables matter, but expensive doesn’t always mean better. Invest in proper shielding and construction rather than premium brands. A $30 quality XLR cable outperforms a $100 boutique cable with poor shielding. Focus on balanced connections (XLR) for microphones and use quality instrument cables for other connections. Avoid extremely cheap cables prone to noise and failure.


