How to Clean a Smoking Pipe: DIY Expert Tips for Maintenance and Care
Keeping your smoking pipe clean is essential for maintaining optimal flavor, ensuring longevity, and promoting a healthier smoking experience. Whether you’re a casual smoker or an enthusiast, understanding proper pipe cleaning techniques can significantly enhance your enjoyment and extend the life of your investment. A well-maintained pipe delivers superior taste, burns more evenly, and requires less frequent deep cleaning when regular maintenance is performed consistently.
Many pipe smokers underestimate the importance of routine cleaning, often waiting until residue buildup becomes severe before taking action. This approach can lead to clogged airways, bitter flavors, and potential damage to the pipe’s interior structure. By implementing the straightforward methods outlined in this guide, you’ll develop efficient cleaning habits that keep your pipe in pristine condition year-round.
Essential Tools and Materials You’ll Need
Before beginning any cleaning process, gather the appropriate tools and materials. Having everything prepared ensures efficient work and prevents frustration during maintenance. Think of this preparation phase similarly to how you’d organize supplies before tackling other DIY cleaning projects around your home.
- Pipe cleaners: Specialized bristled cleaners designed specifically for pipe interiors; purchase quality versions that won’t shed fibers
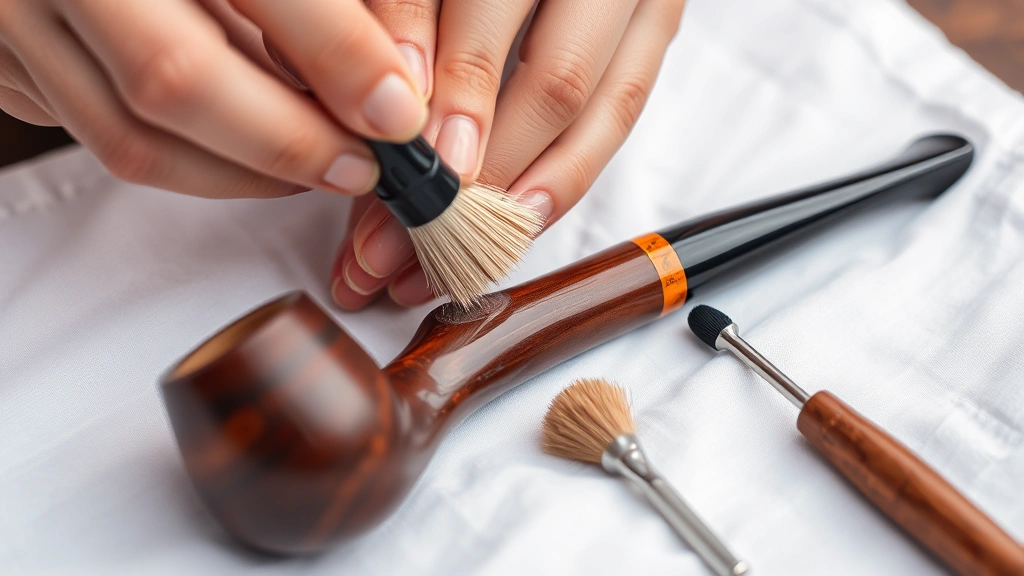
- Soft-bristled brushes: Small brushes for gentle exterior cleaning without scratching the pipe’s finish
- Cleaning solutions: Isopropyl alcohol (90% concentration minimum), specialized pipe cleaning solutions, or hot water
- Paper towels or cotton cloths: Lint-free materials prevent residue transfer and maintain cleanliness
- Dental floss or pipe picks: Thin, flexible tools for dislodging stubborn debris from tight spaces
- Small bowls: Containers for soaking pipes or holding cleaning solutions
- Pipe reamer: Optional tool for removing carbon buildup from the bowl interior
- Soft cloth: Microfiber or cotton fabric for final polishing and drying
Visit your local tobacco shop or reputable online retailers to source quality pipe cleaning supplies. Many retailers offer comprehensive cleaning kits containing multiple tools at reasonable prices. Investing in proper equipment prevents damage and ensures your cleaning efforts remain effective over time.
Daily and Weekly Maintenance Routines
Regular maintenance prevents excessive buildup and keeps your pipe performing optimally. Establishing a consistent routine takes minimal time but yields substantial benefits for pipe condition and smoking quality. This preventative approach mirrors the strategy used in maintaining cast iron cookware through regular care.
Immediate Post-Smoking Care: Within minutes of finishing a smoke session, gently tap the pipe against a hard surface to dislodge loose ash and tobacco remnants. Hold the pipe at a slight angle and tap the bowl’s bottom edge—this simple action removes most loose debris without requiring additional tools. Never force or strike the pipe aggressively, as this risks cracking the bowl or stem.
After the initial tap-out, insert a pipe cleaner into the stem while the pipe remains warm (but safely coolable to touch). Push the cleaner through slowly and deliberately, which helps remove moist tobacco particles and moisture. You may need to use 2-3 cleaners if the first becomes heavily soiled. This single action prevents moisture accumulation and keeps the internal airway clear.
Weekly Deep Wipe: Once weekly, perform a more thorough exterior cleaning. Use a soft, dry cloth to gently wipe the outside of the pipe, removing dust, fingerprints, and minor oxidation. For pipes with stubborn exterior marks, slightly dampen the cloth with distilled water and gently rub the affected area. Dry immediately with a separate clean cloth to prevent water spotting.
Weekly interior attention involves running 4-5 fresh pipe cleaners through the stem and into the bowl’s top opening. Continue until cleaners emerge nearly clean. This preventative measure keeps internal passages clear and prevents flavor deterioration. Store used cleaners in a designated waste container rather than the trash to avoid attracting insects.
Deep Cleaning Methods for Optimal Results
When weekly maintenance isn’t sufficient or buildup has accumulated, implement deeper cleaning techniques. These methods work effectively for pipes smoked regularly or those that haven’t been cleaned thoroughly in extended periods.
Isopropyl Alcohol Soak: Fill a small bowl with 90% or higher isopropyl alcohol. Completely submerge the pipe stem in the solution for 30-45 minutes. The alcohol dissolves stubborn residue and kills odor-causing bacteria. After soaking, use fresh pipe cleaners to gently scrub the interior while the stem remains in the alcohol. The solution loosens hardened deposits, making mechanical removal easier and less forceful.
For the bowl, avoid prolonged soaking if it’s made from wood, as excessive alcohol exposure can damage the finish. Instead, dampen a pipe cleaner with alcohol and work it through the bowl’s interior using gentle circular motions. Follow with dry cleaners to remove excess moisture. If your pipe has a removable bowl (common in many modern designs), you can submerge it separately while protecting the stem.
Hot Water Flush: An alternative or supplementary method involves flushing the pipe with hot (not boiling) water. Boiling water can crack delicate pipes or damage wooden components. Instead, use water heated to approximately 160-180°F. Run the hot water through the stem and bowl while inserting pipe cleaners to mechanically remove loosened debris. This method works particularly well for pipes with minor buildup and requires no chemical solutions.
Repeat the hot water flush 3-4 times, using fresh cleaners with each pass. The repeated flushing removes residual particles and any cleaning solution remnants. This approach is gentler than alcohol for pipes with sensitive finishes or vintage pieces.
Vinegar Solution: For pipes with mineral deposits or stubborn staining, a white vinegar solution offers excellent results. Mix equal parts white vinegar and hot water, then soak the pipe stem for 20-30 minutes. The acidity breaks down mineral buildup and discoloration. Use pipe cleaners during soaking to enhance the cleaning action. Vinegar’s mild nature makes it suitable for delicate pipes, though the smell may linger briefly—ensure proper ventilation during this process.
Removing Stubborn Buildup and Carbon Deposits

Occasionally, pipes develop heavy carbon deposits that resist standard cleaning methods. These stubborn accumulations require more aggressive techniques but can be removed safely with proper care and patience.
Carbon Reaming: A pipe reamer is a specialized tool featuring a curved, sharp edge designed to scrape carbon buildup from the bowl’s interior. Insert the reamer gently into the bowl and rotate it slowly, applying minimal downward pressure. The reamer removes hardened carbon without damaging the bowl’s walls if used correctly. Work in small sections, frequently removing accumulated debris with pipe cleaners. This process takes time but effectively restores heavily compromised pipes.
Always work carefully when reaming, particularly near the bowl’s bottom and sides. Aggressive reaming can thin the bowl’s interior walls, potentially creating weak spots. If resistance is felt, stop immediately and soak the pipe in alcohol or hot water for an additional 30 minutes before resuming.
Specialized Cleaning Solutions: Commercial pipe cleaning solutions from reputable manufacturers offer enhanced cleaning power compared to alcohol alone. These solutions contain solvents specifically formulated to dissolve tobacco tars and resins. Follow product instructions carefully, as some solutions require dilution or specific soaking times. Popular options include solutions recommended by organizations like the International Premium Cigar & Pipe Retailers Association, which maintains standards for pipe care products.
Dental Floss or Pick Method: For pipes with narrow internal passages or heavily clogged stems, dental floss or specialized pipe picks can dislodge stubborn blockages. Thread unwaxed dental floss through the stem carefully, working it back and forth with gentle pressure. The floss’s texture catches debris and pulls it free. Alternatively, use a flexible pipe pick to probe and dislodge particles. These tools work best when the pipe has been pre-soaked in alcohol or hot water to soften deposits.
Multiple Cleaning Sessions: Heavily soiled pipes often require multiple cleaning sessions rather than one aggressive attempt. Soak the pipe overnight in alcohol, then clean thoroughly. Repeat this process 2-3 times if necessary. This staged approach removes buildup gradually while minimizing stress on the pipe’s structure and finish. Patience yields better results than forcing aggressive cleaning techniques.
Proper Drying and Storage Techniques
After cleaning, thorough drying is critical for preventing moisture damage and mold growth. Improper drying can undo your cleaning efforts and compromise the pipe’s condition.
Initial Moisture Removal: Immediately after cleaning, use clean, dry pipe cleaners to absorb residual moisture from the stem’s interior. Insert cleaners and leave them in place for 1-2 minutes, then replace with fresh cleaners. Repeat until cleaners emerge completely dry. This step removes water or alcohol that could promote internal corrosion or mold development.
Air Drying: Stand the pipe upright (bowl up, stem down) on a clean cloth in a warm, dry location away from direct sunlight. Allow 24-48 hours for complete drying before using the pipe again. The upright position encourages moisture drainage and air circulation throughout the pipe’s interior. Never place a wet pipe in a closed container or drawer, as trapped moisture promotes mold and deterioration.
Storage Considerations: Store cleaned pipes in a cool, dry location with moderate humidity (30-50% is ideal). Excessive humidity promotes mold growth, while extremely dry conditions can cause wood to shrink and crack. Avoid direct sunlight, which fades finishes and causes wood discoloration. Many enthusiasts use DIY storage solutions from the DIY Nests Hub Blog to create appropriate environments for their pipe collections.
Store pipes away from strong odors, as they absorb environmental scents. Keep pipes separated from tobacco storage areas during storage to prevent flavor contamination. If you own multiple pipes, rotating their use allows each to dry and rest completely between smoking sessions, extending overall lifespan.
Climate Control: In humid climates, consider using silica gel packets in your storage container to maintain appropriate moisture levels. Replace packets monthly or when they become saturated. In dry climates, a small container of water near (but not touching) stored pipes helps maintain adequate humidity without creating condensation directly on the pipes.
Troubleshooting Common Issues

Even with proper maintenance, pipes occasionally develop issues requiring specialized solutions. Understanding how to address these problems prevents permanent damage.
Persistent Odors: If your pipe retains unpleasant smells after standard cleaning, try soaking it in baking soda solution (1 tablespoon per cup of water) for 2-3 hours. Baking soda neutralizes odors without harsh chemicals. For severe cases, soak overnight. Alternatively, place the pipe in a sealed container with crumpled newspaper or activated charcoal for 24-48 hours—these materials absorb stubborn odors. Never use perfumed solutions, as they interfere with tobacco flavor.
Discoloration and Staining: Surface stains on wooden pipes often respond to gentle rubbing with fine-grit sandpaper (220-grit or higher) followed by conditioning with pipe wax or wood oil. Test this approach on inconspicuous areas first. For meerschaum or clay pipes, avoid abrasive methods and stick to alcohol-based cleaning. Discoloration sometimes indicates internal moisture problems—ensure pipes are drying completely between uses.
Cracks or Splits: Small surface cracks in wood pipes can be stabilized using clear epoxy designed for wood. Clean the crack thoroughly, apply epoxy carefully, and allow to cure per product instructions. Larger cracks or structural damage may require professional repair from experienced pipe craftspeople. Never attempt to glue a pipe that’s actively used, as the adhesive may release toxic fumes when heated.
Loose or Damaged Stems: If the stem separates from the bowl, inspect the joint for debris or damage. Clean both surfaces thoroughly and reinsert, twisting gently. If the fit remains loose, the mortise (joining area) may need professional attention. Smoking with a loose connection allows unfiltered hot air to escape, ruining the smoking experience and potentially damaging the pipe.
Gurgling or Moisture Issues: Pipes that gurgle during smoking contain excess moisture. Increase drying time between uses and ensure you’re removing moisture after cleaning. Some pipes benefit from using pipe filters or moisture-absorbing products designed for this purpose. Check product recommendations from Pipes Magazine for filter compatibility with your specific pipe model.
Flavor Degradation: If your pipe’s flavor has declined despite cleaning, deep cleaning may not fully resolve the issue. Some pipes develop permanent flavor contamination from prolonged use with certain tobacco types. In these cases, consider dedicating that pipe to a specific tobacco type exclusively. Alternatively, perform extended soaking (24+ hours) in alcohol, then air dry completely before attempting a different tobacco.
Frequently Asked Questions
How often should I clean my smoking pipe?
Perform light cleaning (tap-out and single cleaner insertion) after every smoking session. Weekly, run multiple fresh cleaners through the pipe’s interior. Deep cleaning with alcohol or hot water is recommended monthly for regularly used pipes, or every 3-6 months for occasional use. Heavily smoked pipes may require deep cleaning every 2-3 weeks.
Can I use regular rubbing alcohol for pipe cleaning?
Yes, isopropyl alcohol at 90% concentration or higher works effectively. Avoid lower concentrations, as the water content may leave residue. Never use denatured alcohol or products containing additives, as these can damage pipe finishes or leave harmful residues. Purchase pure isopropyl alcohol from pharmacies or cleaning supply retailers.
Is it safe to soak wooden pipes in alcohol?
Brief soaking (30-45 minutes) is generally safe, but extended soaking can damage wood finish or cause warping. For wooden pipes, limit alcohol soaking to the stem only, or use the hot water method instead. Always dry wooden pipes immediately and thoroughly after any wet cleaning.
What’s the difference between pipe cleaners and regular cotton swabs?
Pipe cleaners are specifically designed with appropriate diameter and bristle texture for pipe interiors. Regular cotton swabs are too large for most pipe stems and may leave cotton fibers inside. Always use proper pipe cleaners to ensure effective cleaning and prevent debris accumulation.
Can I use boiling water to clean my pipe?
Boiling water is too hot and can crack delicate pipes, damage wooden components, or warp plastic stems. Use water heated to 160-180°F instead. Boiling may also damage meerschaum or clay pipes. When in doubt, use alcohol-based cleaning methods that don’t require heat.
How do I remove mineral deposits from my pipe?
White vinegar solution (equal parts vinegar and hot water) effectively dissolves mineral deposits. Soak the affected areas for 20-30 minutes, then clean with pipe cleaners. For stubborn deposits, repeat the process or increase soaking time to 45 minutes. Rinse thoroughly with clean water and dry completely.
What should I do if my pipe smells like mold?
Mold indicates moisture retention. Soak the pipe in alcohol for 45 minutes, then use multiple dry cleaners to remove moisture. Air dry in a warm location for 48+ hours. To prevent recurrence, ensure complete drying between uses and store in a dry environment. If mold smell persists, deep cleaning or professional restoration may be necessary.
Is it necessary to clean the exterior of my pipe?
Yes, exterior cleaning removes dust, fingerprints, and oxidation that affect appearance and can gradually damage finishes. Weekly dry cloth wiping and monthly gentle cleaning with slightly dampened cloth maintains the pipe’s aesthetic appeal and protective finish. This mirrors care practices discussed in our guide on cleaning delicate materials like sleeping bags, where gentle methods preserve quality.
Can I use pipe cleaners for other purposes?
While possible, it’s not recommended. Pipe cleaners are specifically manufactured for tobacco pipes, and using them elsewhere may expose them to contaminants that make them unsuitable for pipe cleaning. Maintain separate tool sets for different purposes to ensure hygiene and effectiveness.
How long do pipes typically last with proper maintenance?
Well-maintained pipes can last decades or even generations. Quality pipes made from premium materials may last 50+ years with consistent care. Proper cleaning, appropriate drying, and careful storage significantly extend pipe lifespan. Many collectors maintain pipes that are 30-50 years old through diligent maintenance practices similar to those discussed in comprehensive DIY vehicle maintenance.


