Build a Shed? Pro Tips from a Carpenter
Building a shed transforms your outdoor space into functional storage while adding genuine value to your property. Whether you’re storing garden tools, creating a workshop, or establishing a hobby space, a well-constructed shed combines practical utility with lasting durability. This comprehensive guide draws from years of carpentry experience to walk you through every critical decision and construction phase.
A successful shed project requires thoughtful planning before the first nail is driven. From understanding local building codes to selecting appropriate materials and mastering fundamental framing techniques, the difference between a shed that lasts decades and one requiring constant repairs often comes down to proper preparation and execution. This guide addresses the professional strategies that separate quality builds from shortcuts.
Understanding Local Building Requirements
Before purchasing a single board, consult your local building department about shed regulations. Most jurisdictions require permits for sheds exceeding 100-120 square feet, though some municipalities enforce stricter thresholds. Building codes exist to ensure structural safety, prevent property line disputes, and maintain neighborhood aesthetics. Ignoring these requirements can result in costly demolition orders or significant fines.
Your local building code, often based on the International Building Code (IBC), specifies setback distances from property lines—typically 5-10 feet depending on your jurisdiction. Many areas also require minimum distances from utilities and easements. Request a site plan review before construction begins; this typically costs $50-150 and provides official confirmation that your planned location complies with regulations.
Electrical and plumbing considerations require particular attention. If you’re planning to add outlets or water lines to your shed, you’ll likely need separate permits and inspections. These utility installations must meet specific codes regarding grounding, weatherproofing, and accessibility. Consider consulting with licensed electricians and plumbers for these specialized systems rather than attempting DIY installations that could create safety hazards or code violations.
Review the National Fire Protection Association (NFPA) guidelines regarding combustible storage and ventilation requirements. If your shed will store gasoline, propane, or other flammable materials, special ventilation and separation requirements apply. Understanding these regulations upfront prevents expensive modifications after construction.
Site Selection and Foundation Preparation
Your shed’s longevity depends heavily on proper site selection and foundation installation. Choose a location with good drainage and natural sunlight exposure—these factors prevent moisture accumulation that leads to wood rot and structural deterioration. Avoid low-lying areas where water pools during heavy rain, and consider prevailing wind patterns when positioning doors and ventilation openings.
Before breaking ground, call your local utility locating service (typically accessed through a national hotline like 811) to identify buried gas lines, electrical conduits, water pipes, and telecommunications cables. Striking a utility line during excavation creates dangerous conditions and expensive liability. This service is free and takes 2-3 business days; factor this into your project timeline.
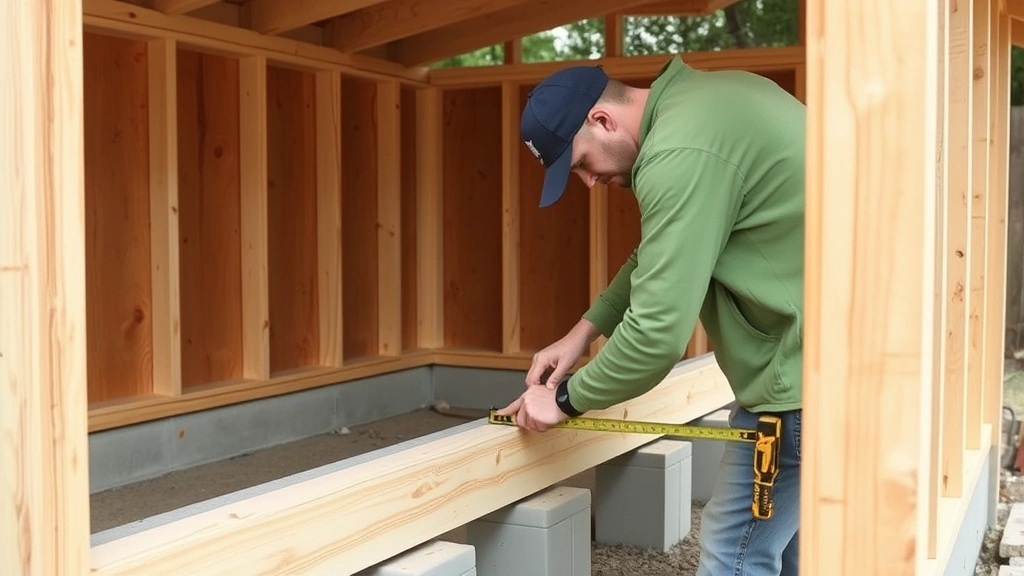
Foundation systems directly impact structural integrity and longevity. Concrete piers—frost-protected footings that extend below your region’s frost line—provide superior support compared to surface-level blocks. Frost lines vary geographically; most northern regions require 3-4 feet of depth, while southern areas may need only 12-18 inches. Insufficient depth allows frost heave to lift and shift your foundation during winter cycles, causing structural damage and door misalignment.
Gravel or crushed stone bases provide drainage and prevent moisture wicking into wooden beams. Install a 4-6 inch gravel layer before setting concrete piers or treated lumber beams. Treated lumber rated for ground contact (pressure-treated to .40 retention or higher) resists rot and termite damage far better than untreated wood. Avoid direct contact between pressure-treated wood and concrete by inserting metal flashing or rubber barriers—this prevents moisture absorption that accelerates wood degradation.
When you’re working on other DIY building projects, foundation principles remain consistent. Proper moisture management during the foundation phase prevents problems throughout your structure’s lifespan.
Framing Fundamentals for Shed Construction
Quality framing creates the structural skeleton that determines your shed’s strength and longevity. Wall framing typically uses 2×4 lumber spaced 16 inches on center—the industry standard that balances material efficiency with structural strength. This spacing accommodates standard insulation widths and sheathing dimensions while providing adequate support for typical shed loads.
Corner posts require special attention as they bear concentrated loads and resist lateral forces from wind. Use doubled 2x4s or 4×4 posts at corners, securing them with multiple fasteners. Interior wall studs should be full-length from sole plate to top plate; avoid splicing studs mid-height as this creates weak points. Properly nailed connections—using 16-penny nails or 3.25-inch structural screws—create rigid assemblies that resist racking (diagonal distortion).
Header construction over doors and windows requires careful calculation based on opening width and roof loads. Openings under 4 feet typically use doubled 2×6 or 2×8 headers, while larger openings require engineered calculations. Under-sized headers deflect under load, causing doors to stick and creating visible sagging. Consult span tables from the American Wood Council for precise header sizing based on your specific conditions.
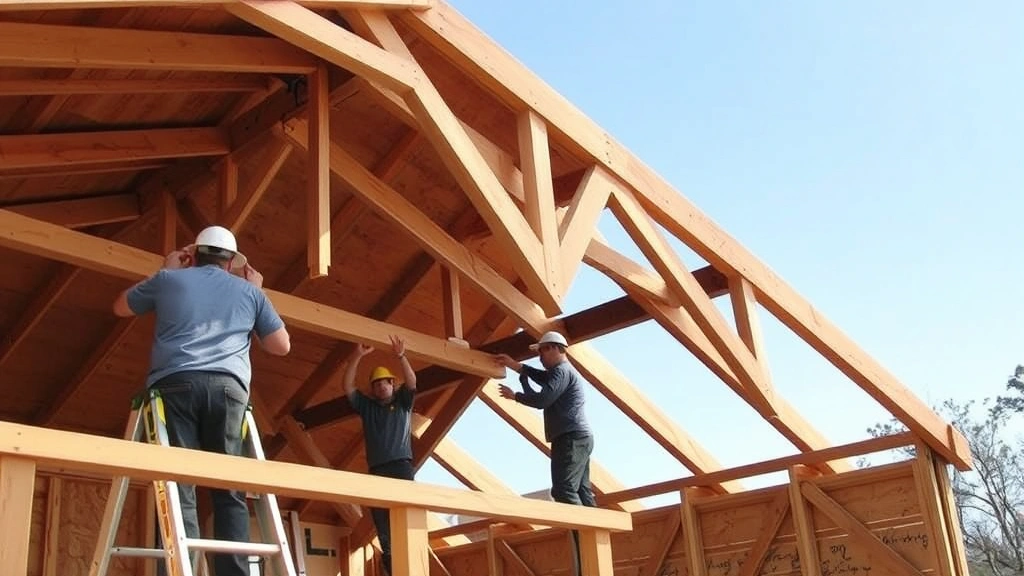
Roof trusses or rafter systems distribute roof loads efficiently across walls. Pre-fabricated trusses offer cost advantages and consistent quality, while site-built rafters provide design flexibility. Truss spacing typically matches wall framing at 16 inches on center. Proper bracing and tie-down connections prevent uplift from wind forces—a critical consideration in areas prone to high winds or storms.
Wall sheathing—typically 1/2-inch plywood or oriented strand board (OSB)—creates a structural diaphragm that transfers lateral forces to the foundation. Sheathing must be properly fastened with nails or screws spaced 6-8 inches apart at all edges and 12 inches in field areas. This seemingly minor detail dramatically increases wind resistance and overall structural rigidity.
For interior finishing projects, understanding framing principles helps you plan electrical runs, insulation placement, and future modifications. Properly framed walls accommodate these systems without compromising structural integrity.
Roofing Systems and Weather Protection
Your roof system is the primary defense against weather damage—the most common cause of shed deterioration. Roof pitch (slope) affects both water drainage and snow load capacity. Minimum 4:12 pitch (4 inches of vertical rise per 12 inches of horizontal run) ensures adequate water drainage in most climates. Steeper pitches shed snow more effectively but require more material and present fall hazards during installation.
Sheathing must support anticipated snow loads in your region. Most northern areas require 1/2-inch plywood or OSB; some heavy-snow regions necessitate 5/8-inch thickness. Consult your local building department for specific snow load requirements—this varies dramatically between regions and directly impacts structural sizing.
Roofing material selection balances cost, durability, and aesthetics. Asphalt shingles offer budget-friendly protection (15-20 year lifespan), while metal roofing provides superior durability (40-50+ years) despite higher initial cost. Metal roofing excels in high-snow or coastal environments where corrosion resistance matters. Ensure proper ventilation beneath roofing to prevent moisture accumulation and premature deterioration—soffit and ridge vents or a continuous ridge vent system prevents condensation damage.
Flashing at roof penetrations (vents, chimneys, skylights) prevents water infiltration at critical weak points. Improperly installed flashing causes interior water damage that remains hidden until significant structural damage occurs. Use corrosion-resistant flashing materials (aluminum, galvanized steel, or copper) and seal all penetrations with appropriate roofing cement or sealant rated for your climate.
Gutters and downspouts direct water away from foundation areas, protecting both your shed and surrounding landscaping. Undersized gutters overflow during heavy rain, allowing water to cascade along walls and saturate the foundation. Size gutters based on your roof area and regional rainfall intensity—most sheds benefit from 5-inch gutters with downspouts extending 4-6 feet from the foundation.
Finishing Touches and Maintenance
Exterior finishes protect wood from UV damage and moisture penetration while enhancing aesthetic appeal. Quality exterior paint or stain-sealant combinations last 5-7 years before requiring recoating. Pressure-treated lumber should cure 6-12 months before painting, as the manufacturing process leaves surface moisture that interferes with paint adhesion. Cedar and other naturally rot-resistant woods benefit from regular maintenance but tolerate finish delays better than pressure-treated lumber.
Interior finishing depends on your intended use. Climate-controlled storage requires proper insulation and ventilation to prevent condensation and temperature extremes. Fiberglass or mineral wool insulation (R-13 to R-21 depending on climate) installed between wall studs reduces temperature fluctuations. Vapor barriers on the warm side of insulation prevent moisture migration into wall cavities where it causes mold and structural damage.
Ventilation prevents moisture accumulation that causes interior deterioration. Soffit and ridge vents create passive air circulation; add gable vents or powered exhaust fans in humid climates. This is particularly important if your shed will house workshop equipment, vehicles, or stored items sensitive to moisture.
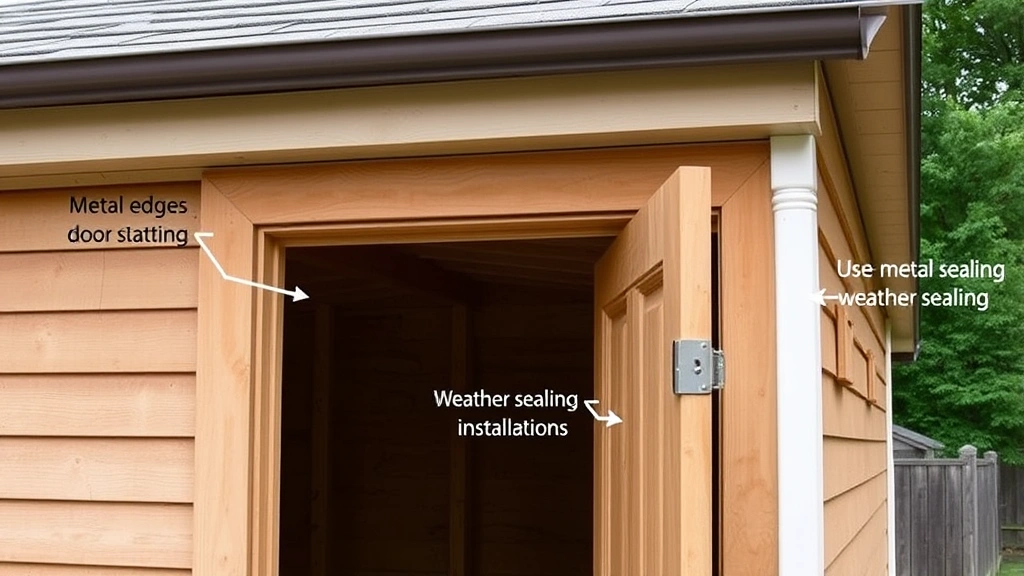
Door and window installation requires attention to flashing and weather sealing. Water intrusion around poorly sealed openings causes rot in framing members and sills. Install flashing above doors and windows, sloping outward to shed water away from the structure. Caulk all gaps with exterior-grade sealant rated for movement and UV exposure.
When planning security features for your property, consider shed access control and lighting. Motion-activated lights deter unauthorized access while improving visibility for legitimate use during evening hours.
Regular maintenance extends your shed’s lifespan dramatically. Annual inspections identifying roof damage, flashing deterioration, and wood rot allow early intervention before problems become expensive. Power wash exterior surfaces every 2-3 years to remove mold and mildew that accelerate wood degradation. Check foundation settling annually—significant movement indicates potential structural problems requiring professional assessment.
Understanding woodworking principles and materials helps you make informed decisions about interior storage organization and custom modifications. Quality construction from the beginning accommodates future adjustments without compromising structural integrity.
Frequently Asked Questions
Do I need a permit for a small shed?
Permit requirements vary by jurisdiction but typically apply to structures exceeding 100-120 square feet or those with electrical/plumbing systems. Contact your local building department for specific thresholds. Obtaining permits may seem costly and time-consuming, but they protect your investment by ensuring code compliance and providing official documentation for property records and insurance purposes.
What’s the best foundation type for sheds?
Concrete piers extending below the frost line provide superior support and longevity. Gravel-filled tire stacks or concrete blocks work for temporary structures but lack the durability of proper frost-protected foundations. Your local building department can specify frost line depth for your region.
How often should I replace shed roofing?
Asphalt shingles typically last 15-20 years; metal roofing lasts 40-50+ years. Lifespan varies based on climate, maintenance, and installation quality. Annual inspections help identify deterioration early, allowing planned replacement rather than emergency repairs after weather damage.
Can I build a shed near my property line?
Most jurisdictions require 5-10 foot setbacks from property lines, though specific requirements vary. Check with your local zoning office and review your property deed for easement restrictions. Violating setback requirements can result in demolition orders regardless of construction quality.
Should I insulate my shed?
Insulation benefits climate-sensitive storage (tools, equipment, vehicles) and workshop spaces. Uninsulated sheds experience temperature extremes that damage stored items and make winter work uncomfortable. R-13 to R-21 insulation provides adequate protection in most climates while maintaining reasonable material costs.
What fasteners are best for shed construction?
Hot-dipped galvanized or stainless steel fasteners resist corrosion better than standard fasteners. Use 16-penny nails or 3.25-inch structural screws for framing connections; these provide superior holding power compared to smaller fasteners. Pneumatic nailers offer speed advantages but require proper technique to avoid under-driving or splitting lumber.


