
Build a Deck? Nashville Carpenter Tips for DIY Success
Building a deck is one of the most rewarding outdoor projects a homeowner can undertake, and if you’re in the Nashville area, you’re blessed with a climate that supports beautiful outdoor living spaces year-round. Whether you’re planning a modest 12×12 platform or an elaborate multi-level entertainment area, the fundamentals of deck construction remain consistent. This comprehensive guide draws on decades of Nashville carpentry expertise to walk you through every phase of your deck project, from initial planning through the final coat of stain.
Nashville’s unique weather patterns—with hot, humid summers and occasional freeze-thaw cycles—demand specific considerations for deck materials and construction techniques. The soil composition and building codes in the Nashville area also present particular challenges that differ from other regions. Understanding these local factors will help you avoid costly mistakes and ensure your deck stands strong for 15-20 years or more.
Understanding Nashville Building Codes and Permits
Before you buy a single board, contact the Nashville Building Code Division to understand current requirements. This is non-negotiable. Many DIYers skip this step and face serious problems during home sales or insurance claims. Nashville follows the International Building Code (IBC) with local amendments, and deck construction has specific requirements regarding post spacing, railing height, and load capacity.
The permit process typically costs $75-$250 depending on deck size, but it’s absolutely worth the investment. Inspectors will verify that your deck meets frost line requirements (typically 3-4 feet in Nashville), proper post spacing (no more than 6 feet for standard decks), and railing specifications. Your local inspector becomes your best resource—don’t hesitate to ask questions before starting work. Many Nashville building departments offer free consultations to homeowners planning deck projects.
Your deck permit will specify requirements for ledger board attachment if you’re connecting to your house. This is critical: improper ledger installation causes more deck failures than any other single factor. Nashville’s building codes require flashing and specific fastener spacing to prevent water infiltration and structural failure.
Site Selection and Layout Planning
Choose your deck location based on sun exposure, views, and proximity to your home’s main entertaining areas. In Nashville, afternoon shade is valuable—the summer sun is intense, and a pergola or shade structure can make your deck genuinely usable during peak heat hours. Consider drainage patterns; avoid low spots where water collects after rain, as this accelerates wood decay and creates pest habitat.
Sketch your deck layout on graph paper, noting existing trees, utilities (call 811 before digging), and your home’s windows and doors. A well-positioned deck should be easily accessed from your kitchen or living areas. Measure twice and mark your corners with stakes and string. Check for level ground or plan for stepped construction if your yard slopes significantly. Nashville’s red clay soil can shift seasonally, so even slight slopes matter for long-term stability.
For deck size, most Nashville homeowners find 12×14 feet to 16×20 feet provides excellent entertaining space without overwhelming smaller yards. Calculate your deck’s total load capacity: residential decks must support 40 pounds per square foot of live load plus 10 pounds per square foot of dead load (the deck’s own weight). This determines post spacing and joist sizing. Use the American Wood Council’s design guides for specific span tables based on wood species and grade.
Materials Selection for Tennessee Climate
Nashville’s humidity and temperature fluctuations demand careful material selection. Pressure-treated lumber (rated for ground contact) is the standard choice for posts, beams, and joists. Look for lumber treated with copper-based preservatives rather than older arsenic-based treatments. For decking surface boards, you have several excellent options: pressure-treated pine or fir (budget-friendly but requires staining every 2-3 years), cedar or redwood (naturally rot-resistant but expensive), or composite materials (low maintenance but higher upfront cost).
Many Nashville carpenters recommend pressure-treated joists with composite decking on top. This combines structural reliability with reduced maintenance. If using pressure-treated lumber for the deck surface, select boards with tight grain and minimal knots. Avoid boards with large knots or significant warping—these indicate lower quality and will cause problems during installation.
Hardware matters tremendously in Nashville’s humid climate. Use stainless steel or galvanized fasteners throughout your project. Regular steel bolts and screws will rust within months, leaving unsightly stains and weakening connections. Galvanized bolts are acceptable for structural connections, but stainless steel is superior if budget allows. This is one area where spending extra money prevents future headaches.
If you’re interested in learning more about outdoor construction materials, our guide on basement finishing techniques covers material selection principles that apply to exterior projects as well.
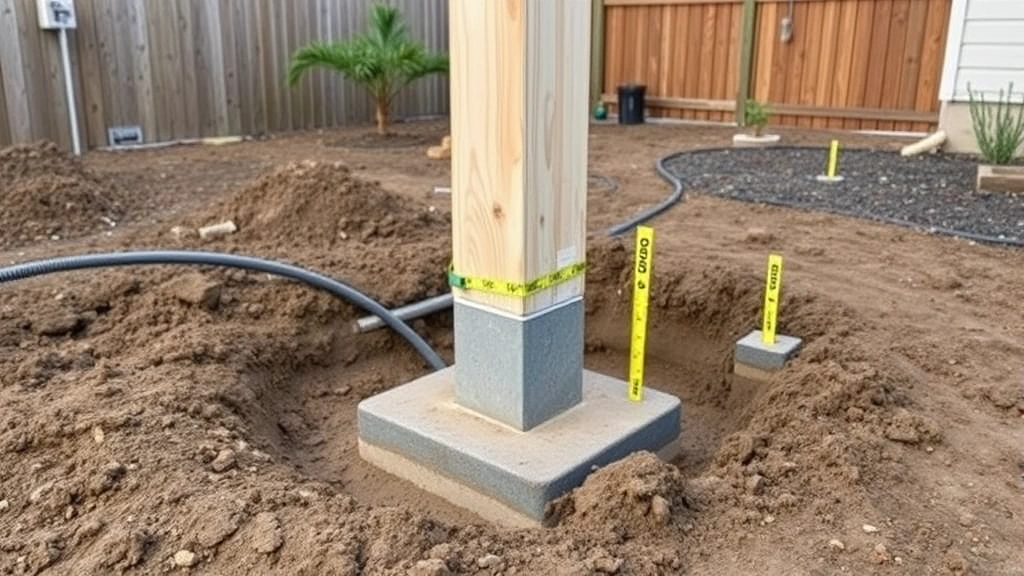
Foundation and Post Installation
Proper post installation is absolutely foundational—literally. Posts must rest on frost-protected footings below Nashville’s frost line, typically 3-4 feet deep depending on your specific location. Shallow footings heave in winter, causing structural failure and railing problems. Use concrete footings with adjustable post bases that allow for minor height adjustments.
Dig holes using a power auger if possible—digging by hand is exhausting and often produces inconsistent depths. Set concrete footings in holes, ensuring they’re level. Allow concrete to cure for 48 hours before installing posts. Use 4×4 posts for standard residential decks, ensuring posts are perfectly vertical. Check with a 4-foot level on two adjacent sides. Posts that aren’t plumb will cause railing and structural issues down the road.
Space posts according to your joist span and load calculations. Standard residential decks typically have posts 6 feet apart, but verify with your building inspector and local code. Posts must be adequately secured to footings and beams using bolts or post bases—never rely on nails alone. The connection between posts and beams is critical for lateral stability, especially important in Nashville where occasional high winds occur.
Connect posts to beams using bolted connections or structural post bases. These connections must resist uplift forces from wind and downward loads from the deck and snow. Most Nashville decks use doubled 2×10 or 2×12 beams bolted securely to posts. Ensure beams are level before fastening—use shims if necessary. An unlevel beam creates cascading problems throughout the rest of your deck.
Framing Your Deck Structure
Joists are the horizontal frame members supporting your decking boards. Joist spacing typically ranges from 12 to 16 inches on center, depending on decking material and span. Pressure-treated 2×8 joists work for most Nashville residential decks with typical 12-foot spans. Longer spans require larger joists—consult span tables provided by lumber suppliers or the American Wood Council.
Install joists perpendicular to your beam, fastening with galvanized bolts or structural fasteners. Spacing joists exactly 16 inches on center simplifies layout and decking installation. Use a spacer block to maintain consistent spacing as you install joists. Install rim joists (outer joists) around the deck perimeter, creating a box frame that’s square and level.
Check that your entire frame is level before proceeding to decking. Use a long level or laser level to verify. Slight slopes can be corrected with shims under posts, but substantial slopes indicate foundation problems. Nashville’s clay soil can shift, so occasionally existing decks show settling. This is usually correctable with careful shimming and adjustment.
If you’re building a deck near your home and connecting it with a ledger board, ensure proper flashing and fastening. The ledger board connection is where most water damage occurs. Use ICC-approved flashing materials and space fasteners 16 inches apart into your home’s rim band. This prevents water from running behind the ledger and into your home’s band board—a common source of rot and insect damage.
Decking Installation Best Practices
Decking boards are the visible surface of your project and deserve careful attention. Space boards approximately 1/8 inch apart to allow for thermal expansion and water drainage. Boards expand and contract with temperature and moisture changes; inadequate spacing causes warping and buckling. In Nashville’s humid climate, this spacing is especially important.
Lay out boards before fastening to ensure symmetrical appearance. Avoid ending with a narrow board at the deck edge—this looks awkward and is prone to splitting. Adjust your starting point to ensure the final board is at least 3-4 inches wide. Mark joist locations on the underside of each board before installation to ensure accurate fastening.
Use two stainless steel screws per joist or galvanized deck screws rated for ground contact. Screws are superior to nails for decking installation because they resist withdrawal and prevent squeaking. Drive screws slightly below the board surface (about 1/8 inch), but not so deep that you break the wood surface. Broken surfaces allow water infiltration and accelerate decay.
Install boards perpendicular to joists running parallel to your home. This is the standard and most attractive arrangement. For diagonal or herringbone patterns, ensure your joist spacing and sizing supports the increased complexity and load distribution. Diagonal patterns require additional framing support and are best attempted by experienced builders.
As you work, periodically check that boards are straight and square. Crooked starting boards compound errors across the entire deck. Use a chalk line to mark straight reference lines if needed. Take breaks to stand back and assess your progress—you want a professional appearance when complete.
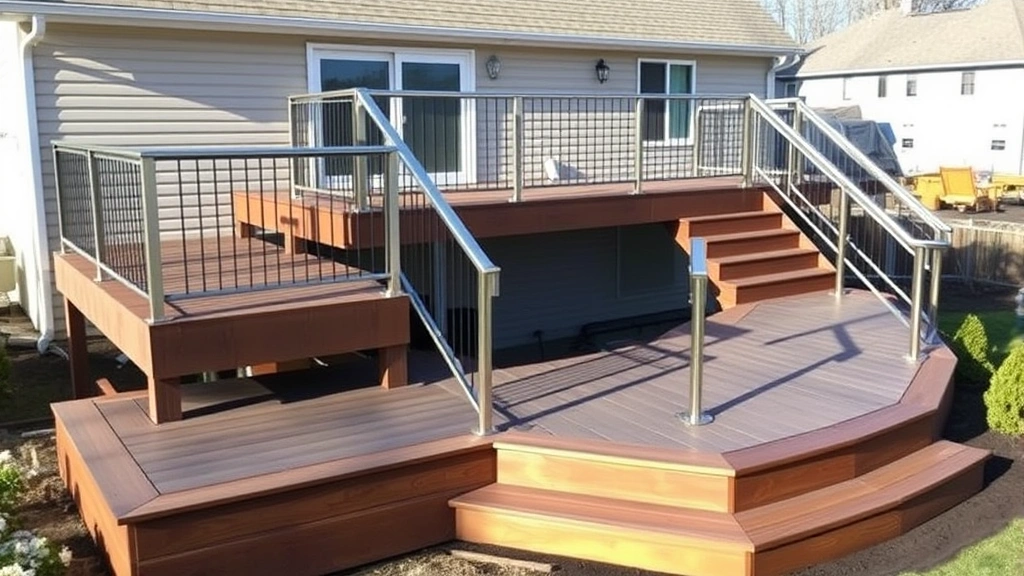
Railings and Safety Compliance
Railings are required for decks elevated more than 30 inches above grade. Nashville code requires railings to be at least 36 inches high (measured from the deck surface to the top rail) and capable of withstanding 200 pounds of horizontal force without failing. This is a safety requirement, not a suggestion—properly installed railings prevent falls and injuries.
Balusters (the vertical pieces between rails) must be spaced no more than 4 inches apart. This prevents children from getting their heads stuck and is mandatory under current building codes. Space balusters consistently for professional appearance. Use galvanized bolts or structural screws to attach railings to deck posts and framing.
Railing design offers creative opportunities. Popular options include wood balusters (classic and attractive), metal balusters (modern and durable), or cable railing (contemporary and unobstructed views). Whatever style you choose, ensure it meets local code requirements for height, spacing, and load capacity. Your building inspector will verify railing compliance during final inspection.
Stairs require similar attention to code. Stair treads must be at least 10 inches deep, risers no more than 7.75 inches high, and stairs must have handrails if there are more than three steps. Handrails must be 34-38 inches high and capable of supporting 200 pounds of force. Stair stringers must be properly supported and fastened to prevent movement.
For additional outdoor construction guidance, explore our comprehensive resources on home security and exterior finishing techniques that complement deck projects.
Finishing and Maintenance
After construction is complete, let your deck weather for 3-6 months before applying finish. This allows the wood to stabilize and accept stain or sealant more effectively. Pressure-treated lumber weathers to gray if left untreated, which is acceptable but not particularly attractive. Most Nashville homeowners prefer staining their decks for appearance and protection.
Choose stain and sealant products specifically rated for exterior wood and Nashville’s climate. Semi-transparent stains show wood grain while providing protection, while solid stains provide more coverage and uniform color. Apply stain following manufacturer instructions, typically requiring two coats with 24-48 hours drying between coats. Weather conditions matter—avoid applying stain if rain is forecast or temperatures are below 50°F.
Maintenance is ongoing but manageable. Sweep your deck regularly to prevent debris accumulation. Pressure wash annually at low pressure (under 1500 PSI) to remove dirt and mildew. Reapply stain every 2-3 years depending on sun exposure and traffic. Composite decking requires less maintenance but still needs occasional cleaning.
Inspect your deck annually for signs of damage: cracked boards, loose fasteners, soft spots indicating rot, or separation at connections. Address problems promptly—small issues become expensive if ignored. Replace damaged boards before they affect adjacent structure. Check that flashing around ledger boards remains intact and sealed.
If you’re expanding your home improvement skills, our guide on beginner woodworking projects provides excellent foundation skills that enhance deck building capabilities. Additionally, understanding DIY best practices across various projects improves your overall construction competency.
FAQ
How far is Nashville from Memphis, Tennessee?
Nashville and Memphis are approximately 210 miles apart, roughly a 3.5-hour drive via I-40 West. While this distance question seems unrelated to deck building, many Nashville area residents work in or travel to Memphis regularly and may be planning outdoor projects for vacation homes or rental properties in either location. Building codes differ slightly between cities, so verify specific requirements for your project location.
What’s the best wood species for Nashville decks?
Pressure-treated Southern pine is the most economical choice and performs well in Nashville’s climate. Cedar and redwood offer natural rot resistance but cost significantly more. Composite materials provide the lowest maintenance but require higher upfront investment. Many Nashville carpenters recommend pressure-treated joists with composite decking for the best balance of durability and maintenance.
Do I really need a permit for my deck?
Yes. Building permits exist to protect your safety and property value. Unpermitted decks complicate insurance claims, create problems during home sales, and may be deemed non-compliant by future inspectors. The permit fee is modest compared to potential problems. Plus, working with an inspector provides valuable guidance that prevents costly mistakes.
How deep do deck posts need to be in Nashville?
Nashville’s frost line is approximately 3-4 feet deep. Posts must rest on concrete footings below this depth to prevent frost heave during winter freeze-thaw cycles. Shallow footings are the primary cause of deck failure in cold climates. Always dig deep enough—the extra effort during construction prevents expensive repairs later.
Can I attach my deck directly to my home without flashing?
Absolutely not. Improper ledger board installation causes water infiltration, rot, and structural failure of your home’s rim board. Use approved flashing materials and space fasteners 16 inches apart into your home’s band board. This is one area where cutting corners causes serious, expensive damage.
How much weight can my deck support?
Residential decks must support 40 pounds per square foot of live load (people and furniture) plus 10 pounds per square foot of dead load (the deck itself). This determines post spacing and joist sizing. Consult span tables from lumber suppliers or the American Wood Council to ensure your design supports required loads.
What fasteners should I use for deck construction?
Use stainless steel or galvanized fasteners throughout. Regular steel fasteners rust in Nashville’s humid climate, leaving stains and weakening connections. Stainless steel is superior but more expensive. For structural connections (bolts, lag bolts), galvanized is acceptable. For decking screws and fasteners exposed to weather, stainless steel is worth the investment.
How often should I restain my deck?
Reapply stain every 2-3 years depending on sun exposure and traffic. Heavily shaded decks may last 4 years between applications, while sun-exposed decks need attention more frequently. Monitor your deck’s appearance—when it starts looking faded or gray, it’s time to restain. Regular maintenance extends deck life significantly.


