DIY Shed Roof? Expert Tips for Perfect Pitch
Building a shed from scratch or replacing an aging roof requires precision, planning, and a solid understanding of roofing fundamentals. The pitch of your roof—the angle at which it slopes—is one of the most critical decisions you’ll make in shed construction. A properly pitched roof ensures water drainage, structural integrity, and longevity. Whether you’re a seasoned DIY enthusiast or tackling your first shed project, mastering roof pitch will set the foundation for a successful build.
The difference between a roof that lasts decades and one that fails prematurely often comes down to getting the pitch right. Too shallow, and water pools on the surface, leading to leaks and rot. Too steep, and you’re wasting materials while creating safety hazards during installation. This comprehensive guide walks you through everything you need to know about calculating, building, and installing a shed roof with the perfect pitch.
Understanding Roof Pitch and Why It Matters
Roof pitch is expressed as a ratio of vertical rise to horizontal run, typically written as X:12, where 12 represents one foot of horizontal distance. For example, a 6:12 pitch means the roof rises 6 inches for every 12 inches of horizontal span. This simple ratio becomes your north star throughout the entire construction process.
The pitch directly impacts several critical factors in shed design. Water drainage is the primary concern—inadequate pitch allows standing water, which accelerates deterioration of roofing materials and promotes mold and rot in the structure below. Structural load capacity also depends on pitch; steeper roofs shed snow and ice more effectively, reducing weight accumulation in heavy snow regions. Additionally, pitch affects material costs, labor difficulty, and aesthetic appeal. A well-designed structure considers pitch as a foundational element from planning through completion.
According to the International Building Code (ICC), minimum roof pitch requirements vary by roofing material and climate zone. Asphalt shingles typically require a minimum 4:12 pitch, while metal roofing can function at steeper or shallower angles depending on installation method. Understanding these codes protects both your safety and your investment.
Calculating the Right Pitch for Your Shed
Determining the ideal pitch for your specific shed involves considering climate, materials, and intended use. Start by measuring your shed’s width—this is your total run. If your shed is 12 feet wide, the run is 6 feet from the center ridge to the edge (half the width). Multiply this run by your desired pitch ratio to find the rise.
For a 12-foot-wide shed with a 6:12 pitch: 6 feet × (6÷12) = 3 feet of rise. This means your ridge board sits 3 feet higher than the wall plates. Use a speed square or calculate using the Pythagorean theorem to determine rafter length. With a 3-foot rise and 6-foot run, rafter length equals √(3² + 6²) = √45 ≈ 6.7 feet.
Climate significantly influences pitch selection. In regions receiving heavy snow, such as the Northeast or Mountain West, steeper pitches (8:12 to 12:12) are essential for snow shedding. Coastal areas with high winds may benefit from moderate pitches (6:12 to 8:12) that reduce wind resistance. In dry climates with minimal precipitation, shallower pitches (4:12 to 5:12) are acceptable and reduce material costs. Consult the National Roofing Contractors Association (NRCA) for climate-specific recommendations in your area.
Budget and accessibility matter too. Steeper pitches require more materials, specialized equipment like roof jacks, and increased safety precautions. If this is your first roofing project, starting with a moderate 5:12 to 6:12 pitch offers a balance between performance and manageable installation difficulty.
Materials and Tools You’ll Need
Successful shed roof construction demands quality materials and appropriate tools. For framing, acquire pressure-treated lumber for trusses and rafters, rated for your climate zone. Choose 2×6 or 2×8 lumber depending on rafter spacing and snow load calculations. You’ll also need ridge boards, collar ties, and gusset plates if building trusses from scratch.
Roofing material selection depends on budget and climate. Asphalt shingles offer affordability and ease of installation for DIY builders. Metal roofing provides superior longevity (40+ years) but requires specialized fastening knowledge. Cedar shakes deliver aesthetic appeal but demand regular maintenance. Underlayment, drip edge, flashing, and fasteners round out material lists. When planning your shed project, consider exploring beginner woodworking fundamentals if you’re new to structural work.
Essential tools include a circular saw or miter saw for cutting precise angles, a speed square for marking rafter cuts, a tape measure, level, and chalk line. A power drill and impact driver speed fastening. Safety equipment—harness, fall protection, and non-slip roof shoes—cannot be overlooked. Rent or purchase scaffolding or roof jacks for working at heights safely. A pneumatic nailer significantly speeds installation compared to hand-driving nails.
Building and Installing Roof Trusses
Trusses are pre-fabricated triangular frames that support the roof and distribute weight to the shed walls. Building your own trusses saves money compared to purchasing pre-made units, though precision is critical. Gather your 2×4 lumber, cut gusset plates from plywood, and prepare a flat work surface for assembly.
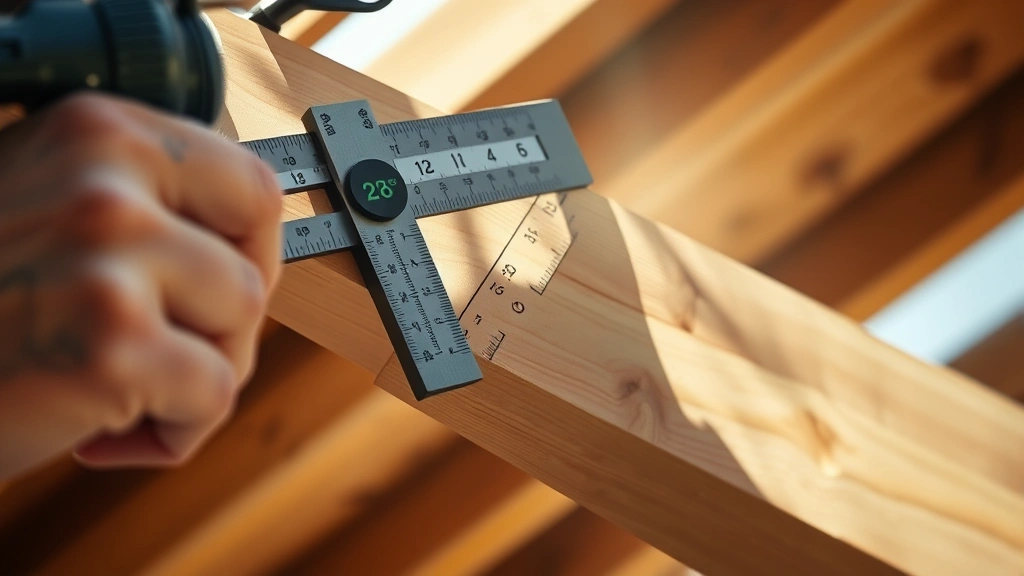
Cut your rafter pieces using a speed square to mark the precise angles at bird’s mouth notches (where rafters sit on wall plates) and at the ridge. For a 6:12 pitch, set your speed square’s pivot point at 6 on the blade and align with your board’s edge. This creates consistent 26.57-degree angles. Cut collar ties—horizontal members connecting opposite rafters—to prevent spreading and strengthen the structure.
Assemble trusses on the ground using gusset plates and galvanized nails or bolts. Gusset plates should be ½-inch plywood, extending at least 4 inches on each side of the joint. Use ring-shank nails or structural screws rated for your load requirements. Check the American Wood Council (AWC) for load tables specific to your lumber grade and spacing.
Once trusses are complete and cured, raise them onto the shed walls. Start with end trusses, bracing them temporarily with 2x4s until the entire structure is in place. Space trusses 16 or 24 inches on center, depending on snow load calculations and local building codes. Secure each truss to the wall plate with hurricane ties or structural fasteners designed to resist uplift forces during high winds.
Step-by-Step Installation Process
Step 1: Prepare the Shed Structure
Before roof work begins, ensure your shed walls are square, level, and properly braced. Install wall plates—pressure-treated 2×6 or 2×8 lumber—securely attached to the top of your walls. Wall plates distribute roof loads across the entire wall structure, preventing point loading.
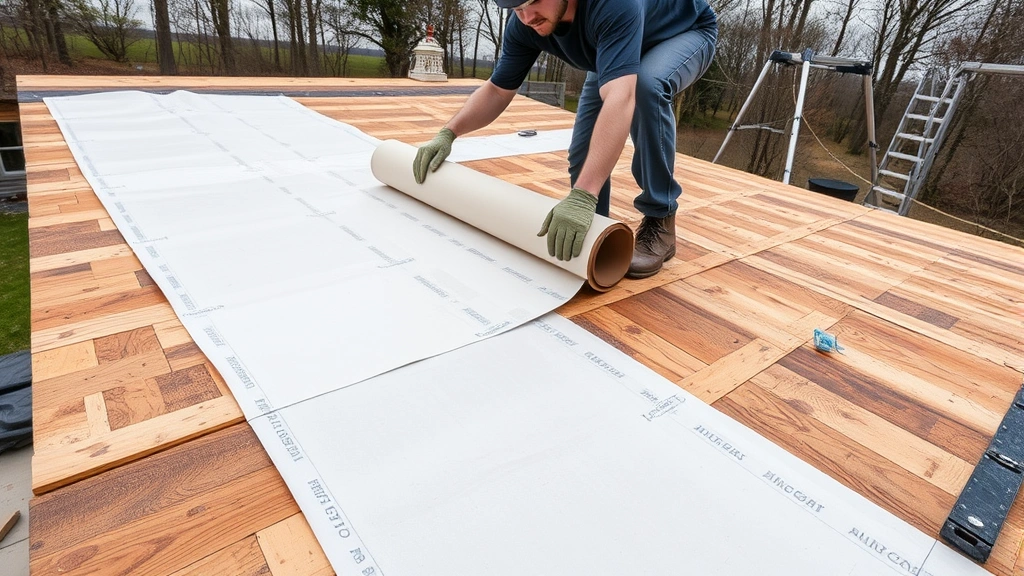
Step 2: Install Roof Underlayment
Once trusses are secured, install roofing underlayment directly over the roof decking. Synthetic underlayment (preferred over felt) resists moisture, provides slip resistance, and offers superior UV protection. Overlap courses by 4-6 inches, starting at the eaves and working toward the ridge. Secure with roofing nails or staples every 12 inches.
Step 3: Install Drip Edge and Flashing
Drip edge channels water away from fascia and prevents wind-driven rain from entering the structure. Install drip edge along the eaves first, then along the gables. Where the roof meets walls or penetrations (vents, chimneys), install flashing to redirect water. Use roofing cement and fasteners rated for your climate zone. This is particularly important if you’re also considering protecting your structure from weather-related damage.
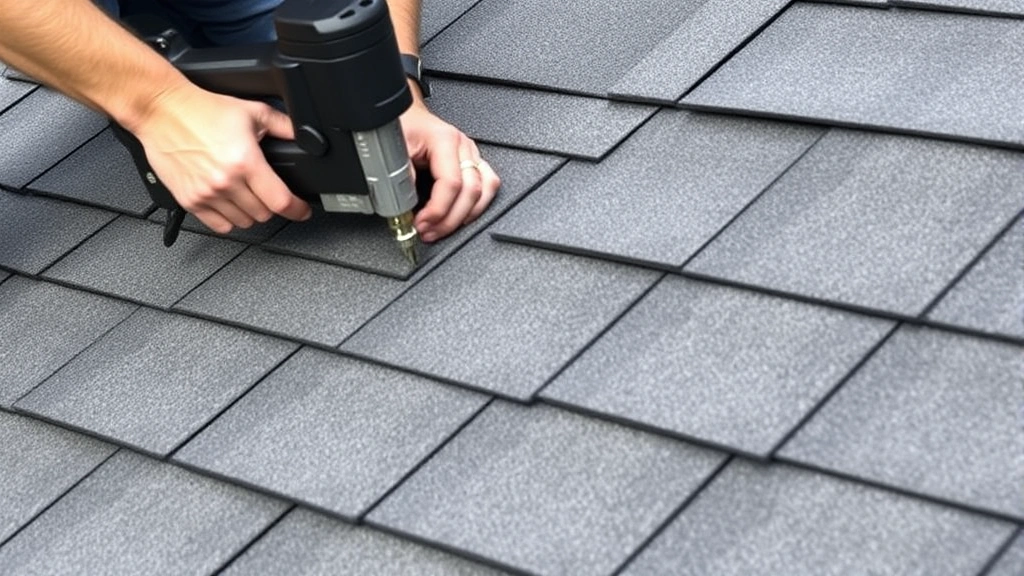
Step 4: Install Roofing Material
For asphalt shingles, start at the eaves with a starter course—a full shingle with the tabs cut off. Subsequent courses overlap the previous row by 5-6 inches. Nail through the nailing strip (marked on shingles) with four fasteners per shingle. Stagger shingle seams between rows to prevent water penetration. Work methodically from eaves to ridge, maintaining consistent overlap and alignment.
Step 5: Cap the Ridge
Ridge cap shingles seal the peak where roof planes meet. These are cut from standard shingles and installed perpendicular to the roof plane. Nail through both plies into the roof decking, ensuring fasteners penetrate at least 1 inch into the decking. Overlap ridge caps by 5-6 inches, with the final cap nailed on both ends to secure the previous cap.
Step 6: Install Ventilation
Proper attic ventilation prevents moisture accumulation and extends shingle life. Install soffit vents at the eaves and ridge vents along the peak. A general rule is 1 square foot of ventilation for every 150 square feet of attic space (or 1:300 if balanced intake and exhaust). This creates air circulation that removes heat and moisture.
Common Mistakes to Avoid
Undersized rafters are a frequent error. Builders sometimes use 2×4 lumber when 2×6 is required, compromising structural integrity. Always calculate snow loads and wind loads for your specific region. The American Society of Home Inspectors (ASHI) provides resources for load calculations.
Inadequate fastening causes shingles to lift in wind. Use the correct fastener type and quantity—never fewer than four nails per shingle. Improper fastener placement above or below the nailing strip reduces holding power. Invest in quality roofing nails with large heads and corrosion resistance.
Insufficient or blocked ventilation leads to premature shingle failure and moisture damage. Ensure vents aren’t blocked by insulation, and maintain the recommended ventilation ratio. Poor flashing installation allows water intrusion at critical junctures. Take time to properly overlap flashing and seal seams with roofing cement.
Skipping underlayment or using low-quality material invites water damage. Underlayment provides a second barrier against wind-driven rain and ice dams. Don’t cut corners here; the modest cost is negligible compared to repair expenses.
Working without proper fall protection is dangerous and potentially fatal. Always use a harness, rope, and anchor point when working at heights above 10 feet. Set up roof jacks for additional safety, especially on steep pitches. If you’re uncomfortable with heights, hire professionals for installation work.
Regional Weather Considerations
Your geographic location dramatically influences roof pitch selection and installation timing. In the Northeast and Upper Midwest, where snow loads exceed 50 pounds per square foot, pitches of 8:12 or steeper are essential. Heavy snow accumulation on shallow roofs can exceed design capacity, causing collapse. Install metal roofing or standing-seam systems in these regions for superior snow shedding.
Coastal regions face hurricane and tropical storm threats. Here, moderate pitches (6:12 to 8:12) combined with robust fastening (8-penny nails spaced 6 inches apart at edges) resist wind uplift. Consider architectural shingles with enhanced adhesive for improved wind resistance. Ensure all penetrations are properly sealed and flashed.
Southern regions with high heat and intense sun benefit from light-colored roofing materials that reflect heat and reduce cooling costs. Asphalt shingles may require UV-resistant formulations. Ensure adequate ventilation to prevent heat buildup in attic spaces, which can prematurely age roofing materials.
In dry Western regions, moisture is less critical, but wind speeds can be significant. Metal roofing performs exceptionally well in these environments, resisting wind damage and lasting 50+ years. Ensure proper fastening and consider wind-rated installation methods.
Schedule roofing work during favorable weather—avoid rain, extreme heat, or freezing temperatures. Asphalt shingles become brittle in cold and too pliable in extreme heat. Spring and fall typically offer ideal conditions. Plan projects to avoid winter weather if possible; if necessary, use cold-weather roofing cement and extend drying times.
FAQ
What’s the minimum roof pitch for a shed?
Most building codes require a minimum 4:12 pitch for asphalt shingles. However, 5:12 to 6:12 is preferable for reliable water drainage and easier snow shedding. Consult your local building department for specific requirements in your area, as codes vary by jurisdiction.
Can I install a roof alone, or do I need help?
While one person can theoretically complete a roof, it’s significantly safer and faster with a helper. One person can manage material handling and fastening, while another stabilizes materials and maintains safety. For steep pitches, having multiple people on site reduces injury risk.
How long does a DIY shed roof typically last?
Properly installed asphalt shingles last 15-25 years. Metal roofing lasts 40-70 years. Cedar shakes last 20-40 years but require regular maintenance. Longevity depends on pitch, ventilation, maintenance, and climate. A well-pitched roof with proper ventilation maximizes material lifespan.
Do I need building permits for shed roof installation?
Most jurisdictions require permits for shed construction and roof work. Permits ensure compliance with local building codes and safety standards. Skipping permits can result in fines and complications when selling property. Check with your local building department before starting work.
What’s the best roofing material for DIY installation?
Asphalt shingles are most DIY-friendly due to ease of installation and forgiving nature. Metal roofing requires specialized fastening knowledge but offers superior longevity. Cedar shakes demand precision and maintenance expertise. Start with asphalt shingles if you’re new to roofing.
How do I calculate snow load requirements?
Snow load varies by elevation and geographic location. The NRCA provides regional snow load maps. Multiply ground snow load (in pounds per square foot) by your roof’s slope factor (varies with pitch). Consult structural engineers or building officials if calculations exceed your comfort level.
Should I hire professionals for roof installation?
If you’re experienced with heights, comfortable with calculations, and have proper safety equipment, DIY installation is feasible. However, if you’re uncertain about any aspect—pitch calculations, structural loads, or working at heights—hiring professionals is worthwhile. A failed roof is expensive to repair and dangerous.
Can I add solar panels to a pitched roof?
Yes, solar panels work well on pitched roofs, particularly south-facing slopes. Ensure your roof structure can support additional weight (typically 3-4 pounds per square foot). Consult solar installers about pitch angles that optimize energy generation in your region. This is a great long-term investment for shed structures.
Mastering shed roof pitch and installation techniques empowers you to build structures that last decades while maintaining safety and functionality. Whether you’re constructing your first shed or replacing an aging roof, understanding pitch fundamentals, following building codes, and prioritizing safety ensures success. Take your time, double-check calculations, invest in quality materials, and don’t hesitate to seek professional guidance when needed. Your shed will reward you with years of reliable service.
Ready to tackle your next project? Explore our comprehensive guides on DIY home building, or learn about powering your outdoor structures. For structural projects requiring electrical work, understanding proper installation methods is essential.


