Build a Shed Roof? Carpenter’s Tips Inside
Building a shed roof is one of the most rewarding DIY projects you can tackle, whether you’re constructing a brand-new storage structure or replacing an aging roof on an existing shed. A properly built shed roof protects your tools, equipment, and materials from the elements while adding functional space to your property. Unlike complex residential roofing, shed roofs offer a more manageable learning curve, making them ideal for homeowners ready to expand their beginner woodworking and construction skills.
This comprehensive guide draws from professional carpentry practices to walk you through every stage of shed roof construction—from initial planning and material selection through final installation and weatherproofing. Whether you’re building a simple lean-to roof or a more complex gable design, understanding the fundamentals of roof framing, load calculations, and proper fastening techniques will ensure your shed roof stands strong for decades.
Understanding Shed Roof Types and Designs
The most common shed roof designs fall into three primary categories: lean-to, gable, and gambrel roofs. Each offers distinct advantages depending on your climate, aesthetic preferences, and intended shed use.
Lean-to roofs are the simplest option, sloping in a single direction from a higher wall to a lower wall. This design is excellent for small sheds, attached structures, and beginners because it requires minimal framing complexity. The single slope naturally sheds water and snow, though snow load accumulation can occur if the pitch is too shallow.
Gable roofs feature two sloping sides that meet at a peak, creating a triangular profile when viewed from the front or back. Gable designs offer superior water drainage, better snow shedding in northern climates, and can provide additional interior headroom or attic space. The peaked design also enhances curb appeal and blends well with residential aesthetics.
Gambrel roofs have two different slopes on each side—a steeper lower slope and a gentler upper slope. While gambrel roofs maximize interior space and deliver classic barn aesthetics, they’re more complex to frame and typically reserved for larger sheds or those with specific architectural goals.
Before committing to a design, check your local International Building Code (ICC) requirements. Many jurisdictions mandate minimum pitch angles, wind and snow load ratings, and fastening specifications for outdoor structures. Even small sheds may require permits in your area, so contact your local building department early in your planning process.
Materials and Tools You’ll Need
Selecting quality materials is fundamental to a durable shed roof. Your material choices depend on climate conditions, budget, and desired longevity.
Framing lumber typically includes pressure-treated 2×6, 2×8, or 2×10 rafters, depending on span and snow load. Pressure-treated lumber resists rot and insect damage—critical for outdoor structures exposed to moisture. For most residential sheds, 16-inch on-center rafter spacing suffices, though 12-inch spacing provides additional strength for heavy snow regions.
Sheathing options range from plywood (typically 1/2-inch or 5/8-inch) to oriented strand board (OSB). Exterior-grade plywood offers superior moisture resistance compared to interior-grade products. Many contractors prefer 5/8-inch thickness for better load distribution and reduced deflection.
Roofing materials include asphalt shingles (most common and affordable), metal roofing (durable and long-lasting), wood shakes (aesthetic but maintenance-intensive), or rubber membranes (excellent for flat roofs). Asphalt shingles typically last 15-25 years, while metal roofing can exceed 50 years with proper maintenance.
Underlayment and flashing are critical moisture barriers. Felt underlayment (15 or 30 lb) or synthetic underlayment prevents water infiltration beneath shingles. Aluminum or galvanized steel flashing protects roof edges, valleys, and penetrations.
Essential tools include a circular saw or miter saw for cutting rafters, a nail gun or hammer for fastening, a level for checking pitch accuracy, a chalk line for layout, a tape measure, a framing square, and safety equipment including harnesses, fall protection, and non-slip footwear. A pneumatic or cordless impact driver accelerates fastening work significantly.
Calculating Roof Pitch and Load Requirements
Roof pitch—the angle of slope—directly impacts water drainage, snow load capacity, and material compatibility. Pitch is expressed as rise-over-run, such as 4:12 (4 inches of vertical rise for every 12 inches of horizontal run).
Minimum pitch recommendations vary by roofing material. Asphalt shingles require at least a 4:12 pitch for proper water shedding. Metal roofing can perform at 3:12 or even lower pitches with appropriate underlayment. Flat roofs (0:12 to 2:12) require specialized membrane systems and excellent drainage design.
Climate significantly influences pitch selection. Northern regions with heavy snow loads benefit from steeper pitches (6:12 to 12:12 or higher) that encourage snow shedding. Southern regions with moderate rainfall can function well with 4:12 to 6:12 pitches. Coastal areas prone to high winds may require steeper pitches for improved wind resistance.
Calculating rafter length requires basic trigonometry or the Pythagorean theorem. For a 4:12 pitch over a 12-foot span (6-foot run from center to edge), use the formula: rafter length = √(run² + rise²). With a 6-foot run and 2-foot rise (4:12 pitch), the rafter length equals approximately 6.32 feet. Add overhang length (typically 12-24 inches) for your total rafter cut length.
Snow and wind load calculations are critical for structural safety. The American Society of Civil Engineers (ASCE) publishes load tables based on geographic location, elevation, and exposure category. Most residential sheds in moderate zones require design for 20-40 psf (pounds per square foot) snow load and 85-100 mph wind speeds. Your local building department can provide specific requirements for your address.
Framing the Roof Structure
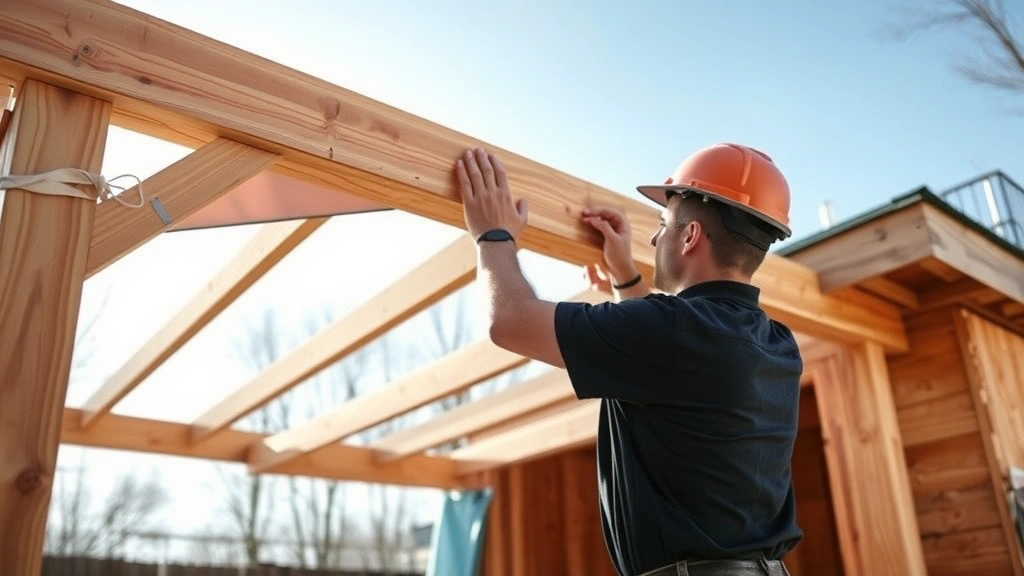
Proper roof framing ensures structural integrity and long service life. Begin by confirming your shed walls are square, level, and properly braced. Walls should be square within 1/2 inch across diagonals.
Rafter layout starts with marking rafter locations on the top plates of your shed walls. For 16-inch on-center spacing, mark at 0, 16, 32, 48 inches, and continue across the wall. Use a framing square to mark the bird’s mouth cut (the notch where rafters sit on the wall) and the ridge cut angle (where rafters meet at the peak).
Cut your first rafter as a template, then test-fit it before cutting remaining rafters. This approach catches errors early and saves material. When cutting multiple identical rafters, use a miter saw with a stop block for consistent length and angle.
Ridge board installation provides a central point where opposite rafters meet. For most sheds, a 2×8 or 2×10 ridge board suffices. Install the ridge board at the correct height to achieve your target pitch. Use temporary bracing to hold the ridge board level and plumb while installing rafters.
Rafter installation proceeds systematically from one end to the other. Secure each rafter with three 16d galvanized nails through the bird’s mouth into the top plate and two 16d nails through the rafter into the ridge board. Stagger nails to prevent splitting. For enhanced shear resistance in high-wind areas, use hurricane ties—metal connectors that bolt rafters to top plates.
Install collar ties (horizontal members connecting opposite rafters) every third or fourth rafter pair, approximately one-third down from the ridge. Collar ties resist rafter thrust and improve overall structural stability.
Overhang framing extends rafters beyond the shed walls to create eaves. Standard overhang lengths range from 12 to 24 inches. Install lookouts (horizontal framing members) perpendicular to rafters every 16 inches on center to support the overhang and provide nailing for soffit materials. Fascia boards attach to rafter ends, creating a finished appearance while protecting exposed rafter ends from weather.
Installing Sheathing and Underlayment
Roof sheathing creates a solid base for roofing materials and distributes loads across rafters. After framing is complete and braced, install sheathing panels perpendicular to rafters, starting at the eaves and working toward the ridge.
Sheathing fastening requires 8d galvanized nails spaced 6 inches apart along rafters and 12 inches apart at intermediate supports. Space panels 1/8 inch apart to allow for wood expansion in humid conditions. Stagger panel end joints—avoid having joints align across multiple rows.
For enhanced wind resistance, particularly in coastal or high-wind zones, use NFPA 160 rated fastening specifications, which may require closer nail spacing or structural screws instead of nails.
Once sheathing is complete, install underlayment—a moisture-protective layer between sheathing and roofing material. Felt underlayment (15 or 30 lb) is traditional and affordable but absorbs moisture. Synthetic underlayment offers superior moisture resistance, better grip for workers, and improved UV durability. Install underlayment horizontally, starting at the eaves and overlapping each course by 6 inches. Fasten with staples or roofing nails every 12-16 inches.
Install drip edge along eaves and gables before underlayment along eaves, but after underlayment along gables. Drip edge directs water away from fascia boards and prevents moisture intrusion at edges.
Applying Roofing Materials
Your choice of roofing material significantly impacts durability, maintenance requirements, and aesthetic appeal. Each option involves specific installation techniques.
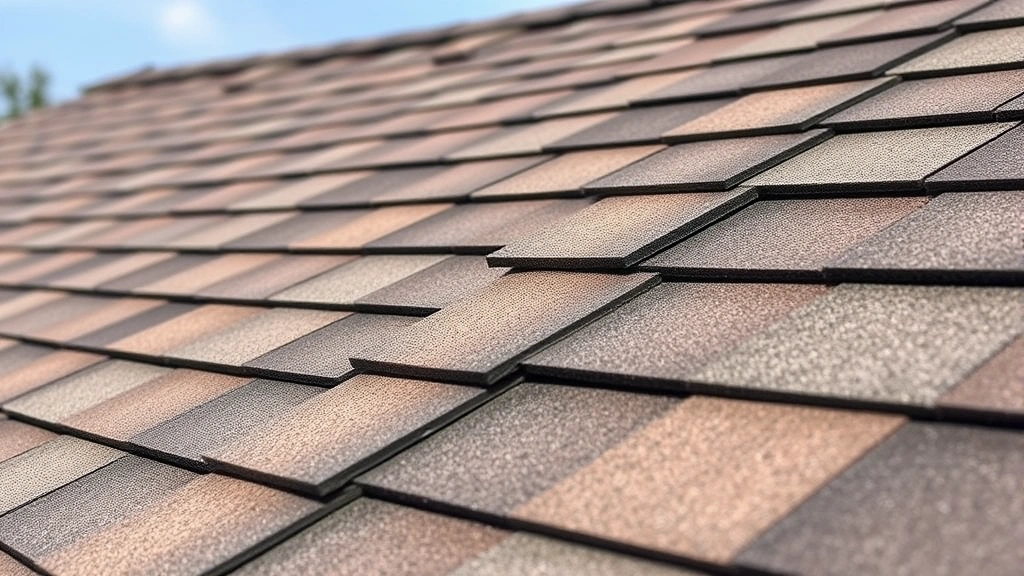
Asphalt shingles remain the most popular choice for shed roofs due to affordability and straightforward installation. Begin at the eaves with a starter course of shingles installed upside down (adhesive strip facing up). This ensures water flows properly over the first course of regular shingles.
Install subsequent courses with 5-inch exposure (overlap), meaning each shingle covers 7 inches of the course below. Offset shingle joints by 6 inches between rows to prevent water channels from forming along joints. Secure shingles with four galvanized roofing nails per shingle, placed 5/8 inch above the adhesive strip. Avoid over-driving nails—they should just dimple the shingle without tearing the mat.
Metal roofing offers exceptional longevity and weather performance. Standing seam metal roofing requires specialized tools and skills, so most DIYers opt for metal shingles or panels that install similarly to asphalt shingles. Use fasteners specifically designed for metal roofing—typically self-sealing screws with rubber washers. Space fasteners per manufacturer specifications, typically 12-16 inches on center through panel ribs.
Ridge cap installation completes the roofing system. Ridge caps are shingles specifically designed for peaks. Install them with 6-inch exposure, starting at one end and working toward the opposite end. Fasten each ridge cap with two nails on each side of the ridge.
Flashing at valleys, penetrations, and edges prevents water intrusion at vulnerable points. Install valley flashing before shingles, ensuring at least 6 inches of flashing extends onto each roof slope. Weave shingles into valley flashing, or install shingles first and lap flashing over them, depending on your chosen method. Seal flashing edges with roofing cement.
Ventilation and Drainage Solutions
Proper ventilation extends roof life by reducing heat and moisture buildup in the attic or rafter cavity. Even uninsulated sheds benefit from ventilation that prevents ice damming and reduces condensation.
Soffit and ridge vents create continuous airflow from eaves to peak. Perforated aluminum or vinyl soffits install beneath overhangs, allowing air intake. Aluminum ridge vents install along the peak, providing exhaust. This balanced ventilation strategy prevents moisture accumulation and reduces temperature extremes.
For sheds without attic space, rafter vents (foam baffles) maintain airflow between insulation and sheathing if you plan future insulation upgrades.
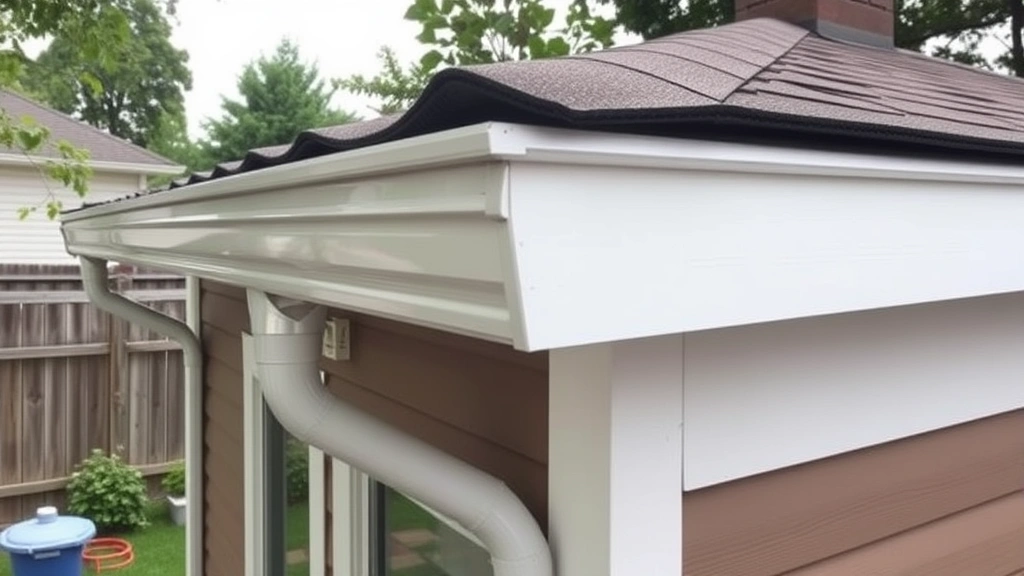
Gutter and downspout systems direct water away from shed foundations and landscaping. Install gutters with a 1/4-inch slope per 10 feet of run, sloping toward downspouts. Downspouts should discharge water at least 4-6 feet away from the shed foundation. In areas with heavy rainfall, consider larger-capacity gutters (6-inch K-style gutters handle more volume than standard 5-inch gutters).
Install gutter guards or screens to minimize debris accumulation and reduce maintenance requirements. Leaf guards are particularly valuable in tree-shaded areas.
Final Details and Maintenance
Completing your shed roof involves finishing touches and establishing maintenance routines that preserve your investment.
Soffit, fascia, and trim work provide weather protection and finished appearance. Install soffit panels beneath overhangs, securing them with trim molding. Fascia boards attach to rafter ends, protecting wood from weather exposure. Paint or stain all wood trim with exterior-grade finishes that resist UV damage and moisture.
Consider these finish recommendations from wood industry associations for optimal protection. Quality exterior paint or stain applied every 3-5 years extends trim life significantly.
Maintenance schedules ensure long roof life. Inspect your shed roof annually, particularly after severe weather events. Look for missing, cracked, or curled shingles; damaged flashing; or debris accumulation. Clean gutters twice yearly—spring and fall—to prevent water backup. Trim tree branches overhanging the roof to reduce debris and improve air circulation.
For asphalt shingles, expect gradual granule loss over time—this is normal. However, excessive granule loss in gutters or significant bald spots indicate premature aging, possibly due to poor ventilation or inadequate underlayment. Address these issues before they compromise the roof.
Repairs and replacements are straightforward for most shed roofing systems. Individual shingles can be replaced by removing fasteners, sliding out the damaged shingle, and installing a new one. Metal shingles can be similarly replaced. Flashing repairs typically involve cleaning damaged areas, applying roofing cement, and installing new flashing over existing flashing.
Plan for eventual roof replacement. Asphalt shingles typically last 15-25 years depending on climate and maintenance. Metal roofing lasts 40-70 years. Budget for replacement before your roof reaches end-of-life to avoid emergency repairs or water damage.
For additional guidance on construction techniques and safety, consult National Association of Home Builders (NAHB) resources and your local building department. Many communities offer free inspections during construction, providing professional feedback on your work.
FAQ
What’s the minimum roof pitch for a shed?
The minimum pitch depends on roofing material. Asphalt shingles require at least 4:12 pitch for proper water drainage. Metal roofing can function at 3:12 pitch with appropriate underlayment. Flat or very low-slope roofs require specialized membrane systems. Check local building codes for your area’s specific requirements.
Do I need a permit to build a shed roof?
Most jurisdictions require permits for any structure, including sheds. Even small sheds may require permits to verify compliance with setback requirements, wind/snow load design, and local zoning regulations. Contact your local building department before starting construction. Unpermitted work can create issues when selling your property and may violate homeowner’s insurance coverage.
How often should I inspect my shed roof?
Inspect your shed roof annually, ideally in spring after winter weather and fall before harsh conditions arrive. After severe storms, check for damage immediately. Look for missing or damaged shingles, flashing separation, debris accumulation, and gutter function. Address minor issues promptly to prevent major damage.
Can I install a new roof over an existing one?
Many jurisdictions allow one layer of roofing over existing shingles, but re-roofing over old material can mask underlying problems. Removal of old roofing provides opportunity to inspect and repair sheathing and underlayment. Most building codes limit total roof layers to two, so if your shed already has multiple layers, removal is necessary.
What’s the best roofing material for a long-lasting shed roof?
Metal roofing offers the longest lifespan—40-70 years with minimal maintenance. Asphalt shingles last 15-25 years and require more frequent maintenance. Wood shakes offer aesthetic appeal but need regular treatment and maintenance. Consider your climate, budget, and long-term maintenance commitment when selecting materials. Metal roofing costs more initially but offers superior value over decades.
How do I prevent ice damming on my shed roof?
Ice dams form when snow melts, runs down the roof, and refreezes at eaves where temperatures are below freezing. Prevent ice dams by ensuring adequate ventilation (soffit and ridge vents), proper insulation if the shed is heated, and unobstructed gutters. In severe climates, consider heated cables along eaves as a temporary solution while addressing underlying ventilation issues.


