How to Build a Deck: Expert Tips Included
Building a deck transforms your outdoor space into a functional entertainment area while adding significant value to your home. Whether you’re a seasoned DIY enthusiast or tackling your first major project, constructing a deck requires careful planning, proper materials, and attention to safety and local building codes. This comprehensive guide walks you through every stage of deck construction, from initial design concepts to the final finishing touches.
A well-built deck not only enhances your property’s aesthetic appeal but also provides a durable outdoor living space for years to come. Success depends on understanding structural requirements, selecting appropriate materials, and following proven construction techniques. We’ll cover everything you need to know to complete this rewarding project confidently.
Planning and Design Considerations
Before purchasing a single board or tool, invest time in thorough planning. Your deck’s success begins with understanding your space, determining its purpose, and establishing realistic timelines and budgets. Consider how you’ll use the deck—will it serve as a dining area, hot tub platform, or relaxation space? This determines size, shape, and structural requirements.
Measure your yard carefully, noting existing trees, utilities, drainage patterns, and sun exposure. Take photographs from multiple angles to visualize how the deck integrates with your home’s architecture. Sketch preliminary designs, considering traffic flow from your home to the deck and beyond. Most residential decks range from 200 to 500 square feet, though custom designs vary significantly.
Height is another critical consideration. Ground-level decks (under 30 inches) have different railing requirements than elevated decks. Check local codes for height-specific regulations. Consider sight lines from your home—you’ll want pleasant views from interior windows. Also think about future access to utilities, HVAC units, or other home systems that might need maintenance.
Sketch your design on graph paper, including measurements, post locations, and joist spacing. This becomes your construction blueprint and helps you calculate material quantities accurately. Many homeowners find it helpful to create full-scale mockups using string and stakes to visualize the final footprint before committing to construction.
Materials and Tools You’ll Need
Selecting quality materials ensures your deck withstands weather exposure and heavy use. Pressure-treated lumber remains the most economical choice for structural components like posts, beams, and joists. Pressure-treated wood resists rot and insect damage when properly installed with adequate drainage. Alternatively, cedar and redwood offer natural rot resistance but cost considerably more.
For decking boards, you have several options: pressure-treated lumber, composite materials, or tropical hardwoods. Composite decking combines wood fibers and plastic, offering low maintenance and excellent durability, though at premium prices. Tropical hardwoods like ipe and cumaru provide superior longevity and aesthetic appeal but require specialized fastening techniques.
Essential materials include:
- Posts: 4×4 pressure-treated lumber for vertical support
- Beams: 2×8 or 2×10 pressure-treated lumber for primary support
- Joists: 2×6, 2×8, or 2×10 depending on span and spacing
- Decking boards: 2×6 or 2×8 boards spaced appropriately for drainage
- Fasteners: Corrosion-resistant deck screws or hot-dipped galvanized nails
- Hardware: Post bases, joist hangers, and lag bolts
- Concrete: For post footings (60-80 lb bags)
Required tools include a circular saw, drill-driver, level, tape measure, square, post-hole digger, and safety equipment. Consider renting specialized equipment like power augers for post holes or pneumatic nailers for faster installation. Invest in quality tools—they improve accuracy and reduce fatigue during extended work sessions.
Understanding Building Codes and Permits
Never skip the permit process, regardless of project size. Building permits exist to ensure structural safety and protect property values. Most jurisdictions require permits for decks exceeding 30 inches in height or covering more than 200 square feet. Contact your local International Code Council (ICC) office to understand specific requirements.
Building codes specify minimum requirements for post spacing (typically 6 feet maximum), joist sizing based on span and spacing, railing height (42 inches minimum), and load capacity (typically 40 pounds per square foot for residential decks). Codes also mandate proper stair construction with specific rise and run measurements, handrail dimensions, and baluster spacing to prevent child entrapment.
Frost depth requirements vary by location—posts must extend below the frost line to prevent heaving during freeze-thaw cycles. Northern regions may require 48-60 inch depths, while southern areas need minimal frost protection. Your local building department provides specific frost depth information for your area.
Deck construction relates to broader home improvement projects that often require permits. Understanding permit requirements upfront prevents costly corrections later. Submit your design drawings, material specifications, and construction timeline. Inspectors verify compliance at foundation, framing, and completion stages.
Site Preparation and Foundation
Proper site preparation determines your deck’s longevity. Clear the area of vegetation, rocks, and debris. Mark post locations using string lines and batter boards—temporary wooden frames that establish precise measurements. Double-check diagonal measurements; they should be equal if your layout is square.
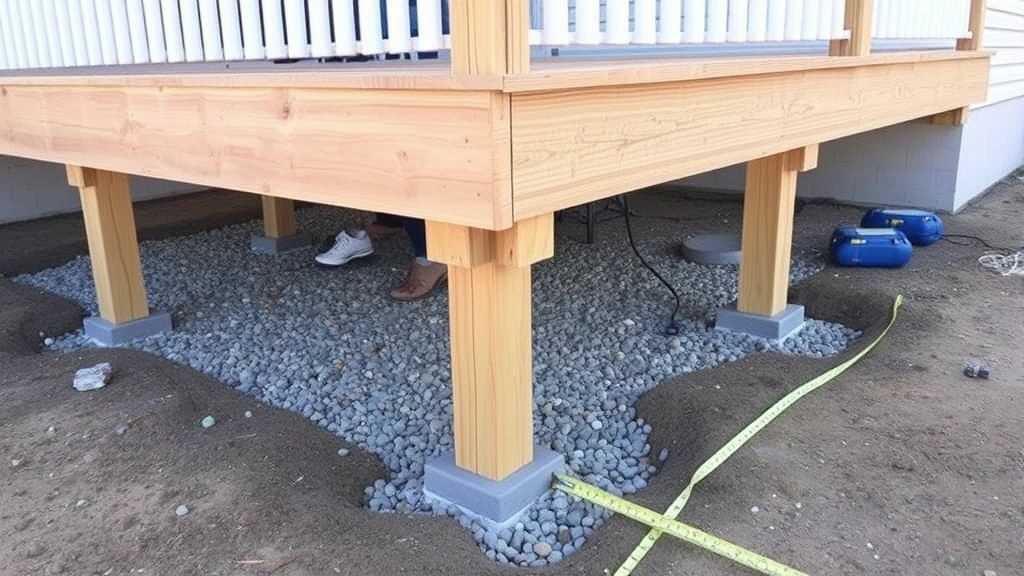
Excavate post holes to the required frost depth, typically 36-48 inches in northern climates. Holes should be 10-12 inches in diameter. Use a post-hole digger, power auger, or hire an excavation service for multiple holes. Remove soil to the frost line, then add 4-6 inches of gravel for drainage. Gravel prevents water from pooling around posts, which accelerates rot.
Install post bases (metal brackets that elevate posts above concrete) before pouring footings. These bases allow air circulation and prevent wood-to-ground contact. Mix concrete according to package directions and fill holes to ground level. Ensure posts remain plumb (perfectly vertical) during concrete curing—use temporary braces if necessary. Allow concrete to cure fully (typically 48 hours) before removing braces or loading posts.
Proper foundation work directly impacts the safety and durability of your entire structure. This foundational work parallels principles discussed in basement finishing projects, where moisture management and structural support are paramount. Inadequate footings cause settling, tilting, and structural failure over time.
Building the Frame and Joists
Once footings cure, install beams on top of posts. Beams span between posts and support joists running perpendicular to the house. Attach beams using bolts or lag screws, ensuring connections are secure and properly spaced. Use a level constantly during installation to maintain proper slope for water drainage (typically 1/8 inch per foot).
Attach the ledger board (the board connecting to your house) using lag bolts spaced 16 inches apart. Install flashing above the ledger to direct water away from your home’s foundation. This critical step prevents water damage to your house’s framing and foundation. Many deck failures result from improper ledger installation and water infiltration.
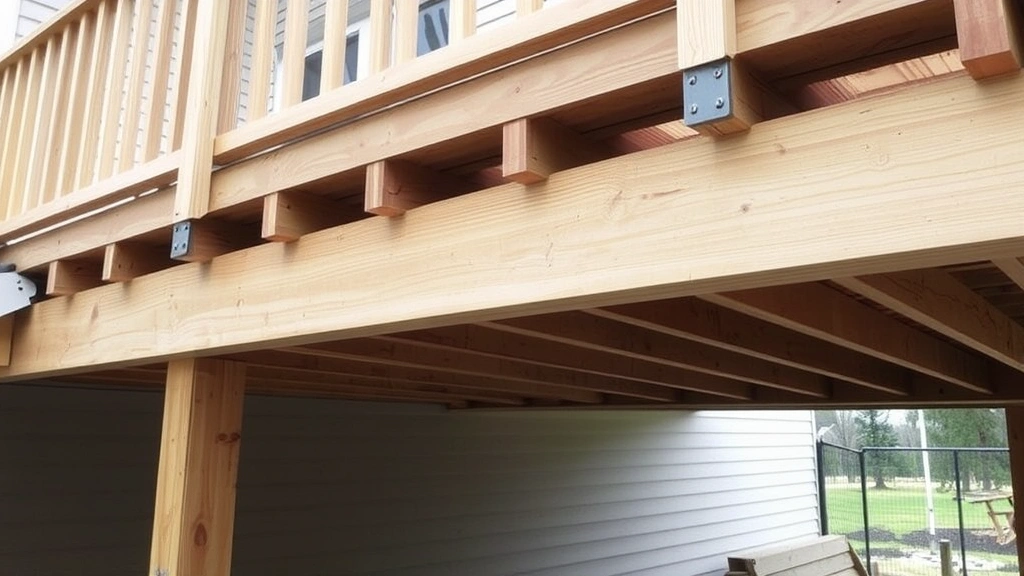
Install joists perpendicular to beams using joist hangers or by resting them on top of beams. Joist spacing typically ranges from 12 to 16 inches on center (measured from joist center to adjacent joist center). Closer spacing accommodates longer spans and heavier loads. Consult lumber grading standards to determine appropriate joist sizes for your span distances.
Ensure joists remain level and properly aligned. Brace joists diagonally to prevent lateral movement during installation. Install rim joists (end joists) along the deck perimeter, securing them to outer joists with bolts or screws. The framing creates the structural skeleton supporting everything above.
Installing Decking Boards
Decking boards create the walking surface and contribute to the deck’s aesthetic appeal. Start at the house side, leaving a 1/4-inch gap between the ledger board and the first decking board for water drainage and wood movement. This gap prevents water from being trapped between the house and deck surface.
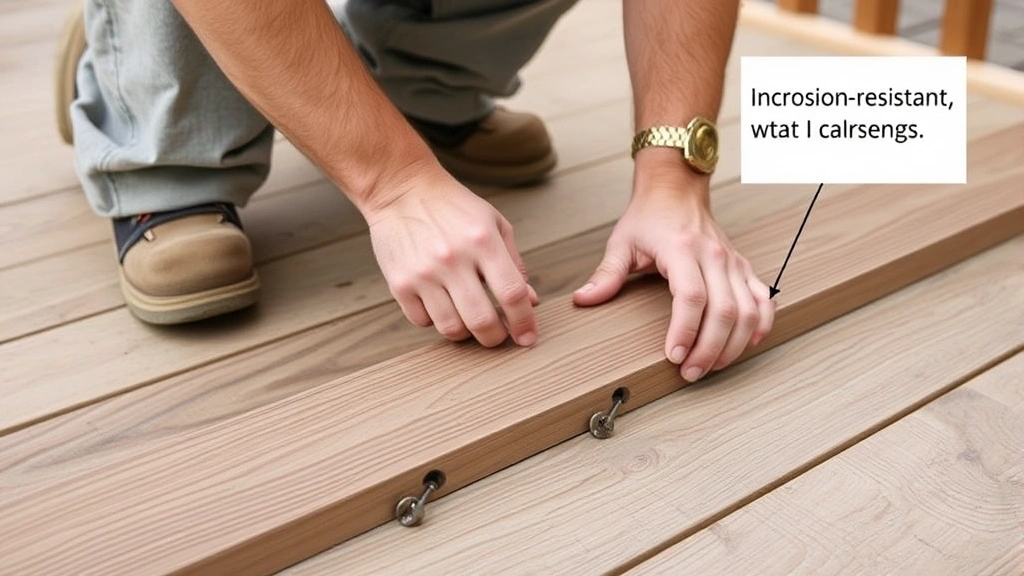
Install boards perpendicular to joists, fastening each board with two screws or nails per joist. Use corrosion-resistant fasteners; standard fasteners rust and stain the deck surface. Maintain consistent spacing between boards (typically 1/8 to 1/4 inch) for drainage and wood expansion. Stagger board joints across multiple joists rather than aligning them vertically—this distributes stress more effectively.
Pre-drill screw holes to prevent splitting, especially with hardwoods. Composite and tropical hardwoods require pilot holes; pressure-treated lumber is more forgiving but benefits from pre-drilling. Keep fasteners 1.5 inches from board edges to prevent splitting. Countersink fasteners slightly below the surface to prevent tripping hazards.
Trim board edges parallel to the house for a finished appearance. Circular saws work well for this task. Consider decorative patterns or contrasting board orientations for visual interest. The decking stage is where your deck transforms from functional structure to attractive outdoor living space. Proper board installation techniques resemble those discussed in flooring installation guides, where attention to spacing and fastening ensures longevity.
Adding Railings and Safety Features
Railings are required for decks exceeding 30 inches in height and must meet specific code requirements. Standard railing height is 42 inches measured from the deck surface. Railings must resist 200 pounds of horizontal force without failure—they’re not merely aesthetic features but critical safety components.
Vertical balusters (the spindles filling the space between rails) must be spaced no more than 4 inches apart to prevent child entrapment. This spacing is strictly enforced and prevents children from getting their heads stuck between balusters. Install balusters securely; they experience significant stress from people leaning against railings.
Stairs require specific dimensions: risers (vertical height between steps) typically measure 7-8 inches, while treads (horizontal step depth) measure 10-11 inches. All steps must be uniform; varying step heights create tripping hazards. Handrails are required on stairs with four or more steps, with 1.5-inch diameter tubing graspable by adults and children.
Install railings securely to the deck frame using bolts or lag screws. Never rely solely on fasteners driven into decking boards—these fail under stress. Railings must be strong enough to support an adult’s weight if they trip and catch themselves. This is non-negotiable for safety.
Consider adding deck lighting for safety and ambiance. Low-voltage LED lights mounted on railings or posts illuminate stairs and pathways. Solar lights offer convenient options without electrical wiring. Proper lighting prevents nighttime accidents and extends your deck’s usability into evening hours.
Finishing and Maintenance
Finishing protects your deck investment and enhances its appearance. Pressure-treated lumber should weather for 3-6 months before finishing to allow moisture content to stabilize. Premature finishing traps moisture inside the wood, causing finish failure and wood damage.
Choose between stains and sealers based on your aesthetic preferences and maintenance tolerance. Transparent stains showcase wood grain while providing UV protection. Solid stains offer more color options but hide wood characteristics. Sealers provide protection without color. Plan to reapply finish every 2-3 years depending on climate and product quality.
Composite decking requires minimal maintenance—occasional cleaning with mild soap and water suffices. Tropical hardwoods need periodic oiling to maintain appearance and protection. Pressure-treated lumber benefits from annual cleaning to remove mold and mildew growth. A stiff brush and mild bleach solution effectively clean most deck surfaces.
Regular maintenance extends deck life significantly. Inspect fasteners annually, tightening loose bolts and replacing corroded fasteners. Check for signs of rot, particularly around posts and where water collects. Remove debris from between boards and gutters to prevent water accumulation. Trim nearby tree branches to improve air circulation and reduce moisture retention.
Your deck maintenance schedule parallels exterior painting maintenance, where regular inspection and timely intervention prevent costly repairs. Address small problems before they become structural issues. A well-maintained deck provides decades of enjoyment and reliable performance.
Consider your deck as part of comprehensive woodworking and building projects. The skills and knowledge you develop building a deck transfer to other home improvement endeavors. Many successful DIY builders use deck construction as a launching point for increasingly ambitious projects.
Winter preparation is essential in cold climates. Remove snow and ice promptly to prevent accumulation damage. Ensure gutters and downspouts direct water away from the deck. In spring, inspect thoroughly for winter damage and address any issues before heavy use season begins.
FAQ
How long does a typical deck project take?
Most residential decks require 2-4 weeks from start to finish, depending on size, complexity, and weather. Ground-level decks proceed faster than elevated structures. Permit approval delays often extend timelines; factor in 1-2 weeks for permitting before construction begins.
What’s the best time of year to build a deck?
Spring and early fall offer ideal conditions—mild temperatures and lower humidity. Summer heat can be exhausting, while winter weather complicates concrete curing and makes working conditions difficult. Avoid wet periods when soil becomes muddy and difficult to work.
Can I build a deck without a permit?
Legally, no. Most jurisdictions require permits for decks over 30 inches high or 200 square feet. Unpermitted decks create liability issues, complicate insurance claims, and may require removal if discovered. Permits cost far less than correcting code violations later.
How much does a deck cost?
Budget $15-30 per square foot for pressure-treated decks, $25-50 for cedar, and $40+ for composite materials. A 400-square-foot pressure-treated deck costs roughly $6,000-12,000 including materials and tools. Hiring contractors increases costs significantly.
What’s the best decking material?
This depends on budget and maintenance tolerance. Pressure-treated lumber is economical but requires regular maintenance. Composite offers low maintenance and longevity. Tropical hardwoods provide superior aesthetics and durability but cost significantly more. Consider your climate, budget, and maintenance preferences.
How do I prevent deck rot?
Install proper footings below the frost line, use post bases to elevate wood above ground, maintain 1/4-inch gaps between boards for drainage, install flashing to direct water away, and apply protective finishes annually. Good drainage is the most critical factor.
What load capacity should my deck support?
Residential decks typically support 40 pounds per square foot. This allows reasonable crowding during gatherings but doesn’t accommodate hot tubs or other concentrated loads. Hot tubs require reinforced framing designed specifically for their weight.


