Table of Contents
Introduction
Want to install blinds yourself? You’re in for a treat. There’s something incredibly satisfying about measuring, mounting, and adjusting window treatments that fit your space perfectly—all without paying someone else to do it. Whether you’re already handy around the house or just getting started with DIY projects, we’re going to walk through every step together so you feel confident tackling this project.
DIY projects are having a moment, and for good reason. People want to save money, learn new skills, and make their homes truly their own. Blinds installation hits that sweet spot—it’s totally doable but makes a real impact. If you’ve done other home projects like DIY flooring installation, you already know the drill: measure twice, cut once, and take your time with the mounting. These skills transfer beautifully to hanging blinds.
Maybe you’re more of an outdoor project person? Things like DIY pallet projects actually share a lot with blinds installation. Both require planning, patience, and that attention to detail that separates “good enough” from “looks professional.” Plus, there’s that same satisfaction of creating something functional and beautiful with your own hands.
Once you’ve mastered blinds, you might find yourself eyeing bigger projects like vinyl siding installation or hardwood floor refinishing. They all build on the same foundation: careful measuring, proper prep work, and securing everything so it lasts. Each project teaches you something new about working with different materials and tools.
What You’ll Learn in This Guide
We’re going to cover everything you need to install blinds like a pro. No guesswork, no “figure it out as you go”—just straightforward steps that actually work.
- Essential Tools and Materials: The must-have tools (drill, level, measuring tape) and the right mounting hardware to keep everything secure and looking sharp.
- Accurate Measuring Techniques: How to measure your windows correctly for inside or outside mounts so your blinds fit just right—no awkward gaps or overlaps.
- Step-by-Step Installation Process: The actual installation from start to finish: drilling, mounting brackets, hanging the blinds, and making sure everything works smoothly.
- Troubleshooting and Maintenance: Common mistakes (like crooked brackets—been there!) and how to avoid them, plus keeping your blinds looking good for years.
By the time we’re done, you’ll have custom-fitted blinds that give you exactly the privacy, light control, and style you want.
Up next, we’ll talk about getting your tools and materials ready. Trust me—having everything you need before you start makes this so much easier. We’ll also look at different mounting options so you can pick what works best for your windows and your style. And if you’re getting bitten by the DIY bug, you might enjoy our guide on DIY car repairs—another great way to build confidence handling practical projects yourself.
Ready to take control of your windows? Let’s dive in and get those blinds installed!
So you’re ready to install blinds yourself? Smart move. Not only will you save some serious cash, but there’s something satisfying about customizing your space exactly how you want it. Plus, let’s be honest—you’ll know it’s done right because you did it yourself. This walkthrough will get you from “where do I even start?” to hanging blinds like you’ve been doing it for years. We’ll cover everything: the tools you actually need (no fancy gadgets required), the step-by-step process, and those little gotchas that can trip you up if you’re not prepared.
Essential Tools and Materials for DIY Blinds Installation
Here’s the thing about DIY projects—having the right stuff ready makes all the difference. Nothing kills momentum like realizing halfway through that you need a specific drill bit. For most blinds (whether you’re going with Venetian, roller, or vertical), you’ll need some basic tools: a drill with the right bits, a measuring tape that actually works, a screwdriver, and a level. These aren’t exotic tools—you probably have most of them already. The key is making sure everything’s working before you start. Want to see how proper tool prep can make or break a project? Check out our DIY flooring installation guide for some eye-opening tips on getting organized.
Now, about materials. Choose blinds that actually fit your space and lifestyle. Venetian blinds give you amazing light control, while roller blinds look sleek and modern. Your mounting brackets and screws need to match your wall type—drywall, wood, brick, whatever you’re working with. And grab a pencil for marking (trust me, you’ll be doing a lot of marking). Quality materials aren’t just about looks—they’ll last longer and work better. If you want to understand different materials and how they behave in home projects, our DIY car repairs basics actually has some great insights that apply to household projects too.
Key Components of Tools and Materials
Your success really comes down to having the right tools and using them properly. Here’s what matters most:
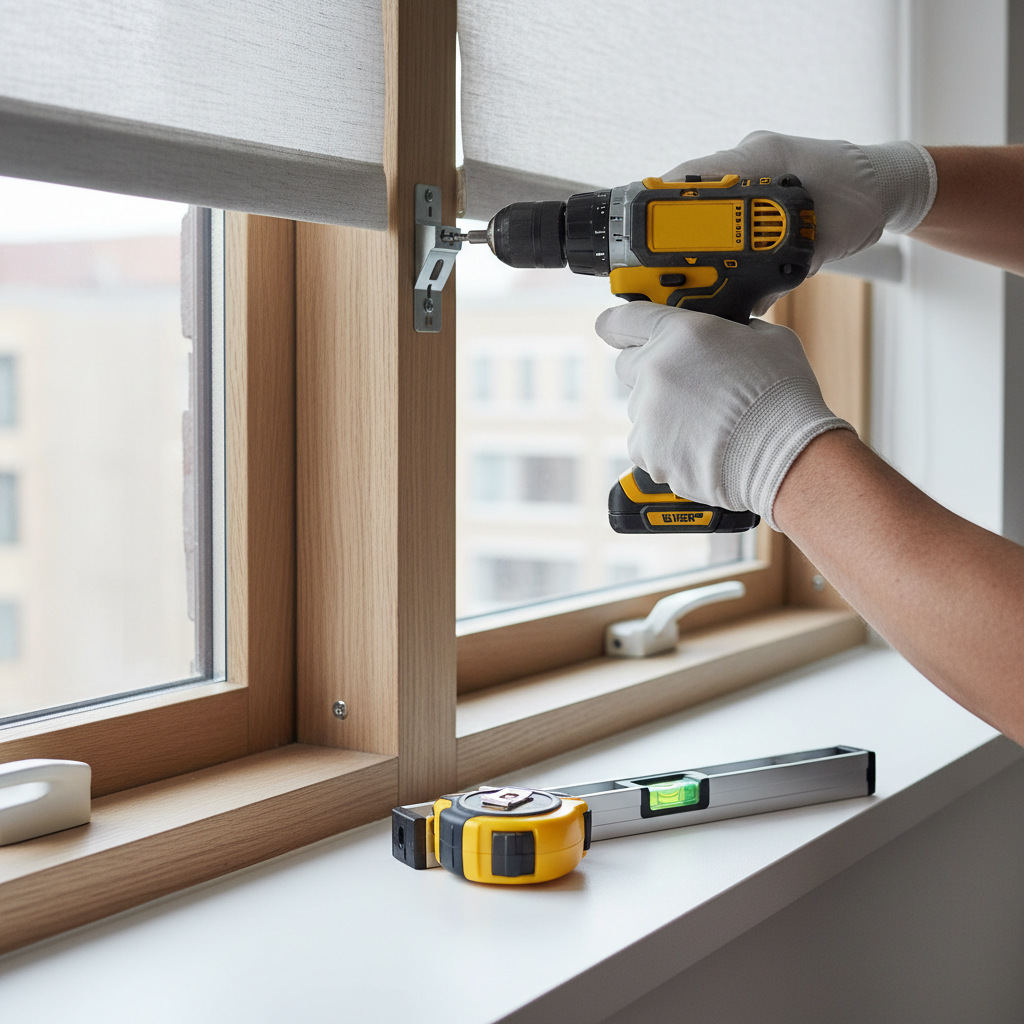
- Drill and Drill Bits: You need clean, precise holes for your brackets. Different walls need different bits—masonry bits for brick, wood bits for studs, regular bits for drywall. Using the wrong bit? That’s how you end up with cracked walls or loose brackets.
- Measuring Tape: This isn’t the place to wing it. Measure twice, cut once, right? A good measuring tape prevents those “oops, these blinds are too big” moments that’ll have you making another trip to the store.
- Screwdriver: Whether it’s manual or powered, you need control here. Too loose and your blinds will sag. Too tight and you’ll strip the screws or crack something. Find that sweet spot.
- Level: Crooked blinds look awful and don’t work properly. A level ensures everything hangs straight and operates smoothly—it’s not optional.
Get these basics right, and you’re already ahead of the game. No surprises, no emergency runs to the hardware store, just smooth sailing through your installation.
Ready for the actual installation? Let’s dive into the process where precision meets practical know-how.
Step-by-Step Installation Process: From Measurement to Securing Blinds
Measurement is where most people either nail it or mess up everything that follows. Here’s what you need to know: measure your window width and height like your project depends on it (because it does). For inside mounts, measure the frame width at three spots—top, middle, bottom—and use the smallest number. Why? Because windows aren’t always perfectly square, and you need clearance. Inside mounting gives you that clean, built-in look that works great when your window trim is something to show off. Outside mounting? Measure the window width plus however much overlap you want. This approach gives you better light control and can hide less-than-perfect window details. Need more perspective on precision in DIY projects? Our DIY paper crafts guide shows how attention to detail makes the difference between amateur and professional results.
Inside versus outside mounting—each has its place. Inside mounts look fantastic and modern, but you need dead-on measurements. No room for error. Outside mounts are more forgiving and can actually make your windows look bigger, but they stick out more into the room. Your choice depends on your windows and what look you’re after. Once you’ve decided, bracket placement becomes critical. Mark everything carefully, use your level religiously, and double-check before you drill. Misaligned brackets are the number one cause of “why won’t these blinds work right?” frustration.
Key Steps in Installation
Follow these steps and you’ll avoid the most common pitfalls that trip up first-time installers:
- Measuring Your Window Accurately: Measure multiple times with a quality tape measure. Write everything down. Those extra few minutes here can save you hours of headaches later when everything actually fits perfectly.
- Selecting Mount Type: Pick inside or outside mount based on your window style and what you want to achieve. Think about privacy, light control, and how the blinds will look with your room’s design.
- Bracket Placement and Alignment: Mark your bracket spots with a pencil and use that level. Seriously, use it. Crooked brackets mean crooked blinds, and crooked blinds look terrible and don’t work right.
- Securing Blinds Firmly: Drill your pilot holes with the right bit, then secure everything snugly but not overly tight. You want solid attachment without damaging your walls or stripping anything.

There’s something incredibly satisfying about installing your own blinds—and I’m not just talking about the money you’ll save (though that’s pretty great too). You get that perfect custom look that fits your space exactly how you want it. With your toolkit ready—drill, measuring tape, screwdriver, and level—you’re all set to tackle everything from getting those measurements spot-on to securing the brackets properly. We’ve covered the essentials: how to measure for both inside and outside mounts, plus those sneaky pitfalls that trip people up (like uneven measurements and wonky bracket placement). And here’s something that makes a huge difference: knowing your wall type and picking the right anchors. Trust me, it’s the difference between blinds that stay put and ones that come crashing down.
But here’s what’s really cool about this whole project—you’re picking up skills that’ll serve you way beyond just hanging blinds. Think about it: you’ve mastered precise measuring, gotten comfortable with power tools, and learned to troubleshoot when things don’t go according to plan. That confidence? It carries over to everything else. Whether it’s figuring out tricky bracket placement or working with different wall materials, you now know how to make your blinds look and work like a pro installed them. Plus, keeping them maintained means they’ll look great and function smoothly for years to come.
Ready to keep this DIY momentum going? You’ve got options that’ll build on what you just learned. Check out our guide on DIY car repairs—seriously, the tool skills and problem-solving you just developed will come in handy under the hood too. Or maybe tackle DIY flooring installation next? Same measuring precision, same attention to detail, but now you’re transforming entire rooms. And if you’re feeling creative, those DIY pallet projects are perfect for adding personality to your home and garden. Each project builds on the last, and before you know it, you’ll be the go-to DIY person in your circle.
Here’s the thing about DIY blinds installation—it’s not just about the blinds. It’s your entry point into a whole world of hands-on creativity and problem-solving. Once you realize you can handle a project like this, what’s stopping you from trying something else? Maybe some relaxing DIY face masks for when you need to unwind after all that drilling? Or perhaps DIY paper crafts when you want to flex those creative muscles? Every project you complete adds to your skill set and gives you that awesome feeling of making something with your own hands. Your home becomes more than just a place you live—it becomes a reflection of what you can accomplish.
Frequently Asked Questions
-
How do I measure my window for blinds?
- For inside mounts, you’ll want to measure the width and height inside that window frame super carefully. Here’s a pro tip: measure in several spots and go with the smallest measurement—windows aren’t always perfectly square, and this ensures your blinds will actually fit.
-
Can I install blinds on any wall type?
- Absolutely, but you’ll need to adjust your approach depending on what you’re working with. Drywall, wood, masonry—they all need different anchors and sometimes different tools to make sure everything stays put.
-
What are common mistakes to avoid?
- The big ones? Measurements that are off (measure twice, cut once!), brackets that aren’t lined up properly, and not thinking through whether you want inside or outside mount before you start drilling holes.
-
When should I call a professional?
- Look, there’s no shame in calling for backup. If you’re second-guessing your measurements, dealing with tricky wall materials you’ve never worked with, or something just isn’t going right during installation—that’s when it’s worth getting an expert involved.