
Pin to Taskbar: Tech Expert’s Guide for Windows Users
The Windows taskbar has become an essential navigation hub for millions of users worldwide, and mastering the ability to customize it can dramatically improve your workflow efficiency. Whether you’re a seasoned professional managing multiple applications or a casual user seeking better organization, understanding how to pin applications to your taskbar transforms your daily computing experience into something more streamlined and intuitive. This comprehensive guide will walk you through every method, platform variation, and advanced technique you need to know about pinning to taskbar functionality.
Pinning applications to your taskbar isn’t just about convenience—it’s about reclaiming control over your digital workspace. Instead of hunting through the Start menu or application folders every time you need a frequently-used program, pinned applications sit right at your fingertips, ready to launch with a single click. Throughout this guide, you’ll discover multiple approaches to accomplish this task, troubleshoot common issues, and learn pro tips that most users never discover.
What Does Pinning to Taskbar Mean
Pinning to taskbar refers to the process of anchoring your favorite applications to the Windows taskbar—that horizontal bar typically located at the bottom of your screen. When you pin an application, you create a permanent shortcut that remains on the taskbar until you explicitly unpin it. This differs from merely running an application, which temporarily displays a button on the taskbar only while the program is open.
Understanding this distinction is crucial because it fundamentally changes how you interact with your most-used programs. The taskbar serves as your personal application dashboard, and pinning represents a deliberate curation of the tools you access most frequently. Think of it as creating a customized toolbar that reflects your unique workflow. Whether you’re working on DIY home security projects and need quick access to your design software, or managing your home generator setup with monitoring applications, pinning ensures these tools are instantly accessible.
The taskbar can accommodate numerous pinned applications, though practical limits exist based on your screen resolution. Most users find that pinning between 5-12 applications provides an optimal balance between accessibility and visual clutter. The order of pinned applications matters too—Windows respects the sequence you establish, allowing you to arrange them logically based on workflow or frequency of use.
How to Pin Applications on Windows 10
Windows 10 offers several straightforward methods to pin applications to your taskbar, each suited to different scenarios and user preferences. The most common approach involves accessing the Start menu and right-clicking on your desired application.
Method 1: Using the Start Menu
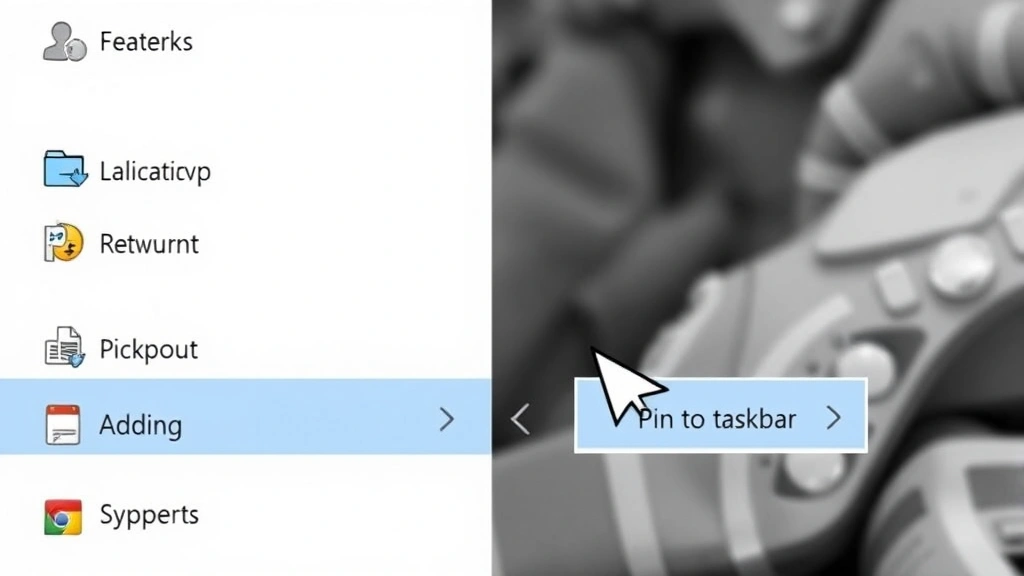
Begin by clicking the Windows Start button in the lower-left corner of your screen. This opens the Start menu displaying your installed applications. Locate the application you wish to pin—you can scroll through the alphabetical list or use the search function by typing the application name. Once you’ve found your target application, right-click on it to reveal the context menu. Among the options presented, you’ll see “Pin to taskbar” displayed prominently. Click this option, and Windows immediately anchors the application to your taskbar. The application icon appears at the far right of existing pinned items, ready for future access.
Method 2: Pinning from Running Applications
If an application is already open on your computer, you can pin it directly from the taskbar itself. Locate the application’s button on the taskbar—it will be highlighted or distinctly visible while the program runs. Right-click on this button to open the application menu. Select “Pin to taskbar” from the options displayed. This method proves particularly useful when you’ve opened an application and realized you’ll need frequent access to it.
Method 3: Desktop Shortcut Method
For applications with desktop shortcuts, the pinning process becomes even more direct. Right-click on the desktop shortcut icon, and you’ll immediately see the “Pin to taskbar” option in the context menu. This method works especially well for less common applications or specialized tools you’ve downloaded. When you’re managing technical projects, like setting up your home network setup, having quick access to networking utilities through taskbar pinning streamlines your workflow significantly.
Method 4: Program Files Directory
Navigate to your Program Files folder using File Explorer—typically located at C:\Program Files or C:\Program Files (x86). Find the application’s executable file (usually marked with a distinctive icon and ending in .exe). Right-click this executable and select “Pin to taskbar” from the context menu. This method grants access to applications that might not appear in your Start menu or might be buried in subdirectories.
Pinning Apps on Windows 11
Windows 11 introduced a redesigned taskbar and Start menu, necessitating slightly different procedures for pinning applications. The fundamental concept remains unchanged, but Microsoft relocated some options to accommodate the new interface design.
Windows 11 Start Menu Method
Click the Start button—now positioned centrally in Windows 11—to open the new Start menu interface. Search for your desired application using the search bar at the top, or scroll through your installed applications. Once located, right-click on the application and select “Pin to taskbar” from the context menu. Windows 11 processes this action and immediately displays the pinned icon on your taskbar. The new interface feels more streamlined, and the pinned applications appear in a dedicated section of the taskbar.
Direct Taskbar Management
Windows 11 allows you to manage your taskbar more intuitively than previous versions. You can right-click on any pinned application icon to access options for unpinning, resizing, or customizing the taskbar appearance. The system also provides recommendations for frequently-used applications, which you can pin directly from these suggestions. This intelligent system learns your usage patterns and adapts accordingly.
Taskbar Settings Access
For more granular control, access your taskbar settings by right-clicking on an empty area of the taskbar and selecting “Taskbar settings.” This opens the Settings application with taskbar-specific options highlighted. Here you can toggle various taskbar features, control which system icons display, and manage application pinning preferences. The settings interface provides unprecedented control over your taskbar appearance and functionality.
Advanced Pinning Techniques
Beyond basic pinning functionality, advanced users can leverage several sophisticated techniques to maximize productivity and customize their taskbar experience.
Rearranging Pinned Applications
Once applications are pinned, you maintain complete control over their arrangement. Simply click and drag any pinned icon to a new position on the taskbar. This allows you to organize applications logically—perhaps grouping communication tools together, placing productivity software in sequence, or arranging tools by frequency of use. The drag-and-drop functionality works seamlessly, and your customized order persists across sessions.
Creating Pinned Folders
Windows allows you to pin entire folders to your taskbar, providing quick access to frequently-accessed file locations. This proves invaluable when you regularly work with specific project folders. Right-click on any folder and select “Pin to taskbar.” The folder icon appears on your taskbar, and clicking it opens a preview showing the folder’s contents. This technique works particularly well for project directories related to your basement finishing projects or other ongoing home improvement initiatives.
Pinning Multiple Instances
For power users, Windows supports pinning multiple instances of the same application. This allows you to maintain separate workspaces or configurations. For example, you might pin your web browser multiple times with different profiles, or pin multiple instances of your text editor for managing different documents simultaneously. Each pinned instance appears as a separate taskbar button, streamlining access to varied workflows.
Customizing Pinned Application Properties
Right-click on any pinned application and select “Properties” to access advanced customization options. You can modify the application’s shortcut name, change its icon, adjust compatibility settings, or modify command-line arguments. These advanced options enable power users to tailor pinned applications to their specific needs, creating optimized shortcuts that launch with predefined parameters.
Troubleshooting Common Issues
Despite Windows’ user-friendly design, occasional issues may prevent successful taskbar pinning. Understanding these problems and their solutions ensures you maintain an optimally organized workspace.
“Pin to Taskbar” Option Missing
If the pin option doesn’t appear in your context menu, several factors could be responsible. First, verify that you’re running a recent Windows version—older versions have limited pinning functionality. Restart your computer, as this resolves many temporary glitches. If the option remains absent, check whether the application requires administrator privileges. Some system applications and specialized tools can’t be pinned through standard methods. Additionally, certain portable applications or those installed in restricted directories may not support taskbar pinning.
Pinned Icons Disappearing
Occasionally, pinned applications vanish from your taskbar after system updates or crashes. This typically occurs when Windows updates modify application file paths or when the system restores from a previous configuration. To resolve this, manually repin the affected applications. If an application consistently refuses to remain pinned, consider using third-party pinning utilities or accessing the application through alternative methods. Creating desktop shortcuts as backups ensures you maintain access even if taskbar pinning fails.
Unresponsive Pinned Applications
When a pinned application fails to launch or responds sluggishly, the issue usually stems from corrupted shortcuts or permission conflicts. Right-click the problematic pinned icon, select “Unpin from taskbar,” and then repin the application using a fresh Start menu search. This refreshes the shortcut data and often resolves responsiveness issues. If problems persist, reinstalling the application may be necessary.
Taskbar Performance Degradation
Pinning excessive applications can impact taskbar performance, particularly on older systems with limited resources. If your taskbar responds slowly or icons take time to load, consider reducing the number of pinned applications. Aim for 5-12 pinned items as a practical guideline. Alternatively, organize applications into groups using taskbar grouping features, which consolidates multiple windows from the same application into a single button.
Best Practices for Taskbar Organization
Effective taskbar management requires strategic thinking about which applications deserve prime real estate on your screen.
Identify Your Most-Used Applications
Track your application usage for several days to identify genuine patterns. Tools like RescueTime automatically monitor your digital activities, revealing which applications consume most of your time. This data-driven approach prevents you from pinning applications out of habit rather than actual need. Focus on applications you access multiple times daily—these are your prime candidates for taskbar real estate.
Organize by Workflow Category
Group related applications together on your taskbar to create logical workflows. Place communication tools (email, messaging) in one section, productivity software in another, and utilities in a third section. This organization accelerates access because you develop muscle memory about where specific application categories reside. When you’re working on projects from the DIY Nests Hub Blog, having your design tools, reference materials, and communication apps logically grouped streamlines your process.
Maintain Visual Clarity
Resist the temptation to pin every application you’ve ever used. A cluttered taskbar becomes counterproductive, requiring excessive clicking and scrolling to locate needed applications. Maintain your pinned applications ruthlessly—review quarterly and remove items that no longer serve your current workflow. This discipline ensures your taskbar remains a productivity asset rather than a source of frustration.
Leverage Taskbar Groups and Stacks
Windows allows you to create application groups on your taskbar, displaying multiple related windows under a single icon. This feature proves invaluable when you work with many browser windows, documents, or application instances. Enable grouping through taskbar settings, and Windows automatically consolidates windows from the same application. Clicking a grouped icon reveals a preview of all open windows, allowing rapid navigation.
Consider Secondary Taskbars
For users with multiple monitors, creating secondary taskbars on additional screens provides dedicated application access for each workspace. This advanced technique requires configuring taskbar settings to display on all monitors and managing application distribution across screens. Power users find this approach dramatically improves productivity by eliminating the need to move windows between monitors repeatedly.
Advanced Configuration for Professional Users
Professional users and power users can implement advanced taskbar configurations that go beyond standard pinning.
Creating Custom Launcher Shortcuts
For specialized workflows, create custom shortcuts that launch applications with specific parameters. Edit shortcut properties to include command-line arguments that configure the application’s behavior at launch. For instance, you might create multiple pinned instances of your text editor, each opening a different project folder automatically. This technique requires familiarity with command-line syntax but delivers significant productivity gains.
Implementing Keyboard Shortcuts
Windows assigns keyboard shortcuts to pinned applications based on their taskbar position. Press Windows Key + [number] to launch the application in that position. The first pinned application is Windows Key + 1, the second is Windows Key + 2, and so forth. Memorizing these shortcuts enables lightning-fast application launching without touching your mouse. This technique proves particularly valuable during intensive work sessions.
Backup and Restore Taskbar Configuration
Power users can backup their taskbar configuration by exporting registry settings or using third-party backup utilities. This proves invaluable when setting up new computers or recovering from system failures. The taskbar configuration stores in the Windows registry, specifically in the HKEY_CURRENT_USER\Software\Microsoft\Windows\CurrentVersion\Explorer\Taskband location. Backing up these registry keys preserves your carefully curated taskbar organization.
FAQ
Can I pin web applications to my taskbar?
Yes, modern browsers support pinning web applications to your taskbar. In Edge and Chrome, open the web application you wish to pin, click the menu button, and select “Install this site as an app” or similar option. The browser creates a pinned application icon that launches the web application in a dedicated window, providing a native application-like experience.
Is there a limit to how many applications I can pin?
Technically, Windows imposes no hard limit on pinned applications, but practical constraints exist. Your screen resolution determines how many icons display before requiring scrolling. Most users find that 12-20 pinned applications represents a comfortable maximum before the taskbar becomes unwieldy. Beyond this point, organization suffers and performance may degrade.
How do I unpin applications from my taskbar?
Right-click any pinned application icon and select “Unpin from taskbar” from the context menu. The application immediately disappears from your taskbar. This action doesn’t uninstall the application—it merely removes the shortcut from your taskbar. You can always repin the application later if needed.
Can I sync my taskbar across multiple computers?
Windows doesn’t natively sync taskbar configurations across devices, but you can manually replicate your setup by pinning the same applications on each computer. For more sophisticated synchronization, consider using third-party tools or cloud-based configuration management systems. Some enterprises implement group policies to standardize taskbar configurations across organizational computers.
What if I accidentally unpinned an important application?
Don’t worry—unpinning merely removes the taskbar shortcut. The application remains installed on your computer. Simply search for the application in your Start menu and repin it. Your application is completely unharmed, and you can restore your taskbar configuration within seconds.
Do pinned applications launch faster than applications accessed through the Start menu?
Pinned applications don’t launch faster—the launch speed remains identical. The advantage of pinning is accessibility and convenience, not performance improvement. However, frequently-used applications may launch faster on subsequent uses due to system caching, regardless of whether they’re pinned.
Can I pin system settings or control panel items to my taskbar?
While you can’t directly pin Settings or Control Panel items, you can create custom shortcuts that launch specific settings pages. For example, create a shortcut that opens Device Manager or Network Settings directly. Then pin these custom shortcuts to your taskbar, providing rapid access to frequently-needed system utilities.


