How to Attach Silicone Breast Forms with Adhesive Tape: Expert Tips Inside
Silicone breast forms are prosthetic devices designed for individuals undergoing breast reconstruction, experiencing asymmetry, or exploring gender expression. Proper attachment using adhesive tape is crucial for comfort, security, and skin health. Unlike permanent surgical solutions, adhesive-based attachment offers flexibility and reversibility, making it an accessible option for many users. Understanding the correct application technique prevents slipping, skin irritation, and damage to both the forms and your skin.
This comprehensive guide walks you through every step of the adhesive tape attachment process, from skin preparation to removal and care. Whether you’re a first-time user or refining your technique, these expert tips will help you achieve a secure, comfortable fit that lasts throughout your day. We’ll cover material selection, application methods, troubleshooting common issues, and best practices for maintaining skin health during extended wear.
Choosing the Right Adhesive Tape
Selecting appropriate adhesive tape is the foundation of successful silicone form attachment. Not all tapes work equally well for this application, and using the wrong product can result in poor adhesion, skin damage, or form slippage. The ideal tape should be hypoallergenic, waterproof, breathable, and specifically formulated for skin contact.
Medical-grade adhesive tapes are your best option. These products are designed for extended skin contact and have been tested for biocompatibility. Look for tapes labeled as latex-free, particularly if you have a latex allergy. Common options include athletic tape, kinesiology tape, and specialized prosthetic tape. Athletic tape provides strong hold but may be less breathable than alternatives. Kinesiology tape offers flexibility and breathability but may not provide maximum hold for heavier forms.
Prosthetic-specific adhesive tapes are engineered for this exact purpose and represent the gold standard. These products balance adhesion strength, skin safety, and durability. They typically feature:
- Hypoallergenic adhesive formulations safe for sensitive skin
- Waterproof properties that resist moisture and perspiration
- Breathable backing that allows air circulation
- Gentle removal characteristics that won’t damage skin
- Extended wear capability, often lasting 8-12 hours
When purchasing tape, check the width and length specifications. Most applications require tape between 1-3 inches wide. Thicker, wider tape provides better load distribution and reduces pressure points. Consider purchasing several types to determine which works best with your skin type and the specific forms you’re using. Budget for quality products—cheaper alternatives often compromise on skin safety and adhesion reliability.
Skin Preparation and Hygiene
Proper skin preparation is absolutely critical for safe, effective adhesive tape application. Your skin’s surface condition directly impacts how well tape adheres and whether irritation develops. Begin by thoroughly cleansing the chest area with mild soap and warm water, then pat completely dry with a clean towel. Any moisture, oils, or residue will compromise adhesion and create an environment where bacteria can thrive.
Exfoliate gently using a soft washcloth or mild exfoliating product to remove dead skin cells and improve adhesive contact. However, avoid aggressive scrubbing that irritates or damages the skin barrier. If your skin is particularly oily, use a mild alcohol-free toner or cleansing solution designed for sensitive skin. Allow the skin to air-dry completely for at least 5-10 minutes before applying tape.
Consider using a skin primer or pre-tape spray designed for athletic or medical applications. These products create an optimal surface for adhesive bonding and can extend wear time significantly. They also provide a protective barrier between your skin and the adhesive, reducing irritation risk. Apply primer according to product instructions and allow it to dry completely.
Assess your skin condition before application. If you have active acne, open wounds, sunburn, or dermatological conditions, postpone adhesive tape use until your skin heals. Even minor irritation can worsen dramatically when covered with tape for extended periods. If you experience eczema or sensitive skin, perform a 24-hour patch test with your chosen tape on a small inconspicuous area to check for allergic reactions.
Hair removal is a personal choice, but smooth skin generally provides better adhesion and easier removal. If you choose to remove hair, do so at least 24 hours before tape application to allow the skin to recover from any irritation. Shaving is gentler than waxing for this purpose. Never apply tape to freshly waxed or excessively irritated skin.
Step-by-Step Application Process
Now that your skin is prepared, follow this systematic approach to attach your silicone breast forms. Gather all materials before beginning: your forms, adhesive tape, scissors, a measuring tape, and any primer or preparation products you’re using.
Step 1: Measure and Cut Tape Strips
Determine how much tape you need by measuring the contact area where the form will sit. Cut tape strips approximately 2-3 inches longer than the width of your form’s base. Pre-cut strips make the application process faster and more precise. Cut multiple strips so you’re not fumbling with scissors while holding a form in place.
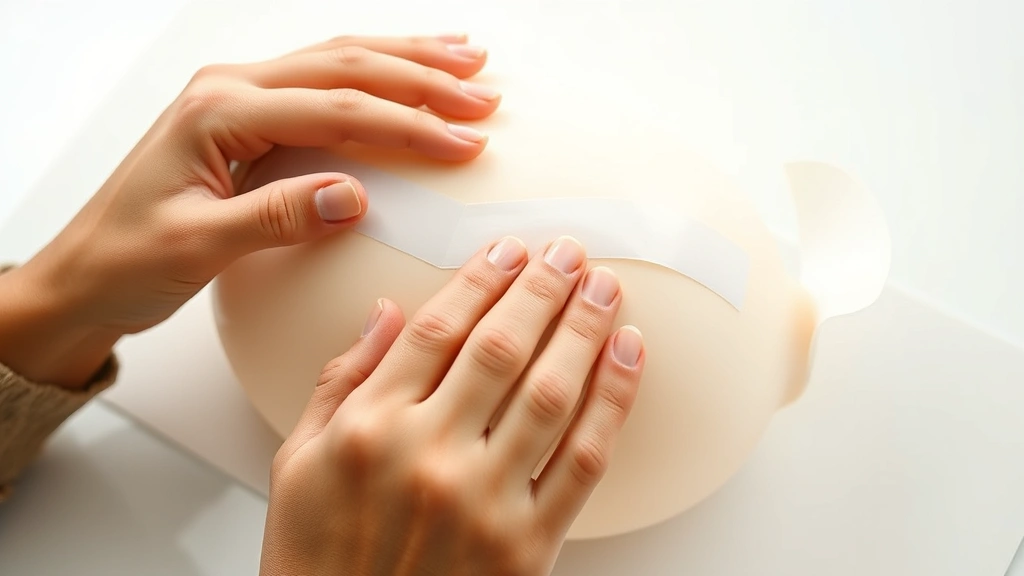
Step 2: Apply Tape to the Form
Place your silicone form on a clean, flat surface with the side that will contact your skin facing upward. Starting at one edge, carefully apply your first tape strip along the bottom edge of the form. Press firmly and evenly, working out air bubbles with your fingers or a smooth tool. Overlap strips by approximately half an inch to ensure complete coverage with no gaps. Continue until the entire contact surface has at least one layer of tape.
Step 3: Apply Second Layer for Reinforcement
For forms that will experience significant movement or extended wear, apply a second layer of tape perpendicular to the first layer. This cross-hatching pattern distributes pressure more evenly and dramatically improves adhesion and durability. This step is particularly important if you plan to wear your forms for 10+ hours or if you’ll be physically active.
Step 4: Position the Form on Your Chest
Stand before a mirror and position the form where you want it to sit. Most people center the form on the chest, aligning it with the natural breast position. Have a helper assist if possible—they can ensure symmetrical placement. Once positioned, press firmly across the entire contact surface, holding pressure for 30-60 seconds to activate the adhesive fully.
Step 5: Apply Reinforcement Tape Around Edges
Once the form is positioned, apply additional tape strips around the edges and perimeter to create a secure seal. This edge reinforcement prevents the form from lifting at the corners, which is where separation typically begins. Pay special attention to the upper and outer edges, which experience the most stress during movement.
Securing the Forms Throughout the Day
Even well-applied tape can loosen during physical activity, temperature changes, or extended wear. Implementing strategies to maintain security throughout your day prevents embarrassing slippage and extends the lifespan of your adhesive tape.
Wear supportive undergarments designed for prosthetic use or specialized bras with reinforced cup construction. These garments provide additional support and help distribute the weight of the forms across a larger surface area. A well-fitting bra reduces stress on the adhesive by supporting the forms’ weight, significantly extending wear time. Many specialized retailers offer prosthetic-friendly bras that accommodate forms while providing natural appearance and comfort.
Monitor tape condition throughout the day, particularly after activities involving sweating or water exposure. If you notice lifting at the edges, carefully press the form back down and apply additional tape strips to reinforce weak areas. Carry spare tape strips in your bag for quick emergency repairs. Maintaining consistent body temperature helps preserve adhesive integrity—excessive heat can soften some adhesives, while cold can make them brittle.
Limit water exposure during extended wear. While most medical-grade tapes are waterproof, prolonged water contact can gradually compromise adhesion. If you’ll be swimming or bathing, plan to remove your forms beforehand. Some users apply a waterproof sealant around tape edges for brief water exposure, though this requires additional preparation time.
When engaging in physical activity, consider wearing an additional supportive layer like a compression shirt or athletic binder over your forms. This distributes pressure more evenly and reduces stress on the adhesive. The added support makes a remarkable difference in form stability during movement, exercise, or extended wear periods.
Safe Removal Techniques
Removing your forms requires as much care as application. Improper removal can damage both the silicone and your skin. Never peel forms away suddenly or aggressively, as this can cause tape to pull skin and cause painful abrasions.
Preparation for Removal
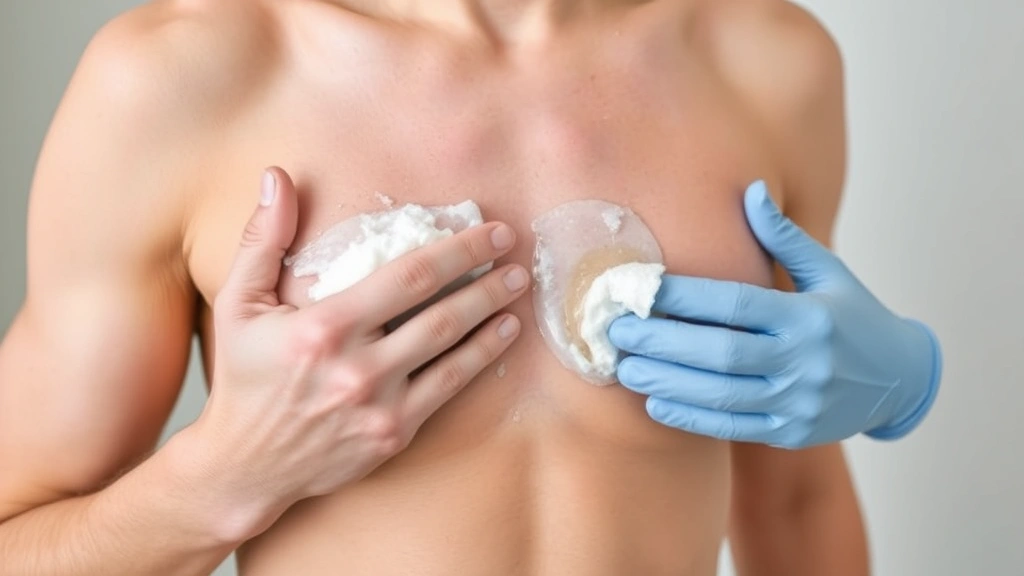
Remove your forms at the end of the day or when you plan extended downtime. Having time to let skin recover is important for maintaining skin health. Gather removal supplies: a gentle oil or commercial adhesive remover, clean washcloths, and lukewarm water. Never use harsh chemicals, acetone, or petroleum-based solvents on skin.
The Removal Process
Apply a generous amount of gentle oil (coconut oil, baby oil, or specialized adhesive remover) around the edges where tape meets skin. Allow the oil to penetrate for 2-3 minutes, which helps break the adhesive bond. Gently lift one corner of the form, continuing to apply oil as you slowly peel the tape away from your skin. Work slowly and deliberately—rushing this process causes skin damage. If you encounter resistance, apply more oil and wait another minute before continuing.
Once forms are removed, use warm water and mild soap to gently cleanse any remaining adhesive residue from your skin. Pat dry with a clean towel. Apply a soothing, fragrance-free moisturizer to areas that were covered by tape. Your skin may feel slightly tender or appear mildly flushed—this is normal and typically resolves within 30-60 minutes.
Maintenance and Storage
Proper care extends the lifespan of your silicone forms and ensures they remain safe and hygienic for continued use. Clean forms thoroughly after each wear using mild soap and warm water. Gently scrub away any skin oils, sweat, or residue using a soft cloth. Pay special attention to the textured or detailed areas where debris accumulates.
Remove old tape before storing your forms. Leaving tape on allows adhesive to harden and become difficult to remove, and old tape degrades over time, becoming less effective. Soak forms in warm soapy water for 5-10 minutes to soften old tape, then gently peel it away. Use gentle oil if tape resists removal.
Store forms in a cool, dry location away from direct sunlight, which can degrade silicone over time. Use the original packaging or a dedicated storage container that protects forms from dust and damage. Avoid storing near heat sources like radiators or in hot vehicles, as excessive heat can warp silicone. Many users store forms in a climate-controlled closet or drawer at room temperature.
Inspect forms regularly for cracks, discoloration, or deterioration. Minor surface cracks can sometimes be sealed with medical-grade silicone sealant, but significant damage typically requires replacement. Well-maintained forms can last several years with proper care.
Troubleshooting Common Problems
Forms Keep Slipping
If your forms consistently slip or separate, several factors may be responsible. First, ensure your skin is completely dry before applying tape—even slight moisture compromises adhesion. Second, verify you’re using sufficient tape with adequate overlap between strips. Third, check that your forms are clean and free of residue from previous tape applications. Finally, consider switching to a higher-tack adhesive tape or applying a skin primer before tape application.
Skin Irritation or Rash
Skin irritation typically results from allergic reaction to adhesive, prolonged moisture under tape, or excessive wear without breaks. If you develop a rash, remove forms immediately and allow skin to air-dry. If irritation persists beyond a few hours, discontinue use and consult a dermatologist. Try switching to hypoallergenic or latex-free tape, or reduce daily wear time to allow skin recovery.
Tape Won’t Stick to Silicone
Old tape residue on forms prevents new tape from adhering properly. Remove all old tape and clean forms thoroughly with soap and water. Dry completely before applying new tape. If the problem persists, your silicone may have a protective coating—consult the manufacturer’s care instructions or consider a different tape brand designed specifically for silicone.
Forms Feel Uncomfortable or Tight
Discomfort often indicates improper sizing or tape application. Ensure your forms are the correct size for your body—forms that are too large will feel heavy and uncomfortable. Check that tape is applied evenly without wrinkles or bunching, which creates pressure points. Wear supportive undergarments designed for prosthetic use, which distribute weight and pressure more evenly.
Tape Leaves Residue on Skin
Some adhesive residue is normal and easily removed with gentle oil and warm water. However, excessive residue suggests you’re leaving forms on too long or the tape is degrading. Reduce daily wear time and ensure you’re using fresh tape for each application. Never apply new tape over old tape residue—always clean forms thoroughly between uses.
FAQ
How long can I safely wear silicone breast forms with adhesive tape?
Most users can comfortably wear forms for 8-12 hours daily with proper tape application and skin care. However, individual tolerance varies based on skin sensitivity, tape quality, and form weight. Start with shorter wear periods (4-6 hours) and gradually increase duration as your skin adapts. Always remove forms before sleeping to allow skin to recover. If you experience discomfort or irritation, reduce wear time immediately.
Can I reuse adhesive tape?
Once tape has been applied and removed, its adhesive properties degrade significantly. Reusing tape typically results in poor adhesion and increased skin irritation risk. Always use fresh tape for each application. However, if you remove your forms during the day and plan to reapply within a few hours, carefully pressing existing tape back down may work temporarily. For best results and skin health, use new tape each time.
What should I do if I develop an allergic reaction?
If you experience severe itching, redness, swelling, or rash that doesn’t resolve within an hour of removal, discontinue use immediately. Wash the affected area thoroughly with mild soap and cool water. Apply a fragrance-free moisturizer or hydrocortisone cream if available. If symptoms persist or worsen, consult a dermatologist. When you resume use, try a different tape brand, preferably latex-free and hypoallergenic formulations.
Can I shower or swim while wearing forms with adhesive tape?
Brief exposure to water (5-10 minutes) typically won’t compromise well-applied tape. However, extended water exposure, hot showers, or swimming can gradually loosen adhesion. For activities involving water, remove your forms beforehand. If you must wear forms in water, apply additional waterproof sealant around tape edges and expect reduced wear time. Always remove forms and allow skin to dry completely afterward.
How do I know if my forms are the correct size?
Properly sized forms should feel comfortable and natural when worn. They should align with your natural chest contours without causing strain or excessive pressure. Try forms in different sizes—most retailers offer sizing guides or fitting services. Consider your body frame, existing chest tissue, and desired silhouette. Forms that are too large will feel heavy and uncomfortable; forms that are too small won’t provide desired results. When in doubt, consult with a prosthetic specialist.
Is it normal for forms to shift slightly during the day?
Minimal shifting is normal as your body moves and tape gradually loosens. However, significant movement indicates inadequate adhesion or insufficient tape coverage. If forms shift noticeably, remove them and reapply with additional tape strips, particularly around edges and pressure points. Ensure you’re wearing supportive undergarments designed for prosthetic use, which significantly reduce shifting.
What’s the best way to store forms long-term?
Store clean forms in original packaging or a dedicated container in a cool, dry location away from direct sunlight and heat sources. Room temperature storage in a climate-controlled closet is ideal. Avoid areas prone to temperature fluctuations like attics or garages. With proper storage and care, quality silicone forms can last several years. Inspect periodically for cracks or deterioration, and replace if damage occurs.
Related Resources: Learn more about DIY solutions and expert guides on our main blog. For home improvement projects, explore our basement finishing guide or comprehensive home security guide. If you’re interested in hands-on projects, check out our beginner woodworking guide for foundational skills.
External References: For medical-grade adhesive standards, consult the FDA’s medical device guidance. The ASTM International provides testing standards for adhesive products used in medical applications. For prosthetic device information, the American Orthotic and Prosthetic Association offers professional resources. Dermatological guidance on skin safety is available through the American Academy of Dermatology. For product specifications and safety data sheets, consult manufacturer documentation for your specific adhesive tape brand.


