
How to Build a Shed: Expert Tips Inside
Building a shed is one of the most rewarding DIY projects you can undertake. Whether you need extra storage space, a workshop, or a garden retreat, a well-constructed shed adds both functionality and value to your property. This comprehensive guide walks you through every step of the process, from initial planning through the final touches, ensuring your shed stands strong for decades to come.
A shed project combines practical construction skills with creative problem-solving. Unlike some home improvement tasks, shed building gives you complete control over the design, materials, and layout. With proper planning and attention to detail, even first-time builders can create a sturdy, professional-looking structure that becomes the envy of the neighborhood.
Planning Your Shed Project
Before picking up a single tool, invest time in thorough planning. Start by determining your shed’s purpose. Will it store garden equipment, serve as a workshop, or provide overflow storage for seasonal items? Your answer influences size, ventilation, and internal layout decisions. Most homeowners find that 8×10 or 10×12 foot sheds offer excellent versatility without overwhelming their yards.
Check local building codes and zoning regulations before committing to your design. Many municipalities require permits for structures over certain square footage, typically 100-200 square feet. Contact your local building department to understand setback requirements—how far your shed must sit from property lines. Some areas have height restrictions or require specific materials. Getting this right from the start prevents costly rework later.
Create detailed plans or purchase shed plans from reputable sources. Your plans should include a materials list, step-by-step instructions, and elevation drawings. If you’re new to woodworking projects, starting with proven plans significantly increases your success rate. Include measurements for door and window openings, roof pitch, and wall heights in your documentation.
Calculate your budget carefully. Typical shed costs range from $1,500 to $5,000 depending on size and materials. Factor in lumber, roofing materials, hardware, fasteners, and tools you may need to purchase. Don’t forget about permits, which typically cost $50-$200. Building in a 10-15% contingency buffer helps manage unexpected expenses.
Choosing the Right Location
Location determines your shed’s longevity and usability. Select a spot with good drainage—never place a shed in a low area where water collects after rain. Poor drainage leads to rotting wood, mold, and structural failure. If your yard slopes, position the shed on higher ground or create a slight grade away from the structure.
Consider sunlight exposure. While some sun helps prevent moisture buildup, intense afternoon sun can warp wood and damage exterior finishes. If possible, position your shed where it receives morning sun but afternoon shade. Ensure adequate airflow around the structure to promote ventilation and prevent moisture accumulation underneath.
Think about accessibility and practicality. Position your shed where you can easily access it from your home or driveway. If you’re storing heavy items, consider proximity to loading areas. Avoid placing sheds under large trees—falling branches damage roofs, and constant leaf debris clogs gutters and promotes rot. Also consider sight lines from your home and neighbors’ homes for aesthetic placement.
Check utility locations before breaking ground. Call your local utility locating service (811 in the United States) to mark underground gas, electric, water, and communication lines. Hitting a buried utility creates safety hazards and expensive repairs. Wait the required time for marking before digging any foundation post holes.
Foundation Options
Your foundation choice impacts the shed’s durability more than any other component. Three primary options exist: concrete piers, concrete pads, and treated wood skids. Each has advantages and considerations.
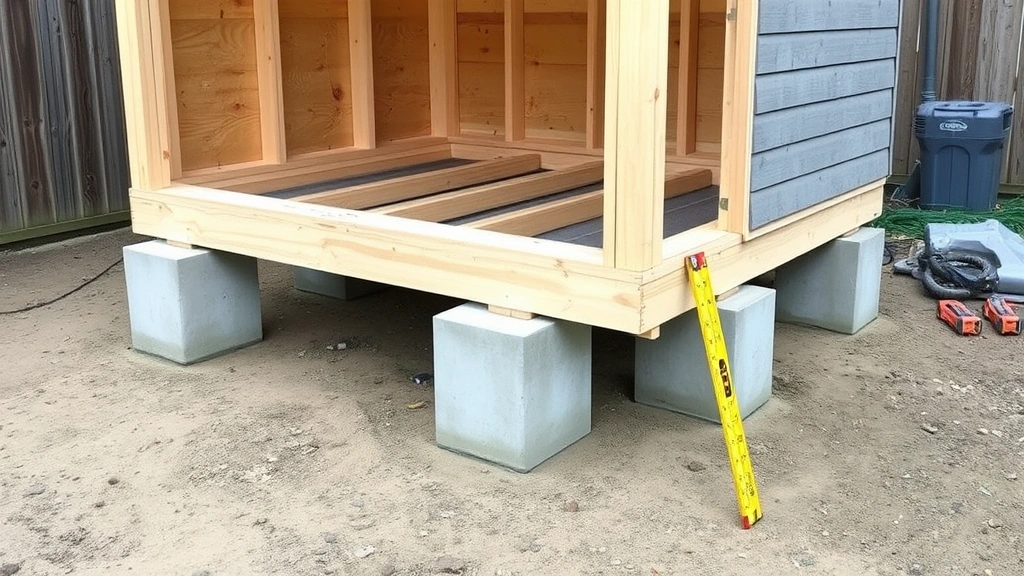
Concrete Piers offer the best longevity. Dig holes below the frost line (depth varies by region, typically 2-4 feet), set concrete piers, and attach your frame to them. This method keeps wood elevated, preventing ground moisture contact and extending the shed’s life significantly. Frost lines vary—check with local building departments for your area’s specific requirements.
Concrete Pads work well for smaller sheds. Pour concrete directly on compacted gravel in a level area. This method costs less than piers but offers less protection from moisture. Ensure proper grading so water runs away from the shed rather than pooling against it.
Treated Wood Skids provide the most budget-friendly option for temporary or portable sheds. Use pressure-treated 4×6 or 4×8 lumber, but understand this method has the shortest lifespan—typically 10-15 years before wood deterioration requires replacement. Never use untreated wood directly on soil.
Whichever method you choose, ensure your foundation is level. Use a long level and measure diagonals to confirm square. An unlevel foundation causes doors to swing open, roof leaks, and uneven stress on framing. Spend extra time getting this right—it’s easier to adjust now than after framing is complete.
Framing the Walls
Wall framing creates your shed’s skeleton. Standard construction uses 2×4 lumber spaced 16 inches on center, which means 16 inches from the center of one stud to the center of the next. This spacing provides strength while maintaining material efficiency.
Build wall frames flat on the ground before standing them up. This approach lets you work safely at waist height and ensures square, straight walls. Lay out all studs, top plates, and bottom plates. Nail or screw components together—screws provide superior holding power and allow disassembly if needed. Use 3-inch deck screws or 16-penny nails for framing.
Create a wall frame for each side: two end walls and two long walls. Include a header above door openings—typically a doubled 2×6 or 2×8 depending on opening width. Headers support the roof load above openings and prevent sagging. For window openings, create similar headers with cripple studs (short studs above and below windows).
After building all frames, stand them up one at a time. Brace each wall with temporary diagonal supports while you secure it to the foundation and adjacent walls. Use corner bracing or metal L-brackets to lock walls square. Check that walls are plumb (perfectly vertical) using a level on all sides before permanently fastening.
Once all walls stand and are braced, install top plates on top of the walls where they meet. This creates a continuous connection point for roof framing. Double-check that corners are square by measuring diagonals—they should be equal.
Installing the Roof
Roof installation protects your entire investment. The roof style you choose affects both appearance and weather resistance. Gable roofs (peaked in the middle) are most common for sheds and shed water effectively. Lean-to roofs (single slope) work for smaller structures or additions.
Determine your roof pitch—typically 4:12 (4 inches of rise per 12 inches of horizontal run) provides good water drainage and looks proportional. Steeper pitches shed snow better but require more materials. Shallower pitches save materials but require better flashing around penetrations.
Install rafters—angled beams that form the roof structure. Rafters connect from the top plates to a ridge board at the peak. Use rafter calculators to determine precise angles and lengths, as even small errors compound across multiple rafters. Pre-cut rafters from building suppliers save time if you’re uncertain about calculations.
Space rafters 16 inches on center, matching wall stud spacing. Install collar ties—horizontal braces connecting opposite rafters—to prevent them from spreading apart. Collar ties should be installed in the upper third of the rafter span.
After rafters are secure, install roof sheathing—typically 1/2-inch plywood. Nail or screw sheathing to every rafter, spacing fasteners 6-8 inches apart around edges and 12 inches in the field. Stagger sheathing joints so they don’t align across multiple rafters.
Install roofing felt or underlayment over sheathing, then add your chosen roofing material. Asphalt shingles are most economical and common. Metal roofing lasts longer (30-50 years) but costs more initially. Whatever you choose, ensure proper ventilation to prevent moisture buildup in the attic space. Install soffit vents and ridge vents to allow air circulation.

Adding Doors and Windows
Doors and windows provide access and light while protecting contents. For the main entry door, use a standard 32-inch or 36-inch wide exterior door. Single doors work for most sheds, but double doors (two 18-24 inch doors) ease moving large items in and out.
Install a door frame (buck) in the opening you created during wall framing. The frame must be perfectly square and plumb. Use shims—thin wedges—to adjust the frame until it’s level and vertical. Secure the frame to the surrounding studs with 3-inch screws or 16-penny nails, driving fasteners through shims into studs.
Hang the door using three hinges (for standard 32-inch doors) or four hinges (for heavier or wider doors). Space hinges evenly with the top hinge 7 inches from the door top and the bottom hinge 11 inches from the bottom. Install a handle and latch appropriate for your climate—stainless steel resists rust better than standard steel.
Windows improve ventilation and reduce the dark, dungeon-like feel of enclosed spaces. Small windows (2×3 or 3×4 feet) provide adequate light and ventilation for most sheds. Install windows high on walls to maximize usable wall space below. Use the same installation method as doors—frame the opening, install a buck, and secure the window unit with screws or nails through the flange into surrounding studs.
Seal around all doors and windows with weatherstripping and caulk. Quality weatherstripping prevents water and pest infiltration while reducing air leaks. Use silicone caulk, which remains flexible and lasts longer than acrylic caulk.
Finishing Touches
Exterior finishing protects wood from weather while enhancing appearance. Siding options include wood, vinyl, metal, or composite materials. Wood siding offers classic appearance but requires regular maintenance. Vinyl and composite materials require minimal maintenance. Metal siding is durable and economical.
Whatever siding you choose, install it over house wrap—a moisture-permeable membrane that prevents water infiltration while allowing vapor escape. Proper house wrap installation is crucial; seal all seams with tape and ensure wrap extends behind all trim pieces.
Paint or stain exposed wood surfaces. Quality exterior paint protects wood from UV damage and moisture. Use paint rated for exterior use, typically requiring two coats. Paint before installing trim for better coverage. Consider the color carefully—lighter colors reflect heat and show dirt less frequently, while darker colors absorb heat and may cause wood warping in extreme climates.
Install gutters and downspouts to direct roof water away from the foundation. Gutters prevent water from cascading directly off the roof edge, which erodes soil and promotes foundation moisture problems. Extend downspouts at least 4-6 feet from the shed base.
Interior finishing depends on your shed’s purpose. For storage sheds, install shelving and hooks to maximize organization. For workshops, consider electrical service—hire a licensed electrician to safely install outlets and lighting. For living spaces or studios, install insulation between studs, add drywall, and finish as needed.
Don’t overlook landscaping around your shed. Grade soil away from the foundation to promote drainage. Plant landscaping at least 3 feet away from walls to allow air circulation and prevent moisture problems. Consider pathways to your shed for easier access and to define usage areas in your yard.
Perform regular maintenance to extend your shed’s life. Inspect the roof annually for damaged shingles. Check flashing around penetrations for gaps or separation. Look for wood rot or insect damage, particularly where wood contacts soil or where moisture accumulates. Caulk gaps that develop in siding or trim. Paint or stain exposed wood every 3-5 years depending on climate and finish quality.
If you’re working on home security improvements, consider adding lighting or cameras to your shed area. For those interested in generator installation for backup power, a shed can house this equipment safely. Those pursuing basement finishing projects might use shed storage for materials and tools during construction.
FAQ
Do I need a permit to build a shed?
Most jurisdictions require permits for sheds larger than 100-200 square feet or for structures over 10-12 feet tall. Check with your local building department before starting. Permits ensure your shed meets safety codes and won’t create conflicts with neighbors. Building without required permits can result in fines or demands to remove the structure.
What’s the best time of year to build a shed?
Spring and early fall offer ideal conditions—moderate temperatures, lower humidity, and typically less rain. Summer heat can be exhausting, and winter cold makes materials brittle and work hazardous. Avoid building during rainy seasons when wet wood is difficult to work with and ground conditions are poor.
How much does it cost to build a shed?
A basic 8×10 shed costs $1,500-$2,500 in materials. Larger structures or those with premium finishes cost more. Labor costs increase significantly if hiring contractors—expect to pay $2,000-$5,000 for professional installation depending on location and complexity. DIY construction saves substantial money but requires time and effort.
Can I build a shed on my property line?
Most jurisdictions require setbacks—minimum distances from property lines. Typical setbacks are 5-10 feet, but some areas require more. Check your local zoning ordinances. Building too close to property lines can result in being forced to move the structure or legal disputes with neighbors.
Should I insulate my shed?
Insulation depends on your climate and intended use. Sheds in cold climates that store items sensitive to freezing benefit from insulation. Workshops or studios used year-round definitely need insulation. Unheated storage sheds in mild climates typically don’t need insulation. Insulation adds cost but improves comfort and protects sensitive items.
What’s the best roofing material for a shed?
Asphalt shingles are most economical and common, lasting 15-20 years. Metal roofing costs more but lasts 30-50 years with minimal maintenance. Cedar shakes offer attractive appearance but require regular maintenance. Choose based on your budget, climate, and aesthetic preferences. In areas with heavy snow, steeper pitches and stronger materials like metal are advisable.


