How to Build a Deck: Expert Tips & Tricks for a Stunning Outdoor Space
Building a deck transforms your backyard into an inviting outdoor living area where family and friends can gather. Whether you’re planning a cozy 8×10 platform or an expansive multi-level entertainment space, understanding the fundamentals of deck construction ensures a safe, durable, and beautiful result. This comprehensive guide walks you through every step of the process, from initial planning and material selection to finishing touches that will make your deck the envy of the neighborhood.
A well-built deck requires careful attention to local building codes, proper structural support, and quality materials that withstand weather exposure. By following proven construction techniques and learning from industry experts, you can create an outdoor space that provides years of enjoyment while maintaining structural integrity and safety standards. This guide covers everything you need to know to build a deck that meets code requirements and exceeds your expectations.
Planning and Permits: The Foundation of Success
Before purchasing a single board, invest time in thorough planning. Measure your available space, consider how you’ll use the deck, and determine the ideal size and shape. A well-designed deck should integrate seamlessly with your home’s architecture and landscape. Create detailed sketches or use design software to visualize the final product, including features like built-in seating, planters, or lighting.
Checking local building codes is absolutely essential. Most municipalities require permits for deck construction, and the International Code Council (ICC) establishes standards that local jurisdictions often adopt. Building codes specify requirements for post spacing, railing height, stair dimensions, and frost line depths for footings. Violations can result in fines, difficulty selling your home, or safety hazards.
Contact your local building department to obtain permit requirements and schedule inspections. The process typically involves submitting detailed plans, paying permit fees, and allowing inspectors to verify work at critical stages. While permits add time and cost, they protect your investment and ensure your deck meets safety standards. Many areas require deck inspections at foundation, framing, and completion stages.
Consider hiring a structural engineer if you’re building on a slope, creating a large or complex design, or dealing with soil conditions that concern you. Professional guidance costs $300-600 but provides peace of mind and ensures calculations meet code requirements. Review your homeowner’s insurance policy to confirm deck coverage and understand any construction requirements your insurer mandates.
Materials and Tools: Choosing Quality Components
Selecting appropriate materials significantly impacts your deck’s longevity, appearance, and maintenance requirements. Pressure-treated lumber remains the most economical choice for structural components like posts, beams, and joists. Modern pressure-treated wood uses copper-based preservatives that resist rot and insect damage without the health concerns of older formulations. Ensure lumber is rated for ground contact when building footings and posts.
For decking boards, you have several options. Pressure-treated wood offers affordability but requires regular staining and sealing. Composite decking, made from wood fiber and plastic, provides low-maintenance durability and doesn’t require staining, though it costs more upfront. Cedar and redwood offer natural beauty but demand regular maintenance to prevent rot and weathering. Tropical hardwoods like Ipe provide exceptional durability but are expensive and difficult to work with.
Essential tools include a circular saw, drill-driver, level, tape measure, carpenter’s square, and post hole digger. A power miter saw makes crosscutting easier, while a reciprocating saw handles notching and demolition. Invest in quality tools that will last through your project and beyond. Rent specialized equipment like post hole augers or laser levels if you don’t own them.
For fasteners, use galvanized or stainless steel screws and bolts rated for exterior use. Avoid nails, which work loose over time as wood expands and contracts. Composite and pressure-treated lumber can leach chemicals that corrode standard fasteners, so purchase hardware specifically rated for your decking material. The American Wood Council provides detailed specifications for fastener selection and spacing.
Foundation and Footings: Building on Solid Ground
Proper footings prevent settling, frost heave, and structural failure. Your deck must rest on footings that extend below the frost line—the depth ground freezes in winter in your region. In northern climates, this may exceed 48 inches, while southern areas might require only 12-18 inches. Contact your local building department to determine the frost line depth for your location.
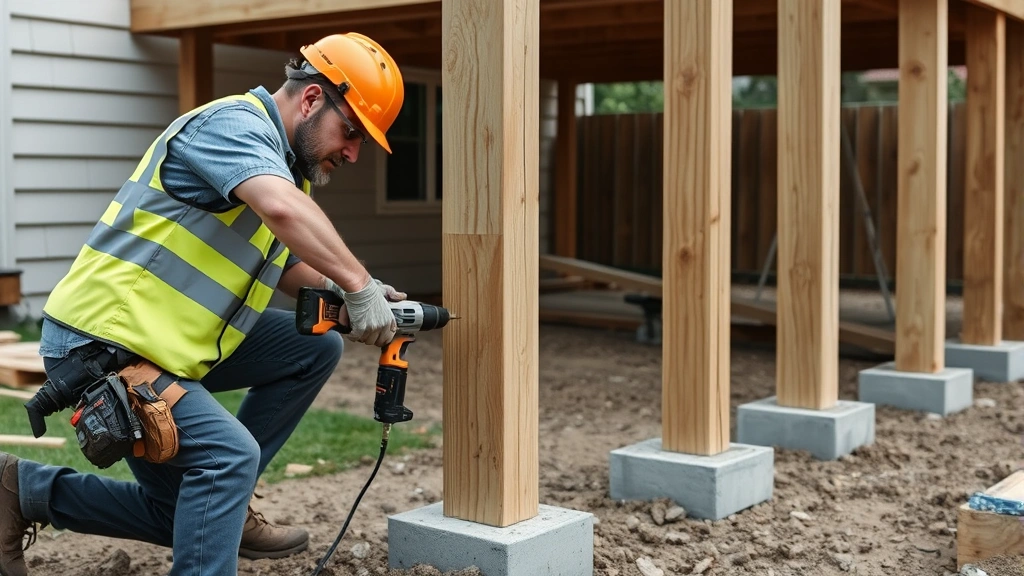
Dig holes for deck posts at each corner and at intervals along beams, typically every 4-6 feet depending on joist span and load calculations. Use a post hole auger to create straight, uniform holes. Place concrete footings or adjustable post bases in each hole. Concrete should be rated for exterior use and extend slightly above ground to shed water away from the post base.
Adjustable post bases provide flexibility for leveling and protect wood from direct soil contact. Set posts in the bases, ensuring they’re plumb using a level. Backfill holes with concrete, following manufacturer instructions for mixing and curing time. Proper concrete curing typically requires 24-48 hours before supporting weight. In cold climates, use concrete additives designed for freezing conditions.
The post-to-footing connection is critical. Use corrosion-resistant hardware rated for your lumber type. Posts should sit on footings with adequate clearance—never set wood directly on concrete. This prevents moisture absorption and rot. For decks less than 30 inches above ground in some jurisdictions, building-on-grade footings may be permitted, but verify with local codes before proceeding with this approach.
Framing the Deck Structure: Creating the Skeleton
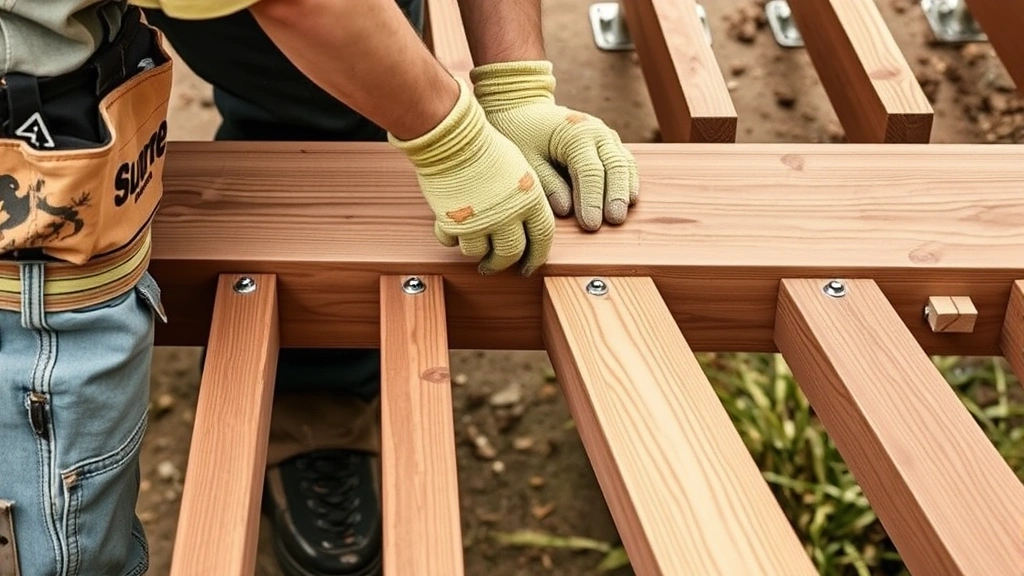
Once footings cure, install posts and beams. Cut posts to height, accounting for beam thickness and desired deck height. Posts should be perfectly vertical—use a level on two perpendicular sides to verify. Attach beams to posts using bolts or structural brackets rated for your load requirements. Never rely on nails alone; bolts provide superior strength and safety.
Beam sizing depends on joist span, post spacing, and anticipated load. The National Fire Protection Association (NFPA) and local building codes provide span tables that specify beam dimensions for various conditions. A typical residential deck with modest post spacing might use doubled 2×10 or 2×12 beams, but calculations must account for your specific design.
Joists run perpendicular to beams and support decking boards. Space joists 16 inches on center for pressure-treated lumber decking, though some composite materials require closer spacing. Attach joists to beams using joist hangers, which distribute load more effectively than nails driven through the joist side. Stagger joist connections to opposing sides of the beam for balanced loading.
Install rim joists around the deck perimeter to close gaps and provide a finished appearance. These joists should match the size and spacing of interior joists. Create blocking between joists every 4 feet to prevent twisting and improve lateral bracing. For large decks, consider installing a complete structural framework that accounts for expansion and contraction of materials.
Ensure all connections are secure and properly fastened. Double-check that the deck frame is level and square using measurements and a level. Measure diagonals—if they’re equal, the deck is square. Minor adjustments now prevent problems later. Verify that all bolts are tight and that no fasteners are missing before proceeding to decking installation.
Installing Decking Boards: Creating the Finished Surface
Begin decking installation at the house rim joist, running boards perpendicular to joists. Leave a small gap (typically 1/8 inch) between the house and the first board to allow water drainage and wood expansion. Use spacers to maintain consistent gaps between boards, which allows water drainage and prevents cupping. Stagger board joints so they don’t align over the same joist.
Secure each board with at least two fasteners per joist. Use corrosion-resistant screws rated for your decking material—they resist loosening better than nails and allow easier repairs. Pre-drill screw holes in hardwoods to prevent splitting. For composite decking, follow manufacturer specifications regarding fastener type, spacing, and installation depth.
Plan board layout to minimize waste and create balanced aesthetics. If you need to rip boards to width, cut them on the first row so the adjustment isn’t visible from common viewing angles. For large decks, stagger board lengths to distribute stress and create visual interest. Leave adequate clearance around obstacles like trees or house features.
Ensure boards are properly fastened before allowing foot traffic. Walk the completed deck, checking for squeaks or movement that indicates loose fasteners. Make adjustments as needed. For composite decking, allow proper curing time before heavy use if manufacturer recommendations specify this requirement.
Railings and Safety Features: Protecting Your Investment
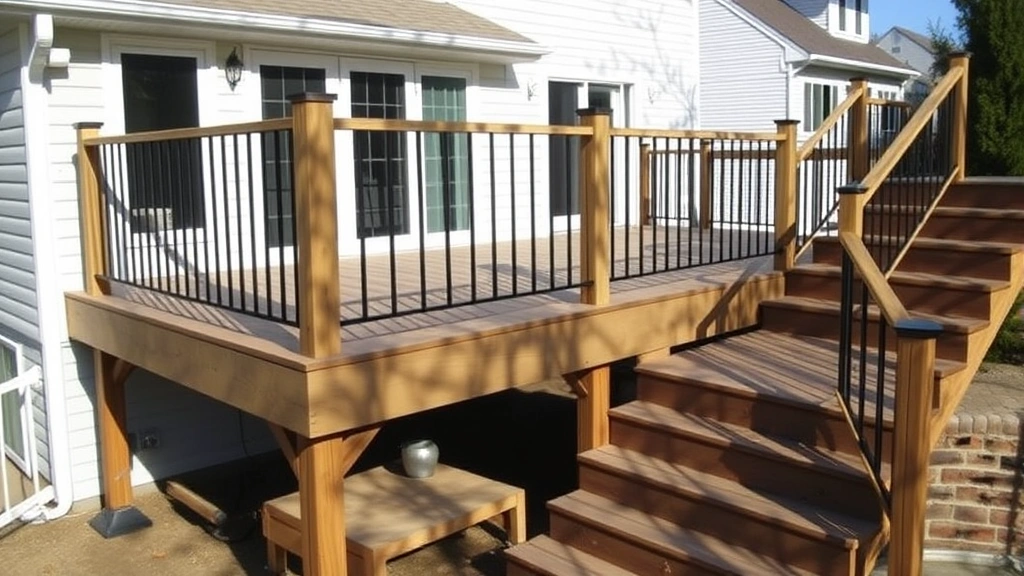
Building codes mandate railings for decks more than 30 inches above ground. Railings must be at least 36 inches high (measured from the deck surface to the top of the railing) and capable of resisting 200 pounds of force applied horizontally. Balusters (vertical spindles) must be spaced so a 4-inch sphere cannot pass between them—this prevents children from getting stuck.
Construct railings from materials matching your decking—pressure-treated wood, composite, metal, or cable systems all work well. Attach railing posts securely to the deck frame using bolts, not just surface fasteners. Posts should be no more than 6 feet apart. For strength, install railings during framing rather than after decking is complete.
Stairs require specific dimensions: treads (horizontal steps) should be 10-11 inches deep, and risers (vertical height) should be 7-7.75 inches. All steps must have consistent dimensions—variation creates tripping hazards. Install stair railings with a 34-38 inch height and ensure adequate handrail graspability. OSHA guidelines provide detailed specifications for stair and railing safety.
Consider additional safety features like deck lighting, non-slip surfaces for stairs, and clearly marked edges. LED lighting improves visibility and creates ambiance. Non-slip tape or paint on stairs prevents accidents in wet conditions. For decks near water features or with significant height, consider additional protective measures beyond basic code requirements.
Finishing and Maintenance: Protecting Your Deck Long-Term
After construction, apply protective finishes appropriate to your material. Pressure-treated wood benefits from staining and sealing every 2-3 years to maintain appearance and water resistance. Composite decking requires less maintenance but may need occasional cleaning and UV protection products. Always follow manufacturer recommendations for your specific material.
Regular maintenance extends deck life significantly. Clear debris from the surface and gutters to prevent water accumulation. Inspect fasteners annually, tightening any that have loosened. Check for signs of rot, particularly where wood contacts soil or water collects. Address problems immediately to prevent spreading damage.
Consider incorporating advanced woodworking techniques for custom features or decorative elements. Built-in benches, planters, or storage boxes add functionality and visual appeal. Ensure any additions maintain structural integrity and don’t compromise the deck’s primary function as a safe outdoor space.
For long-term durability, implement proper drainage around and beneath the deck. Ensure water flows away from footings and the house foundation. Consider installing a ground barrier under the deck to prevent weed growth and reduce moisture. Adequate ventilation underneath prevents moisture accumulation that leads to rot.
FAQ
How much does it cost to build a deck?
Costs vary widely based on size, materials, and complexity. A basic pressure-treated deck might cost $15-25 per square foot, while composite or premium materials run $30-60 per square foot. A 16×12 deck (192 sq ft) could range from $3,000 using pressure-treated wood to over $11,000 with high-end composite. Professional installation adds 30-50% to material costs.
Do I need a permit to build a deck?
Most jurisdictions require permits for decks, especially those elevated more than 30 inches. Permits ensure structural safety and code compliance. Unpermitted decks can create insurance and resale issues. Contact your local building department to determine specific requirements for your area.
How long does deck construction take?
A straightforward 12×16 deck typically takes 2-4 weeks for a homeowner working weekends, or 3-5 days for professionals. Complex designs with multiple levels, custom features, or difficult site conditions require additional time. Weather delays, permit waiting periods, and material delivery times should be factored into planning.
What’s the best decking material?
The best material depends on your priorities. Pressure-treated wood offers affordability but requires maintenance. Composite provides durability and low maintenance at higher cost. Cedar offers natural beauty but needs regular care. Hardwoods provide longevity but cost significantly more. Consider climate, maintenance willingness, and budget when choosing.
How often should I stain and seal my deck?
Pressure-treated wood typically needs staining and sealing every 2-3 years, depending on climate and exposure. Composite decking rarely needs sealing but benefits from occasional cleaning. Hardwoods may require annual treatment in harsh climates. Monitor your deck’s appearance and water absorption to determine timing.
What’s the frost line depth in my area?
Frost line depth varies by location, ranging from 12 inches in warm climates to 48+ inches in northern regions. Contact your local building department, cooperative extension office, or check USDA hardiness zone maps to determine the frost line depth for your area.
Can I build a deck myself or should I hire professionals?
DIY deck building is achievable for those with basic carpentry skills and access to proper tools. However, complex designs, structural calculations, and permit compliance may warrant professional help. Consider hiring professionals for foundation work or critical structural elements while handling finishing work yourself to balance cost and quality.


