DIY Boat Dock? Expert Tips on Cost & Construction
Building your own boat dock is one of the most rewarding waterfront projects a homeowner can undertake. Whether you’re looking to launch a small fishing boat, kayak, or personal watercraft, constructing a dock yourself can save thousands of dollars compared to hiring professional contractors. However, this project requires careful planning, proper permits, and an understanding of waterfront construction principles to ensure safety, durability, and compliance with local regulations.
A typical residential boat dock can cost anywhere from $3,000 to $15,000 or more when built DIY, compared to $10,000 to $50,000+ for professional installation. The final price depends on dock size, materials chosen, water depth, soil conditions, and local building codes. This comprehensive guide will walk you through everything you need to know about planning, budgeting, and constructing a functional boat dock on your property.
Understanding Dock Types and Design
Before you purchase a single board or bolt, you need to understand the different dock styles available and which suits your waterfront property best. The three primary dock types are fixed docks, floating docks, and pile-supported docks, each with distinct advantages and cost implications.
Fixed docks are permanently attached to the shoreline and extend into the water. They’re ideal for properties with stable banks and minimal water level fluctuation. Fixed docks are generally the most affordable DIY option because they don’t require complex floating mechanisms or extensive pile driving. However, they perform poorly in areas with significant tidal changes or seasonal water level variations, and they can create navigation hazards during high water periods.
Floating docks rise and fall with water levels, making them perfect for lakes and rivers with variable water depths. These docks utilize buoyant chambers or barrels to stay afloat while remaining tethered to shore anchors. Floating docks cost more initially but require less site preparation and adapt naturally to water level changes. They’re also easier to remove for winter storage in cold climates.
Pile-supported docks use driven pilings (large posts) to support the deck above water. This style works well for deeper water and provides excellent stability. Pile driving typically requires specialized equipment and professional help, making this the most expensive option for DIYers. However, pile-supported docks offer superior longevity and can accommodate larger boats and heavier loads.
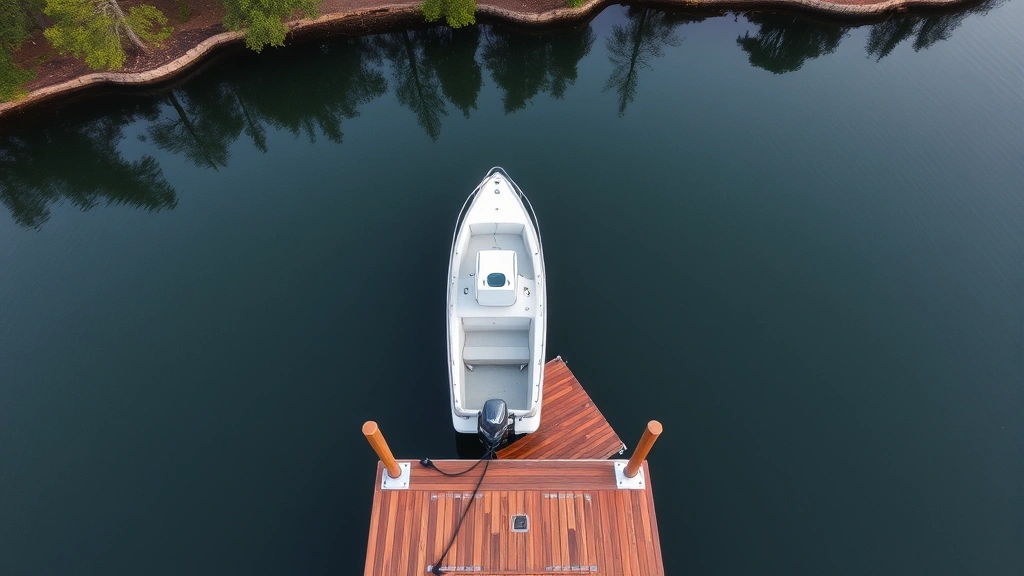
Consider your DIY project planning approach when selecting a dock type. Measure your waterfront carefully, noting water depth at various distances from shore, seasonal water level changes, and boat size requirements. A 4-foot by 20-foot dock is a popular starter size for small boats and kayaks, while larger vessels may require 6-foot by 30-foot platforms or custom configurations.
Permits and Regulations
This is the critical step many DIYers overlook, and it can result in costly fines or forced removal of your dock. Every jurisdiction has specific regulations governing waterfront construction, and most require permits before you begin work.
Contact your local state water resources control board or county planning department to understand permit requirements. You’ll typically need to submit a site plan showing dock dimensions, materials, water depth, setback distances from property lines, and environmental impact considerations. Many areas require environmental assessments to ensure your dock doesn’t harm aquatic vegetation, fish habitats, or water quality.
The International Code Council (ICC) publishes building codes that many jurisdictions adopt for waterfront structures. These codes specify minimum design standards for load capacity, decking materials, guardrail heights, and fastening requirements. Some states have additional coastal construction guidelines if you’re building near saltwater.
Expect permit costs ranging from $100 to $500, with processing times of 2-8 weeks. Some jurisdictions also require inspections during construction and a final approval before you can use the dock. Don’t skip this step—unpermitted docks can be ordered removed regardless of construction quality, and you’ll lose your entire investment.
Materials and Cost Breakdown
Material selection dramatically impacts both cost and longevity. While pressure-treated lumber is affordable, it requires regular maintenance and typically lasts 15-20 years in freshwater or 5-10 years in saltwater. Composite materials and tropical hardwoods cost significantly more but offer superior durability and minimal maintenance requirements.
Pressure-treated lumber costs $1.50-$3.00 per linear foot for standard 2×8 and 2×10 boards. A typical 4×20 dock using treated lumber might cost $800-$1,200 for decking material alone. Pressure-treated posts and stringers add another $400-$600. This is the most budget-friendly option for DIYers but requires annual inspection and maintenance to prevent rot.
Composite decking materials like plastic-lumber blends cost $3.00-$8.00 per linear foot. While the upfront cost is 2-3 times higher than pressure-treated wood, composites resist rot, splinters, and insect damage, virtually eliminating maintenance. A composite 4×20 dock costs $1,600-$3,200 for decking, but you’ll save hundreds in maintenance over 20+ years of service life.
Tropical hardwoods such as cumaru or ipe are naturally rot-resistant and cost $4.00-$12.00 per linear foot. These premium materials are ideal for saltwater applications and can last 25-30 years with minimal maintenance. However, they’re difficult to work with—requiring pre-drilling for fasteners and specialized saw blades.
Beyond decking materials, budget for hardware, fasteners, flotation devices, and anchoring systems. Quality stainless steel bolts, lag screws, and galvanized fasteners cost 2-3 times more than standard hardware but won’t corrode in wet environments. For floating docks, high-density polyethylene barrels or specialized flotation chambers cost $200-$600 depending on buoyancy requirements. Anchor systems using concrete footings, chains, and cleats add another $300-$500.
Here’s a realistic cost breakdown for a basic 4×20 pressure-treated fixed dock:
- Decking boards (2×6, 16″ spacing): $800-$1,200
- Stringers and support beams: $400-$600
- Posts and pilings: $300-$500
- Hardware and fasteners: $200-$350
- Guardrails and safety features: $300-$500
- Tools and equipment rental: $200-$400
- Total: $2,200-$3,550
For a floating dock of equivalent size, add $600-$1,200 for flotation devices and $200-$400 for anchoring systems, bringing the total to approximately $3,000-$5,150.
Site Preparation and Foundation
Proper site preparation determines whether your dock will last 10 years or 30 years. Begin by clearing the waterfront area of vegetation, rocks, and debris. Remove any unstable soil or organic material that could settle or decompose, causing structural movement.
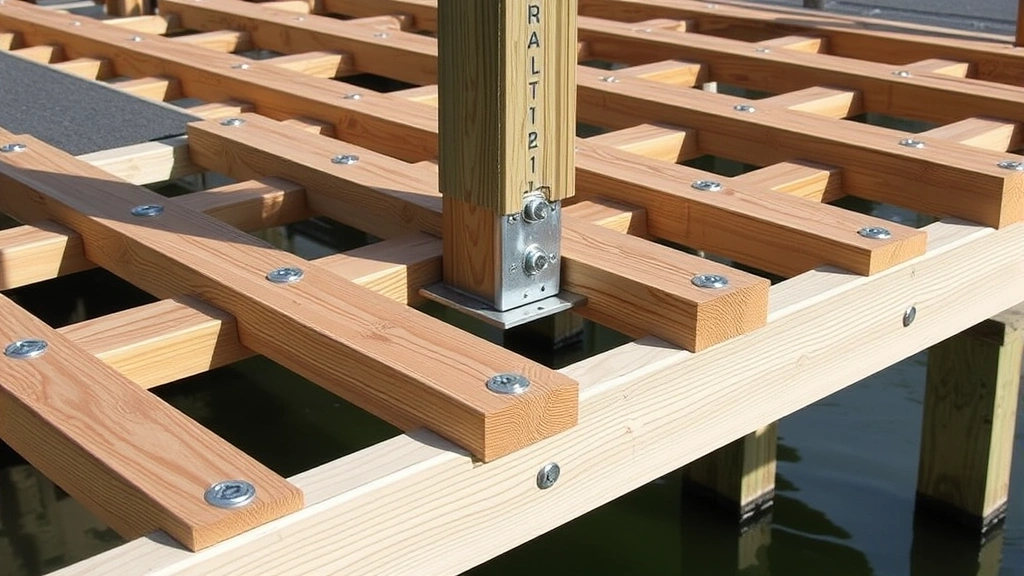
For fixed docks, you’ll need stable anchor points on shore. Drive pressure-treated posts 3-4 feet into the ground, ensuring they’re below the frost line (varies by climate, typically 2-4 feet deep). Posts should extend 2-3 feet above the highest water level to support stringers and decking. Use concrete footings for superior stability—dig holes 3 feet deep, set posts in concrete, and allow 7 days for curing before loading.
For floating docks, prepare a stable shore anchor system. This typically involves concrete footings with eye bolts or cleats that accommodate tether lines. The anchor points must be positioned to prevent the dock from drifting or rotating when boats are loading and unloading. Use galvanized or stainless steel hardware to prevent corrosion.
If you’re building a pile-supported dock in deep water, you’ll likely need to hire professional pile driving equipment. Pilings must be driven 10-15 feet into the lakebed or riverbed, and incorrect installation can result in structural failure. The cost of professional pile driving typically ranges from $1,500-$5,000, making this the largest single expense for deep-water installations.
Check water depth at multiple points along your proposed dock location. Use a long pole or surveying equipment to map the bottom profile. Shallow spots may require dredging (expensive and often restricted), while steep drop-offs might require longer pilings or floating solutions. Understanding your water bottom—whether it’s mud, sand, rock, or silt—helps you select appropriate foundation methods.
Building the Dock Structure
With permits approved and site preparation complete, you’re ready to begin construction. Start by installing the primary support structure—either shore-based posts and stringers for fixed docks or floating platforms for flex-dock systems.
Fixed dock construction begins with stringers (the main beams running parallel to shore). These typically use doubled 2×10 or 2×12 pressure-treated lumber, bolted to shore posts at one end. The outer end either rests on pilings driven into the waterbed or cantilevers with proper support. Space stringers 4-6 feet apart depending on decking thickness and expected loads.
Once stringers are installed and level, attach decking boards perpendicular to stringers using galvanized or stainless steel fasteners. Leave 1/4-inch gaps between boards for water drainage and seasonal wood movement. Stagger board joints across multiple stringers for structural integrity. Use ring-shank nails or corrosion-resistant screws rated for marine use—regular fasteners will rust and fail within months.
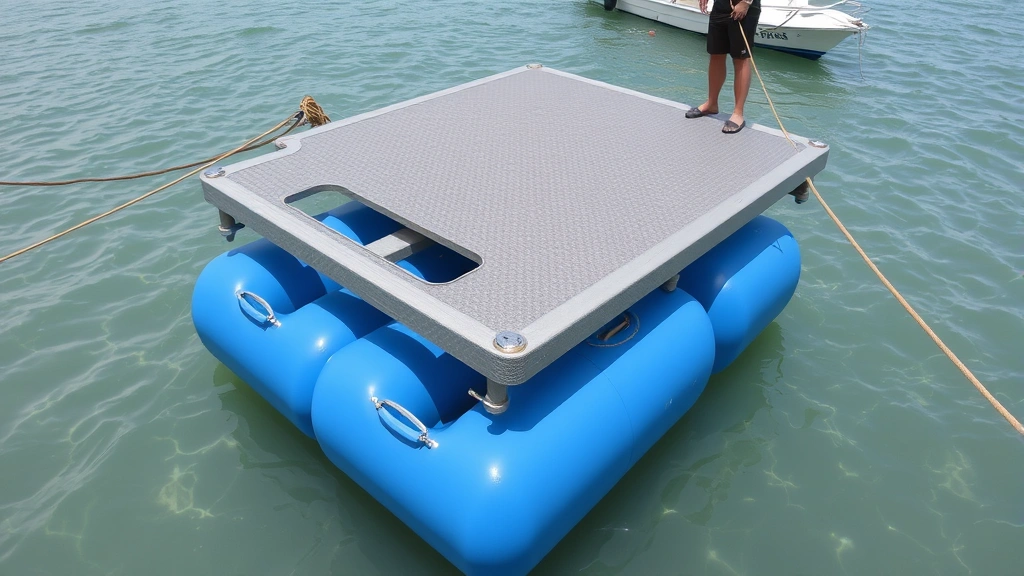
Floating dock assembly differs significantly. Construct the dock platform on shore using treated lumber or composite materials, then add flotation devices underneath. Most DIYers use 55-gallon plastic drums or specialized polyethylene flotation barrels. These must be securely fastened to the dock frame using bolts and brackets, not just resting underneath. Calculate buoyancy carefully—each 55-gallon drum provides approximately 400 pounds of flotation. A 4×20 dock with decking and people weighs roughly 2,000-2,500 pounds, requiring at least 6-7 barrels for safe operation.
After flotation installation, carefully launch the dock into water and position it where it will operate. Attach tether lines to shore anchors using marine-grade rope and hardware. Tethers should allow 3-5 feet of lateral movement to accommodate wave action and boat traffic, but prevent the dock from drifting.
This phase requires careful attention to safety. Work with a helper, use proper lifting techniques, and never work alone near water. Wear a safety-focused approach throughout construction, including life jackets during water-based work.
Safety Features and Finishing
A functional dock is only safe if it includes proper guardrails, cleats, and slip-resistant surfaces. Building codes typically require guardrails on docks longer than 20 feet or higher than 2 feet above water. Guardrails must be 36-42 inches tall with horizontal rails spaced no more than 4 inches apart to prevent children from slipping through.
Install multiple cleats (metal or plastic fixtures) along dock sides for tying boats. Space cleats 4-6 feet apart and position them at a comfortable height for boaters to reach while standing on shore or in a boat. Use stainless steel cleats rated for marine use—they’ll last decades without corrosion.
Apply non-slip surface treatment to decking to prevent accidents when wet. Options include adhesive-backed non-slip tape ($0.50-$1.50 per linear foot), paint-on non-slip coating ($100-$200 per gallon), or textured composite materials that provide natural slip resistance. This is essential for safety and surprisingly affordable.
Add dock lighting if you’ll use the dock during evening hours. Low-voltage LED lights mounted on posts or railings cost $15-$50 each and run on solar power or 12-volt systems. Proper lighting improves safety and allows you to appreciate your dock investment after sunset.
Install a boat lift or jet ski lift if your budget allows. These mechanical systems cost $3,000-$8,000 but protect boats from weather damage and make loading/unloading easier. For DIYers, simple pulley systems costing $200-$500 provide manual boat lifting capability.
Maintenance and Longevity
Regular maintenance extends dock life dramatically. Establish a seasonal inspection routine checking for loose bolts, rotting wood, corroded fasteners, and worn flotation devices.
Spring preparation involves inspecting the entire dock structure after winter. Check for ice damage, debris accumulation, and structural movement. Clean decking thoroughly and reapply non-slip coating if needed. Inspect tether lines on floating docks and replace any frayed or damaged rope.
Summer maintenance includes monthly inspections and fastener checks. Tighten any loose bolts—vibration from boat traffic and water movement can loosen fasteners over time. Inspect decking for splinters and sand or plane rough spots. Check flotation devices for punctures or leaks on floating docks.
Fall preparation means preparing for winter weather. Remove debris, inspect and repair any damage, and consider winterization. In cold climates, drain water from flotation devices and remove the dock for winter storage to prevent ice damage. In mild climates, simply clean and inspect thoroughly.
Winter considerations vary by region. In areas with ice formation, remove floating docks to prevent ice damage. Fixed docks can remain, but inspect them frequently for ice buildup and structural stress. Use ice cleats or anti-ice products to prevent slipping hazards.
Pressure-treated wood requires periodic sealing—typically every 2-3 years. Composite materials need occasional cleaning but resist rot and don’t require sealing. Inspect all fasteners annually, replacing any corroded hardware with stainless steel equivalents. A small investment in annual maintenance prevents expensive repairs and extends dock life by 10+ years.
For detailed guidance on durable construction techniques, consult the Society of Naval Architects and Marine Engineers for technical specifications on waterfront structures.
FAQ
How much does it cost to charter a yacht versus building a dock?
While yacht charters typically cost $2,000-$10,000+ per week, building a personal dock allows you to keep your own boat accessible year-round. A $3,000-$5,000 DIY dock investment pays for itself in just one or two charter trips, making dock ownership far more economical for frequent boaters.
Do I need a permit for a residential boat dock?
Yes, virtually all jurisdictions require permits for dock construction. Contact your local planning department or EPA regional office to understand requirements. Unpermitted docks can be ordered removed regardless of quality.
What’s the best material for a dock in saltwater?
Tropical hardwoods like ipe or cumaru, or marine-grade composite materials, are best for saltwater. Pressure-treated wood deteriorates rapidly in saltwater (5-10 years), while quality hardwoods last 25+ years with minimal maintenance.
Can I build a dock on a rental property?
No, you must own the waterfront property. Check deed restrictions and homeowners association rules before beginning. Some properties have riparian rights limitations that prevent dock construction.
How deep must water be for a boat dock?
Minimum depth depends on your boat’s draft. Small fishing boats typically need 2-3 feet, while larger cruisers require 4-6 feet. Design your dock length to extend into water deep enough to float your boat at the lowest water level.
What’s the lifespan of a DIY dock?
Pressure-treated docks last 15-20 years freshwater, 5-10 years saltwater. Composite docks last 25-30 years, while tropical hardwood docks can last 30+ years. Proper maintenance extends these timelines significantly.
Can floating docks handle heavy boats?
Yes, if properly designed with sufficient flotation. Calculate total weight (dock + boat + people) and ensure flotation capacity exceeds this by 20-30%. Most floating docks safely accommodate boats up to 30,000 pounds.
Is professional help necessary for dock construction?
For pile-driven docks in deep water, yes—hire professionals for pile driving. For fixed and floating docks, experienced DIYers can handle most construction. Consider hiring professionals for electrical work if adding dock lighting or power.


