
DIY Shed Building: What Experts Recommend
Building a shed is one of the most rewarding DIY projects you can undertake. Whether you need extra storage space, a workshop, or a backyard retreat, a well-constructed shed adds functionality and value to your property. However, successful shed building requires careful planning, proper materials, and adherence to local building codes and safety standards. This comprehensive guide walks you through everything experts recommend for creating a sturdy, long-lasting structure that meets your needs and regulations.
Before breaking ground on your shed project, understanding the fundamentals of construction is essential. From site preparation to roof installation, each step plays a crucial role in the durability and safety of your finished structure. We’ll explore what professional builders and construction experts consistently recommend throughout the shed-building process, helping you avoid costly mistakes and ensure your project succeeds.
Planning and Permits
Experts unanimously agree that planning is the foundation of any successful shed project. Before purchasing materials or breaking ground, invest time in detailed planning. Start by determining your shed’s purpose—storage, workshop, garden retreat—as this influences size, ventilation, and interior layout requirements. Most building professionals recommend sketching out your design with accurate measurements and considering how the structure will fit within your property’s landscape.
Checking local building codes and zoning regulations is absolutely non-negotiable. Permits may be required depending on your shed’s size, location, and local jurisdiction. Many areas have specific setback requirements—the minimum distance your shed must be from property lines—and height restrictions. Building departments typically publish these requirements online, or you can visit in person. Failing to obtain necessary permits can result in fines, difficulty selling your property, or being forced to remove the structure entirely.
When reviewing local regulations, pay attention to foundation requirements, as these vary significantly by region. Some areas require concrete foundations, while others permit gravel or treated wood. Additionally, check if electrical work is planned—any wiring will likely require permits and inspection. Taking time to understand these requirements upfront prevents costly rework and legal complications later.

Site Preparation and Foundation
The foundation is absolutely critical to your shed’s longevity. Experts emphasize that proper site preparation determines whether your shed remains level and protected from moisture damage for decades or deteriorates within a few years. Start by selecting a location with good drainage, avoiding low spots where water collects. If your yard tends to hold water, consider elevating your shed or improving drainage around the site.
Clear the area completely of vegetation, rocks, and debris. Most professionals recommend removing at least 4-6 inches of topsoil from the footprint area. This prevents grass and weeds from growing underneath and reduces moisture retention. For the foundation itself, experts recommend one of three approaches: concrete piers, a gravel base, or a concrete slab.
Concrete piers are popular for their cost-effectiveness and ease of installation. They elevate the structure, improving air circulation underneath and protecting the floor from ground moisture. Space piers 4-6 feet apart in rows, ensuring the top surfaces are level. Use a laser level or transit to verify this critical step—an uneven foundation leads to doors that won’t close properly and structural stress.
Gravel bases work well in areas with good drainage. Spread 4-6 inches of compacted gravel, creating a level surface. Some builders add landscape fabric underneath to prevent weeds. While economical, gravel requires occasional raking and regrading.
Concrete slabs provide the most permanent solution, though they’re more expensive and labor-intensive. If you choose a slab, ensure proper slope (1/8 inch per foot) for water drainage and install a vapor barrier underneath to prevent moisture from rising into wooden framing.
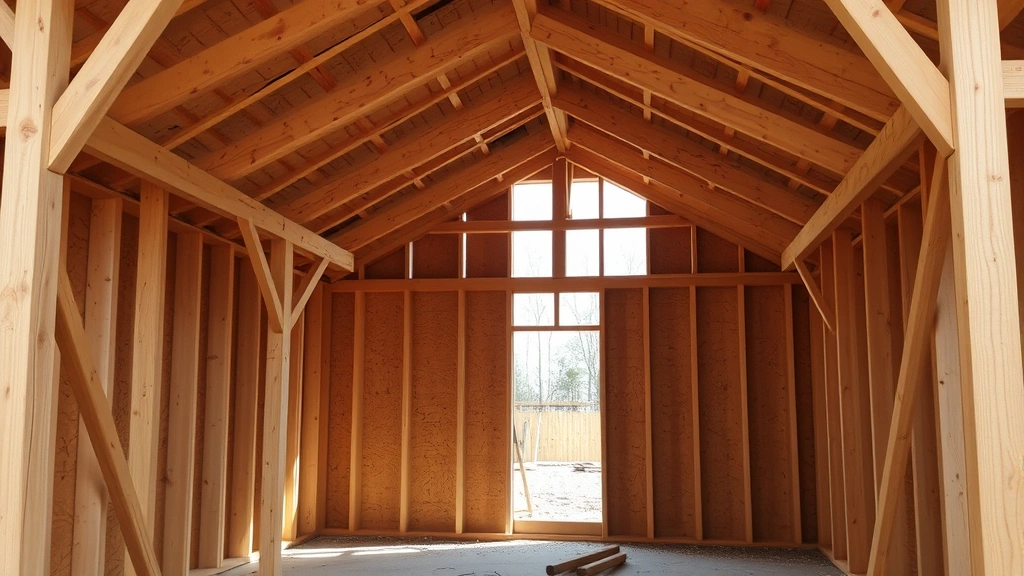
Framing Best Practices
Proper framing is where structural integrity begins. Experts recommend using pressure-treated lumber for the floor frame and any wood that contacts the foundation, as this resists rot and insect damage. For above-ground framing, standard construction lumber is acceptable, though many builders prefer pressure-treated for additional durability.
When framing walls, follow standard 16-inch on-center spacing—studs spaced 16 inches apart from center to center. This spacing is proven to provide adequate support while using materials efficiently. Ensure corners are properly braced with diagonal bracing or sheathing, which prevents racking (lateral shifting) when wind or ground movement occurs. Many builders recommend installing permanent diagonal bracing in at least two walls for additional stability.
Roof design is crucial and should match your climate and aesthetic preferences. The National Wood Construction Board provides detailed guidance on roof pitch and structure. A minimum 4:12 pitch (4 inches of vertical rise for every 12 inches of horizontal distance) is recommended in most climates for adequate water drainage and snow shedding. In heavy snow areas, steeper pitches are advisable.
Experts emphasize using proper fastening techniques throughout. Galvanized or stainless steel fasteners resist corrosion far better than standard steel, extending your shed’s lifespan significantly. When securing framing members, use appropriate fastener types—nails for general framing, bolts for critical connections, and screws for applications requiring easy future removal.
Roofing and Weather Protection
The roof is your shed’s primary defense against weather, making material selection and installation critical. Asphalt shingles remain the most popular choice due to affordability and adequate performance in most climates. However, metal roofing is gaining popularity among builders who value longevity—metal roofs often last 40-50 years compared to 15-25 years for asphalt. Metal also sheds snow more effectively in heavy snow regions.
Regardless of shingle type, underlayment is essential. Professional roofers always install roofing felt or synthetic underlayment beneath shingles, providing a secondary moisture barrier. This prevents water from penetrating if shingles are damaged or lifted by wind. In areas prone to ice dams, ice and water shield—a self-adhering membrane—should cover the first 3-4 feet of roof from the eaves.
Proper ventilation prevents moisture and heat buildup in the attic space. Install soffit vents along the eaves and ridge vents at the peak, allowing air to circulate. This ventilation prevents premature shingle deterioration and reduces heat buildup in summer. The National Roofing Contractors Association recommends at least 1 square foot of ventilation for every 150 square feet of attic space.
Flashing—the metal strips that direct water around protrusions like vents and chimney pipes—is often overlooked but absolutely essential. Improper flashing is a common source of leaks. Install flashing under shingles on the upper side and over shingles on the lower side, following manufacturer specifications precisely.
Doors, Windows, and Ventilation
Doors and windows significantly impact functionality and should be selected with purpose in mind. For storage sheds, a single 3-foot wide door is often sufficient, though double doors (totaling 4-6 feet) improve access for large items. Experts recommend commercial-grade hinges and weatherstripping—these modest upgrades dramatically improve durability and weatherproofing.
Windows provide natural light and improve the space’s usability. Even small windows significantly brighten interiors and reduce the need for artificial lighting during daytime hours. Ensure windows are properly sealed with weatherstripping and caulk to prevent air and water infiltration.
Ventilation is often underestimated in importance. Without adequate air circulation, moisture accumulates, promoting mold growth and material deterioration. Install vents on opposing walls to create cross-ventilation. Louvered vents work well, as they exclude rain while allowing air passage. In humid climates, consider installing a small exhaust fan to actively remove moisture.
Interior Organization
Once your structure is weatherproof, interior organization determines how effectively you use the space. Experts recommend planning storage solutions during the design phase rather than retrofitting later. Wall-mounted shelving, pegboards, and tool racks maximize vertical space, which is especially valuable in smaller sheds.
If your shed will house tools or equipment, consider electrical installation. Running power to your shed enables lighting, charging stations, and tool operation. This requires OSHA-compliant installation with proper grounding, appropriate circuit protection, and weatherproof outlets. Many jurisdictions require licensed electricians for this work.
Flooring in sheds varies by use. A concrete slab provides durability for heavy equipment and machinery. For storage sheds, stained or sealed concrete is practical and easy to maintain. Wooden floors require more maintenance but are warmer underfoot. Whatever surface you choose, ensure it’s level and properly sloped for drainage if moisture is a concern.
Safety Considerations
Safety should be paramount throughout your shed-building project. Always wear appropriate personal protective equipment—safety glasses, work gloves, dust masks, and hearing protection when operating power tools. Many DIY injuries occur when builders rush or skip safety precautions.
Electrical safety is paramount if you’re running power to your shed. Install a dedicated circuit with proper breaker protection. All outdoor outlets should be GFCI-protected (Ground Fault Circuit Interrupter), which cuts power instantly if a fault is detected. Never run extension cords permanently—install proper wiring through conduit.
When working at heights—installing roofing or high wall sections—use proper fall protection. Even from modest heights, falls can cause serious injury. Use scaffolding, ladders with stabilizers, or safety harnesses as appropriate for the task.
Proper tool operation prevents injuries. Read manufacturer instructions for all power tools before use. Maintain tools in good condition—dull saw blades are more dangerous than sharp ones because they require excessive pressure. Never disable safety features on tools, and keep hands clear of moving parts.
Fire safety deserves attention, especially if you’re using your shed as a workshop or storing flammable materials. Keep a fire extinguisher nearby and know how to use it. Store flammable liquids in approved containers in a well-ventilated area away from ignition sources.
FAQ
Do I need a permit to build a shed?
Permit requirements vary by location. Many jurisdictions require permits for sheds exceeding certain sizes (often 100-200 square feet). Some areas require permits for any permanent structure. Contact your local building department to determine specific requirements for your area. Obtaining permits ensures your structure meets safety codes and prevents legal complications.
What’s the best foundation type for a shed?
The best foundation depends on your climate and budget. Concrete piers offer good balance—affordable, effective, and relatively easy to install. In areas with poor drainage, piers are preferable to slabs. In very cold climates where frost heave is a concern, piers should extend below the frost line. Consult local architectural guidelines for frost depth requirements in your region.
How long does a typical shed last?
A well-built shed using quality materials and proper maintenance can last 20-30 years or longer. Pressure-treated wood resists rot, metal roofing extends longevity, and regular maintenance—resealing wood, replacing damaged shingles, clearing gutters—significantly extends lifespan. Sheds in harsh climates may require more frequent maintenance.
Can I build a shed on a concrete patio?
Building directly on an existing concrete patio is possible if the patio is level and in good condition. However, the concrete should slope slightly for drainage, and you may want to add a vapor barrier between the concrete and wooden framing. Ensure the patio is large enough for the shed footprint plus any overhang. If the patio is cracked or uneven, address these issues first.
What tools do I need for a DIY shed project?
Essential tools include a circular saw, drill, level, measuring tape, square, hammer, and nail gun (optional but valuable). A table saw or miter saw improves accuracy for framing cuts. For roofing, you’ll need a roofing nailer and appropriate safety equipment. Many builders rent specialized tools like nail guns and scaffolding rather than purchasing them. Don’t skimp on quality tools—poor-quality tools lead to inaccurate work and frustration.
Should I hire professionals for any parts of the project?
Many DIYers successfully complete entire shed projects independently. However, hiring professionals for specific tasks—roofing, electrical work, or concrete work—ensures these critical elements meet code and function properly. Professional roofers, for example, work safely at heights and understand flashing requirements thoroughly. Electrical work often requires licensed professionals per local code. Assess your skills honestly and hire professionals where safety or code compliance is paramount.


