Is DIY Drywall Repair Possible? Expert Insights
Drywall damage is one of the most common issues homeowners face, whether from accidental wall impacts, water damage, or settling foundations. The good news is that many drywall repairs are absolutely within reach for DIYers willing to invest time in learning proper techniques. From small nail holes to larger structural damage, understanding when you can tackle repairs yourself versus when to call professionals is essential for maintaining your home’s integrity and appearance.
This comprehensive guide explores the reality of DIY drywall repair, breaking down which projects are manageable for beginners and which require professional expertise. We’ll cover the tools you’ll need, step-by-step repair methods, and safety considerations that should guide your decision-making process.
Understanding Drywall Damage Types
Before attempting any drywall repair, you need to identify the type and extent of damage you’re dealing with. Drywall damage falls into several categories, each requiring different repair approaches. Small holes—typically less than one inch in diameter—are the easiest to repair and perfect for beginners. These might result from nail pops, picture hangers, or minor impacts.
Medium damage includes holes ranging from one to six inches across, often caused by doorknob impacts or accidental kicks. These require more skill but remain manageable for homeowners with basic construction knowledge. Large damage encompasses areas bigger than six inches and may involve structural concerns. Water damage presents its own challenges, as you must address the underlying moisture issue before attempting repairs, a concept similar to understanding proper basement finishing techniques where moisture control is paramount.
Structural damage—cracks extending from corners, damage near load-bearing walls, or areas showing signs of settling—typically requires professional assessment. The International Code Council (ICC) provides building standards that may apply to your repairs, particularly if they involve structural elements or fire-rated walls.
Essential Tools and Materials
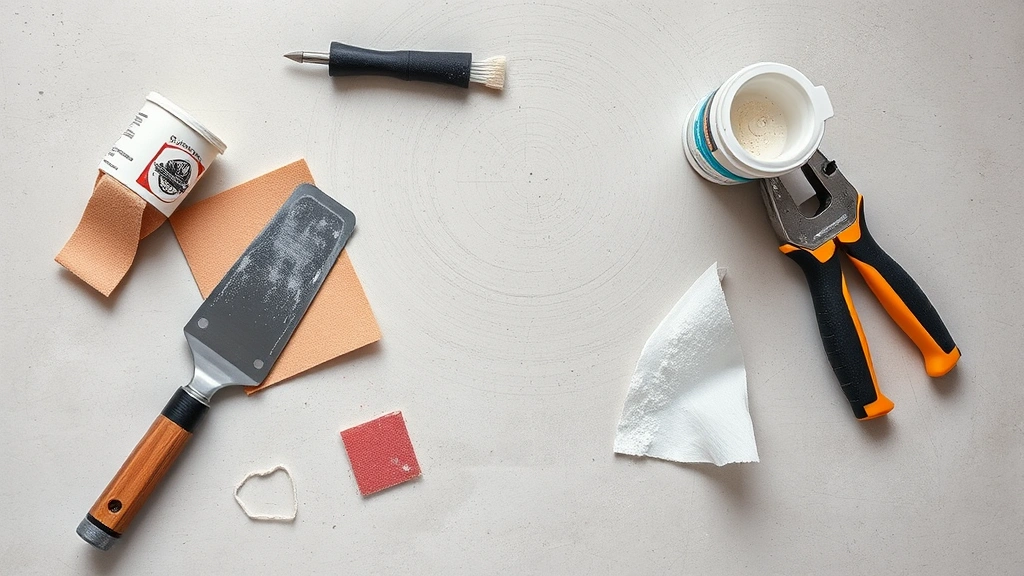
Successful drywall repair depends heavily on having the right equipment. For small repairs, you’ll need basic hand tools: a putty knife (2-4 inches wide), sandpaper in various grits (120, 150, and 220), a drywall saw or utility knife, and a taping knife for spreading joint compound. A drywall pole sander extends your reach for ceiling repairs and reduces strain on your arms and shoulders.
Material requirements vary by repair size. Joint compound (also called mud) serves as your primary filler and comes in different formulations—lightweight for easier sanding, all-purpose for general work, and topping compound for final finishing coats. You’ll also need drywall tape, either mesh or paper varieties, depending on your repair method. Primer and paint matching your existing walls complete the finishing process.
For medium to large repairs, consider investing in additional tools: a drywall circle cutter for clean circular patches, a T-square for straight edges, and a utility knife with fresh blades for precise cuts. A OSHA-compliant dust mask is essential, as drywall dust contains silica particles that pose respiratory health risks. Safety glasses protect your eyes during overhead work, and work gloves prevent cuts and skin irritation from joint compound.
Small Hole Repair Techniques
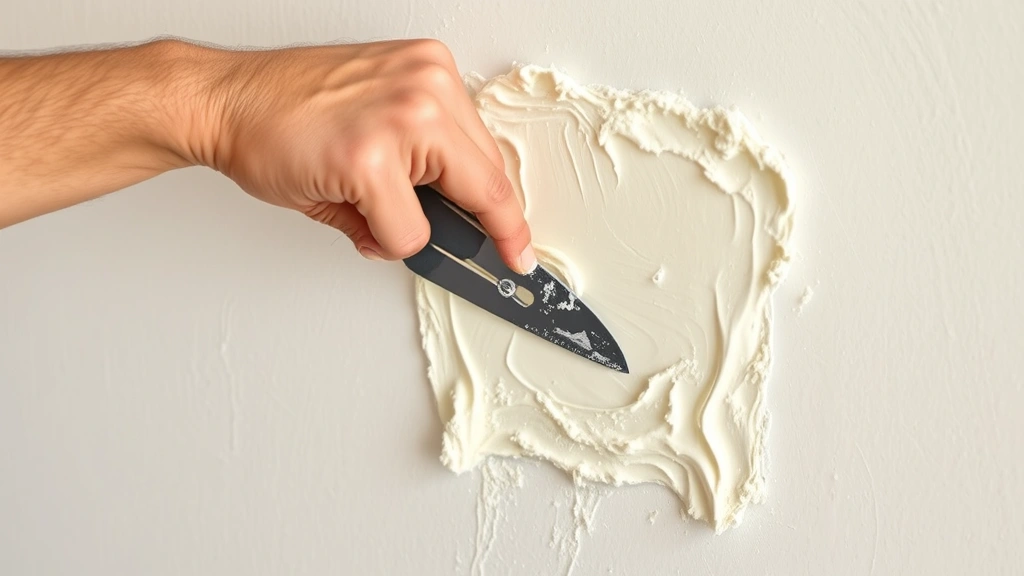
Small holes—those under one inch—represent the perfect entry point for DIY drywall repair. The spackling method works beautifully for these minor imperfections. Start by cleaning the hole, removing any loose drywall paper or debris with a putty knife. Apply spackling compound directly into the hole using a 2-inch putty knife, overfilling slightly since the compound shrinks as it dries. Once dry (typically 1-2 hours), sand smooth with 120-grit sandpaper, then apply a second coat if needed.
For slightly larger small holes (3/4 to 1 inch), the patch-and-tape method provides better results. Cut a small square or rectangle around the damage, removing all loose material. Cut a patch from drywall or use a self-adhesive mesh patch, applying it directly over the hole. Cover the patch with joint compound, feathering the edges outward 6-8 inches. This feathering technique—gradually thinning the compound at the edges—creates an invisible repair when properly executed.
The key to invisible small repairs lies in patience with sanding. After your final coat dries completely, sand with 220-grit sandpaper using light, circular motions. Wipe away dust with a damp sponge and allow to dry before priming and painting. These techniques apply whether you’re touching up walls in a primary bedroom or finishing a DIY house painting project.
Medium Damage Repairs
Holes ranging from one to six inches require a more structured approach but remain within DIY capability. The box-cutting method works best for these repairs. Using a drywall saw or utility knife, cut a clean rectangle around the damage, extending at least two inches beyond the damaged area. Your goal is creating straight, even edges—wobbly cuts result in visible seams.
Cut a drywall patch to fit your opening exactly, then secure it using drywall screws or nails spaced six inches apart around the perimeter. The screws should sink slightly below the surface but not tear the paper facing. Once secured, apply joint compound over the entire patch, covering all seams and screw heads. Use a 6-8 inch taping knife for this first coat, feathering edges outward.
Medium repairs typically require three coats of joint compound: the first coat embeds tape and covers fasteners, the second coat builds up the repair area and smooths transitions, and the final coat creates a finished appearance. Allow each coat to dry completely (4-8 hours depending on humidity) before sanding with progressively finer grits. The patience invested in multiple coats and careful sanding directly determines whether your repair blends invisibly with surrounding walls.
Large Area Replacements
Repairs exceeding six inches or spanning multiple studs move into territory requiring significant skill and planning. Large replacements demand accurate measurements and understanding of drywall installation standards. Standard drywall sheets measure 4×8 feet (sometimes 4×12), and professional installation typically involves screws spaced 12 inches apart on studs and 16 inches apart on ceilings.
For large repairs, you’ll likely need to replace an entire section of drywall rather than patching. Measure from stud center to stud center, mark your cutting lines on both sides of the damage, and use a drywall saw to cut out the damaged section. This is where understanding basic framing becomes important—you need to know where studs are located, typically 16 or 24 inches apart.
Install backing boards or blocking between studs at the patch edges, providing a nailing surface for your new drywall piece. Cut your replacement patch to fit precisely, secure it with drywall screws, then tape and mud all seams using the multi-coat method. Large repairs are significantly more visible than small ones, so meticulous finishing work is absolutely essential. Many homeowners find that large repairs justify calling professionals, particularly if the damaged area is highly visible or if the underlying cause (water damage, structural movement) requires expert assessment.
Finishing and Taping Skills
The finishing process separates amateur-looking repairs from professional results. Proper taping technique creates the foundation for invisible repairs. When applying drywall tape, use a 4-6 inch taping knife to embed the tape into a thin layer of joint compound, pressing firmly to eliminate air bubbles and wrinkles. Paper tape requires more skill than mesh tape but provides superior results when properly installed.
Joint compound application demands consistent technique. Load your taping knife with compound, then use a smooth, even motion to spread it across the repair area, maintaining consistent pressure. Feather the edges by reducing compound thickness gradually toward the surrounding wall—this creates gradual transitions that don’t catch light or cast shadows. The goal is making your repair completely invisible when painted, which requires compound extending 10-12 inches beyond the original damage for large repairs.
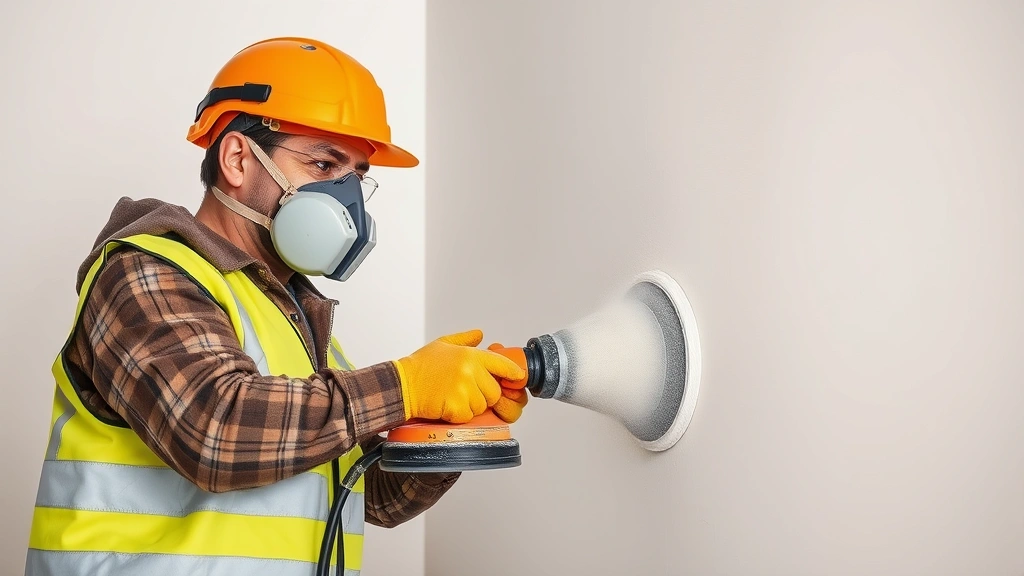
Sanding technique significantly impacts final appearance. Always sand between coats after compound dries completely, using progressively finer grits (120, 150, 220). Sand in circular motions, maintaining light pressure to avoid gouging. Wear a dust mask during sanding—drywall dust accumulation poses health risks and creates a mess. After final sanding, wipe the entire repair area with a damp sponge to remove all dust before priming and painting, ensuring proper paint adhesion and finish quality.
Understanding finishing techniques helps with other home improvement projects too, such as planning home security installations that might require wall penetrations or learning new skills that expand your DIY capabilities.
When to Call a Professional
Recognizing your limitations is crucial for home safety and quality results. Extensive water damage requires professional assessment because hidden moisture can promote mold growth and structural deterioration. Professionals use moisture meters and thermal imaging to identify moisture extent, then address underlying causes before repair work begins. The American Institute of Architects provides resources on moisture management in buildings.
Structural damage—cracks radiating from corners, damage near load-bearing walls, or issues indicating foundation settling—demands professional evaluation. These problems often signal serious structural concerns that require engineering assessment. Fire-rated walls in multi-family buildings, around fireplaces, or in garages have specific installation requirements; improper repairs compromise fire safety and may violate building codes.
Asbestos-containing drywall, found in many homes built before the 1980s, requires professional remediation. Never sand or cut potentially asbestos-containing materials; disturbing asbestos releases dangerous fibers. Have materials tested before attempting repairs on older homes. Popcorn ceilings and some joint compounds may also contain asbestos.
Additionally, if you’re uncomfortable with any aspect of the repair—whether it’s working at heights, using power tools, or assessing damage extent—professional contractors bring expertise, insurance, and warranty guarantees. The cost difference between a DIY repair and professional work often justifies hiring experts, particularly for visible areas or complex damage.
Safety Considerations
Drywall repair involves several safety hazards that deserve serious attention. Drywall dust contains crystalline silica, a known carcinogen that causes silicosis and lung cancer with prolonged exposure. Always wear a NIOSH-approved respirator rated for silica dust when sanding drywall, not just a basic dust mask. Ensure adequate ventilation by opening windows and using fans to direct dust outside.
Working at heights requires fall protection and stability. Use sturdy ladders or scaffolding for ceiling repairs, never standing on chairs or unstable surfaces. Maintain three points of contact on ladders and consider using a drywall pole sander to reduce overhead work. If you’re uncomfortable at heights, this is a clear indicator to hire professionals.
Electrical and plumbing safety cannot be overlooked. Before cutting into walls, locate electrical wiring and plumbing using a stud finder with wire detection capabilities. Cutting into live electrical circuits causes shock and fire hazards; puncturing water lines creates water damage. If you’re unsure about hidden utilities, contact your local utility locating service before beginning work.
Joint compound and spackling materials contain chemicals that may irritate skin and eyes. Wear work gloves and safety glasses during application. Ensure good ventilation when using these products, particularly in enclosed spaces. Read product safety data sheets (SDS) before use, understanding specific hazards and required precautions.
Proper tool usage prevents injuries. Utility knives with dull blades require excessive pressure and slip easily; maintain sharp blades and cut away from your body. Power tools demand respect and attention; never operate them while fatigued or distracted. Secure your work area, keeping children and pets away from active work zones.
FAQ
Can I repair drywall without taping?
Small holes under one inch can be filled with spackling compound without tape, but larger repairs require tape for structural integrity. Tape provides reinforcement, preventing cracks from reappearing as the compound dries and shrinks. Skipping tape on medium or large repairs almost guarantees visible cracks within months.
How long does drywall repair take?
Small repairs require 2-4 hours including drying time. Medium repairs typically take 1-2 days with drying between coats. Large repairs may require 3-5 days, and water-damaged repairs take significantly longer once moisture issues are addressed. Rushing the drying process by using heat or fans can cause cracking and poor adhesion.
What’s the best way to match existing paint after drywall repair?
Bring paint samples to the store for color matching, or have the store match your existing wall paint using their spectrophotometer. Flat paint hides repairs better than glossy finishes, which highlight imperfections. Always prime repaired areas before painting, as bare joint compound absorbs paint unevenly, creating visible patches.
Should I use mesh or paper tape for drywall repairs?
Paper tape provides superior results but requires more skill to apply properly. Mesh tape is more forgiving for beginners but may not create as invisible seams. Either works for most repairs; choose based on your comfort level and the repair’s visibility. Professional tapers typically prefer paper tape for final results.
Can I repair water-damaged drywall myself?
Only if you’ve eliminated the moisture source and the damage is minor. Water damage indicates an underlying problem—leaks, humidity, or condensation—that must be fixed first. Repairing over wet or damp drywall causes mold growth and compound failure. Extensive water damage requires professional assessment and often complete replacement of affected sections.


