
How to Activate Takeover 2K25: Expert Tips Inside
NBA 2K25 has revolutionized player customization with its Takeover system, a powerful mechanic that allows you to unlock specialized abilities and dominance features for your MyPlayer. Whether you’re grinding through MyCareer, competing in online multiplayer, or perfecting your build in the lab, understanding how to activate Takeover 2K25 is essential to elevating your game. This comprehensive guide breaks down everything you need to know about triggering, managing, and maximizing your Takeover abilities for competitive advantage.
The Takeover system in NBA 2K25 represents one of the most significant gameplay innovations in recent years. Unlike previous iterations, this year’s version offers deeper customization, multiple activation paths, and dynamic performance boosts that can turn the tide of any game. From aggressive defensive stops to explosive scoring runs, your Takeover choice defines your playstyle and determines how you impact your team. Understanding the mechanics behind activation ensures you’re never caught off-guard and always ready to dominate when it matters most.

Understanding the Takeover System in 2K25
The Takeover system in NBA 2K25 functions as a progression-based mechanic that rewards consistent performance with temporary ability boosts. Unlike cosmetic upgrades, Takeover directly impacts your player’s attributes, shooting percentages, defensive prowess, and overall effectiveness on the court. The system tracks your performance through badge progression, attribute ratings, and in-game performance metrics that accumulate throughout each game session.
Your Takeover meter builds through successful plays aligned with your chosen specialization. If you select an offensive Takeover, you’ll build the meter through scoring, assists, and offensive rebounds. Defensive Takeovers accumulate through steals, blocks, and defensive stops. The meter typically fills between 60-90 seconds of consistent play, depending on your build, badge levels, and the specific Takeover variant you’ve selected. Understanding these mechanics helps you anticipate activation timing and coordinate team strategies around your Takeover availability.
NBA 2K25 offers multiple Takeover categories, each fundamentally changing how you approach the game. Offensive Takeovers enhance shooting, driving, and playmaking abilities. Defensive Takeovers amplify steal chances, block potential, and perimeter defense effectiveness. Balanced Takeovers provide moderate benefits across multiple categories, ideal for two-way players. Specialized Takeovers like “Sharpshooter” or “Lockdown Defender” offer hyper-focused benefits that transform you into a specialist when activated. Choosing the right Takeover for your build and playstyle is crucial for maximizing effectiveness.
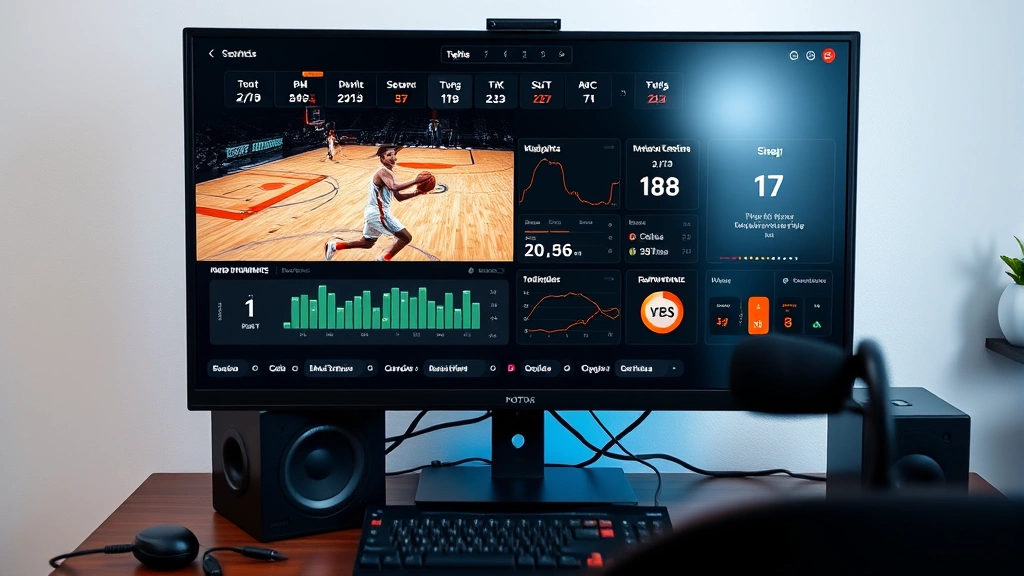
The visual feedback system in 2K25 makes Takeover activation unmistakable. Your player’s appearance changes, court graphics shift in color, and audio cues signal when you’ve entered Takeover mode. These indicators serve practical purposes beyond aesthetics—they communicate to opponents that you’re in an enhanced state, creating psychological pressure and forcing defensive adjustments. Experienced players recognize these signals and adapt their strategy accordingly.
Step-by-Step Guide to Activating Takeover
Activating Takeover 2K25 requires understanding the exact moment when your meter reaches full capacity and knowing which button combination triggers the effect. The process differs slightly between platforms and control schemes, but the fundamental principle remains consistent: perform plays matching your Takeover specialization until the meter fills, then press the designated activation button.
Step 1: Build Your Takeover Meter
Begin each game by performing plays aligned with your selected Takeover category. If you’ve chosen an offensive Takeover, focus on scoring plays, successful passes that generate assists, and offensive rebounding opportunities. Make contested shots, drive to the basket, and execute pick-and-roll plays. The meter builds progressively with each successful play. You’ll notice a glowing indicator on your player’s character model showing the meter’s current status. The first activation typically requires 60-90 seconds of consistent play, establishing baseline momentum.
Step 2: Monitor the Takeover Meter
Pay attention to the meter’s visual representation on your screen, usually displayed near your player’s energy bar or in the bottom corner of the HUD. The meter fills through a series of segments or as a continuous bar, depending on your settings. Different plays contribute varying amounts to meter growth. Highlight-reel plays—deep threes, perfect passes, or defensive steals—contribute more significantly than standard possessions. Understanding these multipliers helps you strategically build meter in crucial moments rather than waiting passively.
Step 3: Execute the Activation Command
Once your Takeover meter reaches full capacity, you’ll see a visual indicator signaling readiness. On PlayStation controllers, press L1 and R1 simultaneously. On Xbox, press LB and RB together. On PC with controller, the command mirrors console controls. If you’re using keyboard and mouse, check your settings menu for the designated activation key. The button combination must be executed while you have possession or are positioned defensively. Attempting to activate without a full meter results in no effect and can create defensive vulnerabilities.
Step 4: Maximize Your Activation Window
Takeover effects last between 20-45 seconds depending on your build and badge configuration. This window represents your peak performance opportunity. Use this time to attack aggressively, take high-difficulty shots you’d normally avoid, and impose your will defensively. The enhanced attributes during Takeover often result in significantly higher shooting percentages, faster release animations, and superior defensive responsiveness. Experienced players time crucial possessions—final minutes, tied games, playoff moments—to coincide with Takeover activation.
Step 5: Plan Your Next Activation
As your Takeover effect expires, immediately shift focus toward rebuilding your meter for the next activation. This cyclical pattern continues throughout the game. Efficient players maintain near-constant Takeover availability by understanding how to chain successful plays and maintain momentum. The better you understand your build’s meter-building efficiency, the more frequently you’ll access Takeover benefits, creating a compounding advantage over opponents.
Building Your Optimal Takeover Setup
Creating your ideal Takeover configuration requires analyzing your playstyle, understanding your build’s strengths, and selecting complementary specializations. The DIY Nests Hub Blog emphasizes customization fundamentals that apply equally to gaming optimization—selecting the right tools for your specific project. Your Takeover selection functions as your primary tool for game impact.
Consider your primary role on the team. If you’re a shooting guard or small forward focused on scoring, offensive Takeovers like “Sharpshooter” or “Playmaker” align perfectly with your responsibilities. These specializations enhance three-point shooting, mid-range accuracy, and assist generation. Centers and power forwards often benefit more from “Rebounder” or “Rim Protector” Takeovers that maximize their presence in the paint. Point guards might prefer “Lockdown Playmaker” configurations that balance offensive distribution with defensive pressure.
Badge combinations significantly influence Takeover effectiveness. If you’ve invested in shooting badges like “Limitless Range,” “Catch and Shoot,” and “Green Machine,” your Sharpshooter Takeover becomes exponentially more powerful. The synergy between your badge progression and Takeover selection creates multiplicative benefits. Conversely, selecting a Takeover that doesn’t align with your badge investment wastes potential and creates inefficient gameplay patterns.
Attribute allocation also impacts Takeover performance. A Takeover specialization that enhances three-point shooting provides minimal benefit if your three-point attribute remains below 75. Conversely, when your relevant attributes reach 85+, Takeover activation creates nearly automatic success on high-difficulty attempts. This relationship between attributes, badges, and Takeover creates a integrated system where each component supports the others.
Experiment with different Takeover types during practice games before committing to competitive play. Understanding how each specialization feels, how quickly the meter builds, and which offensive patterns maximize meter growth prevents costly mistakes during ranked competition. Some players prefer aggressive Takeovers that build quickly but provide moderate boosts, while others invest heavily in single specializations that create overwhelming advantages during activation.
Advanced Takeover Strategies for Competitive Play
Elite NBA 2K25 competitors use sophisticated Takeover strategies that extend far beyond simple activation timing. Understanding these advanced techniques separates casual players from competitive contenders. These strategies parallel the meticulous planning required in DIY basement finishing projects, where precise execution and strategic planning determine success.
Meter Management Across Game Phases
Professional players strategically time Takeover activation around game momentum. Rather than using Takeover immediately when available, they preserve it for crucial moments—final possessions, defensive stops in close games, or when facing elite opponents. This patience creates psychological pressure as opponents recognize you’re saving your advantage for critical moments. Managing meter across quarters allows you to maintain near-constant Takeover availability during the fourth quarter, when games are decided.
Coordinated Team Takeovers
In team-based modes, synchronized Takeover activation creates overwhelming offensive and defensive pressure. Coordinate with teammates to activate Takeovers simultaneously, creating moments where your entire lineup operates at peak efficiency. Opponents struggle to defend against multiple enhanced players, often resulting in easy baskets or defensive breakdowns. This team-level strategy requires communication and understanding your teammates’ Takeover types, but the results justify the coordination investment.
Defensive Takeover Specialization
While offensive Takeovers receive more attention, defensive specializations often determine game outcomes. “Lockdown Defender” Takeovers increase steal chances and defensive responsiveness, creating turnover opportunities that fuel fast breaks. Activating defensive Takeovers when opponents attempt high-difficulty shots or during their peak offensive possessions can completely shut down scoring runs. Defensive-minded players who master this specialization become invaluable team members, generating possessions that shift momentum decisively.
Build-Specific Takeover Optimization
Different player builds have unique Takeover synergies. Stretch bigs benefit from “Sharpshooter” Takeovers that transform them into three-point threats, forcing defensive adjustments that open driving lanes. Playmaking centers thrive with “Playmaker” Takeovers that enhance passing accuracy and vision, creating easy baskets for teammates. Rim-running guards maximize “Slasher” Takeovers that make them nearly unstoppable in transition. Understanding these build-specific synergies allows you to select Takeover specializations that create maximum impact.
The home security guide emphasizes layered protection strategies; similarly, elite Takeover usage combines multiple tactical approaches. Never rely solely on one Takeover strategy. Mix aggressive activation timing with patient meter management. Combine offensive Takeovers with defensive pressure. Vary your approach to keep opponents guessing and prevent defensive adjustments from completely neutralizing your Takeover advantage.
Takeover Management and Resource Allocation
Long-term success in NBA 2K25 requires understanding how Takeover integrates with overall player development. Your Takeover effectiveness depends on multiple interconnected systems: badge progression, attribute allocation, equipment selection, and playstyle consistency. Managing these resources efficiently creates compounding advantages that become increasingly pronounced as you advance.
Badge Progression and Takeover Synergy
Badges represent your most important resource investment. Prioritize badges that directly enhance your selected Takeover specialization. If you’ve committed to a “Sharpshooter” Takeover, max out shooting badges before investing in defensive or playmaking badges. This focused badge allocation creates dramatic Takeover effectiveness improvements. Spreading badge investments across multiple categories creates a versatile player but weakens individual Takeover specializations. Competitive players sacrifice versatility for dominance in their primary role.
Attribute Allocation Strategies
Your attribute distribution fundamentally determines Takeover viability. Allocate primary attributes (three-point shooting for sharpshooters, defensive prowess for lockdown defenders) to 99 before distributing points to secondary attributes. This ensures your Takeover specialization reaches peak effectiveness. Balanced attribute allocation creates flexible players but limits Takeover ceiling. Competitive players often create multiple builds with different attribute distributions and Takeover specializations, choosing the appropriate build for specific matchups and team needs.
Equipment and Takeover Enhancement
Shoes, jackets, and accessories provide attribute boosts that enhance Takeover effectiveness. Select equipment that boosts your primary Takeover attributes. Sharpshooters benefit from shoes with three-point and ball handling boosts. Lockdown defenders improve with defensive consistency and perimeter defense equipment. These seemingly minor bonuses compound significantly when combined with badge effects and attribute allocation, often creating the difference between good and elite Takeover performance.
Practice and Consistency
Takeover mastery requires extensive practice and playstyle consistency. Spend time in practice modes understanding exactly when your meter builds, how different plays contribute varying amounts, and which offensive patterns maximize meter growth. This practice translates directly to competitive games where meter management becomes second nature. Players who practice regularly develop intuitive Takeover timing, allowing them to activate at optimal moments without conscious thought.
External resources like the NBA official website provide real player statistics and performance data that inform Takeover strategy development. Understanding how real NBA players approach their strengths and leverage their advantages creates a foundation for effective Takeover usage. The 2K Games official site regularly updates Takeover mechanics and provides patch notes explaining balance changes that impact Takeover effectiveness. Staying informed about these updates prevents your strategies from becoming obsolete.
FAQ
How quickly does the Takeover meter build in NBA 2K25?
The Takeover meter typically fills within 60-90 seconds during the first activation, depending on your build, badge levels, and playstyle consistency. Subsequent activations often build faster as momentum compounds. Highlight-reel plays contribute disproportionately to meter growth, allowing skilled players to build meter in 30-45 seconds through aggressive, efficient play.
Can you activate Takeover multiple times per game?
Yes, you can activate Takeover repeatedly throughout each game. After your Takeover effect expires (typically 20-45 seconds), you immediately begin rebuilding the meter. Efficient players maintain near-constant Takeover availability by understanding how to build meter quickly and managing activations strategically.
What’s the difference between offensive and defensive Takeovers?
Offensive Takeovers enhance shooting, driving, playmaking, and scoring abilities, building through successful scoring plays and assists. Defensive Takeovers amplify steal chances, block potential, and perimeter defense, building through defensive stops and steals. Your choice determines how you build the meter and what benefits you receive during activation.
Does Takeover work in all game modes?
Takeover functions in MyCareer, MyPark, ProPLAY, and most competitive modes. Some specialized game modes may disable Takeover or modify its mechanics. Always check mode-specific rules before committing to Takeover-dependent strategies in unfamiliar game types.
How do I know which Takeover suits my playstyle?
Analyze your primary role, badge investments, and attribute allocation. If you’ve invested heavily in shooting badges and three-point attributes, “Sharpshooter” Takeover aligns perfectly. If you’ve prioritized defensive badges and perimeter defense attributes, “Lockdown Defender” becomes your optimal choice. Test different Takeovers in practice modes to discover which feels most natural for your playstyle.
Can teammates help build my Takeover meter?
Your Takeover meter builds only through your own plays. However, teammates’ successful plays create easier scoring opportunities, allowing you to build meter more efficiently. Playing within a coordinated system where teammates generate open looks accelerates your meter building compared to isolation-heavy playstyles.
What happens if I activate Takeover with a partially full meter?
You cannot activate Takeover with a partially full meter. The meter must reach full capacity before activation becomes available. Attempting to press the activation buttons with an incomplete meter produces no effect and can create defensive vulnerabilities as you’re distracted from active gameplay.


