How to Balance a Washing Machine: Expert Tips & Tricks
A washing machine that vibrates excessively during the spin cycle isn’t just annoying—it’s a warning sign that something needs attention. An unbalanced washing machine can damage your flooring, disturb your neighbors, and accelerate wear on internal components. Whether you own a front-load or top-load model, learning how to balance a washing machine is an essential DIY skill that can save you hundreds in repair costs and extend your appliance’s lifespan significantly.
The good news is that most balance issues stem from simple, fixable problems. In this comprehensive guide, we’ll walk you through identifying why your washing machine is unbalanced, diagnosing the root cause, and implementing proven solutions that work. From load distribution techniques to leveling adjustments, you’ll discover practical strategies that professional technicians use every day.

Understanding Washing Machine Balance
Proper balance in a washing machine is crucial for optimal performance. When your machine operates correctly, the drum spins smoothly at high speeds without excessive movement. The balance system distributes weight evenly during the spin cycle, allowing the machine to perform its job efficiently while protecting your home’s structure.
Your washing machine relies on several components working together to maintain balance. The suspension system, which includes springs and shock absorbers, keeps the drum centered. The leveling feet at the base provide stability and support. When any of these components fail or aren’t adjusted properly, the entire machine becomes unstable. Understanding this relationship helps you diagnose problems more effectively and explore more DIY home solutions with confidence.
Modern washing machines are engineered with counterweights that help balance the spinning drum. These weights are calibrated to offset the natural forces created during high-speed rotation. If your machine is relatively new and experiencing balance issues, the problem is usually external rather than internal—typically related to installation or load management rather than component failure.

Identifying Balance Problems
Before you can fix an unbalanced washing machine, you need to recognize the symptoms. The most obvious sign is excessive vibration during the spin cycle. You might hear loud banging, thumping, or grinding noises that weren’t present when the machine was new. Some machines walk across the floor, literally moving several inches from their original position during operation.
Additional warning signs include water leaking from the seals, clothes that aren’t getting cleaned properly despite using the correct wash cycle, or an unusual burning smell emanating from the machine. The drum might also make squeaking sounds, suggesting that components are rubbing against each other due to misalignment.
Pay attention to when the problem occurs. Does the vibration happen during the wash cycle, rinse cycle, or specifically during the spin cycle? Does it occur with every load or only when you wash heavy items like blankets and comforters? This information helps you determine whether the issue is load-related or mechanical. Keep detailed notes about these observations—they’ll prove invaluable if you need to call a professional technician.
Load Distribution Techniques
One of the most overlooked causes of washing machine imbalance is improper load distribution. Many people toss clothes into the drum haphazardly, which creates uneven weight distribution. During the spin cycle, the drum tries to center this unbalanced load, causing vibration and strain on the machine.
Proper loading technique matters significantly. Arrange clothes around the drum’s perimeter rather than piling them in the center. For top-load machines, spread items evenly around the agitator. For front-load machines, distribute clothes across the entire drum opening before closing the door. This simple adjustment eliminates many balance problems without requiring any repairs.
Avoid overloading your machine. While it’s tempting to wash everything in one load to save time, overstuffing prevents proper water circulation and creates excessive weight that the suspension system must support. Follow your manufacturer’s guidelines regarding load capacity—typically, you should fill the drum about three-quarters full, leaving enough space to fit your hand on top of the clothes.
When washing heavy items like bedding, consider splitting the load into two smaller loads. Washing one queen-sized comforter in a standard machine is often problematic because the weight concentrates unevenly. Two separate loads actually wash more effectively and eliminate balance issues. Large items also need special attention—ensure they’re folded or arranged so they don’t bunch up on one side of the drum during rotation.
Mixing different fabric weights helps achieve better balance. Don’t wash all heavy items together or all lightweight items together. Instead, combine heavy towels with lighter shirts and underwear. This natural distribution prevents weight from concentrating in any single area of the drum, resulting in smoother, quieter operation.
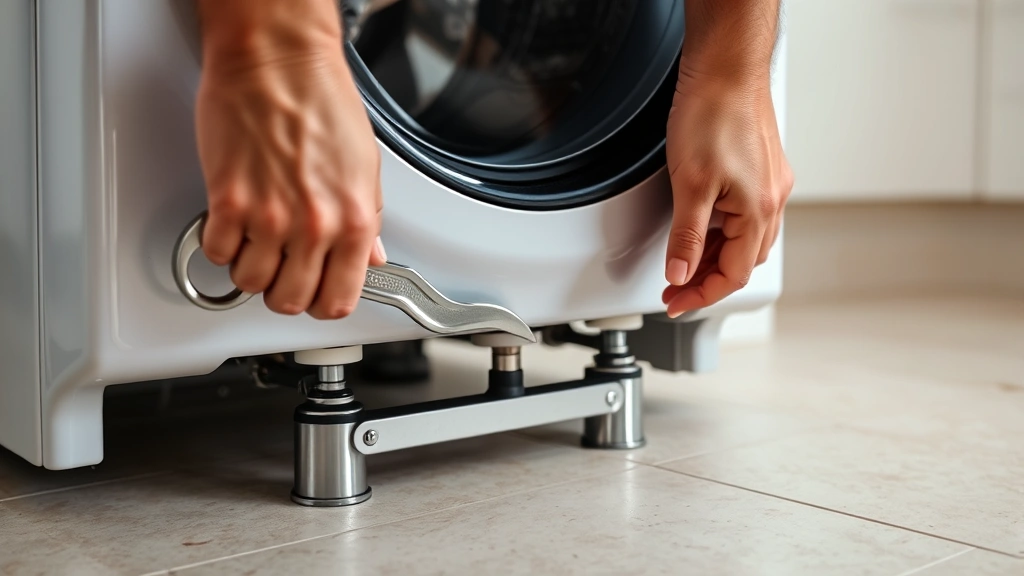
Checking and Adjusting Leveling Feet
The leveling feet beneath your washing machine are critical for stability. Over time, these feet can become loose, uneven, or damaged, causing the entire machine to sit at an angle. Even a slight tilt can create significant vibration during high-speed spinning. Checking and adjusting these feet is one of the most important steps in balancing your washing machine.
Start by unplugging your washing machine completely. Safety should always be your first priority when working with appliances. Once the power is disconnected, you can safely access the feet without risk of accidental activation. Give the machine a gentle push to see how stable it is. It should feel solid and immobile, not wobbly or loose.
Use a level tool to check if your machine sits evenly on the floor. Place the level on top of the machine, checking both front-to-back and side-to-side angles. The bubble should sit centered in the vial, indicating level positioning. If the bubble is off-center, your machine is tilted and needs adjustment.
Most washing machines have adjustable feet that screw up or down to change height. Depending on your model, you might need to remove a front panel to access all four feet. Consult your owner’s manual for specific instructions regarding your machine’s design. Generally, you’ll loosen a locking nut, adjust the foot height by turning the threaded portion, then retighten the locking nut to secure the adjustment.
When adjusting feet, make small changes and recheck with your level frequently. It’s easier to make multiple small adjustments than to overcorrect and have to reverse your work. Front feet are typically adjustable, while rear feet might be fixed. If your machine has fixed rear feet, focus on adjusting the front feet until the machine is level.
After achieving level positioning, gently push the machine side-to-side and front-to-back. It should resist movement and return to its original position. If it still rocks or shifts, the feet might be damaged and need replacement. Contact your appliance manufacturer or a qualified technician for replacement feet that match your specific model.
Inspecting Internal Components
If you’ve addressed load distribution and leveling feet but your machine still vibrates excessively, internal component damage might be responsible. This is where diagnosis becomes more complex, and you’ll need to decide whether DIY repair is appropriate or if professional service is necessary.
The suspension system, which includes springs and shock absorbers, can deteriorate over time. These components wear out from years of supporting the spinning drum. When they fail, the drum loses its centering support and vibrates against the outer tub. Replacing suspension components requires significant disassembly and is typically beyond the scope of basic DIY maintenance.
Drum bearings can also wear out, causing the drum to shift slightly during rotation. This creates the thumping sound you hear during the spin cycle. Bearing replacement requires removing the entire drum assembly, which is a complex procedure that demands mechanical expertise. If you suspect bearing failure, professional service is the safest choice.
The counterweight system might also be compromised. Some machines use concrete counterweights that can crack or become loose. If a weight has shifted or broken, it no longer effectively balances the drum. While you might be able to visually inspect these components after removing access panels, repairs typically require professional assistance.
Before assuming internal damage, ensure you’ve thoroughly addressed the simpler solutions. Many people request expensive repairs when simple leveling adjustments would solve the problem. Start with the basics, document what you’ve tried, and only consider professional service after ruling out load distribution and leveling issues.
Preventive Maintenance Tips
Maintaining your washing machine properly prevents balance problems from developing in the first place. Regular maintenance is far less expensive than emergency repairs and keeps your machine operating smoothly for years.
Clean your machine regularly, especially the rubber seal on front-load models where moisture and debris accumulate. Run an empty hot water cycle with white vinegar or a commercial washing machine cleaner monthly. This prevents mold growth and removes mineral deposits that can affect performance. As part of your broader home maintenance routine, establish a schedule for appliance care.
Check your machine’s leveling feet quarterly, even if you’re not experiencing problems. Look for cracks, damage, or signs of wear. Tighten any loose locking nuts you discover. This preventive approach catches issues before they develop into serious problems.
Inspect hoses and connections annually. Loose hose connections can vibrate during operation, creating noise that sounds like the machine itself is unbalanced. Ensure all connections are tight and secure, and replace hoses showing signs of wear or damage according to manufacturer recommendations.
Use the correct amount of detergent. Excess soap creates too many suds, which can interfere with proper drum rotation and balance. Modern detergents are concentrated, requiring less product than older formulations. Follow the manufacturer’s guidelines for your specific detergent type.
Avoid washing extremely delicate items with heavy items. While mixing weights helps balance, extremely delicate fabrics can get damaged by heavy items during vigorous spinning. Separate your laundry thoughtfully to protect your clothes while maintaining proper machine balance.
When moving your washing machine, ensure the shipping bolts are properly installed. These bolts lock the suspension system in place during transport. If you relocate your machine, reinstall these bolts before moving, then remove them after installation. Forgetting this step is a common cause of balance problems in recently relocated appliances.
Consider your machine’s placement in your home. Washing machines perform best on level, solid flooring. Uneven or soft flooring contributes to vibration problems. If your machine sits on a wooden floor that flexes during operation, you might experience more vibration than if it were on concrete. While you can’t always change your flooring, awareness of this factor helps you understand your machine’s behavior.
FAQ
Why is my washing machine so loud during the spin cycle?
Excessive noise typically indicates an imbalance issue. Check your load distribution first—uneven weight distribution is the most common cause. If that’s not the problem, check that your machine is level using a spirit level. Ensure all leveling feet are properly adjusted and secure. If noise persists after these adjustments, internal component damage might be responsible, and professional service may be needed.
Can I use shims instead of adjustable feet to level my washing machine?
While shims can provide temporary leveling, they’re not a proper long-term solution. Adjustable feet are designed to handle the stresses of machine operation, while shims can shift or compress over time. Use adjustable feet for permanent leveling. Shims might work temporarily while you order replacement feet, but replace them with proper adjustable feet as soon as possible.
How often should I clean my washing machine to prevent balance problems?
Run a cleaning cycle monthly using white vinegar or commercial machine cleaner. This prevents debris and mineral buildup that could affect performance. Additionally, wipe down the rubber gasket on front-load machines weekly to prevent mold growth. Regular cleaning maintains optimal machine function and prevents many common problems.
Is it safe to repair internal components myself?
Washing machine repair involving internal components like suspension systems, bearings, or counterweights requires professional expertise. These components are under significant tension and stress. Improper reinstallation can cause the machine to malfunction dangerously. Unless you have specific mechanical training and the manufacturer’s detailed instructions, professional service is the safer choice. Your safety and your machine’s integrity are worth the investment.
What’s the maximum load size for my washing machine?
Consult your owner’s manual for your specific machine’s capacity. Generally, fill the drum about three-quarters full, leaving space to fit your hand on top of the clothes. Overloading prevents proper water circulation and creates balance problems. When in doubt, wash in smaller loads rather than risk overloading.
Do front-load machines balance differently than top-load machines?
Both types use similar balance principles, but the mechanics differ slightly. Front-load machines rely on proper weight distribution around the drum’s perimeter. Top-load machines distribute weight around the central agitator. Both require level installation and proper load distribution. Regardless of type, the fundamental principles of balance remain the same.
How long do washing machine suspension systems typically last?
Well-maintained suspension systems usually last 5-10 years, depending on usage frequency and load patterns. Heavy use or frequent washing shortens lifespan. Signs of wear include increased vibration, unusual noises, or visible damage to springs or shock absorbers. When these components fail, professional replacement is necessary.
As you develop your DIY skills, remember that understanding your appliances is part of comprehensive home ownership. Mastering financial balance and home improvement projects both require attention to detail and systematic problem-solving. Your washing machine is no exception.
By implementing these expert tips and tricks, you’ll eliminate most balance-related issues and keep your washing machine operating smoothly. Start with the simplest solutions—load distribution and leveling feet—before considering more complex repairs. Your patience and systematic approach will save money and extend your appliance’s lifespan significantly.


