DIY Greenhouse Plans: Expert Tips & Tricks for Growing Success
Building your own greenhouse is one of the most rewarding DIY projects you can undertake. Whether you’re a seasoned gardener or just starting to explore plant cultivation, a custom greenhouse provides the controlled environment necessary for year-round growing. Unlike purchasing a pre-made structure, designing and constructing your own greenhouse allows you to tailor dimensions, ventilation systems, and materials to your specific climate and gardening goals.
This comprehensive guide walks you through every aspect of greenhouse construction, from initial planning and material selection to foundation work and installation of critical climate control systems. We’ll cover proven building techniques, safety considerations, and expert strategies that professional builders use to create durable, functional growing spaces. Whether you’re planning a modest 8×10 structure or an ambitious 20×30 build, the principles and methods outlined here will help you create a greenhouse that stands the test of time.
Planning Your Greenhouse Project
Before breaking ground or purchasing materials, invest time in thorough planning. The location of your greenhouse significantly impacts its success. Choose a spot that receives at least 6-8 hours of direct sunlight daily, preferably with southern or southeastern exposure in the Northern Hemisphere. Avoid areas shaded by trees, buildings, or structures that could reduce light availability during critical growing seasons.
Start by sketching your desired dimensions on paper. Consider your available space, the types of plants you’ll grow, and future expansion possibilities. A 10×12-foot greenhouse provides ample space for most home gardeners, while smaller 8×8 structures work well for apartment dwellers or those with limited yard space. Larger commercial-style greenhouses (20×30 feet or more) require more robust framing and may necessitate building permits.
Check local building codes and zoning regulations before finalizing your plans. Many municipalities require permits for structures over 100-200 square feet. Consult your local building department or review resources from the International Code Council to understand setback requirements, height restrictions, and structural standards. This step prevents costly delays and ensures your greenhouse meets safety standards.
Create a detailed materials list and budget. Research suppliers for quality components—poor-quality glazing or framing materials will compromise your structure’s longevity and performance. Consider whether you’ll use polycarbonate, glass, or polyfilm covering, as each has distinct advantages regarding cost, durability, and light transmission. When planning your budget, allocate 20-30% extra for unexpected expenses and material waste.
Foundation and Site Preparation
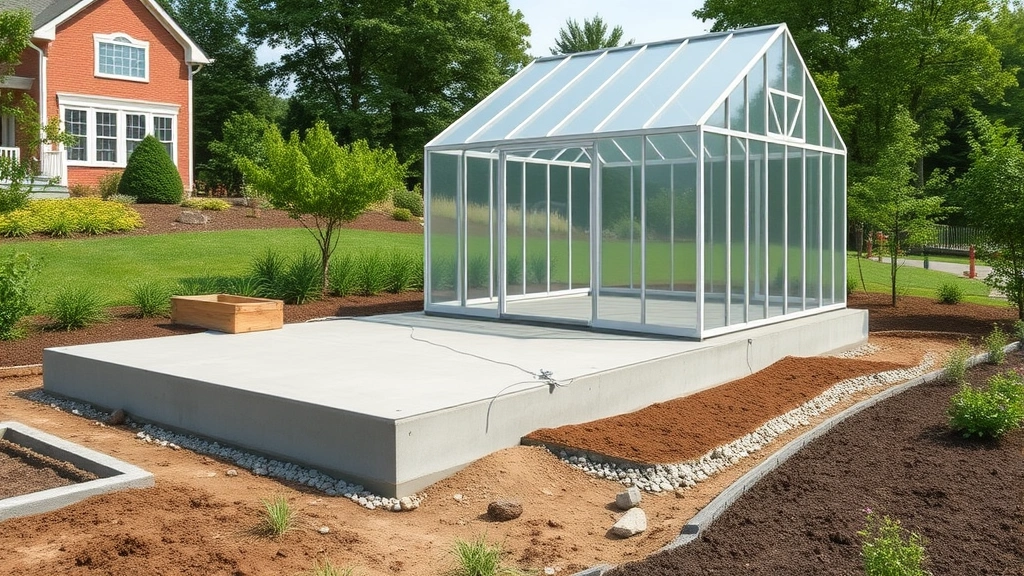
A solid foundation is non-negotiable for greenhouse longevity. Proper site preparation prevents settling, water damage, and structural failure. Begin by clearing the area of vegetation, rocks, and debris. Use a level to identify high and low spots. Most greenhouse sites require minimal grading, but significant slopes may need leveling to prevent water pooling and uneven settling.
Choose your foundation type based on your climate and soil conditions. Concrete slab foundations work best in stable soil and moderate climates. Dig down 12-18 inches, add 4 inches of gravel base for drainage, then pour a 4-6 inch reinforced concrete slab with proper slope for water runoff (1/8 inch per foot minimum). In frost-prone regions, extend footings below the frost line—typically 24-48 inches depending on your location. Check your local building codes forum for frost depth requirements in your area.
Alternatively, use concrete pier footings with pressure-treated wood sill plates. This method provides excellent drainage and works well on sloped or wet sites. Space piers 4-6 feet apart, extending below frost line. This approach also allows for easier future modifications compared to full slab construction.
Ensure proper drainage around your greenhouse perimeter. Grade the soil to slope away from the structure, creating a minimum 6-inch drop over 10 feet. Consider installing a French drain or gravel perimeter if your site has poor natural drainage. This investment prevents water accumulation that can lead to foundation damage and mold problems inside your growing space.
Framing and Structural Considerations
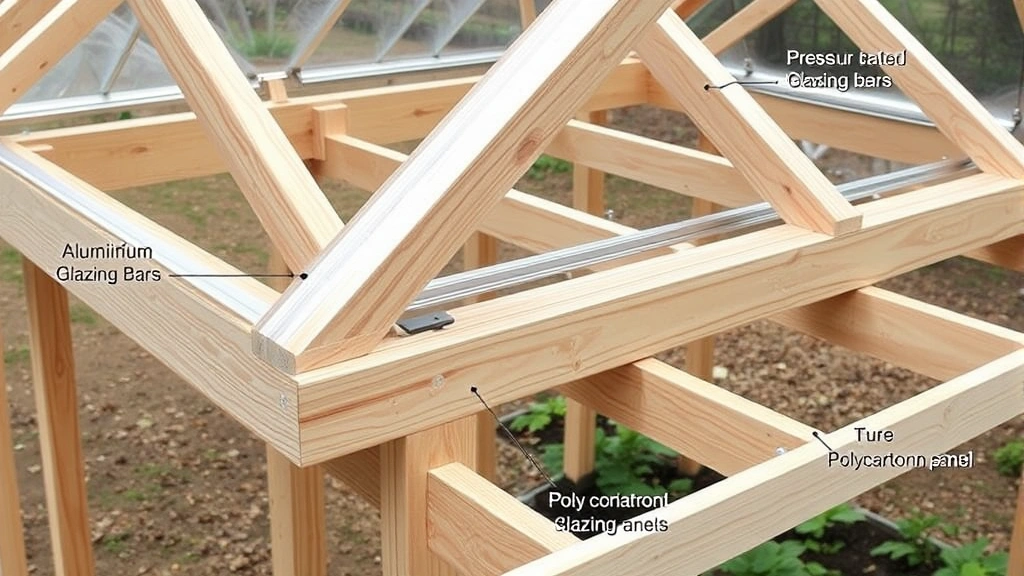
Your greenhouse frame must support glazing weight, wind loads, and snow accumulation in winter climates. Wood and aluminum are the most common framing materials, each with distinct advantages. Pressure-treated lumber (2x4s and 2x6s) provides strength, cost-effectiveness, and ease of modification. Aluminum offers superior corrosion resistance and requires less maintenance, though it’s more expensive and conducts temperature changes more readily.
Design your frame with proper spacing between structural members. For most glazing materials, horizontal rafters should be spaced 24 inches apart, with vertical supports no more than 4 feet apart. This spacing prevents sagging under weight and maintains structural integrity through seasons. For larger structures exceeding 15 feet in width, consider engineering support from a structural professional to ensure adequate load-bearing capacity.
When using wood framing, prioritize pressure-treated lumber rated for ground contact in sill plates and any members that contact concrete. Use galvanized hardware throughout—stainless steel is ideal but expensive, while galvanized provides excellent corrosion resistance at reasonable cost. Regular paint or stain application extends wood framing life considerably; plan for resealing every 3-5 years.
Install proper ventilation openings in your frame design. Roof vents at the peak allow hot air escape, while sidewall louvers or doors enable cross-ventilation. Plan vent openings to occupy at least 15-20% of your total glazed area for adequate passive cooling. This foundational planning prevents costly retrofitting later when you discover inadequate air circulation.
Your frame should include a slight roof pitch (4-12 minimum) to ensure water runoff and snow shedding in winter climates. This pitch also prevents water pooling that damages glazing and promotes algae growth. In areas with heavy snow loads, consider steeper pitches (6-12 or greater) to minimize accumulation stress on the structure.
Glazing Options and Installation
Glazing material selection dramatically affects greenhouse performance, cost, and maintenance requirements. Tempered glass provides excellent light transmission (90%), durability, and aesthetic appeal, but costs significantly more and requires careful installation to prevent breakage. Polycarbonate (twin-wall or multi-wall) offers superior insulation, impact resistance, and lighter weight at moderate cost, though it yellows over time and requires UV-protective coating.
Polyethylene film (4-6 mil thickness) provides the most economical option with decent light transmission but requires annual replacement and offers minimal insulation. Consider your climate when selecting glazing—cold regions benefit from polycarbonate’s insulation properties, while warm climates prioritize light transmission and cooling efficiency.
Install glazing with proper overlap and sealing. For overlapping panels, maintain minimum 2-inch overlap with glazing tape between layers. Use silicone sealant (not latex caulk) around edges to prevent air leaks and water infiltration. Allow sealant to cure fully (24-48 hours) before exposing to moisture or temperature fluctuations.
Secure glazing panels with appropriate fasteners—aluminum extrusions, rubber strips, or glazing bars depending on your frame type. Avoid over-tightening fasteners, which causes stress cracks in glass or polycarbonate. Leave minimal expansion space (1/8 inch per 12 feet) for thermal movement, particularly important in regions with significant temperature swings.
For glass installation, use glazing compound or silicone gaskets rather than putty alone. This approach accommodates frame movement and provides superior water sealing. Consider installing double-pane insulated glass units (IGUs) in cold climates—the additional cost is offset by reduced heating requirements and superior plant environment control.
Ventilation and Climate Control
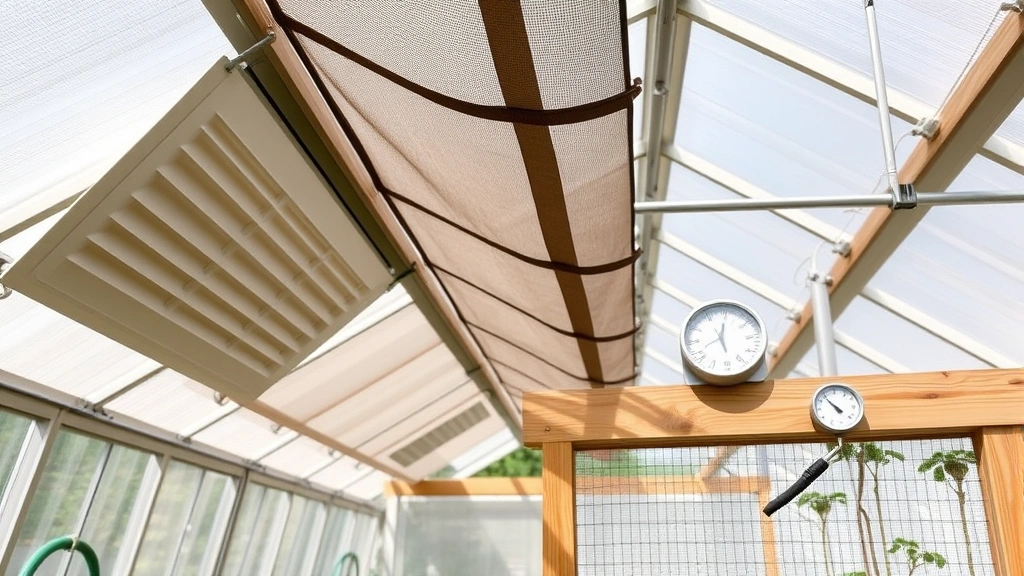
Proper ventilation is critical for healthy plant growth and disease prevention. Stagnant air promotes fungal infections, pest infestations, and inadequate pollination. Design your ventilation system with both passive and active components. Passive ventilation uses roof vents and sidewall louvers to create natural air circulation through temperature differentials and wind pressure.
Roof vents should open at the peak, allowing hot air escape. Install them on both sides of a pitched roof for maximum effectiveness. Size vents to occupy 15-20% of floor area—a 10×12 greenhouse (120 sq ft) needs 18-24 sq ft of vent opening. Louver vents prevent rain and pest entry while maintaining airflow.
Supplement passive ventilation with mechanical fans for reliable climate control. A 12-inch exhaust fan rated for your greenhouse volume (calculate volume in cubic feet and plan for complete air exchange every 2-3 minutes) effectively removes excess heat and humidity. Install thermostatic controls to activate fans automatically when temperatures exceed target levels.
Shade cloth deployment helps manage summer heat without compromising light availability. Install retractable shade cloth systems that provide 30-50% shade reduction during peak summer months. This approach maintains adequate light for growth while preventing excessive temperature rise that stresses plants and increases cooling demands.
Consider evaporative cooling (swamp coolers) in dry climates where humidity is low. These systems cool air through water evaporation, providing substantial temperature reduction at minimal electrical cost. In humid climates, focus instead on dehumidification through ventilation and potentially supplemental heating to prevent condensation and fungal issues.
Heating systems maintain growing conditions during cold months. Electric heaters work for small structures but prove expensive for larger greenhouses. Consider propane heaters with proper ventilation or passive solar heating supplemented by thermal mass (water barrels or stone) that absorbs daytime heat and releases it at night. In cold climates, insulating your greenhouse with additional glazing layers or thermal blankets substantially reduces heating requirements.
Electrical and Water Systems
Safe electrical installation is essential for powering fans, heaters, and grow lights. Install a dedicated circuit from your main panel with proper breaker protection. Use outdoor-rated wiring in conduit, elevating it above potential water contact. All outlets should be GFCI-protected given the wet environment. If you’re uncomfortable with electrical work, hire a licensed electrician—this investment ensures safety and code compliance.
Plan lighting for winter growing or propagation. LED grow lights provide efficient spectrum-specific light for plant growth while generating minimal heat. Position lights 12-24 inches above plants depending on intensity. Use timers to maintain consistent photoperiods (typically 14-16 hours for most vegetables and herbs).
Water delivery systems should provide convenient access and efficient irrigation. Drip irrigation with soaker hoses conserves water and reduces disease by keeping foliage dry. Install a rain barrel system to capture roof runoff—greenhouse roofs provide substantial water collection area that reduces municipal water dependence. Include overflow capacity and screening to prevent mosquito breeding.
For larger greenhouses, consider automated watering systems with soil moisture sensors. These systems maintain consistent moisture levels and reduce daily labor, particularly valuable during vacations or extended absences. Ensure all water sources are filtered to prevent clogging emitters and disease introduction.
Install a hose bib or hydrant inside your greenhouse for convenient watering and system maintenance. Use frost-free models in cold climates to prevent winter damage. Provide adequate drainage for excess water—most plants prefer well-draining conditions, and standing water promotes root disease and pest problems.
Common Mistakes to Avoid
Inadequate ventilation tops the list of greenhouse construction mistakes. Many builders underestimate cooling requirements, resulting in excessive summer temperatures that damage plants and waste energy. Design ventilation conservatively, planning for complete air exchange every 2-3 minutes, and include both passive and active components.
Poor drainage planning leads to foundation damage, mold, and structural failure. Never skip proper grading and drainage installation. This foundational work prevents expensive repairs and maintains your structure’s integrity for decades. Water damage costs far exceed initial drainage investment.
Insufficient insulation in cold climates dramatically increases heating costs and limits winter growing. Plan for proper glazing, thermal mass, and supplemental insulation from project inception. Retrofitting insulation proves far more expensive and disruptive than designing it into your original plans.
Overlooking local building codes and permits creates legal liability and potential forced removal of your structure. Invest time understanding requirements early—permits often expedite construction by clarifying standards before you begin. Many jurisdictions offer code consultation services at minimal cost.
Using low-quality materials to save money typically results in premature failure and costly replacement. Invest in durable glazing, quality framing lumber, and corrosion-resistant hardware. The additional upfront cost is negligible compared to rebuilding sections prematurely.
Neglecting equipment maintenance shortens component lifespan and reduces effectiveness. Plan for annual inspections of glazing, seals, ventilation equipment, and structural components. Regular maintenance extends your greenhouse life by 10+ years and prevents catastrophic failures.
Many builders fail to account for future expansion or modifications. Design your greenhouse with utility access, adequate foundation strength, and structural considerations that accommodate future additions. This foresight prevents expensive redesign when your growing needs evolve.
For comprehensive guidance on structural planning and building standards, consult the Association of General Contractors and the National Fire Protection Association for safety standards applicable to your jurisdiction.
If you’re undertaking larger construction projects, understanding how to become a building inspector provides valuable insight into code requirements and construction standards. Additionally, many principles from DIY basement finishing regarding moisture control and structural considerations apply to greenhouse construction. For electrical integration, review DIY home security best practices for outdoor electrical installation safety.
FAQ
What’s the best greenhouse size for beginners?
An 8×10 or 10×12-foot greenhouse provides ample growing space without overwhelming complexity. This size accommodates diverse plant types, allows comfortable working space, and remains manageable for one person to construct. Smaller structures (6×8) work for apartment dwellers, while serious gardeners often prefer 15×20 or larger for expanded production capacity.
How much does a DIY greenhouse cost?
Budget $2,000-$5,000 for a basic 10×12 structure with polycarbonate glazing and manual ventilation. Glass greenhouses cost $4,000-$8,000+, while premium structures with automated systems exceed $10,000. Material costs represent 60-70% of total investment, with labor (if hiring contractors) comprising the remainder. Start with a modest structure and expand as your skills and budget allow.
Do I need a building permit?
Most jurisdictions require permits for structures exceeding 100-200 square feet or those within setback distances from property lines. Contact your local building department to confirm requirements. Permits typically cost $100-$300 and take 1-2 weeks to obtain. Skipping permits risks fines and forced removal—always verify requirements before beginning.
What glazing material lasts longest?
Tempered glass offers 20+ year lifespan with minimal degradation. Polycarbonate typically lasts 10-15 years before yellowing reduces light transmission. Polyethylene film requires annual replacement but costs least initially. For long-term investment, tempered glass provides best value despite higher upfront cost.
Can I build a greenhouse on a concrete patio?
Yes, with proper preparation. Clean the patio thoroughly, ensure adequate drainage around the perimeter, and use concrete anchors or adhesive to secure your frame. This approach eliminates foundation work but may limit future relocation. Ensure your patio structure supports the additional weight—most patios accommodate greenhouse loads without issue.
What temperature should I maintain?
Most vegetables thrive at 65-75°F during day and 55-65°F at night. Herbs prefer slightly warmer conditions (70-80°F), while cool-season crops tolerate 50-65°F. Use thermostats and heating/cooling systems to maintain consistent temperatures. Monitor conditions with indoor-outdoor thermometers and adjust systems accordingly.
How often should I water greenhouse plants?
Frequency depends on plant type, season, and environmental conditions. Check soil moisture daily—most plants prefer consistently moist but not waterlogged conditions. In summer, daily or twice-daily watering may be necessary. Winter reduces requirements substantially. Install drip irrigation or soaker hoses for consistent, efficient water delivery.
Should I use a greenhouse heater in winter?
In cold climates (below 40°F regularly), supplemental heating extends growing season and protects plants. Passive solar heating with thermal mass works well for moderate climates. In severe climates, electric heaters or propane systems provide necessary warmth. Calculate heating costs and compare against plant value to determine necessity for your situation.


