Bathroom Fan Replacement: Electrician Tips for Safe and Effective Installation
Replacing a bathroom exhaust fan might seem intimidating, but with proper guidance and safety precautions, most homeowners can tackle this project successfully. A functioning bathroom fan is essential for moisture control, preventing mold growth, and maintaining indoor air quality. Whether your current fan is making excessive noise, not drawing air properly, or you’re simply upgrading to a more efficient model, this comprehensive guide will walk you through the process like a professional electrician would approach it.
Bathroom exhaust fans work by pulling humid air out of your bathroom and venting it outside through ductwork. Over time, these fans can accumulate dust, lose suction power, or develop mechanical issues. Rather than tolerating poor performance, replacing your fan ensures your bathroom stays dry and healthy. This project requires basic electrical knowledge, proper tools, and most importantly, a commitment to safety throughout the installation process.
Safety Precautions and Tools You’ll Need
Before you begin any bathroom fan replacement work, safety must be your top priority. Electrical work carries inherent risks, and proper preparation prevents accidents, injuries, and costly mistakes. Start by gathering all necessary tools and materials to avoid mid-project trips to the hardware store, which can interrupt your workflow and compromise safety by leaving electrical components exposed.
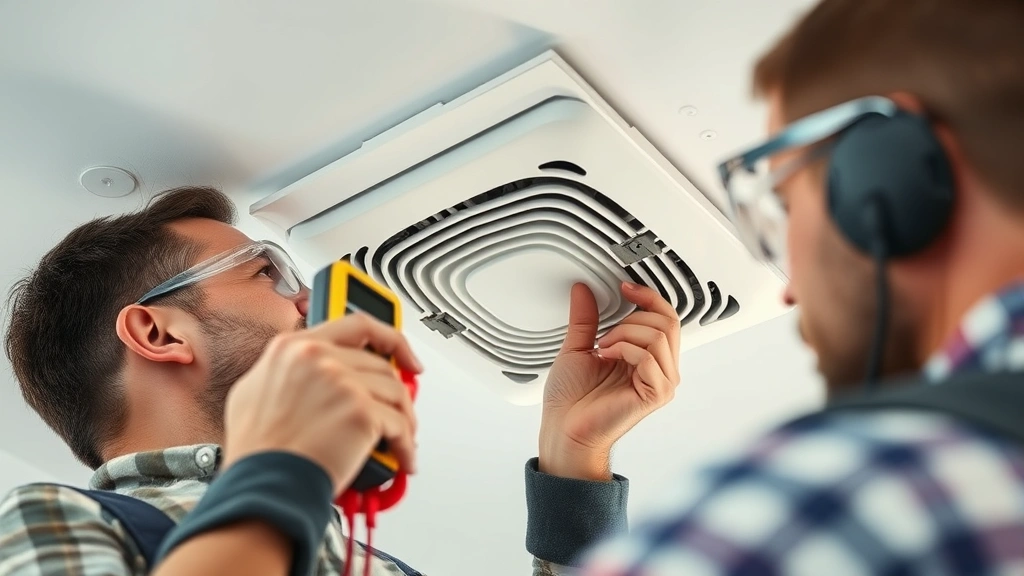
Essential Safety Equipment: A non-contact voltage tester is absolutely critical—this device detects electrical current without physical contact, allowing you to verify power is truly off before touching wires. Never skip this step. Wear safety glasses to protect your eyes from dust and debris that will fall from the ceiling cavity. Have a flashlight or headlamp ready, as attic or ceiling spaces are typically dark. Wear gloves to protect your hands from sharp metal edges on the housing and to avoid contact with dust or debris accumulated in ductwork.
Required Tools: You’ll need a screwdriver set with both Phillips and flathead options, a power drill with bits, a putty knife for scraping old caulk or sealant, a wire stripper for preparing electrical connections, needle-nose pliers for handling small wires, and a drywall saw or utility knife if you need to enlarge the opening. A stepladder or sturdy step stool is essential for safe access to ceiling-mounted fans. Keep a home safety guide nearby as reference material.
Materials to Have Ready: Purchase the replacement fan unit that matches or exceeds your current fan’s CFM (cubic feet per minute) rating. Grab a roll of duct tape and foil tape for sealing ductwork connections. Some installations benefit from flexible ducting if you’re replacing rigid ductwork. Have wire nuts in appropriate sizes, electrical tape, and possibly a length of appropriate gauge wire if splicing is needed.
Turning Off Power and Removing the Old Fan
Killing the electrical power to your bathroom fan is non-negotiable. Locate your home’s electrical panel and identify the circuit breaker controlling the bathroom lighting circuit—bathroom fans are typically on the same circuit as bathroom lights. Switch this breaker to the OFF position. To be absolutely certain power is disconnected, flip the light switch on and off; the light should not respond. This confirms the circuit is dead.
Now comes the crucial verification step: use your non-contact voltage tester on the existing fan fixture. Hold the tester near the fan housing and any visible wires. If the tester alerts or lights up, power is still present—do not proceed. Return to the electrical panel and try a different breaker. Only when your voltage tester confirms no power should you continue working.
Access your bathroom fan by removing the grille or trim ring. Most fans have a clip or screw-held trim ring that slides down or unscrews from the housing. Carefully pull this away from the ceiling, revealing the ductwork connection and electrical box. You may find an access panel covering the motor and mounting hardware; remove this as well.
Disconnect the electrical wires connecting your fan to the house wiring. If the wires are twisted together with wire nuts, carefully untwist them and set the wire nuts aside. If the fan is hardwired into a junction box, you may need to loosen terminal screws holding the wires. Take a photo of the wire configuration before disconnecting anything—this documentation proves invaluable when reconnecting your new unit.
Disconnect the ductwork by loosening the hose clamp or foil tape holding the flexible duct to the fan housing. If rigid ductwork is involved, you may need to loosen screws or straps. Gently pull the ductwork away from the fan housing. Be prepared for dust and debris to fall; this is why you’re wearing safety glasses and have a flashlight ready.
Now remove the old fan housing from the ceiling. Most fans are held with brackets or screws to the ceiling joists. Locate these fasteners and remove them. Some fans sit in a frame that’s nailed to joists; you may need to pry this frame out carefully with a flatbar. Work slowly and deliberately to avoid damaging ceiling material or joists.
Preparing the Housing and Ductwork
With the old fan removed, inspect the opening and surrounding area. Look for any damage to ceiling joists, water damage, or deteriorated insulation. If you notice mold or significant moisture damage, addressing this before installing your new fan prevents future problems. Wipe away accumulated dust and debris from the opening and joists using a damp cloth.
Examine your ductwork carefully. Old, kinked, or crushed ducts reduce fan efficiency significantly. If your ductwork is damaged, now is the time to replace it. According to EPA guidelines on indoor air quality, properly sealed and supported ductwork is essential for effective moisture removal. Rigid ductwork is generally superior to flexible ducting, though flexible ducts offer easier installation in tight spaces.
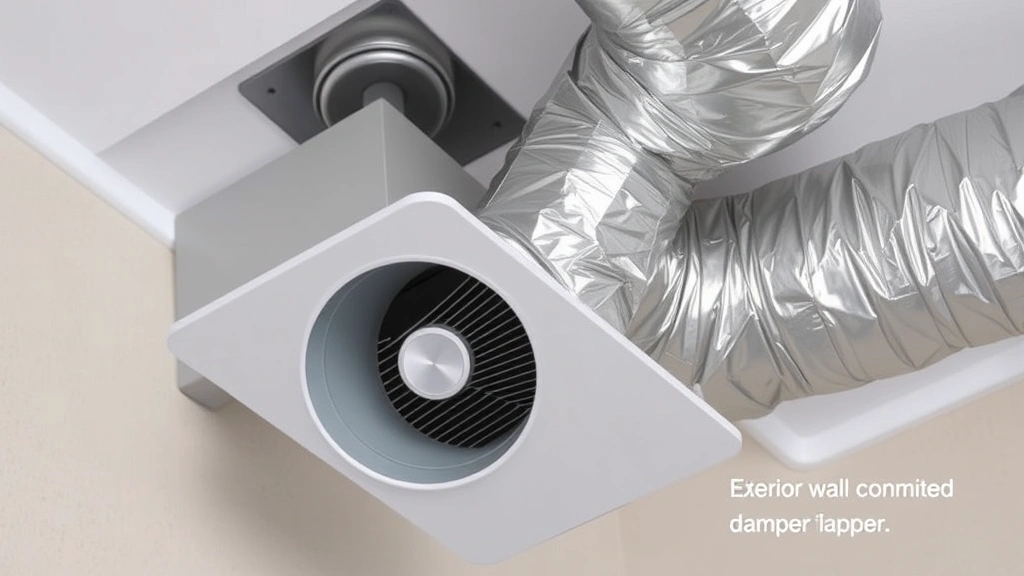
Check that your ductwork terminates outside your home, not into an attic or crawlspace. Venting moist air into these spaces causes serious moisture problems and potential structural damage. If your current setup vents internally, this is a critical correction to make during replacement. The duct should exit through your roof, gable wall, or soffit, with a damper or flapper preventing outside air from flowing backward into your home when the fan is off.
Clean the ductwork thoroughly using a brush or vacuum with extension hose. Years of accumulated dust and lint reduce airflow and efficiency. This cleaning improves your new fan’s performance immediately. If ductwork has significant damage or shows signs of mold, replacement is warranted despite added cost.
Prepare the mounting area by ensuring joists are clear and you have proper support for your new fan housing. Some new fans come with brackets that mount between joists; others have a frame that sits on joists. Verify you have the correct mounting configuration for your specific model by reviewing the manufacturer’s installation instructions carefully.
Installing the New Fan Unit
Before touching the new fan, review the manufacturer’s installation manual completely. Different fan models have variations in mounting, electrical connections, and ductwork attachment. Understanding these details prevents installation errors and ensures your warranty remains valid.
Position your new fan housing in the ceiling opening, aligning it with the joists using the provided mounting brackets or frame. Most modern fans have brackets that allow adjustment for different joist spacing. Secure the housing firmly to the joists using the fasteners provided—typically 1/4-inch bolts or heavy-duty screws. The housing must be rock-solid with no movement; any flex or vibration translates to noise during operation.
Ensure the housing is level and sits flush against the ceiling drywall. An improperly positioned housing creates gaps where air can leak, reducing fan efficiency and potentially allowing conditioned air to escape into attic spaces. Use shims if necessary to achieve proper alignment.
Connect your ductwork to the fan housing outlet. If using flexible ducting, slide the duct over the outlet and secure it with an appropriately-sized hose clamp, tightening it firmly. Avoid kinks in flexible ductwork, as these significantly reduce airflow. Route the duct to minimize bends and maintain as straight a path as possible to your exterior vent.
If using rigid ductwork, connect sections with foil tape and self-tapping screws, ensuring all connections are airtight. According to ENERGY STAR standards for bathroom ventilation, proper duct sealing improves efficiency and ensures effective moisture removal. Avoid using standard duct tape for permanent connections; foil tape provides superior longevity and airtightness.
Electrical Connections and Wiring
This section requires careful attention, as improper electrical work creates fire hazards and safety risks. If you feel uncertain about electrical connections, consulting professional guidance for home projects is always appropriate—electrical codes exist for safety reasons.
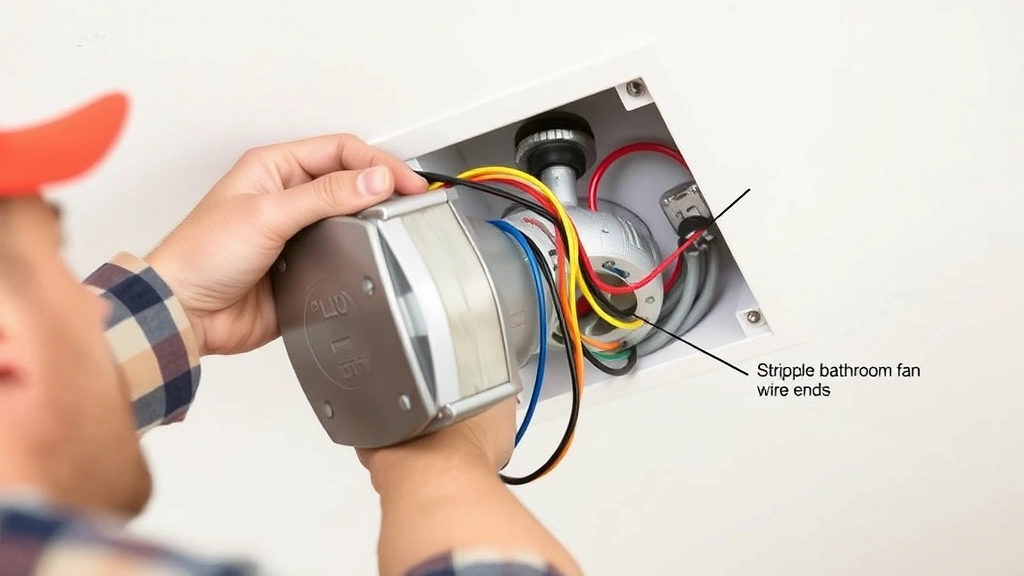
Understanding Your Wiring: Most bathroom fans connect using a simple two-wire circuit: a black wire (hot/power) and a white wire (neutral). Some installations include a ground wire (bare copper or green) for additional safety. Your new fan will have corresponding wires exiting from its junction box or motor housing. These wires must connect to your home’s electrical circuit using wire nuts or terminal connections.
Verify wire gauges match before connecting. If your existing circuit uses 14-gauge wire, your new fan should connect using 14-gauge wire. If you’re unsure, refer to the National Electrical Code (NEC) for proper wire sizing, or consult a licensed electrician.
Making Connections: Strip approximately 3/4 inch of insulation from each wire end using your wire stripper. Twist the black wire from your new fan together with the black wire from your home’s circuit. Screw a wire nut clockwise over these twisted wires until the connection is tight and no copper is visible. Repeat this process for the white (neutral) wires. If a ground wire is present, connect the new fan’s ground wire to your home’s ground wire using a wire nut or by inserting both into the same ground screw terminal if available.
Wrap each wire nut connection with electrical tape for added security and insulation. This prevents accidental disconnection and provides extra protection against moisture in the humid bathroom environment. Carefully fold the connected wires back into the junction box, ensuring they don’t get pinched or kinked.
Special Considerations: If your bathroom fan includes a humidity sensor or timer feature, follow the manufacturer’s instructions for these additional connections. Some fans have separate control wires for these features. If your installation involves a separate humidity sensor, mount this sensor in an appropriate location on the bathroom wall or ceiling where it can accurately detect moisture without being in direct spray from the shower.
If your fan includes a light fixture, the wiring is slightly more complex, with separate connections for the light circuit and fan motor circuit. Again, follow manufacturer instructions meticulously for these configurations. When in doubt, contact the fan manufacturer’s technical support line—they can walk you through connections specific to your model.
Finishing Touches and Testing
With the fan mounted, ductwork connected, and electrical wiring complete, you’re nearly finished. Install the trim ring or escutcheon (the decorative ring covering the gap between fan housing and ceiling) by sliding it into position and securing it with the provided clips or screws. This finishing piece provides a clean, professional appearance and helps seal the gap between the housing and drywall.
If your fan includes a damper, ensure it moves freely and closes completely when the fan is off. A stuck damper prevents proper sealing and allows outside air and pests to enter your home. Apply a small amount of lubricant (such as silicone-based spray) if the damper is stiff, avoiding WD-40 or petroleum-based products that can damage plastic components.
Install the grille or trim cover by sliding it up into the trim ring and securing with provided clips. Some grilles include a filter; if so, note the filter type and replacement schedule for future maintenance. A clogged filter dramatically reduces fan performance, so plan to check and replace filters according to manufacturer recommendations—typically every 3-6 months in humid climates.
Now comes the moment of truth: testing your installation. Restore power to the circuit by switching the breaker back to ON. Flip the bathroom light switch—your fan should start immediately. Listen for unusual noises; the fan should operate quietly with minimal vibration. If you hear grinding, squealing, or rattling, turn off the fan immediately and investigate. These sounds indicate installation problems or mechanical issues requiring correction.
Test airflow by holding a tissue near a vent or by observing condensation reduction over several days of normal bathroom use. The tissue should be drawn toward the vent by the fan’s suction. If airflow seems weak, check for kinked ductwork, blockages, or damper issues before troubleshooting further.
Check for any air leaks around the trim ring or housing. Seal any gaps with paintable caulk to prevent air leakage and maintain efficiency. Allow caulk to cure per manufacturer instructions before running the fan continuously.
If your fan includes a timer or humidity sensor, test these features to ensure they function correctly. Set the timer for a short duration and verify the fan stops as expected. If humidity sensing is included, run hot water in the shower and confirm the fan activates automatically when humidity increases.
Finally, consider running the fan for 20-30 minutes after showers to fully remove moisture from the bathroom. This practice extends the life of paint, fixtures, and structural components while preventing mold growth. Many modern fans include timer features that automatically shut off after a preset duration, making this easy to maintain.
FAQ
What CFM (cubic feet per minute) should my bathroom fan be?
The International Mechanical Code (IMC) specifies minimum ventilation requirements based on bathroom size. For most bathrooms, 1 CFM per square foot of floor area is standard, with a minimum of 50 CFM. A 100-square-foot bathroom would require at least a 100 CFM fan. For larger bathrooms or those with multiple showers, higher CFM ratings are appropriate. Check your local building codes for specific requirements in your jurisdiction.
Can I install a bathroom fan myself, or do I need an electrician?
If you’re comfortable working with basic electrical connections and follow manufacturer instructions carefully, many homeowners successfully install bathroom fans. However, if you’re uncertain about any electrical aspect or your home has older wiring, hiring a licensed electrician is wise. The safety considerations justify professional installation costs.
How often should I replace my bathroom fan?
With proper maintenance, a quality bathroom fan should operate effectively for 10-15 years. However, if your fan isn’t pulling air effectively, makes excessive noise, or shows signs of motor failure, replacement is warranted regardless of age. Regular cleaning and filter replacement extend fan lifespan significantly.
Should I vent my bathroom fan into the attic?
Absolutely not. Venting into the attic introduces moisture that causes mold, wood rot, and structural damage. Always vent to the exterior through the roof, gable wall, or soffit. This is non-negotiable for proper fan operation and home protection.
What’s the difference between rigid and flexible ductwork?
Rigid ductwork provides superior airflow and efficiency but requires more careful installation routing. Flexible ducting is easier to install in tight spaces but is more prone to kinking and dust accumulation. For most installations, rigid ductwork is preferred if space allows. When using flexible ducting, support it properly and avoid kinks that reduce airflow.
Do I need a damper on my bathroom fan ductwork?
Yes, a damper or backdraft preventer is essential. This one-way valve allows moist air to exit while preventing cold outside air from flowing backward into your home when the fan is off. Without a damper, you lose conditioned air and waste energy. Most modern fans include integrated dampers, but older installations may need dampers added to existing ductwork.
What maintenance does my new bathroom fan require?
Clean or replace the filter every 3-6 months depending on use and humidity levels. Vacuum the grille periodically to remove dust accumulation. Check ductwork annually for blockages or pest intrusions. If your fan includes a humidity sensor, verify it’s functioning correctly by testing during shower use. These simple maintenance steps ensure optimal performance and longevity.
Replacing your bathroom fan is a manageable project that improves your home’s comfort and protects its structural integrity. By following these electrician-approved steps and prioritizing safety throughout the process, you’ll enjoy reliable moisture control and fresh air circulation in your bathroom for years to come. If you’re tackling other home improvement projects, explore our guides on home painting, flooring installation, and other DIY improvements to continue building your skills and confidence in home maintenance.


