How to Clean Evaporator Coil: HVAC Expert Tips for Peak Performance
Your air conditioning system’s evaporator coil is one of the most critical components for maintaining efficient cooling and indoor air quality. Over time, dust, debris, and biological growth accumulate on the coil’s surface, reducing heat transfer efficiency and forcing your system to work harder. A dirty evaporator coil can increase energy consumption by 15-20% and compromise your comfort during peak summer months. This comprehensive guide walks you through professional-grade cleaning techniques that HVAC technicians use, helping you restore your system’s performance and extend its lifespan.
Understanding how to clean an evaporator coil properly requires knowledge of your system’s design, appropriate cleaning solutions, and safety precautions. Whether you’re a homeowner looking to maintain your HVAC investment or someone interested in preventive maintenance, this guide provides the detailed instructions and expert insights you need. We’ll cover everything from identifying when cleaning is necessary to executing the cleaning process safely and effectively.
Why Clean Your Evaporator Coil Matters for HVAC Efficiency
The evaporator coil is the heat exchanger located inside your indoor air handling unit, typically found in your attic, basement, or utility closet. Its primary function is to absorb heat from your home’s air, allowing refrigerant to circulate and cool your space. When the coil accumulates contaminants, the efficiency of this heat transfer process deteriorates significantly.
A clean evaporator coil enables your system to operate at manufacturer specifications, reducing strain on the compressor and extending component lifespan. The U.S. Department of Energy reports that regular coil maintenance can improve system efficiency by 5-15%, translating to measurable savings on your monthly energy bills. Additionally, a clean coil promotes better air quality by preventing mold growth and reducing the circulation of dust and allergens throughout your home.
When considering indoor cleaning projects, don’t overlook your HVAC system’s internal components. Just as you would maintain other home systems, your air conditioning deserves regular attention. The evaporator coil directly impacts the air quality you breathe daily, making this maintenance task both a performance and health investment.
Identifying When Your Evaporator Coil Needs Cleaning
Recognizing the warning signs of a dirty evaporator coil helps you address the problem before it causes significant system degradation. Several observable symptoms indicate your coil requires professional attention or DIY cleaning.
- Reduced cooling capacity: Your air conditioning runs continuously but fails to reach your thermostat setpoint, particularly on hot days
- Weak airflow: Air coming from your vents feels noticeably less forceful than normal operation
- Unusual odors: Musty, moldy smells emanate from your vents, indicating biological growth on the coil
- Higher energy bills: Your cooling costs increase without corresponding changes in usage patterns or outdoor temperatures
- Ice formation: Frost or ice builds up on the refrigerant lines or coil exterior, suggesting airflow restriction
- System cycling issues: Your air conditioner short-cycles, turning on and off more frequently than normal
- Water drainage problems: The condensate drain pan overflows or backs up into your home
Most HVAC manufacturers recommend inspecting your evaporator coil annually and cleaning it every 2-3 years, depending on environmental factors. Homes in dusty areas, with pets, or in humid climates may require more frequent cleaning. If you’ve neglected maintenance for several years, professional inspection is advisable before attempting DIY cleaning.
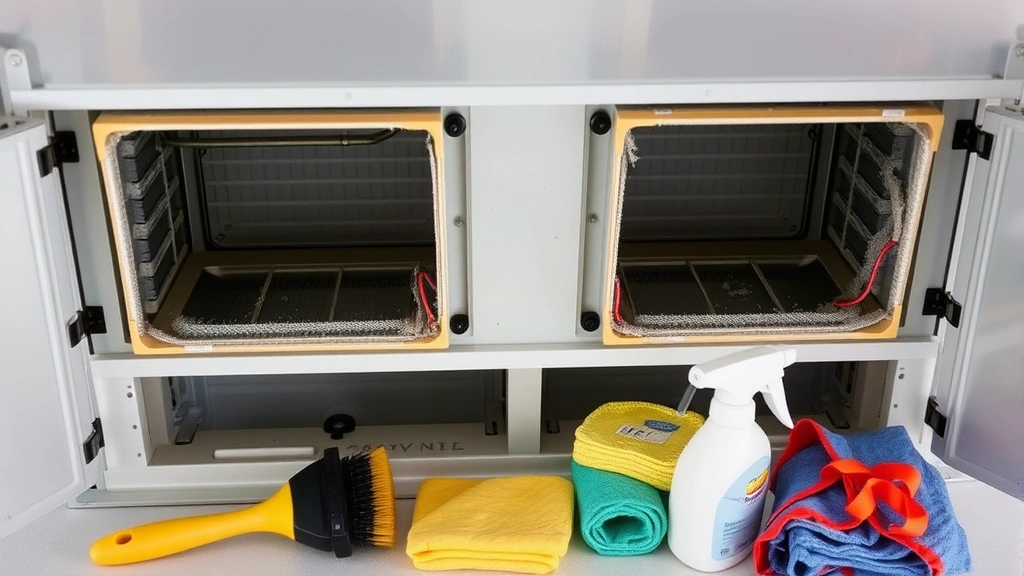
Essential Tools and Materials for Evaporator Coil Cleaning
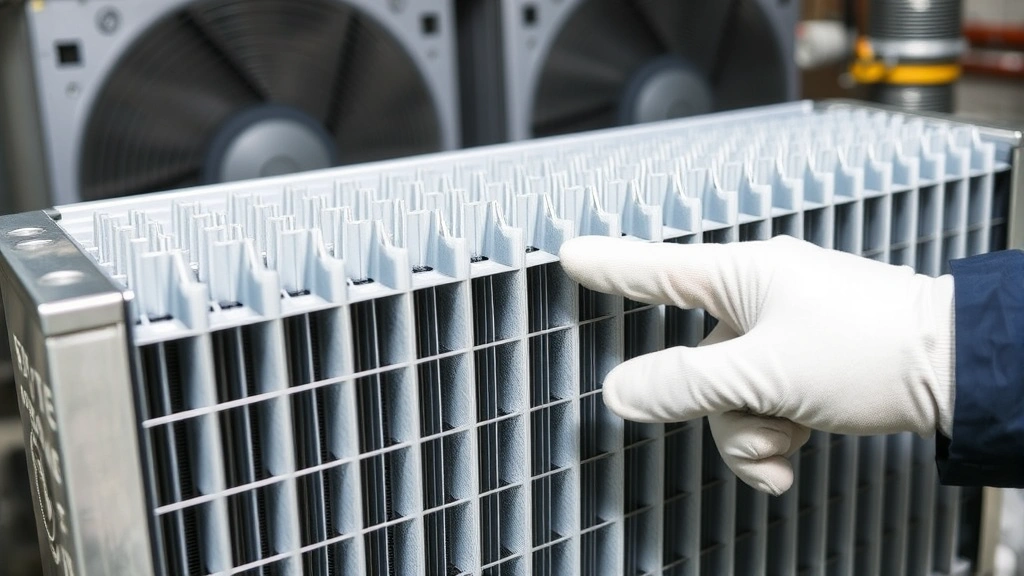
Proper equipment ensures safe, effective cleaning without damaging the delicate aluminum fins of your evaporator coil. Gather these items before beginning your project:
- Safety equipment: Work gloves, safety glasses, dust mask or respirator (N95 minimum), and potentially a full-face shield
- Cleaning solutions: Commercial evaporator coil cleaner, mild dish soap diluted in water, or specialized alkaline/acidic cleaners approved by your HVAC system manufacturer
- Soft-bristled brush: A coil brush with soft nylon bristles designed to avoid damaging aluminum fins
- Spray bottle or pump sprayer: For applying cleaning solution evenly across the coil surface
- Wet/dry vacuum: Essential for removing loosened debris and excess moisture
- Access tools: Screwdrivers, wrench, or socket set to remove access panels and covers
- Drop cloths and plastic sheeting: To protect surrounding areas from cleaning solution splash and drips
- Towels and rags: Microfiber cloths work best for final drying without leaving lint
- Flashlight or headlamp: The area around evaporator coils is typically dark and cramped
Regarding cleaning solutions, consult your system’s documentation or contact your HVAC manufacturer for approved products. Some coils have special coatings that certain cleaners can damage. Popular commercial options include HVAC-specific coil cleaners that are formulated to dissolve aluminum oxide buildup without harming the coil material.
Critical Safety Precautions and System Preparation
Before touching any HVAC components, prioritize safety for yourself and your system. Improper handling can damage expensive equipment or create hazardous situations.
Electrical safety is paramount. Turn off your HVAC system at the thermostat and the circuit breaker controlling your air handler. Wait at least five minutes to ensure all electrical charge dissipates. If you’re uncomfortable working with electrical systems, hire a licensed HVAC technician instead. Many homeowners cause thousands of dollars in damage by accidentally damaging electrical components during DIY maintenance.
Refrigerant safety requires caution. Never attempt to service refrigerant lines yourself unless you hold EPA certification. Refrigerant is dangerous to handle and regulated under federal law. If you suspect a refrigerant leak or need to disconnect refrigerant lines, contact a certified technician immediately.
Prepare your work area thoroughly. Lay down plastic sheeting and drop cloths to catch cleaning solution, debris, and condensation. Have your wet/dry vacuum nearby and plugged in before starting. Position your flashlight to illuminate the coil clearly. Many HVAC systems are located in tight spaces, so ensure you have adequate room to work safely without contorting your body into uncomfortable positions.
Check your system’s access points. Familiarize yourself with how to access your evaporator coil before beginning work. Some systems require removing multiple panels, while others have dedicated access doors. Take photos of the panel arrangement before disassembly so you can reassemble correctly. Document where each fastener goes—HVAC systems have various screw sizes and types that shouldn’t be mixed up.
Step-by-Step Professional Evaporator Coil Cleaning Process
Step 1: System Shutdown and Safety Verification
Turn off your HVAC system at the thermostat, then switch off the circuit breaker controlling your air handler. Wait five minutes for electrical discharge. Verify the system is off by attempting to turn it on—nothing should happen. This confirms safe working conditions before you begin accessing internal components.
Step 2: Access Panel Removal
Carefully remove the access panels covering your evaporator coil. These are typically held with screws, clips, or latches. Take photos documenting the original configuration, and organize fasteners in labeled containers. Don’t force panels—if resistance occurs, you may have missed a fastener. Gently lay panels aside in a clean area where they won’t get dirty or damaged during your cleaning work.
Step 3: Initial Debris Removal
Using your wet/dry vacuum with the brush attachment, gently remove loose dust and debris from the coil surface. Work slowly to avoid damaging the delicate aluminum fins. Vacuum from top to bottom, allowing gravity to assist debris removal. This initial pass removes the bulk of surface contamination before you apply liquid cleaners.
Step 4: Cleaning Solution Application
Prepare your cleaning solution according to the product instructions. Commercial evaporator coil cleaners typically require dilution with water. Pour the solution into your spray bottle or pump sprayer. Starting at the top of the coil, apply the solution generously but not excessively—you want thorough coverage without solution running everywhere uncontrollably.
Allow the cleaning solution to dwell on the coil for the time specified by the product (typically 10-15 minutes). This soaking period allows the chemical action to break down accumulated grime, mold, and mineral deposits. During this time, do not disturb the coil or apply additional solution.
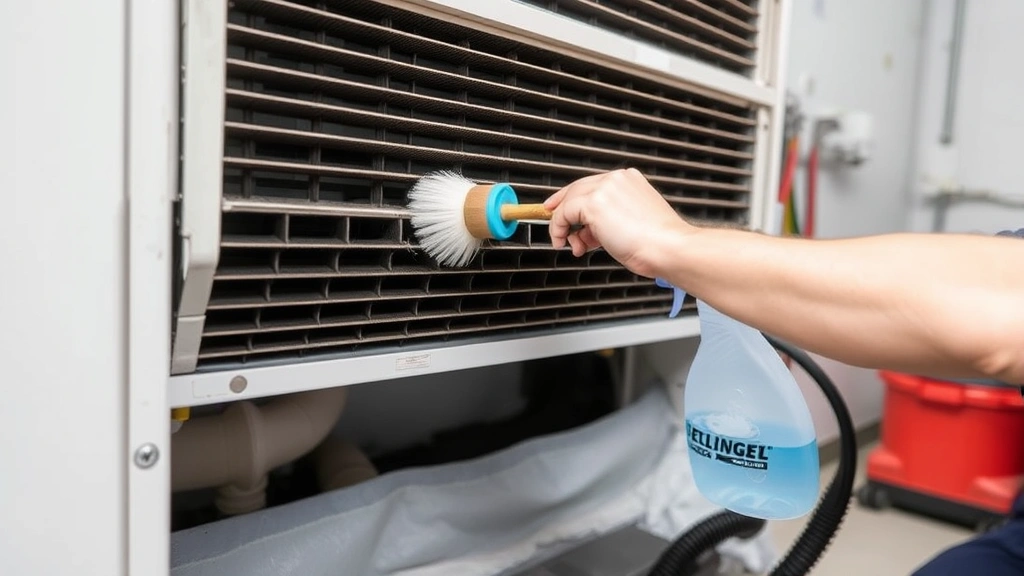
Step 5: Gentle Brushing and Agitation
After the solution has dwelled, use your soft-bristled coil brush to gently agitate the coil surface. Brush in the direction of the fins, never against them, to avoid bending or damaging the delicate aluminum. Apply light to moderate pressure—aggressive scrubbing can puncture the fins or separate them from the coil tubes. Work systematically from top to bottom, ensuring every area receives attention.
Step 6: Rinsing and Debris Removal
Using distilled water in your spray bottle, rinse the coil thoroughly to remove loosened contaminants and cleaning solution residue. Spray from top to bottom, allowing water to cascade downward. Immediately follow with your wet/dry vacuum to capture the rinse water and debris. You may need to repeat the rinse-and-vacuum cycle 2-3 times until the water running off appears clear and clean.
Step 7: Final Drying
Use your wet/dry vacuum to remove as much remaining moisture as possible from the coil. Then use clean, dry microfiber towels to wipe down the coil and surrounding components. Proper drying prevents moisture from promoting mold regrowth and helps your system restart cleanly. Leave the access panels off for 30 minutes to allow air circulation and complete drying.
Step 8: Reassembly and System Restart
Carefully reinstall all access panels, fasteners, and covers, following the photos you took during disassembly. Ensure all panels are secure and properly sealed—loose panels can allow air leaks that reduce cooling efficiency. Once reassembled, restore power at the circuit breaker and turn on your HVAC system. Allow it to run for 15 minutes and listen for any unusual noises or operational issues before considering the job complete.
Professional Cleaning vs. DIY Maintenance: Making the Right Choice
While DIY evaporator coil cleaning is possible for homeowners with mechanical aptitude, professional service offers significant advantages in many situations. Understanding when to tackle this project yourself versus hiring a technician helps you make an informed decision.
DIY cleaning is appropriate when: Your system is accessible and you’re comfortable working in tight spaces, you’ve confirmed there are no refrigerant leaks, your coil shows only moderate dust accumulation, and you have experience with basic HVAC maintenance. DIY cleaning typically costs $50-150 in supplies and saves $200-400 in service calls.
Professional service is recommended when: Your coil is heavily contaminated with mold or biological growth, you suspect refrigerant leaks, your system is newer and still under warranty (DIY work might void it), you’re uncomfortable working with electrical components, or your HVAC system has complex configurations. Professional technicians have specialized equipment like compressed air systems and commercial-grade cleaning solutions that provide superior results. They can also identify other system issues during their inspection.
Consider that improper cleaning technique can damage your evaporator coil permanently, requiring replacement costs of $400-1,200. If you’re uncertain about your abilities, professional service is the safer investment. Many HVAC companies offer maintenance plans with annual inspections and cleaning for $150-300 annually, spreading costs predictably throughout the year.
Preventive Maintenance to Extend Time Between Cleanings
Implementing preventive measures reduces how frequently you need to clean your evaporator coil and keeps your system running efficiently year-round.
Air filter replacement is fundamental. Change your HVAC system’s air filter every 1-3 months, depending on filter type and household conditions. A clean filter prevents dust from reaching your evaporator coil in the first place. EPA guidelines on residential air filtration recommend checking filters monthly and replacing them when visibly dirty. Using MERV 11-13 filters improves dust capture compared to basic MERV 8 filters.
Maintain proper humidity levels. Humidity above 55% promotes mold growth on evaporator coils. Using a whole-home dehumidifier or ensuring your air conditioning system’s condensate drain works properly helps prevent biological contamination. If you’re concerned about indoor humidity, consider addressing moisture issues throughout your home systematically.
Clear your condensate drain regularly. The evaporator coil produces condensation that drains through a condensate line. If this line becomes clogged with algae or debris, water backs up and promotes mold growth on the coil itself. Flush your condensate drain with a mixture of equal parts white vinegar and water quarterly to prevent blockages. This simple maintenance task takes 15 minutes and prevents expensive mold remediation.
Schedule professional inspections annually. Having an HVAC technician inspect your system each spring before cooling season allows early detection of problems. They can identify coil contamination, refrigerant issues, and component wear before they impact your comfort or efficiency. Annual inspections cost $100-200 and often pay for themselves through early problem detection.
Improve outdoor unit cleanliness. Your outdoor condenser unit also accumulates debris. Keeping vegetation at least two feet away and periodically rinsing the unit with a garden hose helps your entire system operate efficiently. Blockages around the outdoor unit force your compressor to work harder, indirectly stressing your indoor evaporator coil.
Seal air leaks around your air handler. Gaps around ductwork and air handler access panels allow unconditioned air to bypass your filter and reach your evaporator coil. Sealing these leaks with mastic sealant or metal tape keeps filtered air flowing through the coil, reducing contamination rates.
Frequently Asked Questions About Evaporator Coil Cleaning
How often should I clean my evaporator coil?
Most HVAC systems benefit from evaporator coil inspection annually and cleaning every 2-3 years. However, homes in dusty environments, with multiple pets, or in humid climates may require more frequent cleaning—potentially annually. If you maintain a clean air filter and proper humidity levels, you can often extend the interval between cleanings to 3-5 years.
Can I use a pressure washer to clean my evaporator coil?
No, pressure washers are too aggressive for delicate evaporator coil fins. High-pressure water can bend or separate aluminum fins, causing permanent damage requiring coil replacement. Always use gentle spray bottles or low-pressure water sources. Even garden hoses on full blast can damage coils—use the mist setting instead.
What’s the difference between alkaline and acidic coil cleaners?
Alkaline cleaners work well on organic contamination like dust, pollen, and light mold growth. Acidic cleaners are better for mineral deposits from hard water and heavy oxidation. Consult your system manufacturer’s recommendations, as using the wrong cleaner type can damage certain coil coatings. Many commercial products are pH-neutral and safe for all coil types.
Is it safe to use household vinegar to clean my evaporator coil?
Vinegar is mildly acidic and can be used for light cleaning, particularly for mold prevention. However, it’s less effective than commercial coil cleaners for heavy contamination. If using vinegar, dilute it 1:1 with water and ensure your coil material is compatible with acidic solutions. For best results, use products specifically formulated for HVAC evaporator coils.
Why is my evaporator coil icing up?
Ice formation typically indicates restricted airflow across the coil, often caused by a dirty filter, blocked return air ductwork, or a dirty evaporator coil itself. The restriction reduces airflow, allowing refrigerant to cool the coil below the dew point, causing condensation to freeze. Cleaning your air filter and evaporator coil usually resolves the issue. If ice persists, contact a technician to check for refrigerant undercharge or other mechanical issues.
Can I clean my evaporator coil without removing access panels?
Some newer HVAC systems have improved access, but most require panel removal for thorough cleaning. Attempting to clean without proper access prevents you from reaching all contaminated areas and may cause cleaning solution to drip into electrical components. Proper access panel removal ensures complete, safe cleaning and system protection.
Should I clean my evaporator coil if my air conditioning is working fine?
Yes, preventive cleaning maintains efficiency and extends component lifespan. Even if cooling seems adequate, a dirty coil forces your system to work harder, consuming more energy and increasing wear on the compressor. Annual inspections help identify coil contamination before it impacts cooling performance, keeping your system operating at peak efficiency and saving money on energy bills.
What external links should I consult for HVAC standards and guidance?
The International Code Council establishes building codes including HVAC requirements. The American Society of Heating, Refrigerating and Air-Conditioning Engineers (ASHRAE) provides technical standards for system maintenance. The Contracting Business publication offers industry best practices and maintenance guidance. Your system’s manufacturer documentation is also essential—consult it before beginning any maintenance work.


