Your Mac contains irreplaceable data—from family photos and important documents to creative projects and personal files. Protecting this information through iCloud backup is one of the smartest decisions you can make as a Mac owner. Unlike external hard drives that can fail or get misplaced, iCloud provides automatic, cloud-based protection that works seamlessly in the background.
Whether you’re a homeowner documenting your basement finishing project, storing blueprints for your next crown molding installation, or keeping records of your home security setup, having a reliable backup system is essential. This comprehensive guide walks you through every step of backing up your Mac to iCloud, ensuring your valuable information stays safe and accessible.
Understanding iCloud Backup for Mac
iCloud backup represents Apple’s integrated solution for protecting your Mac data across multiple devices. Unlike Time Machine, which creates local backups on external drives, iCloud works continuously in the cloud, synchronizing your files in real-time. This means your documents, photos, and system settings are always protected, even if your physical Mac is damaged or stolen.
The iCloud backup system uses end-to-end encryption, ensuring that your sensitive information—including financial records, personal health data, and home automation settings—remains private and secure. Apple’s servers store your encrypted data in geographically distributed data centers, protecting against hardware failures and natural disasters.
For homeowners managing DIY projects, iCloud backup proves invaluable. You can safely store before-and-after photos of your house painting projects, design files for your flooring installation, and contractor contact information without worrying about loss.
System Requirements and Preparation
Before starting your backup process, verify that your Mac meets Apple’s technical requirements. You’ll need macOS Big Sur or later (macOS 11.0 and above) for full iCloud backup functionality. Older Mac models may support earlier macOS versions and limited iCloud features.
Hardware requirements include:
- A Mac with at least 64GB of available storage space
- Stable internet connection (broadband recommended for faster initial backup)
- Minimum 4GB of RAM for optimal performance
- Sufficient iCloud storage plan (5GB free or higher capacity paid plans)
Preparation steps before enabling backup:
- Update macOS to the latest version by clicking the Apple menu and selecting System Settings
- Connect your Mac to a reliable Wi-Fi network
- Ensure your battery is charged or connect to power (initial backups can take several hours)
- Close unnecessary applications to free up system resources
- Verify your internet speed using Speedtest for optimal backup performance
Setting Up Your Apple ID
Your Apple ID serves as the foundation for all iCloud services. If you don’t already have one, you’ll need to create it before proceeding with backup configuration.
To create or verify your Apple ID:
- Click the Apple menu in the top-left corner of your screen
- Select “System Settings” from the dropdown menu
- Look for your profile picture or name at the top of the sidebar
- If you see “Sign In,” click it and enter your existing Apple ID credentials
- If you don’t have an Apple ID, select “Create Apple ID” and follow the prompts
During Apple ID setup, you’ll need to provide:
- Your email address (which becomes your Apple ID)
- A strong password containing uppercase, lowercase, numbers, and symbols
- Security questions for account recovery
- A trusted phone number for verification
Apple’s official Apple ID documentation provides additional security guidance for protecting your account.
Enabling iCloud Drive
iCloud Drive is the primary mechanism for backing up your Mac’s files and documents. This service automatically syncs your Desktop, Documents, Downloads folders, and other designated locations to the cloud.
To enable iCloud Drive:
- Open System Settings and click your profile name at the top
- Select “iCloud” from the left sidebar menu
- Locate “iCloud Drive” in the list of services
- Toggle the switch next to iCloud Drive to the ON position
- When prompted, choose “Keep on Mac” to maintain local copies of files
The “Keep on Mac” option is crucial for users who want both local and cloud storage. This approach provides redundancy—if iCloud experiences any issues, your files remain accessible on your Mac. Files in your iCloud Drive will show a small cloud icon in Finder, indicating their backup status.
You can also choose which folders to sync by clicking “Options” next to iCloud Drive. This allows selective backup of Desktop, Documents, and Downloads folders—a smart approach if your Mac has limited storage capacity.
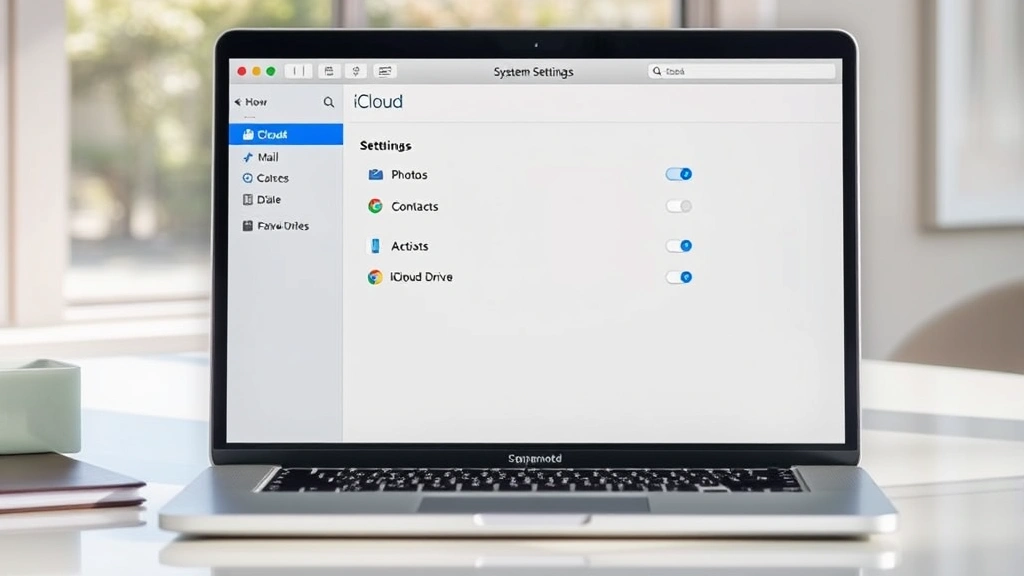
Configuring iCloud Backup Settings
Beyond iCloud Drive, macOS offers additional backup options for system settings, app data, and preferences. Configuring these ensures comprehensive protection of your entire Mac environment.
Steps to configure complete backup settings:
- Navigate to System Settings > [Your Name] > iCloud
- Review the list of available services for backup
- Enable “Photos” to backup your photo library to iCloud Photos
- Enable “Mail” to sync email accounts and messages
- Enable “Contacts” to backup your contact information
- Enable “Calendars” to protect your schedule and events
- Enable “Notes” to backup all your notes and memos
- Enable “Reminders” to sync your task lists
- Enable “Keychain” to backup saved passwords and payment information
Each service can be toggled independently based on your preferences and storage needs. For homeowners tracking multiple DIY home improvement projects, enabling Notes and Reminders ensures your project lists and ideas stay synchronized across all devices.
Consider your iCloud storage plan when selecting services. If you’re using the free 5GB plan, prioritize critical data like Keychain and important documents. Upgrade to a larger plan (50GB, 200GB, or 2TB) if you want comprehensive backup of photos and large files.
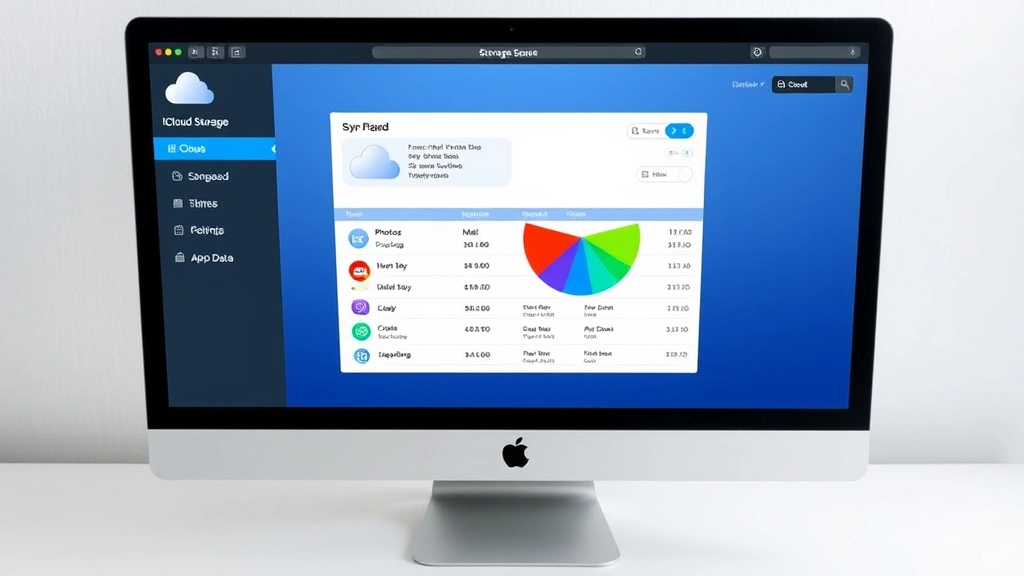
Managing Your iCloud Storage
Understanding your storage usage prevents backup failures and ensures continuous protection. Apple provides detailed storage management tools within System Settings.
To check your storage usage:
- Open System Settings and select your profile name
- Click “iCloud”
- Select “Manage” next to the storage bar
- Review the breakdown of what’s using your storage space
The storage breakdown typically shows:
- Photos and Videos: Usually the largest category; consider enabling iCloud Photos optimization to store lower-resolution versions locally
- Mail: Old emails with attachments consume significant space; archive or delete unnecessary messages
- iCloud Drive: Documents and files; review for duplicate or outdated files
- App Data: Backup data from individual applications; varies by app usage
- Device Backups: If you own multiple Apple devices, each maintains a backup
Storage optimization strategies:
- Enable “Optimize Mac Storage” in Photos settings to keep full-resolution originals in iCloud while storing optimized versions locally
- Regularly review and delete old emails, especially those with large attachments
- Archive completed projects to external drives to free up iCloud space
- Remove backups for devices you no longer own
- Upgrade your storage plan for $0.99/month (50GB), $2.99/month (200GB), or $9.99/month (2TB)
Troubleshooting Common Issues
Even with proper setup, backup issues occasionally occur. Understanding how to diagnose and resolve problems ensures continuous protection of your data.
Backup not starting:
- Verify your internet connection by opening a web browser and visiting a website
- Sign out of iCloud (System Settings > [Your Name] > Sign Out) and sign back in
- Restart your Mac to reset system services
- Check available storage space; you need at least 10GB free to initiate backup
- Ensure you’re connected to Wi-Fi, as cellular connections won’t work
Slow backup performance:
- Pause other network activities (streaming, downloads, video calls) during backup
- Move your Mac closer to your Wi-Fi router to improve signal strength
- Schedule backups during off-peak hours (late evening or early morning)
- Disable other cloud services temporarily to reduce network congestion
- Consider upgrading your internet plan if your connection is consistently slow
iCloud storage full:
- Delete old device backups you no longer need
- Review and remove large video files or duplicates
- Clear your Mail trash and spam folders
- Upgrade to a larger iCloud storage plan
- Offload photos to an external drive and remove them from iCloud
Files not syncing:
- Check that iCloud Drive is enabled in System Settings
- Verify the file is saved within your iCloud Drive folder in Finder
- Look for a cloud icon next to the filename; a loading circle indicates in-progress sync
- Restart your Mac if files remain stuck in sync
- Check Apple’s support website for service status updates
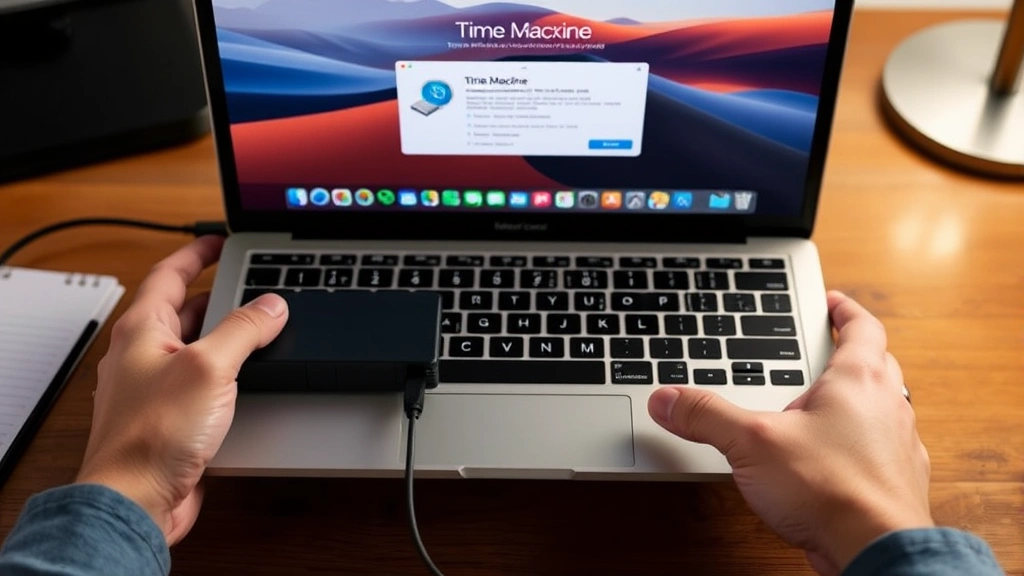
Best Practices for Mac Backup
Implementing comprehensive backup practices ensures maximum data protection beyond basic iCloud functionality.
Implement a multi-layered backup strategy:
- Primary backup: iCloud for automatic cloud protection and cross-device sync
- Secondary backup: Time Machine to an external hard drive for local redundancy
- Tertiary backup: Periodic manual backups to a separate external drive stored offsite
This approach provides protection against multiple failure scenarios. If iCloud experiences an outage, Time Machine ensures access to your files. If your Mac is stolen, an offsite backup protects against total data loss.
Regular maintenance tasks:
- Review your backup status monthly by checking System Settings > iCloud
- Verify that critical files appear in iCloud Drive by checking Finder
- Update macOS regularly to ensure backup features work optimally
- Change your Apple ID password every 90 days for security
- Review connected devices in System Settings > [Your Name] and remove old devices
- Check iCloud storage usage quarterly and adjust settings as needed
Security considerations:
- Enable two-factor authentication on your Apple ID for enhanced security
- Use a unique, strong password that you don’t use for other services
- Never share your Apple ID credentials with anyone
- Regularly review which apps have access to your iCloud data
- Consider setting up a trusted recovery email address for account access
For homeowners storing sensitive documents like home improvement contracts, warranty information, or property records in iCloud, these security practices are especially important. Your data protection directly impacts your home’s security and your financial well-being.
Frequently Asked Questions
How much does iCloud backup cost?
Apple provides 5GB of free iCloud storage for every Apple ID. This covers basic backups for light users. Paid plans start at $0.99/month for 50GB, with options for 200GB ($2.99/month) and 2TB ($9.99/month). Family sharing allows you to share a larger plan among up to six family members.
Can I backup multiple Macs to one iCloud account?
Yes, you can backup up to 10 devices using a single Apple ID. However, each device maintains its own backup, and they share the same iCloud storage pool. If you have multiple Macs, consider upgrading to a larger storage plan or using separate Apple IDs for each device.
What happens if I cancel my iCloud subscription?
If you stop paying for iCloud storage, you’ll have 30 days to purchase additional storage or delete files to get under your free 5GB limit. After 30 days, Apple will delete your backup data. However, your devices will continue to use iCloud services with the free 5GB limit.
Is iCloud backup encrypted?
Yes, all iCloud backups are encrypted both in transit and at rest. Most data uses standard encryption, while certain sensitive information (like Keychain data, health records, and payment information) uses end-to-end encryption that Apple cannot access.
Can I backup to iCloud and Time Machine simultaneously?
Absolutely. In fact, this is recommended best practice. iCloud provides automatic cloud backup, while Time Machine creates local backups on an external drive. Together, they provide comprehensive protection against various failure scenarios.
How long does the initial iCloud backup take?
Initial backup duration depends on your Mac’s data volume and internet speed. A Mac with 100GB of data on a 10 Mbps connection might take 24-48 hours. Subsequent backups are much faster since only changes are synced. Keep your Mac connected to power and Wi-Fi during the initial backup.
Can I access my iCloud backup from another Mac?
Yes, you can access files from iCloud Drive on any Mac where you sign in with your Apple ID. However, device-specific backups (created during Mac setup) can only be restored to that specific device. Cloud files are accessible from any device.
What files should I prioritize for backup?
Prioritize irreplaceable files: family photos, important documents (tax returns, insurance policies, property records), creative projects, and financial information. Less critical files like applications (which can be reinstalled) and system files (which backup automatically) are lower priority when storage is limited.


