How to Build a Shed: Carpenter’s Proven Guide
Building a shed is one of the most rewarding DIY projects you can undertake. Whether you need additional storage, a workshop, or a garden retreat, a well-constructed shed adds functionality and value to your property. This comprehensive guide walks you through every step of the shed-building process, from planning and foundation work through roofing and finishing touches. With proper planning, the right tools, and attention to detail, you can create a sturdy structure that lasts for decades.
The shed-building journey typically spans several weeks to months, depending on size, complexity, and your experience level. Unlike waiting for caulk to dry or cement to cure, shed construction involves active work phases that demand your attention and skill. This guide provides the knowledge needed to tackle this project confidently and safely.
Planning and Permits
Before you drive a single nail, proper planning is essential. Start by determining your shed’s purpose, size, and location. Consider local building codes, setback requirements, and easements. Most jurisdictions require permits for structures over 100-200 square feet, though regulations vary significantly. Contact your local building department to understand requirements in your area, as the International Code Council (ICC) provides model codes that most municipalities adopt.
Create detailed plans or obtain pre-designed shed blueprints. Include dimensions, materials list, foundation specifications, and roof design. A 10×12 shed is popular for homeowners seeking balance between usable space and construction complexity. Sketch the layout showing door placement, window locations, and any interior features. This planning phase prevents costly mistakes and ensures your final structure meets codes and your needs.
Budget considerations extend beyond materials. Factor in permits, tool rentals, and potential professional help for foundation work or electrical installations. Most shed projects range from $2,000 to $8,000 depending on size and finish quality. Document your plans and keep permits accessible during construction for inspections.
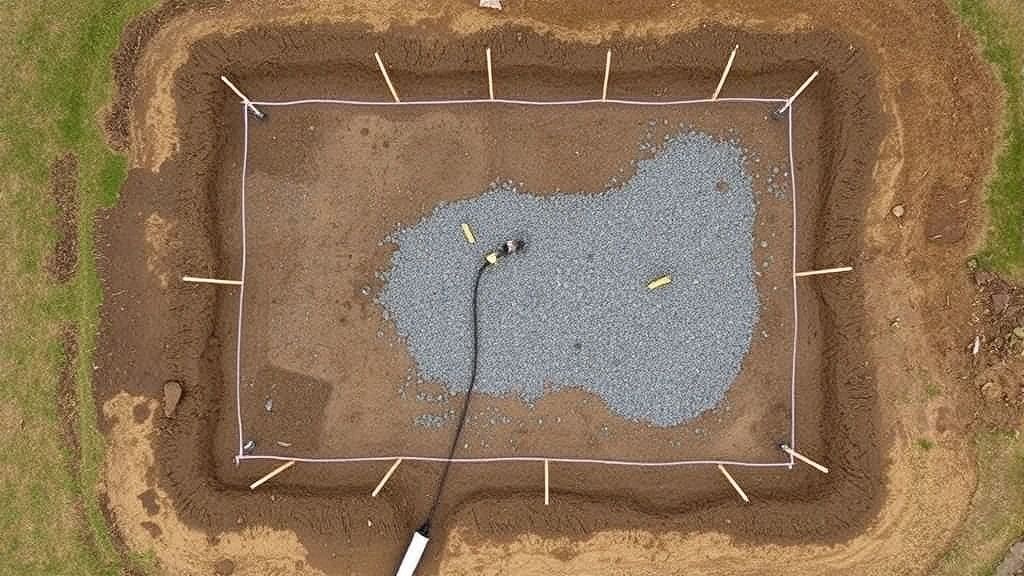
Site Preparation and Foundation
Selecting the right location is critical for longevity and functionality. Choose a level, well-draining site away from large trees that might drop branches or shade the structure excessively. Clear the area of vegetation, rocks, and debris. Mark the foundation footprint using string and stakes, ensuring square corners by measuring diagonals—they should be equal.
The foundation type dramatically impacts your shed’s durability. Common options include gravel pads, concrete piers, or concrete slabs. For most climates, concrete piers or a gravel pad with pressure-treated runners work well. If you’re in an area with freeze-thaw cycles, understanding how long cement takes to cure becomes important for proper foundation curing before building begins.
For a gravel pad foundation, excavate 4-6 inches, add landscape fabric to prevent weed growth, then fill with compacted gravel. For concrete piers, dig holes below the frost line (typically 2-4 feet depending on climate), set piers in concrete, and allow proper curing time. For a concrete slab, ensure proper grading for drainage, add a vapor barrier, and consider reinforcement with rebar or wire mesh. Most concrete needs 7 days minimum curing before building frame construction.
Once your foundation is ready, install treated rim boards or runners that will support your shed’s frame. Ensure these are level and square, as all subsequent work depends on this foundation accuracy.
Building the Frame
The frame is your shed’s skeleton. Begin with the floor frame using pressure-treated lumber, typically 2×6 or 2×8 joists spaced 16 inches on center. Secure joists to the foundation using anchor bolts or concrete fasteners. Install rim joists around the perimeter and add cross-bracing for stability.
Wall frames consist of studs, top plates, and bottom plates. Standard construction uses 2×4 lumber with studs spaced 16 inches on center. Build walls on the ground, then tilt them into place and brace temporarily. Cut studs for door and window openings, adding headers above openings to distribute load. A typical 8-foot wall height provides comfortable interior space while maintaining structural integrity.
For a 10×12 shed, you’ll need two 10-foot walls and two 12-foot walls. Construct walls with proper spacing, secure temporary bracing, and check for plumb using a level. Connect walls by securing top plates together at corners using 3-inch nails or bolts. Install diagonal bracing or sheathing to brace walls against wind loads before adding roof framing.
Your frame’s quality determines everything that follows. Ensure all corners are square, walls are plumb, and connections are secure. This investment in precision prevents problems during wall and roof installation.
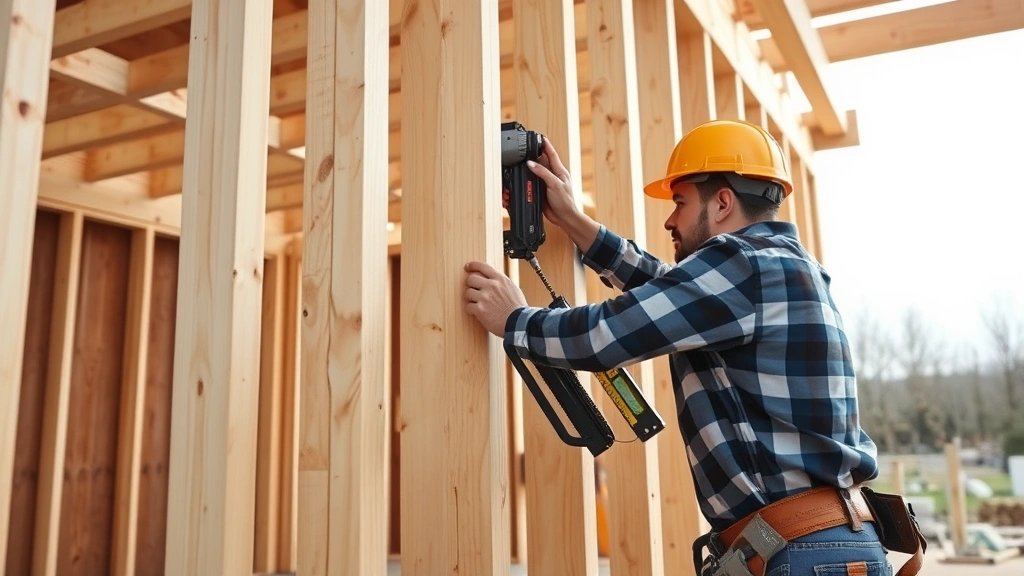
” alt=”Carpenter assembling wooden wall frame structure with pneumatic nailer, showing proper stud spacing and corner bracing on construction site with level and measuring tools visible”>
Wall Construction
With the frame complete, add wall sheathing using plywood or oriented strand board (OSB). Sheathing strengthens the frame, provides a nailing surface for siding, and helps brace against wind. Use 7/16-inch sheathing and space fasteners 8 inches apart around edges and 12 inches in the field. This sheathing layer is critical for structural integrity and weather resistance.
Install house wrap or weather barrier over sheathing before adding siding. This breathable membrane allows moisture escape while preventing water infiltration. Overlap seams by 6 inches and seal with tape designed for house wrap. This step prevents water damage inside walls, extending your shed’s lifespan significantly.
Choose siding material based on budget, aesthetics, and maintenance preferences. Common options include:
- Wood siding: Classic appearance, requires regular maintenance and painting
- Metal siding: Durable, low-maintenance, modern look
- Vinyl siding: Affordable, minimal maintenance, decent appearance
- Board-and-batten: Attractive, moderate maintenance, rustic appeal
Install siding starting from the bottom, overlapping courses to shed water. Secure with corrosion-resistant fasteners appropriate for your siding type. Leave gaps around door and window openings, installing trim and flashing to direct water away from openings. Proper flashing around all penetrations prevents water damage and extends shed longevity.
Don’t rush wall finishing. Quality siding and flashing installation protects your investment and keeps the interior dry for years to come. If you’re planning additional structures, similar attention to moisture management applies to basement finishing and other projects.
Roofing Installation
The roof protects everything inside your shed. Begin by installing roof trusses or rafters. Pre-made trusses simplify this process, while site-built rafters offer customization. Typical residential roofs use 4/12 to 6/12 pitch (4-6 inches of rise per 12 inches of run), balancing water shedding with interior headroom and aesthetic appeal.
Install roof sheathing using 7/16-inch OSB or plywood, securing with 8-inch fastener spacing. Add underlayment—either felt or synthetic—before shingles. This layer provides temporary weather protection during installation and adds a secondary water barrier. Overlap courses by 4 inches and secure according to manufacturer specifications.
Asphalt shingles are the most common roofing choice for sheds. They’re affordable, durable (20-30 year lifespan), and relatively easy to install. Start at the roof’s lower edge, working upward. Use roofing nails in the specified nail strip locations—typically four nails per shingle. Stagger joints between courses for maximum water shedding.
Don’t overlook flashing and trim details. Install flashing around penetrations like vents or chimneys, at valleys where roof planes meet, and at roof edges. Install gutters and downspouts to direct water away from the foundation, preventing erosion and water damage to your shed’s base.

” alt=”Worker installing asphalt shingles on shed roof, showing proper nailing technique and shingle overlap pattern with roofing nailer and completed courses visible”>
Finishing and Details
With structure complete, finishing work transforms your shed into a functional space. Install doors and windows using proper flashing and weatherstripping to prevent air and water infiltration. Hang doors with quality hinges and add locks if needed. Interior finishing depends on your shed’s purpose—shelving and workbenches for storage, electrical outlets for workshops, or simply sealed concrete floors for equipment storage.
Insulation and ventilation improve comfort and protect contents. Even unheated sheds benefit from ventilation to control humidity and prevent moisture buildup. Install soffit and ridge vents or gable vents to maintain air circulation. If you plan climate-controlled storage, add insulation between wall studs and under the roof.
Electrical systems require licensed electrician installation in most jurisdictions. Running power to your shed enables lighting, tool charging, and equipment operation. Ensure all work meets National Electrical Code (NEC) standards and local requirements. Ground all circuits properly and use GFCI protection for outdoor-accessible outlets.
Paint or stain exterior surfaces to protect wood and enhance appearance. Use exterior-grade paint or stain rated for your climate. Maintain your shed annually by inspecting roof condition, checking flashing, and repainting or staining as needed. Proper maintenance keeps your shed looking great and functioning reliably for decades.
Consider your shed’s relationship to your home’s aesthetic. Similar to house painting principles, color selection and finish quality affect curb appeal. Choose colors that complement your home while reflecting your personal style.
For those interested in expanding their DIY skills beyond shed building, explore home security systems or visit the DIY Nests Hub Blog for additional project inspiration and detailed guides.
FAQ
How long does it take to build a shed?
A typical 10×12 shed takes 4-8 weeks for one person working weekends, or 2-3 weeks with help. Timeline depends on experience, weather, and project complexity. Foundation curing adds 1-2 weeks before frame construction begins.
Do I need a permit to build a shed?
Most jurisdictions require permits for structures over 100-200 square feet. Some allow smaller accessory structures without permits, but requirements vary. Always contact your local building department before starting. Unpermitted structures may face removal orders and complicate insurance claims.
What’s the best shed foundation?
The best foundation depends on your climate and soil conditions. Gravel pads work in well-draining areas; concrete piers suit freeze-thaw climates; concrete slabs provide durability in wet regions. Consult American Institute of Architects guidelines or local building codes for your specific situation.
Can I build a shed myself without experience?
Yes, with proper planning and research. Start with a smaller structure (8×8 or 10×10), use detailed plans or kits, and don’t hesitate to hire professionals for specialized work like electrical installation or foundation work. Many DIY builders successfully complete sheds as their first major project.
What tools do I need?
Essential tools include circular saw, drill, level, tape measure, framing square, nail gun, and safety equipment. Rent specialized equipment like scaffolding or concrete mixers rather than purchasing. Budget for tool rental or borrow from friends and family to reduce costs.
How do I ensure my shed is square and level?
Measure diagonals during foundation layout—equal measurements confirm square corners. Use a 4-foot level during frame construction, checking studs for plumb and beams for level. Check again after trusses are installed. Precision during early stages prevents problems during wall and roof installation.
What’s the best roofing material for sheds?
Asphalt shingles offer the best value and durability for most homeowners. Metal roofing lasts longer (40+ years) but costs more. Cedar shakes provide rustic appeal but require maintenance. Consider your climate, budget, and aesthetic preferences when choosing roofing material.
Should I insulate my shed?
Insulation improves comfort and protects stored items from temperature extremes. Even basic insulation in walls and under the roof helps regulate interior temperature. Uninsulated sheds work fine for tool storage in mild climates but may damage temperature-sensitive items.


