How to Install Drywall? Pro Tips for Success
Drywall installation is one of the most transformative skills a DIY enthusiast can master. Whether you’re finishing a basement, renovating a bedroom, or tackling a complete wall replacement, understanding proper drywall installation techniques will save you time, money, and frustration. This comprehensive guide walks you through every step of the process, from material selection to final finishing touches.
Installing drywall correctly requires precision, patience, and the right tools. Professional installers spend years perfecting their craft, but with proper preparation and attention to detail, homeowners can achieve professional-quality results. The key is understanding not just the how, but the why behind each step—from framing verification to joint compound application.
Before diving into installation, recognize that drywall work is physically demanding and involves working at heights. Safety should always be your first priority. Proper equipment, including sturdy ladders, dust masks, and protective eyewear, is essential. This guide emphasizes safety-conscious practices throughout the installation process.
Materials and Tools You’ll Need
Successful drywall installation starts with having the right materials and tools on hand. The most important material is the drywall itself, typically available in 1/2-inch or 5/8-inch thickness. Standard 1/2-inch drywall is suitable for most residential applications, while 5/8-inch provides better fire resistance and sound dampening—important considerations for basement finishing or multi-story homes.
You’ll need drywall fasteners, available as either screws or nails. Most professionals recommend drywall screws over nails because they hold better and are less prone to popping after installation. Use 1-1/4 inch screws for 1/2-inch drywall and 1-5/8 inch screws for 5/8-inch drywall. Additionally, stock up on:
- Joint compound (mud) in buckets—typically 5-gallon containers
- Fiberglass mesh tape for reinforcing joints
- Sandpaper in 120, 150, and 220-grit varieties
- Corner bead for inside and outside corners
- Primer and paint suitable for drywall
Essential tools include a power drill-driver for fastening, a drywall lift (highly recommended for ceiling work), T-square for marking, utility knife, mud pan, taping knives in various widths (4-inch, 6-inch, 10-inch, and 12-inch), and a taping sander or sanding pole. Safety equipment—dust masks rated N95 or better, safety glasses, and work gloves—is non-negotiable.
For detailed guidance on finishing touches after drywall installation, consider reviewing our comprehensive resource on DIY house painting techniques to understand how to properly prepare and paint your newly installed drywall surfaces.
Preparation and Planning
Before hanging a single sheet of drywall, thorough preparation is essential. First, verify that your framing is square, level, and plumb. Use a level to check vertical studs and a straightedge to identify any bowing or warping. Studs should be spaced 16 inches on center for standard residential construction, though some applications require 24-inch spacing. Consult local ICC building codes for your region to ensure compliance.
Ensure all electrical boxes, plumbing, and HVAC work are completed and inspected before drywall installation. This prevents costly rework later. Install any backing boards or blocking where fixtures will be mounted—towel racks, shelves, or heavy artwork require solid support behind the drywall.
Plan your drywall layout strategically. Minimize seams, especially on ceilings where they’re more visible. Use the longest sheets possible to reduce the number of joints. Stagger seams on adjacent rows so they don’t align vertically—this strengthens the wall and reduces cracking. For a complete basement finishing project, careful planning of moisture barriers and drywall placement is particularly critical.
Measure twice, cut once. Mark your cuts clearly using a pencil and T-square. Drywall cuts easily with a utility knife—score the paper face, snap the core against a table edge, then cut the back paper. For cutouts around electrical boxes, use a drywall saw or hole saw.
Hanging Drywall Sheets
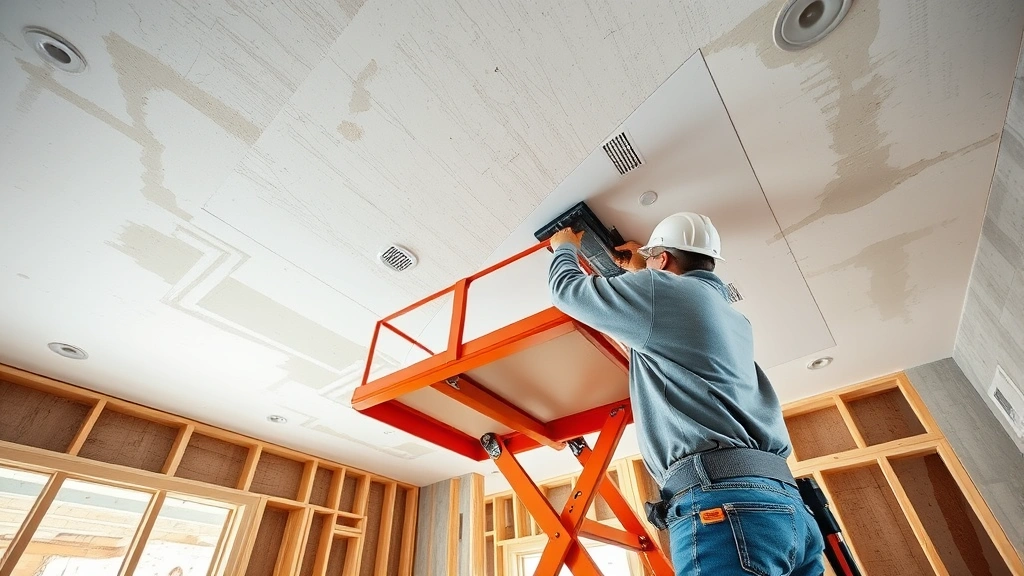
The actual hanging process requires coordination and precision. Always start with ceiling installation first, as this is the most challenging and physically demanding part. Use a drywall lift to hold sheets at ceiling height—this tool is worth renting and will dramatically reduce strain and improve safety.
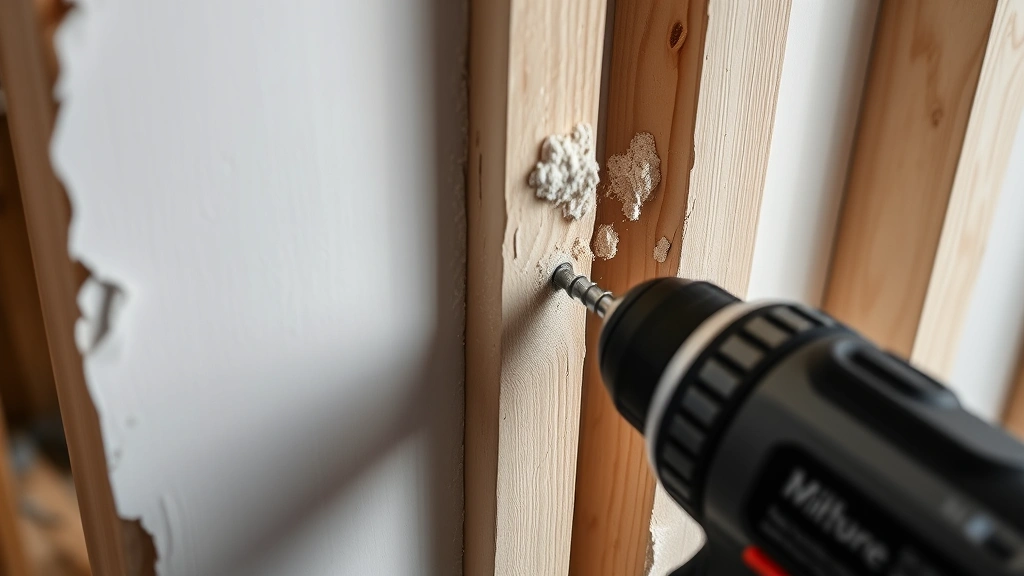
Position your first sheet in a corner, ensuring it’s tight against the framing. Use a power drill-driver to install screws every 12 inches along studs and every 16 inches along ceiling joists. Screws should be driven perpendicular to the surface, sinking slightly below the paper face without tearing it. This creates a small dimple that will be filled during mudding.
For walls, start at the top and work downward. Offset seams so they don’t align with ceiling seams. Hang sheets horizontally rather than vertically when possible—this creates fewer vertical seams and results in a stronger, more stable wall. Leave a 1/4-inch gap at the bottom of walls to allow for floor settlement and moisture movement.
Keep fastener spacing consistent: 12 inches on center for ceilings and 16 inches for walls. Avoid placing screws closer than 3/8 inch from edges to prevent paper tearing. After hanging all sheets, do a final inspection—run your hand over surfaces to feel for protruding screws or sheet edges.
If you’re working on a larger renovation project involving multiple rooms, understanding the broader context of basement finishing strategies will help you sequence your work efficiently.
Taping and Mudding Joints
Joint finishing is where drywall installation becomes an art form. This three-coat process transforms seams into seamless surfaces. Begin with corner bead installation on all outside corners. Crease the bead slightly and apply a thin line of joint compound down each side, then press firmly into place. Use a corner tool to smooth and straighten.
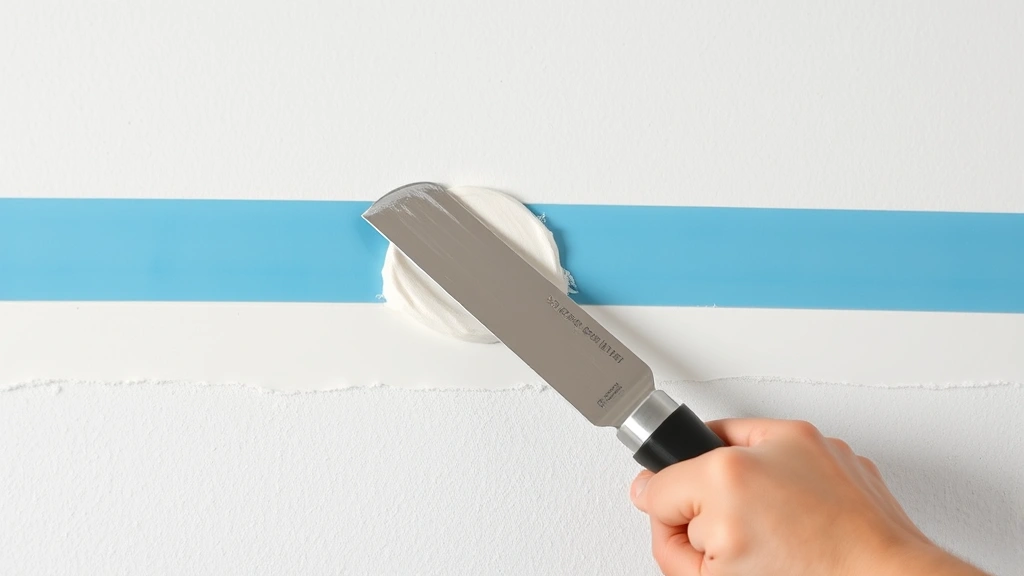
For flat seams, apply fiberglass mesh tape centered over the joint. This reinforces the joint and prevents cracking. Use a 4-inch knife to apply the first coat of compound—the “scratch coat.” Spread a thin layer (about 1/8 inch thick) over the tape, feathering edges slightly beyond the tape width. Allow this to dry completely, typically 24 hours.
The second coat, or “fill coat,” uses a wider knife (6-inch or 8-inch) to apply compound over the dried first coat. This coat should be thinner than the first, with edges feathered even wider. Again, allow complete drying before proceeding.
The final coat, the “finish coat,” uses your widest knife (10-inch or 12-inch) to create a smooth, nearly invisible transition. This coat should be very thin—barely visible—with edges blended seamlessly into the surrounding drywall. Feathering edges 6 to 8 inches on each side of the seam is standard practice.
Apply corner compound using a corner tool or wide knife, maintaining even pressure and straight lines. Inside corners require careful work with a corner knife or flexible putty knife. Work slowly and deliberately—rushing this step results in visible, unprofessional seams.
Sanding and Finishing
After the final coat dries completely, sanding creates the smooth, seamless surface that defines professional work. Begin with 120-grit sandpaper to remove any ridges, bumps, or imperfections. Use a sanding pole with a dust collection attachment to minimize airborne particles—drywall dust is extremely fine and creates respiratory hazards.
Sand lightly in circular motions, avoiding aggressive pressure that tears the paper face. Work systematically across the wall, paying special attention to seams and corners. After 120-grit sanding, vacuum thoroughly and inspect for remaining imperfections.
Progress to 150-grit sandpaper for a finer finish, then finish with 220-grit for a smooth, paint-ready surface. Between each grit, vacuum and allow dust to settle before proceeding. The more thorough your sanding process, the better your paint finish will be.
Address any remaining imperfections with spot repairs using lightweight joint compound. Allow these spot repairs to dry and sand smooth before proceeding to priming. Check your work under bright lighting from multiple angles to catch any remaining defects.
Priming and Painting
Never skip the priming step. Drywall primer seals the surface, provides uniform coverage, and ensures proper paint adhesion. Apply primer using a roller with a 3/8-inch nap. Work in systematic sections, maintaining a wet edge to avoid visible lap marks. Allow primer to dry according to manufacturer instructions, typically 1-2 hours.
When choosing paint, opt for quality interior latex paint in your desired finish. Most professionals recommend eggshell or satin finishes for drywall, as they’re more durable and easier to clean than flat finishes. Apply paint using the same technique as primer—systematic sections with maintained wet edges. Two coats are typically necessary for optimal coverage and color.
For additional insights on painting techniques and product selection, review our detailed house painting guide for professional-quality results.
Allow adequate drying time between coats. Check paint can instructions for specific timing. Proper drying ensures that subsequent coats adhere correctly and don’t cause the previous coat to lift or bubble.
FAQ
What’s the difference between 1/2-inch and 5/8-inch drywall?
1/2-inch drywall is lighter, easier to handle, and less expensive. It’s suitable for most residential applications with 16-inch stud spacing. 5/8-inch drywall is heavier, provides better fire resistance, superior sound dampening, and is required by code in some applications. Choose 5/8-inch for fire-rated assemblies, basements, or areas requiring enhanced soundproofing.
How long does drywall compound take to dry?
Standard joint compound typically requires 24 hours between coats. However, environmental factors matter significantly. Cool, humid conditions extend drying time; warm, dry conditions reduce it. Lightweight or “fast-set” compounds dry faster, sometimes in 2-4 hours. Check your specific product’s instructions, as brands vary. Avoid applying subsequent coats before thorough drying, as this causes cracking and poor adhesion.
Can I install drywall over existing drywall?
Yes, drywall can be installed over existing drywall, but this approach has drawbacks. It adds weight to framing, reduces ceiling height, and makes future repairs more complicated. It’s only recommended if removing existing drywall is impractical. Ensure the existing surface is clean, secure, and free of major damage. Use drywall screws to fasten through both layers into framing.
What’s the best way to cut drywall around outlets and switches?
Mark outlet locations on the drywall sheet before hanging. Use a drywall saw or oscillating multi-tool to cut rectangular openings slightly larger than the box. Rough openings are acceptable—outlet boxes will cover gaps. For circular openings (recessed lights), use a drywall hole saw or drywall jab saw. Always turn off electrical power before working near outlets.
How do I prevent drywall from cracking?
Proper installation prevents most cracks. Use the correct fastener spacing, maintain structural integrity, and allow adequate drying time between mudding coats. Use quality joint compound and apply thin, even coats with proper feathering. Ensure framing is straight and stable. In areas prone to movement, consider using flexible joint compound or corner bead designed to accommodate settling.
Should I hire a professional or DIY?
Hanging drywall is manageable for DIYers with proper tools and patience. Mudding and finishing require more skill and practice—this is where most beginners struggle. Consider hiring professionals for mudding and finishing if you want professional results quickly. If learning and doing the work yourself, expect a longer timeline and plan for a learning curve on finishing.
What are common drywall installation mistakes?
Common errors include inadequate fastener spacing, improper screw depth, insufficient drying time between mudding coats, poor seam feathering, skipping primer, and failing to verify framing before installation. Rushing the finishing process is the most frequent mistake. Quality drywall installation requires patience and attention to detail at every stage.
For comprehensive guidance on finishing basement spaces with drywall, consult our complete basement finishing guide. Additional resources from the Gypsum Association provide technical specifications for various applications. Always verify local building codes and fire safety requirements before beginning your project. The National Association of Certified Home Inspectors also provides quality standards for drywall installation.
Drywall installation is a foundational skill that opens doors to numerous home improvement projects. Whether you’re creating a new room, finishing a basement, or renovating existing spaces, mastering these techniques delivers professional results and significant cost savings. Take your time, prioritize safety, and don’t hesitate to ask for guidance when tackling challenging sections. Your finished walls will reflect the care and precision you invested in their installation.


