How to Clean Pearls: Expert Tips Revealed
Pearls are among the most delicate and precious gemstones, requiring specialized care to maintain their lustrous beauty and longevity. Whether you own a strand of classic pearl necklaces, pearl earrings, or vintage pearl jewelry passed down through generations, understanding proper cleaning techniques is essential for preserving their natural radiance. Unlike harder gemstones such as diamonds or sapphires, pearls have an organic composition that makes them vulnerable to damage from harsh chemicals, excessive moisture, and abrasive materials.
Many jewelry owners mistakenly treat pearls the same way they clean other gemstones, which can result in irreversible damage to the delicate nacre—the lustrous layer that gives pearls their characteristic shine. This comprehensive guide reveals professional-grade techniques used by jewelers and gemologists to safely clean and maintain pearl jewelry at home. By following these expert-approved methods, you’ll extend the life of your pearls and keep them looking as beautiful as the day you received them.
Understanding Pearl Composition and Why They Need Care
Pearls are fundamentally different from other gemstones due to their organic nature. They are created when an irritant, such as a grain of sand or parasite, enters an oyster or mussel shell. The mollusk responds by secreting layers of nacre—a combination of aragonite (a form of calcium carbonate) and conchiolin (an organic protein)—around the irritant. This process, which can take several years, results in the beautiful gem we know as a pearl.
The nacre layer, also called mother-of-pearl, is what creates the pearl’s distinctive luster and iridescence. However, this same composition makes pearls significantly more porous and softer than diamonds or rubies. The Mohs hardness scale rates pearls at only 2.5 to 4.5, compared to diamonds at 10. This means pearls can be easily scratched, and their porous nature allows them to absorb liquids and oils readily.
Understanding this composition is crucial because it explains why pearls react negatively to common jewelry cleaning methods. Ultrasonic cleaners and steam cleaning, which work wonderfully for diamonds, can damage the nacre of pearls. Similarly, harsh chemicals can strip away the organic components that give pearls their beauty. This is why DIY cleaning methods require careful attention and adherence to gentle techniques specifically designed for delicate materials.
Essential Supplies for Pearl Cleaning
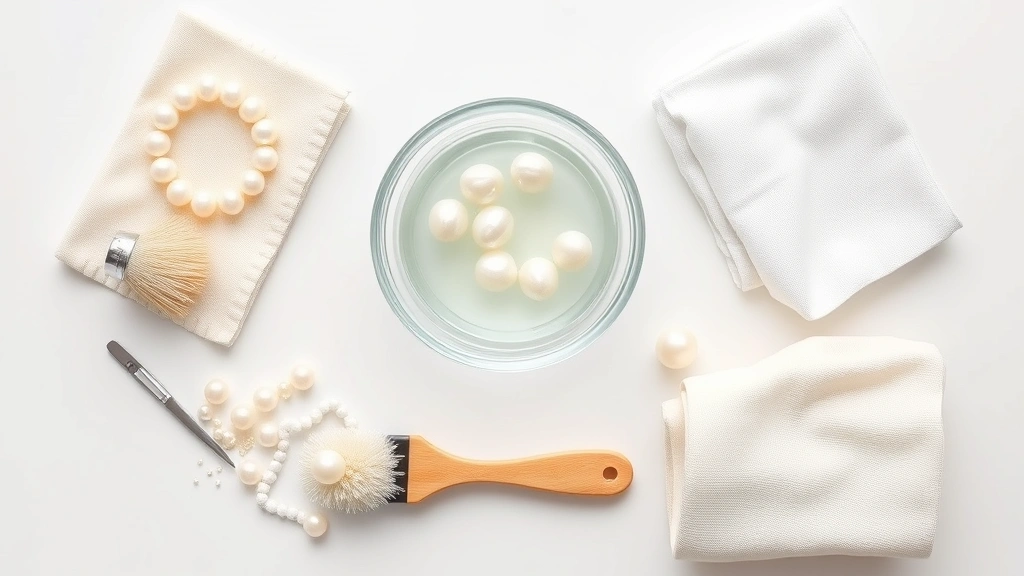
Before you begin cleaning your pearls, gather the following supplies to ensure you have everything needed for a safe and effective cleaning process:
- Distilled water: Tap water contains minerals and impurities that can leave residue on pearls. Distilled water is essential for rinsing.
- Mild dish soap: Choose a pH-neutral, gentle formula without dyes or perfumes. Brands specifically formulated for hand washing work best.
- Soft cloths: Use lint-free microfiber cloths or soft cotton cloths. Avoid paper towels, which can be abrasive.
- Soft-bristled brush: A soft toothbrush or specialized jewelry brush helps remove debris without scratching.
- Shallow bowl: Use a ceramic or glass bowl to create your cleaning solution.
- Soft towels: Keep absorbent, lint-free towels nearby for drying.
- Chamois cloth: This specialized material is excellent for final polishing and buffing.
Avoid collecting common household items like vinegar, baking soda, alcohol, or bleach. While these substances are useful for cleaning other household items, they are far too harsh for delicate pearls and will damage the nacre.
Step-by-Step Guide to Cleaning Pearls
This fundamental cleaning method works for most pearl jewelry and should be performed regularly to maintain shine and prevent buildup of oils and debris.
Step 1: Prepare Your Cleaning Solution
Fill your shallow bowl with lukewarm distilled water—approximately 8 ounces. Add just one or two drops of mild dish soap. The solution should be barely visible; you want the water to be only gently soapy. Stir gently to distribute the soap evenly.
Step 2: Inspect Your Pearls
Before submerging your pearls, examine them carefully under good lighting. Note any visible dirt, oils, or debris. Check the string or mounting to ensure it’s secure. If the string appears worn, frayed, or weakened, do not submerge the entire strand. Instead, clean individual pearls or consult a professional jeweler for restringing.
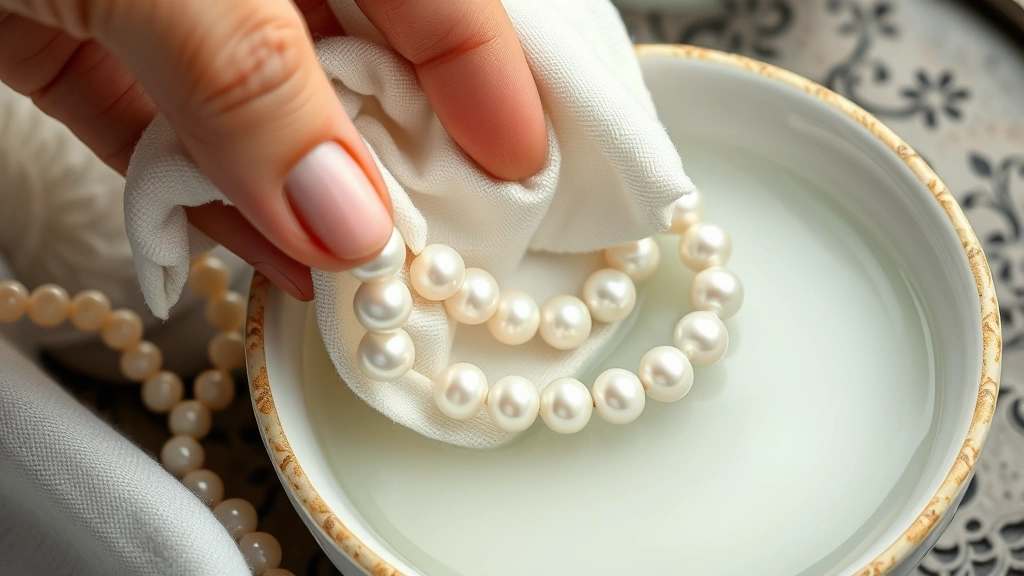
Step 3: Soak the Pearls
Gently place your pearl jewelry into the soapy water solution. Allow it to soak for no more than 5 minutes. This brief soak helps loosen surface oils and debris without allowing excessive water absorption into the porous nacre.
Step 4: Gentle Cleaning
Using your soft-bristled brush or soft cloth, gently wipe each pearl in a circular motion. Pay special attention to areas where oils accumulate, such as where the pearl sits against your skin. Be extremely gentle—you’re not scrubbing; you’re gently removing surface residue. For pearl strands, work section by section, cleaning each pearl individually.
Step 5: First Rinse
Remove the jewelry from the soapy water and hold it under a gentle stream of lukewarm distilled water. Allow the water to flow over the pearls for approximately 30 seconds, ensuring all soap residue is removed. Never use hot water, as temperature fluctuations can damage the pearl structure.
Step 6: Second Rinse
Repeat the rinse process with fresh distilled water to ensure no soap remains. This second rinse is crucial because any leftover soap will leave a film on the pearls, dulling their natural luster.
Advanced Cleaning Techniques for Stubborn Stains
For pearls with more stubborn stains or heavy buildup, you may need to employ slightly more intensive techniques while still maintaining gentleness.
The Oil and Sweat Removal Method
Body oils and perspiration are the primary culprits behind pearl dulling. If standard washing hasn’t fully restored shine, try this method: Create a solution using distilled water and a single drop of mild dish soap. Add one drop of pure mineral oil (not baby oil, which contains additives). Soak the pearls for 3 to 5 minutes, then gently wipe with a soft cloth. The mineral oil helps dissolve stubborn oils while being gentle enough not to damage the nacre. Follow with thorough rinsing in distilled water and pat dry immediately.
The Vinegar-Free Approach for Mineral Deposits
If your pearls have mineral deposits from hard water or chlorine exposure, avoid vinegar despite common recommendations. Instead, create a solution of distilled water with a tiny amount of mild dish soap and one drop of lemon juice. Soak for 3 minutes only, then rinse thoroughly with distilled water. The citric acid gently helps dissolve mineral deposits without the harsh acidity of vinegar.
Addressing Discoloration
Yellowing or discoloration over time is normal for pearls, but excessive discoloration may indicate damage or buildup. Never attempt to bleach pearls or use whitening agents. Instead, consult a professional jeweler who can assess whether the discoloration is surface-level or indicates deeper issues with the nacre.
Drying and Storage Best Practices
How you dry and store your pearls is just as important as the cleaning process itself. Improper storage can undo all the benefits of careful cleaning.
Drying Your Pearls
After rinsing, pat your pearls gently with a soft, lint-free cloth. Never wring or squeeze pearl strands. For necklaces and bracelets, lay them flat on a soft cloth to air dry completely before storing or wearing. Allow at least 2 to 3 hours of air drying time. This prevents moisture from becoming trapped between pearls and the string, which can lead to mold or degradation of the string material.
Use a chamois cloth for final buffing once the pearls are completely dry. The soft texture of chamois helps restore shine and removes any remaining water spots or fingerprints.
Storage Guidelines
Store pearls in a cool, dry location away from direct sunlight, which can cause fading. Excessive heat and humidity can damage both the pearls and their settings. Keep pearls separate from other jewelry to prevent scratching. Use individual soft pouches or compartments in a jewelry box lined with soft fabric.
Never store pearls in airtight plastic bags or containers, as this can trap moisture. Instead, use breathable fabric pouches that allow air circulation. For valuable or vintage pearl pieces, store them in a dedicated jewelry box with acid-free tissue paper.
Humidity Considerations
Pearls thrive in environments with moderate humidity—ideally between 40 and 60 percent. Overly dry environments can cause the organic components of the nacre to become brittle, while excessive moisture promotes mold and bacterial growth. If you live in an extremely dry climate, consider storing pearls in a small box with a piece of slightly damp cotton, refreshed monthly.
What to Avoid When Cleaning Pearls
Understanding what not to do is equally important as knowing proper cleaning techniques. These common mistakes can cause irreversible damage:
- Ultrasonic cleaners: These devices use high-frequency vibrations that can crack pearls and damage their string or setting.
- Steam cleaning: The intense heat and moisture can cause the nacre to peel or crack.
- Chemical cleaners: Products containing ammonia, bleach, or other harsh chemicals will dissolve the nacre.
- Abrasive materials: Never use rough cloths, sponges, or brushes. Even paper towels can scratch delicate pearls.
- Excessive water: Prolonged soaking allows water to penetrate the porous nacre, potentially causing internal damage.
- Temperature extremes: Avoid hot water, which can cause thermal shock and cracking.
- Perfumes and cosmetics: These contain acids and chemicals that damage pearls. Apply cosmetics and fragrances before putting on pearl jewelry.
- Chlorine and saltwater: Both can discolor and damage pearls. Remove pearl jewelry before swimming.
Additionally, avoid storing pearls in direct sunlight for extended periods. UV radiation can fade pearl color, particularly in white and black pearls. Store them in a dark location and wear them regularly rather than keeping them permanently stored, as pearls benefit from exposure to body oils and humidity that regular wearing provides.
Professional Cleaning vs DIY Methods
While the methods outlined in this guide are effective for regular maintenance, there are times when professional cleaning is necessary.
When to Clean Pearls at Home
Use DIY cleaning methods for regular maintenance every 3 to 6 months or whenever you notice visible oil buildup or dullness. These techniques are safe for healthy pearls that haven’t sustained damage. Home cleaning works well for everyday pearl jewelry that receives regular wear and exposure to body oils.
When to Seek Professional Cleaning
Consult a professional jeweler if your pearls show signs of damage, such as cracks, chips, or areas where the nacre appears to be peeling. If the string of a pearl strand appears worn, frayed, or weak, a professional should restring the pearls using appropriate materials. Professional jewelers have access to specialized equipment and solutions that can address specific issues without risking further damage.
Additionally, seek professional help for antique, vintage, or extremely valuable pearl pieces. The sentimental or monetary value of heirloom pearls justifies the investment in professional care. Jewelers can also provide expert assessment of pearl quality and authenticity, helping you understand the true value of your collection.
Professional cleaning typically involves gentle ultrasonic vibration (different from standard ultrasonic cleaners), specialized solutions, and expert assessment of the pearls’ condition. While more expensive than DIY methods, professional cleaning can extend the life of valuable pieces and ensure they receive appropriate care.
For those interested in learning more about caring for delicate materials, explore our guides on how to clean leather furniture, which shares similar principles of gentle care for delicate surfaces. You might also find value in our comprehensive DIY car cleaning guide, which demonstrates how proper technique matters across different materials.
FAQ
How often should I clean my pearls?
Clean pearls every 3 to 6 months with the gentle method described above. If you wear them frequently or notice visible dullness or oil buildup, clean them more often. Regular light cleaning is better than infrequent deep cleaning, as it prevents buildup without stressing the pearls.
Can I use regular tap water to clean pearls?
No. Tap water contains minerals, chlorine, and other impurities that can leave residue on pearls and potentially cause discoloration over time. Always use distilled water for cleaning and rinsing. This ensures no unwanted minerals or chemicals come into contact with the delicate nacre.
Is it safe to wear pearls while swimming?
No. Both chlorinated pool water and saltwater can damage pearls. Chlorine causes discoloration and can weaken the nacre, while saltwater contains minerals that can leave deposits and cause corrosion. Remove pearl jewelry before swimming and store it safely away from the pool area.
What should I do if a pearl becomes loose in its setting?
Do not attempt to tighten or adjust the setting yourself. Take the jewelry to a professional jeweler immediately. Loose pearls can fall out and become lost, and improper handling can damage both the pearl and its setting. A jeweler can securely reset the pearl without risk of damage.
Can I use pearl cleaning solutions sold commercially?
While some commercial pearl cleaning products exist, they’re not necessary for regular maintenance. The gentle method using distilled water and mild dish soap is just as effective and far less expensive. If you choose a commercial product, verify it’s specifically formulated for pearls and read all instructions carefully.
How do I know if my pearls are real?
Real pearls have a unique weight, warmth, and surface texture compared to imitation pearls. They also show subtle variations in color and luster. However, determining authenticity definitively requires professional assessment. If you’re uncertain about pearl authenticity, consult a certified gemologist or jeweler who can perform proper testing.
What causes pearls to yellow over time?
Yellowing is a natural aging process in pearls, particularly white and cream-colored varieties. Exposure to light, heat, and environmental factors contributes to gradual color changes. While some yellowing is inevitable and doesn’t indicate damage, excessive discoloration may suggest improper storage conditions or nacre degradation. Proper storage in a cool, dark location slows this process.
Can I repair a cracked pearl?
Unfortunately, cracks in pearls cannot be effectively repaired. Once the nacre is cracked, the damage is permanent. In some cases, a jeweler might repolish the pearl to make minor surface damage less noticeable, but structural cracks cannot be sealed or filled. This is why proper cleaning and handling are so important—prevention is far better than attempting repairs.
How should I care for pearl jewelry during pregnancy or periods of inactivity?
If you won’t be wearing pearl jewelry for an extended period, store it in a cool, dry location with moderate humidity. Pearls benefit from regular wearing because body oils and humidity help maintain their luster. Before storing for several months, clean the pearls using the method described in this guide. Check on stored pearls periodically to ensure storage conditions remain appropriate, and consider taking them out to wear occasionally to prevent them from drying out excessively.


